You can attach a patio cover to your fascia, but with one important catch: the fascia board itself cannot carry the structural load. You have to fasten through the fascia and into the solid framing behind it, specifically the rafter tails, blocking between rafters, or a ledger board bolted to the house framing. The fascia is just trim. Treat it like trim, and you will have a solid, leak-free connection. Treat it like structure, and the cover will eventually pull away from the house.
How to Attach a Patio Cover to Fascia: Steps

Celia Vaughn
16 Jun 2026
First: Is Your Fascia the Right Place to Connect?
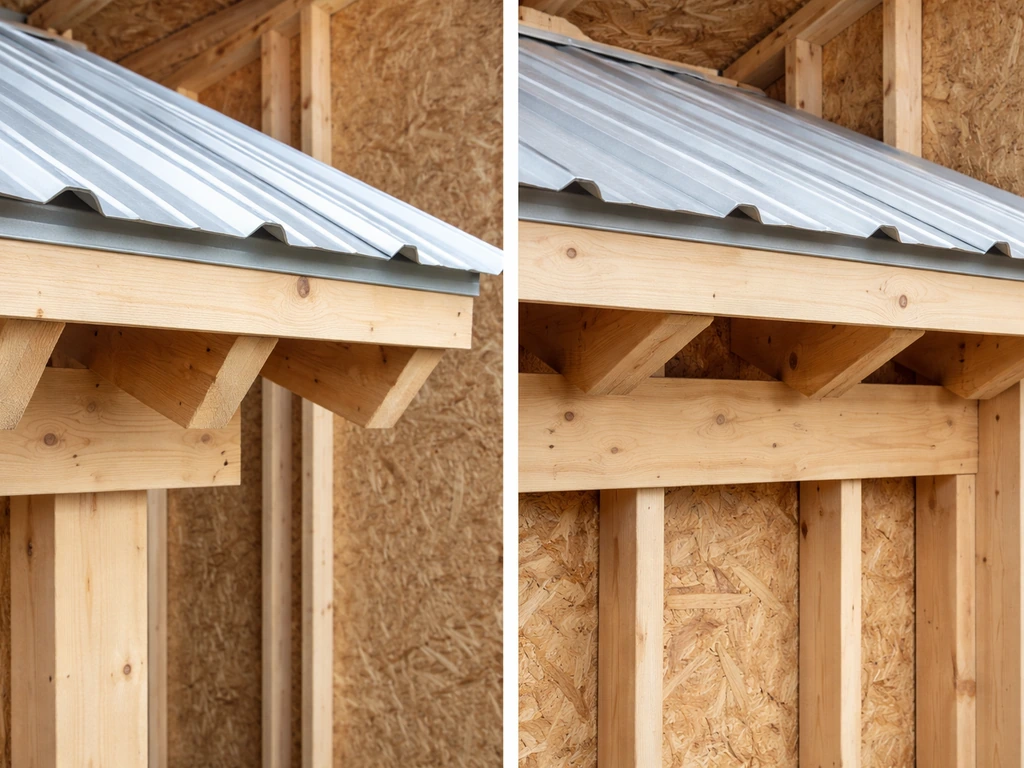
Before you buy a single bolt, spend 20 minutes checking whether a fascia attachment is even the right move for your situation. On a standard lean-to patio cover, the high side of the cover attaches to the house and the low side rests on outer posts. That attachment point almost always ends up at or near the fascia. That is fine, but what matters is what is behind the fascia.
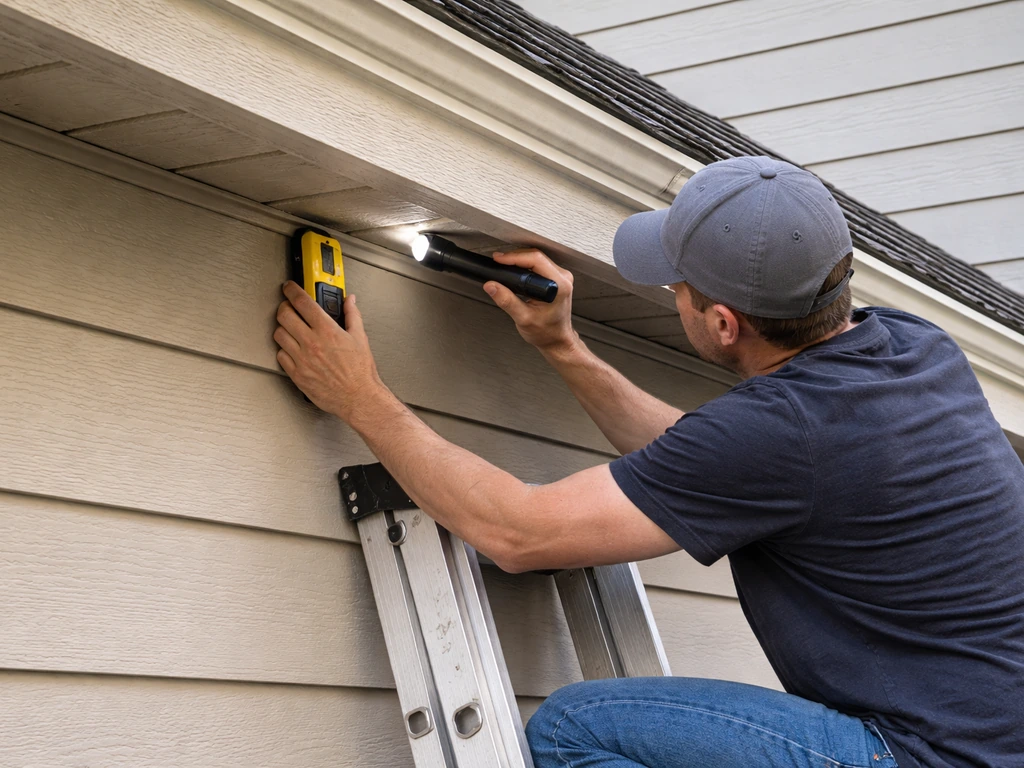
Get a stud finder and a flashlight and look along the roofline. On most homes, the rafter tails extend to the fascia board, which means you have solid wood every 16 to 24 inches right behind that fascia. On homes with roof trusses, the tails are thinner but still present. On older homes or some stucco or brick homes, you may have a very different structure. If you cannot confirm solid rafter tails or blocking behind the fascia, stop and plan for a different attachment strategy, such as a ledger bolted directly to wall studs lower on the wall. That approach is covered separately if your situation calls for it.
Also check your roof type. A standard gable or hip roof with overhanging eaves is the ideal candidate for this kind of attachment. A flat roof or a home with very short overhangs may not give you enough room to work, and you may need to trim or temporarily remove the fascia to get proper ledger contact with the framing. That is actually common and nothing to be afraid of.
- Confirm rafter tails or solid blocking exist directly behind the fascia before purchasing hardware
- Note the spacing of rafter tails (typically 16 in. or 24 in. on center) so you can plan fastener locations
- Check if fascia is wood, composite, or aluminum wrap, since each requires slightly different prep
- Look for any existing rot or damage in the fascia or rafter tails before committing to this attachment point
- Measure the fascia width and depth so you know what fastener length you actually need to reach framing
Tools and Materials You Will Need
Nothing exotic here. Most of these tools are already in a standard DIY toolkit, and the hardware is available at any home center or lumber yard.
| Item | What It Is For | Notes |
|---|---|---|
| Hammer drill or impact driver | Driving lag screws and bolts into framing | Cordless impact driver handles most wood framing; hammer drill needed for masonry |
| Stud finder / rafter locator | Finding rafter tails behind fascia | Magnetic stud finders can pick up hidden nails in rafters |
| Tape measure and chalk line | Marking level ledger position | A 4-ft level works too but chalk line is faster over long spans |
| Circular saw or reciprocating saw | Trimming fascia or cutting ledger to length | Reciprocating saw useful if removing a section of fascia |
| Caulk gun | Applying sealant and flashing tape | A standard 10-oz frame works fine |
| Ledger board (2x6 or 2x8 lumber) | Primary structural attachment member | Size depends on span; match or exceed existing rafter depth |
| Structural lag screws (1/2 in. x 3 in. to 5 in.) | Fastening ledger through fascia into rafter tails | Use hot-dipped galvanized or stainless in wet climates |
| Through-bolts (1/2 in. carriage or hex bolts) | Alternative to lags where you have full access to both sides | Stronger than lags; use with washers on both sides |
| Z-flashing or step flashing (aluminum or galvanized) | Directing water away from ledger-wall interface | 6-in. wide minimum recommended |
| Self-adhering flashing tape (e.g., Grace Vycor) | Secondary water barrier behind ledger | Install before ledger goes up |
| Exterior polyurethane or silicone caulk | Sealing around fastener heads and flashing edges | Use a product rated for outdoor/UV exposure |
| Post bases and hanger hardware (joist hangers, etc.) | Connecting cover rafters to ledger | Match gauge and metal type to avoid corrosion |
How to Attach the Patio Cover Step by Step
This method works for a standard lean-to patio cover where you are mounting a horizontal ledger board at the roofline against or just below the fascia. If you want a complete walkthrough for installing a patio cover to the house, follow the steps in order below how to install patio cover to house. The ledger becomes your structural connection point, and the patio cover rafters hang off of it.
Step 1: Lay Out the Ledger Height
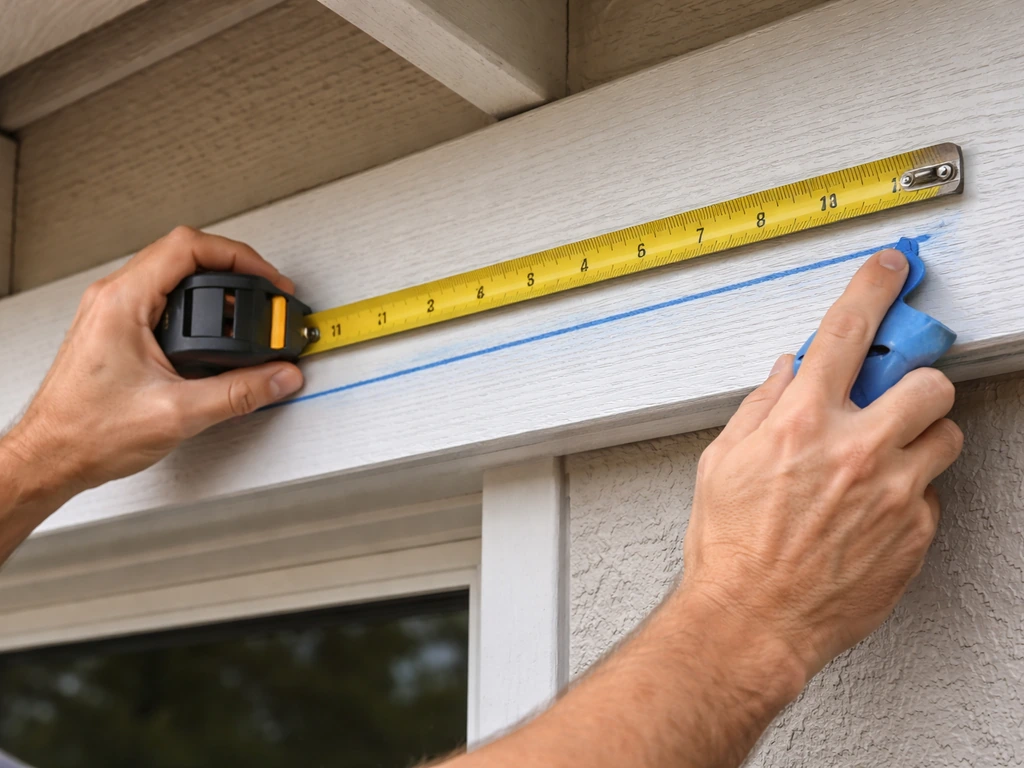
Decide where the top of your patio cover ledger will sit. For a lean-to roof, you want the ledger positioned so the cover slopes away from the house at roughly 1/4 inch per foot minimum for drainage. Mark a level line across the fascia at that height using a chalk line and a 4-ft level. Double-check it is truly level and not just parallel to a sloping soffit.
Step 2: Locate the Rafter Tails
Use your stud finder or tap along the fascia to locate each rafter tail. Mark them clearly with a pencil or masking tape. On most homes they are 16 in. or 24 in. on center. You need a fastener into every rafter tail, or at minimum every other one if they are 16 in. apart. Do not skip any. This is where the load actually transfers to the house structure.
Step 3: Prepare the Wall Surface and Install Flashing Tape
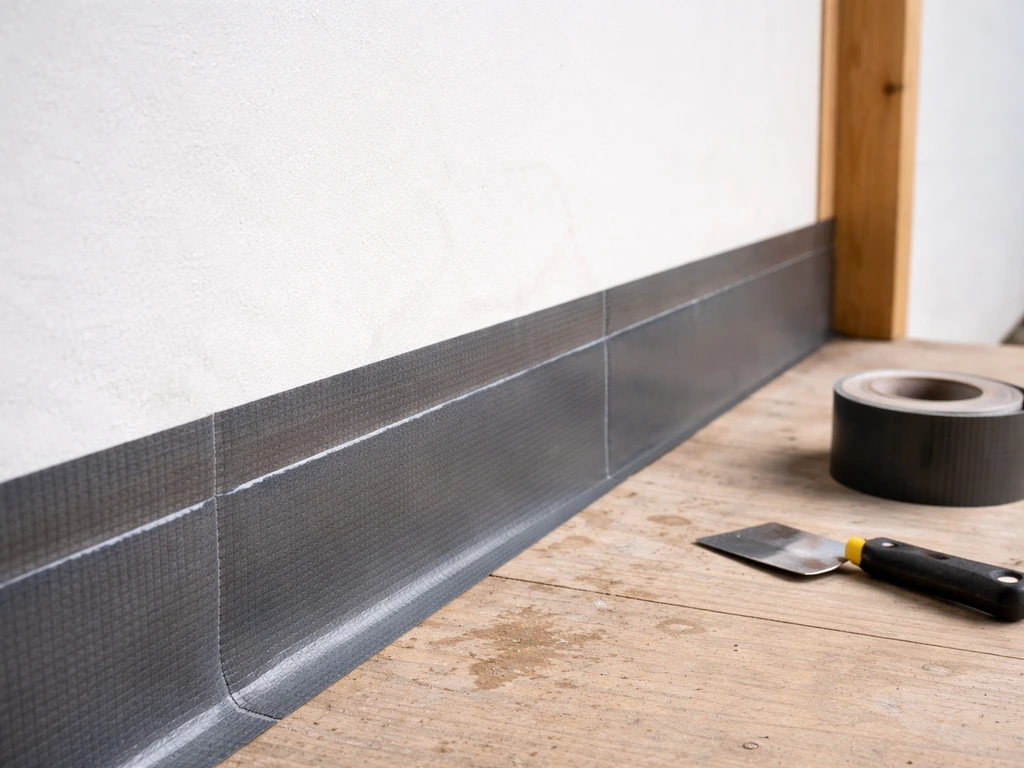
Before the ledger goes up, the wall surface behind it needs a waterproof barrier. If you are attaching against a wood fascia, apply a layer of self-adhering flashing tape (like Grace Vycor or any peel-and-stick membrane) to the wall or fascia surface where the ledger will sit. This goes on before the ledger, so water cannot travel behind the board and into the wall cavity. Overlap any seams by at least 6 inches and press it firmly to eliminate air pockets.
Step 4: Cut and Position the Ledger Board
Cut your ledger board (usually a 2x6 or 2x8 depending on your span) to the exact width of the patio cover. Lift it into position against the fascia, aligned with your chalk line. Have a helper hold it or use temporary screws to tack it while you verify level and position. The top of the ledger should be at or just below the fascia, never above the roofline where it would block drainage.
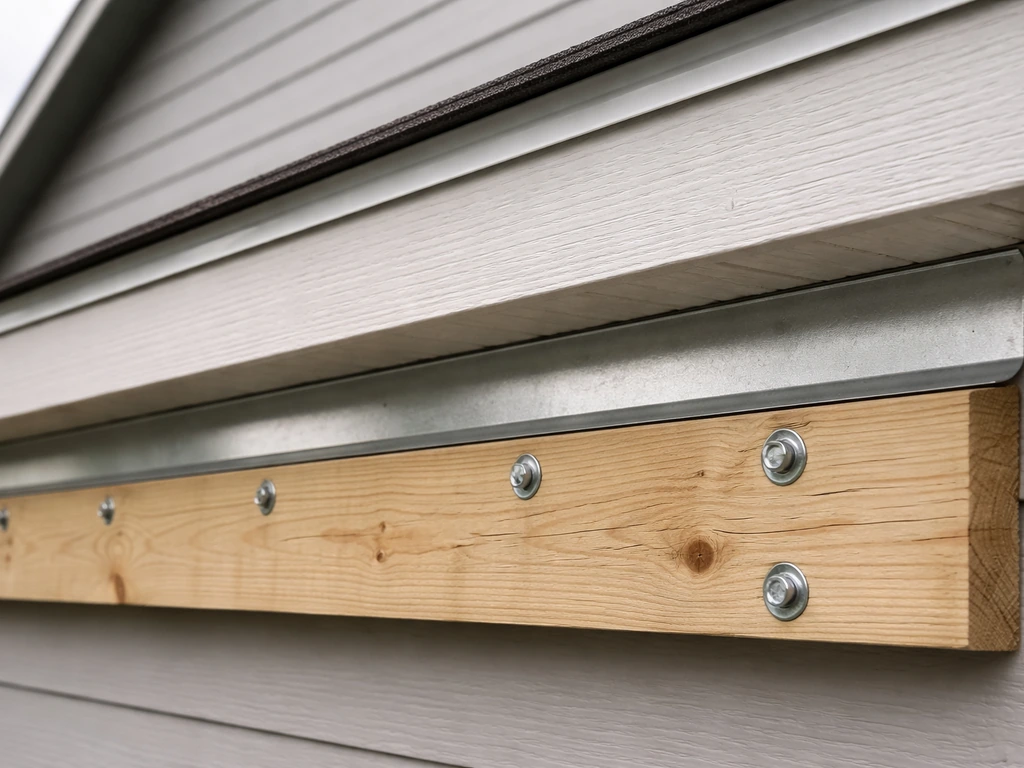
Step 5: Drive the Lag Screws
At each rafter tail location, drill a pilot hole slightly smaller than your lag screw diameter, going through the ledger, through the fascia, and into the rafter tail. A 1/2-inch lag screw should penetrate at least 2.5 to 3 inches into solid wood framing beyond the fascia. Drive the lags until the washer seats firmly against the ledger face but do not overtighten to the point of crushing the wood. Leave a very slight gap (about 1/16 inch) at the fascia surface if you plan to caulk the joint later.
Step 6: Install Z-Flashing Above the Ledger
This step is required by the 2024 IRC (section R507.9.1.5) and it is one of the most skipped steps on DIY projects. Slide a continuous piece of Z-flashing up behind the siding or fascia material above the ledger so the upper leg tucks behind the wall finish and the lower leg laps over the front face of the ledger. This is what routes water forward and off the cover instead of letting it run down behind the ledger. If you cannot get flashing behind existing siding, use a wide self-adhering membrane and then caulk the top edge with polyurethane sealant.
Step 7: Hang the Cover Rafters
With the ledger secured and flashed, attach joist hangers or rafter ties to the ledger face at your planned rafter spacing. Set your patio cover rafters into the hangers, nail them off with the specified hanger nails (the short joist-hanger nails, not regular framing nails), and check that everything is square before proceeding with roofing or panels.
Weatherproofing, Flashing, and Sealing
Water intrusion at the ledger-fascia joint is the number one long-term failure mode for attached patio covers. Even a small gap that lets water in will eventually rot framing, cause mold, and compromise the attachment. The flashing tape under the ledger and the Z-flashing above it work together as a system. If you only do one, you are leaving yourself exposed.
After the Z-flashing is in place, run a bead of exterior-grade polyurethane or silicone caulk along the top edge where the flashing meets the wall material. Do not caulk the bottom edge of the ledger or the bottom of the flashing; that gap needs to stay open so any incidental water that gets past the flashing can drain out rather than get trapped. Sealing the bottom is a very common mistake.
Every lag screw hole is also a potential water entry point. Before driving each lag, apply a small dab of caulk around the pilot hole, then drive the fastener. After driving, put another small dab over the washer and head. This is especially important if you are attaching into wood fascia that is exposed to weather.
If your roofing material (corrugated metal, polycarbonate panels, shingles) butts up against the house wall above the ledger, you will also need step flashing or a continuous piece of counter flashing running up the wall at that joint. Think of the entire ledger zone as a waterproof dam: every component should direct water outward and downward, never inward.
Structural Safety: Loads, Spacing, and Permits
The patio cover puts real weight on your house structure, and that load has to travel through the ledger into the rafter tails and on into the roof framing. The fascia board itself contributes nothing structural. This is worth repeating because it changes how you think about fastener placement: every fastener must hit solid framing, not just fascia or soffit material.
For a standard residential patio cover in most climates, the structural load calculation has to account for the dead load (weight of the cover materials themselves), live load (people, temporary loads), and if you are in a snow or high-wind area, those additional loads. The 2024 IRC and most local codes require attached patio covers to be engineered to handle these loads, which is why permits exist. If your project is over a certain size (often 200 square feet, but check locally), a permit is required and a building inspector will verify your ledger attachment. This is actually helpful, not just bureaucracy.
- Lag screws into rafter tails should be 1/2 in. diameter minimum and penetrate at least 2.5 in. into solid framing
- Space fasteners to hit every rafter tail, not just every other one, on covers with significant span or snow load
- If rafter tails are only 1.5 in. wide (standard 2x lumber), a single lag per tail is typical; two lags staggered vertically are stronger
- Do not attach into the soffit material, aluminum soffit vents, or decorative fascia wrap alone
- Check your local jurisdiction for permit thresholds; most require a permit for any attached structure over 200 sq ft
- In high-wind zones (hurricane or tornado areas), engineer-stamped drawings may be required regardless of size
Pull-out capacity is your key safety metric. A single 1/2-inch lag screw in Douglas fir has roughly 350 to 500 lbs of withdrawal resistance depending on penetration depth and wood species. A typical 12-foot-wide patio cover might have 8 to 10 fastener points, giving you several thousand pounds of total resistance, well more than you need for a standard cover. But if you are attaching into rotten wood, green lumber, or soft pine instead of structural framing, those numbers drop fast. When in doubt, get an inspector to look at it.
Common Mistakes, Fixes, and When to Call a Pro
Fastening Into Fascia Only, Not Framing
This is the single most common error. The fascia board is typically a 1x6 or 1x8 finish piece with minimal structural capacity. If your lags stop in the fascia without reaching rafter tails, the cover will eventually sag or pull away. Fix: use a longer fastener or remove a strip of fascia to expose the rafter tails and attach directly. Yes, you can re-install or replace the fascia strip after the ledger is up.
Skipping Flashing and Getting Leaks
If water is tracking down the wall behind the ledger, you will see staining on the soffit or, worse, on interior walls. Pull the ledger (or at least the top section of it), install proper flashing tape behind it, re-seat it, and add Z-flashing above. It is a frustrating redo but far better than rotted wall framing down the road.
Ledger Not Level
A ledger that is not level causes the cover rafters to be different lengths, the roof panels to drain incorrectly, and the whole structure to look off. Always chalk-line the ledger position with a level before drilling a single hole. If the fascia itself is not level (which happens on older homes), shim the ledger rather than following the fascia line.
Caulking the Wrong Edges
Sealing the bottom edge of the ledger or the bottom of the Z-flashing traps water instead of letting it drain. Caulk only the top edges and around fastener heads. Leave the bottom edge open.
When to Stop and Call a Pro
Some situations genuinely exceed DIY risk, and it is worth being straight about that. If you open up the fascia area and find rotted rafter tails, that is a structural repair job before you can proceed with the cover installation. If your home has engineered trusses (the triangulated kind with metal connector plates), you should not modify or cut them without an engineer's sign-off. If you are in a seismic zone or high-wind region and the project requires stamped engineering drawings, hire the engineer. The ledger attachment itself might be DIY-able, but the paperwork and calculations need professional backing. The cost of an hour with a structural engineer is trivial compared to a collapse or a failed inspection that forces you to tear everything out.
If your home has vinyl siding, stucco, or brick at the attachment zone rather than a standard wood fascia, the prep work is more involved and the attachment method changes. If you are dealing with vinyl siding, plan to remove or properly integrate the siding so the ledger and flashing can seal correctly and fasteners hit solid framing. If you are attaching the patio cover to a stucco wall instead of a wood fascia, the flashing and waterproofing details (and the attachment points) change compared with a fascia connection how to attach patio cover to stucco house. Those exterior finishes each have their own flashing and waterproofing requirements. Similarly, if your attachment point needs to drop lower on the wall to hit wall studs instead of rafter tails, the approach shifts to a standard ledger-to-wall-framing method, which is a related but different process. HomeTips notes that when a patio- or roof-ledger cannot be attached to floor joists, it should be fastened to wall studs, typically spaced 16 in. on center and sometimes 24 in., and it recommends doubling framing around openings fasten the ledger to wall studs (typically 16 in. or 24 in.).
A Quick Comparison: Fascia Attachment vs. Wall Ledger Attachment
| Factor | Fascia Attachment (into rafter tails) | Wall Ledger Attachment (into wall studs) |
|---|---|---|
| Best for | Lean-to covers where height aligns with roofline | Covers that sit lower on wall or where rafter tails are inaccessible |
| Structural anchor | Rafter tails behind fascia | Wall studs or rim joist |
| Flashing complexity | Higher (Z-flashing into roofline area) | Moderate (ledger flashing against siding) |
| DIY difficulty | Moderate | Moderate |
| Risk of water intrusion | Higher if flashing skipped | Moderate with proper lap flashing |
| Typical fastener | 1/2 in. lag screws 3-5 in. long | 1/2 in. lag screws into studs at 16-24 in. spacing |
Attaching to the fascia is a completely valid and common approach when the rafter tails are accessible and in good shape. Follow the flashing details, hit solid framing with every fastener, get your permit if the project size calls for it, and you will have a cover that holds tight and stays dry for years.
FAQ
Can I remove the fascia temporarily to get better access to the rafters, then put it back?
Yes, but only if you are still able to fasten into solid framing behind the fascia, not the fascia trim itself. If you can expose rafter tails and attach the ledger into them (or into blocking between rafters), you can proceed and then reinstall the fascia strip after the ledger is fixed and flashed.
How do I choose the right pilot-hole size for lag screws through the fascia?
No. Pilot holes should match the lag screw diameter so the screw can pull the ledger tight without splitting the rafter tail. If the hole is too large, the withdrawal capacity drops and the ledger can loosen over time, especially in wet, freeze-thaw climates.
Should I caulk the bottom of the ledger where water might collect?
You can caulk around the fastener heads and along the top edges where the flashing meets wall material, but you should not caulk the bottom edge of the ledger or the bottom edge of the Z-flashing. Leaving that lower gap open creates a drain path for any incidental water that gets past the upper seals.
If my fascia is not level, do I still mount the ledger on top of it?
Flush installation depends on the ledger being level, not necessarily the fascia being level. If the fascia line is out of level, shim the ledger at the fastener points so the ledger surface is true, otherwise your rafters will vary in length and your panels can end up with uneven gaps.
What should I do if a lag screw location lands between rafter tails (not in solid wood)?
If you miss a rafter tail, do not rely on the fascia to hold load. Options are: relocate the ledger fastener to a rafter location, add approved blocking between rafters, or switch to a ledger-to-wall-stud attachment lower on the wall where you can hit solid studs.
What if I do not have enough overhang space to install Z-flashing properly?
Test-fit first. If your roof eave is too short, you may not have space to slide flashing behind existing trim, or you may not get proper hanger installation. In that case, you may need to adjust the cover height, temporarily remove part of the fascia/trim, or use a different waterproofing approach so the flashing can still direct water outward.
Can I substitute regular nails for the hanger nails when attaching the cover rafters to the ledger?
You should use the hanger or rafter tie nails specified for the hanger brand, not generic framing nails. Using the wrong nail can cause reduced pull-out strength or improper seating in the hanger, which can affect alignment and long-term stability.
After installation, how can I tell whether my leak is from the ledger flashing or from the bottom gap?
If you see water staining near the soffit or the wall after rain, do not just add more caulk. Verify the tape under the ledger and the Z-flashing above it are properly layered, with overlaps that shed water outward, then re-seat the ledger as needed. Caulking over a bad flashing layer often traps moisture instead of fixing the leak path.
Does the ledger always have to sit exactly at the fascia line?
Often, yes. Many projects use the ledger at or slightly below the fascia line, but the key is that the fasteners still penetrate solid rafter tails and that drainage slope is maintained. If the cover must sit higher or lower for structure clearance, you may need to adjust ledger height and re-check slope and hanger alignment.
How does snow load or high-wind design change the fascia-attachment approach?
For snow and high-wind areas, treat fastener spacing and ledger size as structural design items, not just “based on typical DIY layouts.” The safe path is to confirm the design load requirements with local code and, if needed, get the ledger and attachment engineered to match your snow load and wind exposure.
What if I discover rot around the rafter tail ends where the ledger will attach?
Sometimes. If the fascia board is deteriorated or you find rotted rafter tails, you cannot “build over it” safely. Repair the damaged framing first (replace rafter tails or install proper structural repairs per local requirements) and only then install the ledger and flashing system.
Is it okay if the ledger ends up looking slightly different from the fascia line, visually?
Yes, and it can be normal if the soffit and roofline are not consistent, but you need the ledger itself to be level and the fasteners to be located where solid framing exists. A sloped fascia line often means you will shim the ledger rather than follow the fascia visually.
Can I skip flashing tape if I plan to use exterior sealant on the ledger?
If you are using a separate waterproofing layer, verify that it is compatible with the surfaces you are sealing to (wood, painted trim, masonry, vinyl). On wood fascia, peel-and-stick tape usually works well when overlapped correctly and firmly pressed, but on some exterior finishes you may need a different flashing integration method so the seal does not peel over time.
If I had a previous leak in that area, should I reflash the whole ledger zone?
Potentially, if your wall below the ledger must stay dry. If water has been getting behind the fascia, you may need to dry the area before sealing, and you might need to address compromised sheathing or rim framing. A thorough inspection and moisture check is the safest way to avoid trapping ongoing wetness under new flashing.