To attach a patio cover to an existing house, you fasten a ledger board (or header beam) directly into the house's structural framing, run your rafters or patio cover panels from that ledger out to a beam supported by posts, then seal the house-side connection with metal flashing so water can't sneak behind your siding. Get those three things right, solid structural connection, correct fastener sizing, and proper flashing, and you'll have a cover that's safe, code-compliant, and leak-free for decades.
How to Attach a Patio Cover to a House: DIY Guide

Celia Vaughn
3 May 2026
Choose your patio cover style and materials first
The style you pick determines everything about how the cover attaches to the house. A lean-to (also called a shed-style or attached patio cover) is by far the most common DIY approach: one side connects to the house, the other side rests on posts. It sheds water away from the house, it's structurally straightforward, and most aluminum patio cover kits are designed around this shape. Gable-style and hip-roof covers exist too, but they involve more framing complexity and are harder to flash correctly at the house wall.
For materials, you're basically choosing between wood, aluminum (including manufactured systems like Alumawood or Alumashade), and steel. Wood gives you flexibility and a traditional look, but it requires painting, staining, and ongoing maintenance. Aluminum patio cover systems are the most popular DIY option right now for good reason: the kits include pre-engineered components, the ledger and rafter sizing is already calculated, and aluminum doesn't rot or need painting. Steel is durable but heavy and harder to cut on-site. For most homeowners doing this as a DIY project, a manufactured aluminum kit is the easiest path because the engineering is done for you.
| Material | DIY Difficulty | Maintenance | Typical Lifespan | Best For |
|---|---|---|---|---|
| Wood (lumber) | Moderate | High (paint/stain every few years) | 20-30 years with upkeep | Custom looks, matching existing wood trim |
| Aluminum (kit system) | Easy-Moderate | Very low | 30-50+ years | Most DIY homeowners; fastest install |
| Steel | Moderate-Hard | Low (if galvanized/coated) | 40+ years | Large spans, high wind/snow areas |
My recommendation: if you're tackling this solo or with one helper, start with an aluminum kit system. The components are lightweight, the instructions include ledger hardware specs, and the aluminum ledger cover pieces handle part of the weatherproofing for you.
Assess the house attachment points before you touch a drill
This is where a lot of DIYers skip steps and pay for it later. The ledger board that connects your patio cover to the house has to land on structural members, not just drywall, sheathing, or stucco. If you bolt into finish material with nothing solid behind it, you're relying on pull-out strength the material doesn't have. The cover could pull away from the house under wind uplift or snow load.
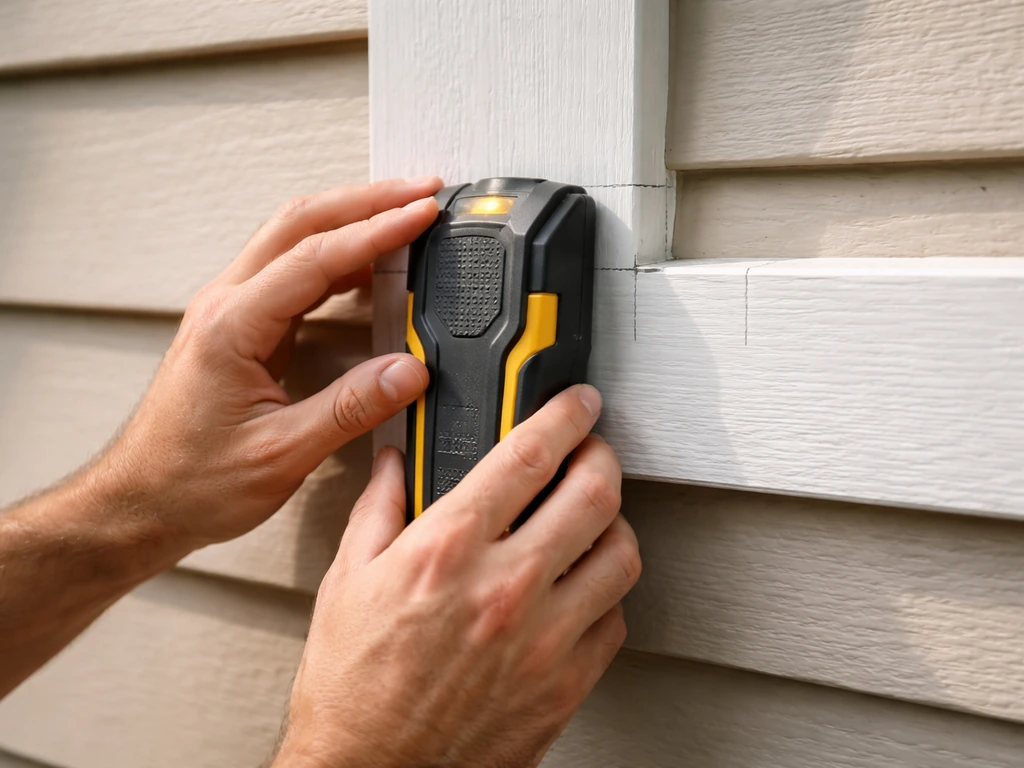
Find your studs and rim joist
Use a quality stud finder and confirm finds by probing with a finish nail before you commit to a layout. In a standard wood-frame house, studs run 16 inches on center. What you're looking for at the ledger zone is either the wall studs themselves or, if you're attaching near the roofline, the band joist (rim joist) that runs along the top of the wall framing. The band joist zone is the most structurally solid horizontal target on most houses and is where deck ledger connections are required to land per the IRC. Patio cover ledgers follow the same logic.
Check what's covering the attachment area on your house exterior. Wood siding is the easiest case. Stucco, vinyl siding, and fiber cement all require slightly different approaches for both fastening and flashing. If your house has vinyl siding, you'll need to cut or remove a section to get the ledger tight to the sheathing. If you are wondering how to attach a patio cover to vinyl siding, focus on getting the ledger tight to the sheathing and using the right flashing so water cannot get behind it. Stucco requires Z-flashing and caulk because you generally can't slide traditional step flashing behind it. Each of those specific scenarios has its own detailed approach worth studying before you start.
Check your eave and roof overhang geometry
Measure the existing roof eave overhang carefully. This overhang tells you where the fascia sits and how far out from the wall face the lowest edge of the house roof structure is. Many patio cover instructions use this measurement to set the height and alignment of the attachment point on the wall. If you're attaching up near the roofline rather than lower on the wall, you need to confirm you're still hitting solid structure and that your chosen attachment height won't conflict with soffit framing or existing roof rafters.
Attachment methods: ledger, beam, and rafter connections explained
There are two primary ways to connect an attached patio cover to a house, and the difference matters structurally.
Method 1: Wood ledger board fastened to the house
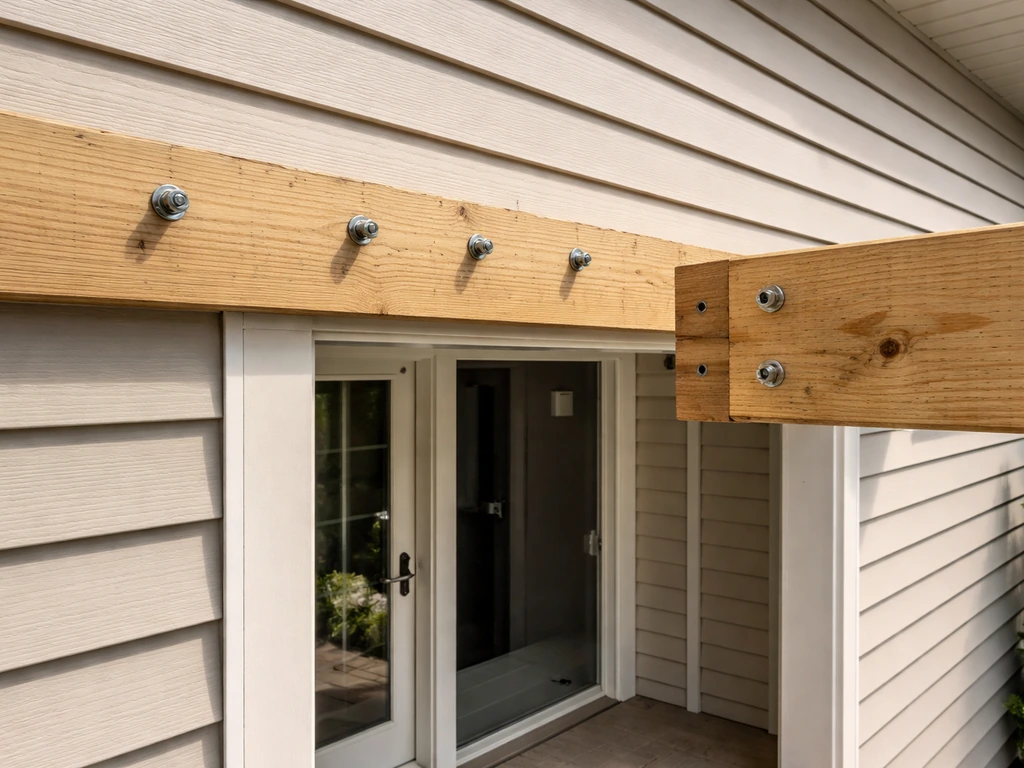
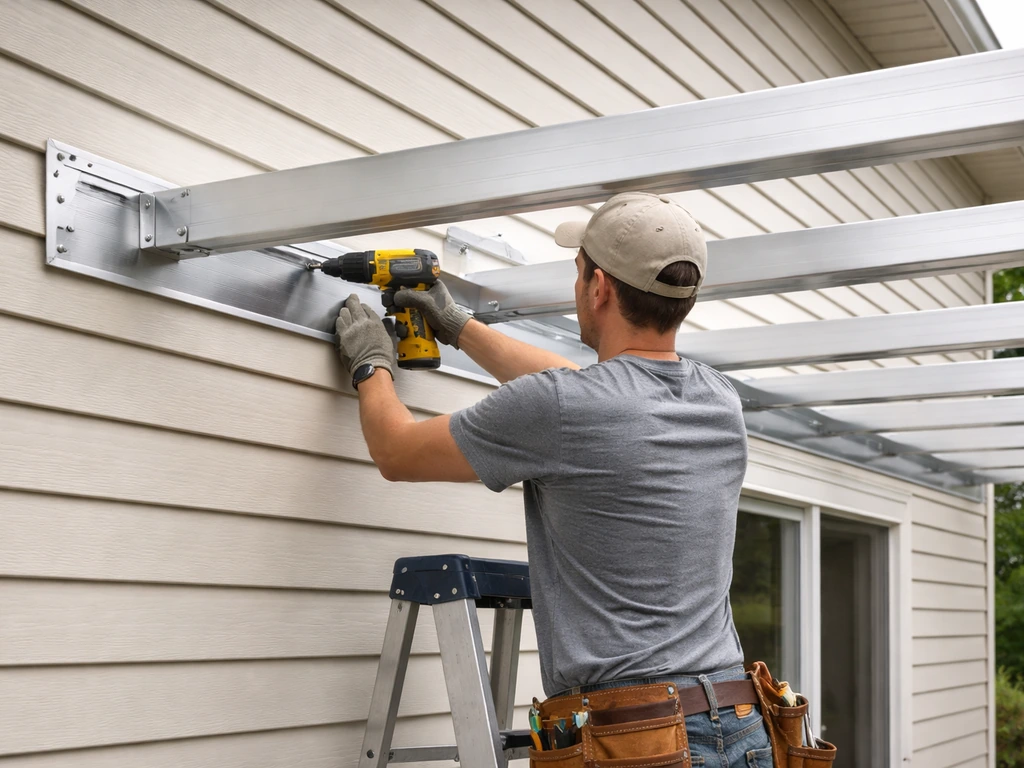
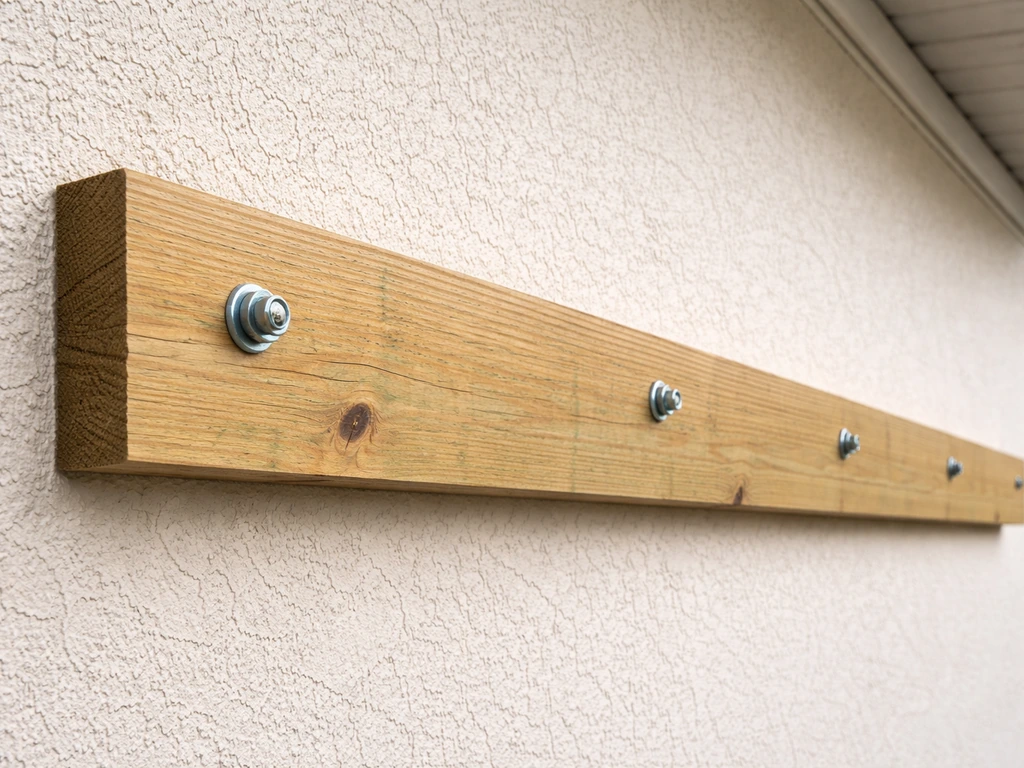
This is the standard approach for both wood-framed patio covers and most aluminum kit systems. You mount a horizontal lumber ledger (typically 2x6 or 2x8 dimensional lumber) directly to the house wall at your chosen attachment height. The patio cover rafters or aluminum cover panels then rest on or connect to this ledger. The ledger transfers all vertical (gravity) and lateral (wind/racking) loads into the house structure. This is why the fastener choice and bolt pattern matter so much.
For ledger fasteners, the IRC prescriptive standard for deck ledgers (which patio cover ledgers mirror closely) calls for 1/2-inch lag screws or through-bolts into the band joist. A real-world example from a permitted patio cover plan in Laguna Hills, CA specifies two 1/2-inch by 5-inch lag bolts at 16 inches on center. Some manufactured systems spec slightly different hardware: Amerimax/Alumawood documentation calls for 1/4-inch by 4-inch lag screws into studs for their specific system. Always defer to your kit's engineering package if you're using a manufactured system, because the engineering is load-specific.
- Never use regular nails as the primary fastener — the IRC explicitly prohibits nail-only ledger connections because they can't resist withdrawal loads
- Drill correctly sized pilot holes so threads fully engage the structural member without splitting the wood
- Recess bolt heads flush with the ledger face so the cover components sit tight against the board
- Use corrosion-resistant fasteners: stainless steel, hot-dip galvanized, or approved coated hardware — especially critical with aluminum components to avoid galvanic corrosion
Method 2: Header beam approach
Some systems, including certain Alumashade configurations, use a header beam rather than a flat ledger board. The beam spans between anchor points on the house (typically post brackets or bolted hangers into the wall structure) and carries the patio cover loads to fewer, heavier connection points rather than a continuous ledger. This approach changes load transfer math and requires engineering to confirm the anchor points can handle the concentrated loads. It's less common in standard DIY kits but worth knowing about if your kit documentation mentions it.
Rafter and bracket connections
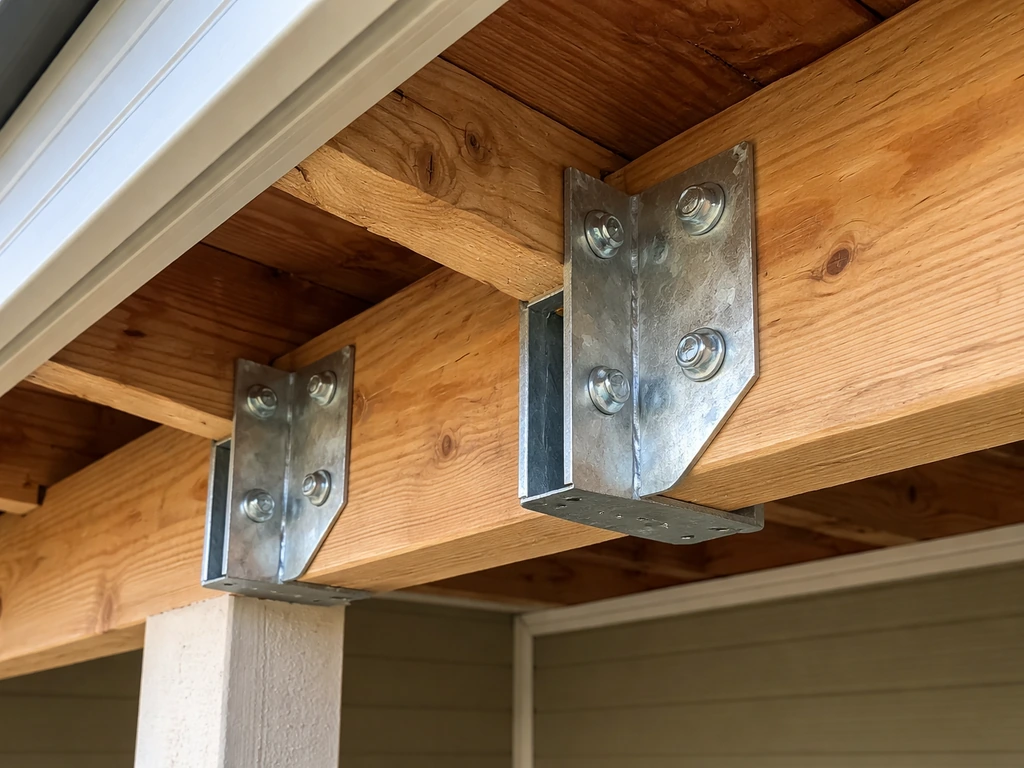
For aluminum systems that attach near the roofline rather than the wall, the connection is often made with heavy-duty galvanized L-brackets bolted into the house roof rafters. Alumashade's technical specs specifically describe this: brackets go into each house rafter along the attachment line. This transfers loads directly into the roof structure, which is strong but also means your fasteners have to hit rafter locations precisely. Measure and mark each rafter location before you start drilling.
Step-by-step installation workflow for attaching to an existing house
This workflow covers a lean-to aluminum patio cover kit attached via a wall ledger, which is the most common DIY scenario. Adjust for your specific kit instructions where they differ.
- Mark and confirm your ledger height on the wall. Account for slope: a lean-to needs a slight pitch away from the house (typically 1/4 inch per foot minimum) so water drains outward. Mark the top of the ledger location, then use a level to run a chalk line across the full attachment width.
- Locate and mark all studs or band joist within the ledger zone. Use a stud finder, confirm with a probe nail, and mark each center point. Your fastener pattern will land at each stud, 16 inches on center typically.
- Remove siding in the ledger zone if needed. For vinyl siding, cut a horizontal strip slightly wider than the ledger height so the ledger can sit tight against the sheathing. For wood lap siding, you can sometimes notch around boards, but removing a course gives a flatter seat and better flashing geometry.
- Cut and pre-drill the ledger board. For wood systems, use pressure-treated lumber rated for exterior ground contact. Pre-drill fastener holes to avoid splitting. For aluminum kits, the ledger channel or board is part of the kit.
- Hold the ledger in position and transfer bolt-hole locations to the wall. A common method is to drill through the ledger, press it against the wall, and let the drill bit tips mark the sheathing — then remove the ledger and drill your pilot holes into the structure.
- Apply a bead of polyurethane sealant or self-adhering flashing tape along the wall surface where the ledger will sit before mounting. This creates a back-seal behind the ledger even before the metal flashing goes on.
- Fasten the ledger with the specified lag bolts or through-bolts. Torque them down firmly but don't over-tighten to the point of crushing the wood. Check that bolt heads are flush or recessed.
- Install your posts at the outer edge of the cover footprint. Dig footings below the local frost line depth, set post bases (anchor brackets), and pour concrete. Let it cure at least 48 hours before loading.
- Set the outer beam on top of the posts and connect with post-cap hardware. Level across from the ledger to the outer beam to verify the slope is correct.
- Install rafters or patio cover panels between the ledger and outer beam. For aluminum kit systems, the cover panels typically slide in from one end. Follow the kit's rafter or panel spacing spec — this is usually engineering-specified and not something to estimate.
- Secure rafter tails to the outer beam with the specified hardware. On aluminum systems, this usually means a fascia channel or end cap that locks panels in place.
- Install flashing at the house connection (see the next section for detail) before any final trim goes on.
Common mistake at this stage: people rush the post footing and don't get below frost line, or they set posts before the ledger is confirmed level and end up fighting the slope adjustment later. Set the ledger first, confirm it's level and correctly sloped, then work outward to the posts.
Weatherproofing and sealing at the house connection
This is the step that separates a patio cover that lasts from one that causes rot and water damage inside your wall within a few years. The joint where your patio cover meets the house is a horizontal ledge that catches rain, and without proper flashing it will funnel water right into your wall assembly.
Standard flashing for wood-sided houses
The classic approach is to slide metal step flashing or a continuous Z-flashing up under the siding above the ledger. For a general flashing how-to, LP Building Solutions provides guidance on blank" rel="noopener noreferrer">installing flashing under siding and notes the importance of correct Z-flashing geometry/coverage considerations. The blank" rel="noopener noreferrer">flashing laps over the top of the ledger, then the siding above laps over the flashing. This creates a watershed that sheds water out and over the ledger rather than behind it. For most patio cover ledger zones, a continuous piece of Z-flashing (an L-shaped or Z-profile metal strip, typically 26-gauge galvanized, the same gauge called out in Laguna Hills patio cover permit details) works well. Slide the upper leg behind the siding or under the course above the ledger, let the lower leg drape over the face of the ledger board.
Stucco and other non-slideable siding
On a stucco wall you can't slide flashing behind the finish surface, so you use Z-flashing applied on the face of the stucco at the top edge of the ledger, then caulk the top edge of the flashing to the stucco with a high-quality polyurethane or silicone sealant. The caulk is a secondary line of defense, not the primary one. The flashing still does the physical water-shedding work. Check that caulk line every two to three years and re-apply when it starts to crack or pull away from the stucco. Attaching to a stucco house adds enough complexity to the flashing detail that it's worth reading through a dedicated guide for that specific wall type.
Drip edge and kick-out flashing at the outer edge
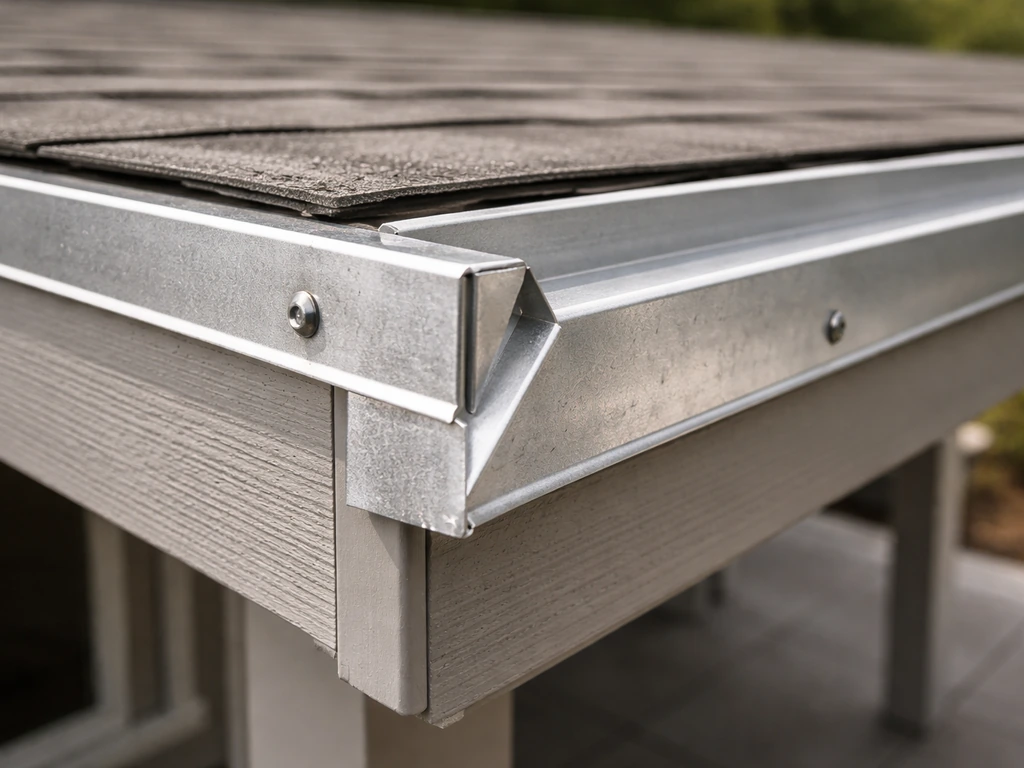
At the lower edge of your patio cover roof, the edge farthest from the house, install a drip edge (an L-shaped metal flashing profile) along the fascia. After you’ve confirmed the fascia framing and find solid fastening points, you can attach the patio cover’s drip edge and trim with the right screws and flashing details attach patio cover to fascia. This directs water off the roof surface and over the fascia rather than letting it wick behind the trim. Where your patio cover roof line meets a house wall on the side (if you have a cover that tucks into a corner), you need kick-out flashing at that lower termination point to divert roof runoff into a gutter rather than dumping it onto the wall face. Relying on caulk alone at that corner is a common mistake that leads to wall staining and eventually rot.
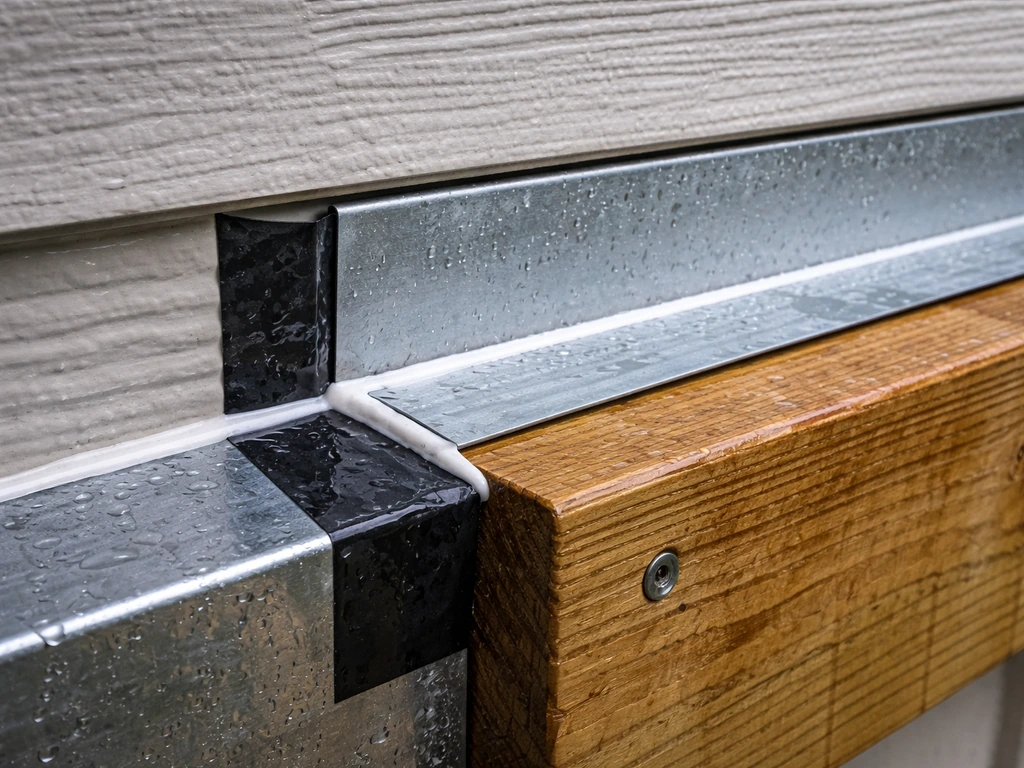
Aluminum cover systems and the ledger cover piece
If you're using an aluminum kit like Duralum or similar, the system includes an aluminum ledger cover component that slides over the wood ledger board after it's mounted. This aluminum channel covers the top of the wood ledger and acts as an integrated flashing element. You still need to install Z-flashing at the wall above it, but the aluminum cover piece handles the ledger-top exposure that would otherwise hold standing water against the wood.
Aluminum patio cover specifics and hardware selection
Aluminum kit systems have their own hardware quirks that are worth knowing before you order materials or start drilling.
Corrosion compatibility is the big one. Aluminum in contact with steel fasteners in a wet environment will corrode through galvanic action. Manufactured system specs like the Amerimax/Alumawood engineering packet are explicit about this: steel fasteners must be stainless (300 series), hot-dip galvanized, or otherwise corrosion-protected. Don't grab generic zinc-plated screws from the bin, they'll show rust streaks on your aluminum cover within a couple of years and eventually fail at the connection.
For ledger attachment in aluminum systems, fastener sizing is kit-specific. Amerimax/Alumawood documentation specifies 1/4-inch by 4-inch lag screws into studs for their Laguna system. Other systems may call for different sizing. Pull out your kit's installation instructions and engineering packet and use exactly what's specified. The engineering was calculated for those fastener sizes and that spacing, substituting "close enough" hardware defeats the engineering.
Aluminum panels and components expand and contract more than wood with temperature swings. Most aluminum kit instructions include guidance on leaving small gaps at panel ends to allow for thermal movement. Ignoring this causes buckling in summer heat. If your kit instructions mention expansion gaps, follow them.
For the roof attachment zone near the house roofline, aluminum systems that attach with L-brackets into house rafters use heavy-duty galvanized brackets bolted into each rafter. The bracket spacing must match the rafter layout in your house, so measure rafter spacing carefully before ordering hardware. Standard is 16 or 24 inches on center, but verify on your specific house.
Permits, safety, and when to call a pro
Permits: almost always required
Attached patio covers are a structural addition to your home and virtually every jurisdiction requires a permit. This isn't bureaucratic overhead, it's what ensures an inspector verifies your ledger connection is structurally sound before you close it up. Many jurisdictions also require engineered plans showing how the structure resists wind uplift, snow load, and lateral forces. Ogren Engineering notes that almost every city and county requires structural engineering before permits for roof structures. Douglas County building division is typical: permit submissions need structural framing plans including ledger attachment detail and roof covering details. Some cities like Arlington, TX have a pre-approved residential patio cover technical bulletin that simplifies the permit process if you follow their standard design, worth checking if your city has something similar.
Skip the permit and you risk problems when you sell the house (unpermitted structures can block a sale), potential insurance claim denials if the structure causes damage, and fines if a neighbor or inspector notices. Pull the permit.
Safety on the job
- Never work alone when setting beams or ledgers at height — you need a second person to hold components in position while you fasten
- Use proper scaffolding or a stable ladder positioned so you can work with both hands; don't hold a component with one hand and drill with the other from an unstable position
- Wear eye protection when drilling into existing walls — you don't know what's directly behind the sheathing until the bit comes through
- Check for electrical wiring and plumbing in the wall before drilling lag bolt locations — a wire finder/voltage sensor is a worthwhile $20 investment
- Confirm your post footing locations don't cross any buried utility lines before you dig — call 811 (USA) for a free utility locate
When to stop DIYing and hire a pro
Most attached patio cover installations are genuinely within DIY reach if you're comfortable with basic carpentry, a drill, and working at modest heights. But there are specific situations where the honest answer is to bring in a structural engineer or licensed contractor.
- Your house is older construction (pre-1980s) with unknown framing, non-standard stud spacing, or deteriorated rim joist — get it inspected before loading it with a patio cover
- You're in a high wind zone (coastal, mountain, or tornado-prone regions) or an area with significant snow loads — the uplift and snow load engineering requires professional calculation, not a DIY guess
- Your attachment zone involves masonry, brick veneer, or ICF walls — fastener type and anchor selection for masonry is a different skill set and gets code-scrutinized heavily
- The cover spans wider than about 16-20 feet — longer spans mean heavier loads at the ledger connection and potentially require engineer-stamped plans regardless of jurisdiction
- Your permit application is rejected or requires engineered drawings you can't produce yourself — hire an engineer to stamp the plans rather than trying to build without a permit
- After removing siding you find rot, mold, or damaged sheathing at the ledger zone — stop, remediate the damage, and reassess the structural integrity before proceeding
The ledger connection is the most structurally critical part of the entire project. Everything else, panels, rafters, posts, is only as good as that one connection to the house. Take the time to get it right, pull the permit, and you'll have a covered patio that adds real value to your home and doesn't give you problems.
FAQ
Can I attach a patio cover ledger to the house sheathing or studs through siding, without exposing studs?
You generally need solid framing behind the finish, not sheathing. Even if you can reach it through siding, confirm the ledger bolts land in studs or the band joist (rim joist). If the planned bolt locations miss studs, move the ledger or choose the kit’s alternative connection points rather than increasing fastener length to “reach more material.”
What if my house has diagonal bracing, blocking, or a weird stud spacing where the ledger will land?
Don’t assume a standard 16-inch layout will match your house. Use a stud finder plus confirmation probing, then compare actual stud positions to the kit’s spec spacing. If your kit requires a specific bolt pattern, you may need to shift the ledger location slightly, notch/adjust trim to clear bracing, or use the kit’s engineered option for irregular framing (if provided).
How do I choose the right ledger slope or pitch for drainage?
Many patio covers require a slight downward slope away from the house to move water off the cover. Before installing, check your kit instructions for the required pitch, then level the ledger using that target slope, not level-or-plumb for aesthetics. If your existing roof eave or fascia alignment conflicts with the pitch, recheck your measurement for the attachment height and fascia line.
Do I need to remove existing siding and underlayment under the ledger flashing?
Often you need to create a continuous, properly lapped flashing path, especially for step flashing or Z-flashing. With siding types like vinyl, you may have to cut/remove a section so the flashing can sit tight to the sheathing and the siding can lap back over it. If the kit or flashing method cannot be achieved because of trim or underlayment, adjust the wall detail before fastening the ledger.
How much clearance should I leave for aluminum panel expansion and thermal movement?
Follow the specific expansion guidance in your kit, but plan on leaving small end gaps at panel ends and avoiding tight “pinched” joints. If you install panels with no gap, summer heat can cause buckling and you may not be able to correct it without disassembly. Also keep fasteners within the kit’s slot or hole guidance so movement is allowed.
Can I use the same fasteners that came with one patio cover on a different brand or model kit?
No, mixing fasteners across brands can break the engineering assumptions behind load capacity and corrosion protection. Use the fastener sizes, materials, and spacing called for in your exact kit’s instructions and engineering package, especially for aluminum systems where the corrosion-safe fastener type is critical.
What’s the safest way to waterproof the ledger if my house has stucco or hard-to-work trim?
For stucco, the flashing detail usually relies on face-mounted Z-flashing plus a sealant line at the top edge, with the metal doing the primary water shedding. Don’t rely on caulk as the main barrier, and make sure the flashing overlaps in the correct direction. If you cannot achieve a proper lap due to trim, you may need to adjust the attachment height or modify the wall opening so the flashing can fully shed water.
How do I prevent rust streaks or premature failure on aluminum kit connections?
Use only the corrosion-compatible fasteners specified for your system. Generic zinc-plated screws can create galvanic corrosion in wet conditions and leave visible rust streaks on aluminum components. Also avoid contact between aluminum and unprotected steel parts anywhere in the connection zone.
Do I need kick-out flashing at every wall termination, or only in corners?
Kick-out flashing is needed when runoff could dump onto a vertical wall surface at a roof-wall intersection, commonly at corner terminations or tucked-in areas. If water from the patio cover roof ends up striking a wall face, that’s a risk point. When in doubt, plan the termination so runoff is diverted into a gutter or channel, not across the wall.
What inspection or documentation should I prepare for my permit application?
Expect to provide a structural framing plan or engineered detail showing how the ledger is attached and how loads (wind uplift, snow load, and lateral/racking forces) are transferred. Have your kit’s engineering packet and hardware specs available, since many jurisdictions use them to verify the connection design. If your plan reviewers ask for an engineer stamp, factor that cost and timeline into your schedule.
When should I hire a structural engineer instead of proceeding with the kit instructions?
If your ledger connection cannot land on confirmed studs or the band joist, if your attachment zone has unusual framing (blocked studs, major interior soffit conflicts, or nonstandard wall construction), or if you’re using a nonstandard roof attachment method, get engineering review. Also consider it if you live in a high wind or heavy snow area or if the permit requires an engineer beyond the kit package.