To attach a ledger board to your house for a patio cover, you bolt or screw a pressure-treated lumber board directly into your home's rim joist (the horizontal framing member at the top edge of your foundation or floor system), not into studs, not over siding, and never into just sheathing alone. You expose the rim joist by removing siding at that location, install proper Z-flashing to redirect water away from the house, then fasten the ledger with 1/2-inch lag screws or structural screws in a staggered two-row pattern with spacing determined by your roof load. That's the core of it. Everything else in this guide is making sure you do each of those steps correctly so the ledger stays put, stays dry, and passes inspection.
How to Attach a Ledger Board to a House for a Patio Cover

Celia Vaughn
19 May 2026
What a ledger board actually does (and why getting it right matters)
A ledger board is the piece of lumber you attach to the side of your house that acts as one side of your patio cover's roof structure. For a lean-to style patio cover, the ledger carries the high end of your roof rafters or joists while the far end rests on a beam supported by posts. Every load that comes down through your roof, your own weight walking on it, rain, wind, snow if you're in that climate, transfers through those rafters into the ledger and then into your house's framing. That's why this connection is structural, not cosmetic. If you fasten the ledger into the wrong place, the whole structure can pull away from the house under load.
The IRC (International Residential Code) is very specific here: prescriptive ledger attachment rules only apply when you're connecting to a rim joist or band joist, which is the horizontal framing member that runs along the perimeter of your floor system. The IRC does not allow you to use these standard prescriptive fastener tables if you're attaching to wall studs instead. If your house doesn't have an accessible rim joist at the right height, or if the structure is unusual (post-and-beam, for instance), you need an engineer to design a custom connection. Most standard wood-framed homes do have a suitable rim joist, but you need to confirm that before you start drilling.
Tools, materials, and code checks before you touch the wall

What you'll need
- Pressure-treated lumber for the ledger (2x8 or 2x10 is typical — match or exceed the depth of your roof joists/rafters)
- 1/2-inch diameter lag screws or structural ledger screws like LedgerLOK (minimum length to fully penetrate the rim joist with about 1/4 inch protruding past the interior face)
- Z-flashing (galvanized or aluminum, sized to the ledger width)
- Self-adhering flashing tape or building paper/roofing felt for the back flashing layer
- Corrosion-resistant joist hangers (hot-dipped galvanized or stainless steel)
- Hammer, circular saw, reciprocating saw or oscillating tool for siding removal
- Drill with 1/2-inch spade bit and pilot bit for lag screws
- 4-foot level and long straightedge
- Tape measure, chalk line, pencil
- Stud finder or combination stud finder/AC wire detector
- Safety glasses, work gloves, and fall protection if you're working above 6 feet
Check permits before anything else

Most jurisdictions require a building permit for an attached patio cover. Pull the permit before you start. This isn't just bureaucratic box-checking, the permit process often reveals code requirements specific to your area that aren't obvious from general guides. Some cities have standard approved details (Santa Clarita's roofed patio cover standard detail, for example, specifies a minimum slope of 1/4 inch per foot). Your inspector will also want to see the ledger connection before you cover it up, so you need that inspection scheduled at the right time.
Also check fastener requirements specific to your climate and siding type. In corrosive environments or where pressure-treated lumber contacts hardware, fasteners need to be hot-dipped galvanized or stainless steel. Mixing incompatible metals at the connection point can cause galvanic corrosion over time, which quietly destroys the connection from the inside. Your inspector and the fastener manufacturer's specs will tell you exactly what's required.
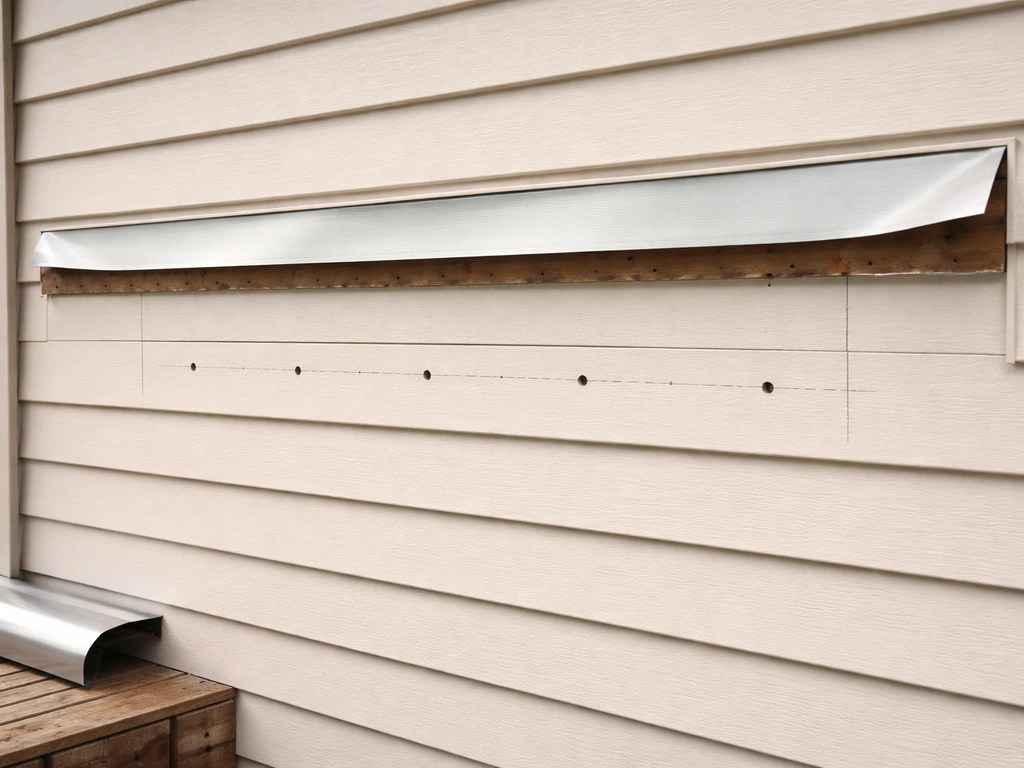
Marking your layout: height, slope, and finding real structure
Before you remove any siding, work out exactly where the ledger needs to sit on the wall. The ledger height determines your roof slope, and that slope needs to drain water away from the house. The minimum slope for a patio cover roof is typically 1/4 inch per foot of horizontal run, and a common practical range is 1/4 inch to 1 inch per foot.
If your patio cover extends 12 feet out from the house, a 1/4-inch-per-foot slope means the outer edge of your roof is 3 inches lower than the ledger end. Mark your target ledger height on the wall with a pencil mark, then use a level and chalk line to extend that mark across the full width of where the ledger will go.
A critical height consideration: the top of the ledger typically needs to sit below the door threshold or window sill it's adjacent to. Many builders set the ledger so the finished roof surface ends up 1 to 2 inches below the door threshold, which prevents water from pooling back toward the house opening. Measure from the door sill down and factor in your roofing material thickness before you finalize the ledger height.
Now use a stud finder to locate the rim joist. On a typical two-story home, the rim joist runs at the level of the first-floor framing, usually just above the foundation. On a single-story home with a raised floor, it's at floor level. If your house is slab-on-grade (common in the South and Southwest), you may not have a rim joist at a convenient height, which is a situation that sometimes requires engineering. Once you've confirmed the rim joist location, check that it aligns with your target ledger height. If they're off, you may need to adjust your roof pitch or post height at the outer beam, not force the ledger to a height where it has no solid backing.
While you're at this stage, also mark your joist layout directly on the face of the ledger board before you install it. Draw a line at each joist location (typically 16 or 24 inches on center) so you can position your ledger fasteners to land between joist locations. This keeps fasteners out of the way of future joist hanger installation and is a best practice that makes the whole process cleaner.
Preparing the wall surface and getting water protection right
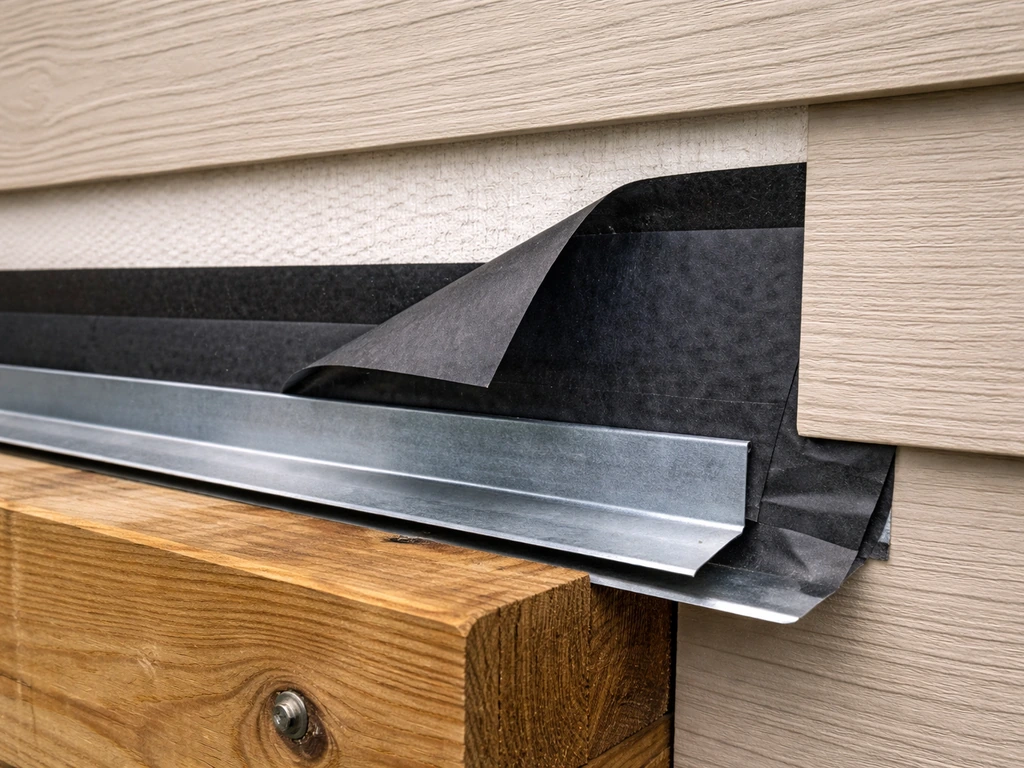
This is the step that separates a ledger that lasts 30 years from one that causes rot damage in 5. Water is the enemy here. The goal is a layered system that routes any incidental water, from rain, from condensation, from ice, away from the house framing and out to the exterior. You do not want water sitting behind the ledger against the sheathing.
Start by removing the siding at the ledger location. For lap siding or vinyl siding, this means carefully cutting along the top and bottom of the ledger area with an oscillating or circular saw set to the siding thickness (be careful not to cut into the sheathing).
For stucco, it's more involved, you'll need to cut and remove the stucco to expose the sheathing, and you'll need to address the weep screed at the bottom of the cut so it sits at least 1 to 2 inches above your finished deck/roof surface to allow drainage and drying.
If you are working with stucco, follow the right removal and water-protection approach so the ledger connection is properly flashed and structurally sound how to attach patio cover to stucco house. If your house has vinyl siding, composite, or stucco, those present their own attachment considerations that go beyond this guide.
Once siding is removed, you'll see the sheathing and ideally the top edge of the rim joist. Inspect what you find here. If the sheathing is soft, discolored, or smells musty, stop and investigate before you go further. Damaged sheathing or rim joist means there's an existing water problem, and installing a ledger over it will just trap the issue. Fix the damage first.
Now install your moisture protection layers. The standard three-layer approach works like this: first, apply self-adhering flashing tape or roofing felt (building paper) directly on the exposed sheathing in the ledger area, this is your back flashing layer. Second, install a piece of Z-flashing along the top edge of where the ledger will sit, tucked behind the existing housewrap or building paper above and extending down over the ledger face.
Third, after the ledger is installed, add a lower flashing piece below it if there's a gap between the ledger bottom and the siding below, to close off that cavity. The housewrap or building paper above the ledger should lap over the top of the Z-flashing, not be tucked behind it. Water should always be able to find its way down and out, not in and behind.
Installing the ledger board: fastening patterns and what actually holds it
With flashing prep done, hold the ledger in position (you'll want a helper or temporary prop blocks for this) and confirm it's level or at your intended slope. Clamp it temporarily if you can. Now you're ready to fasten.
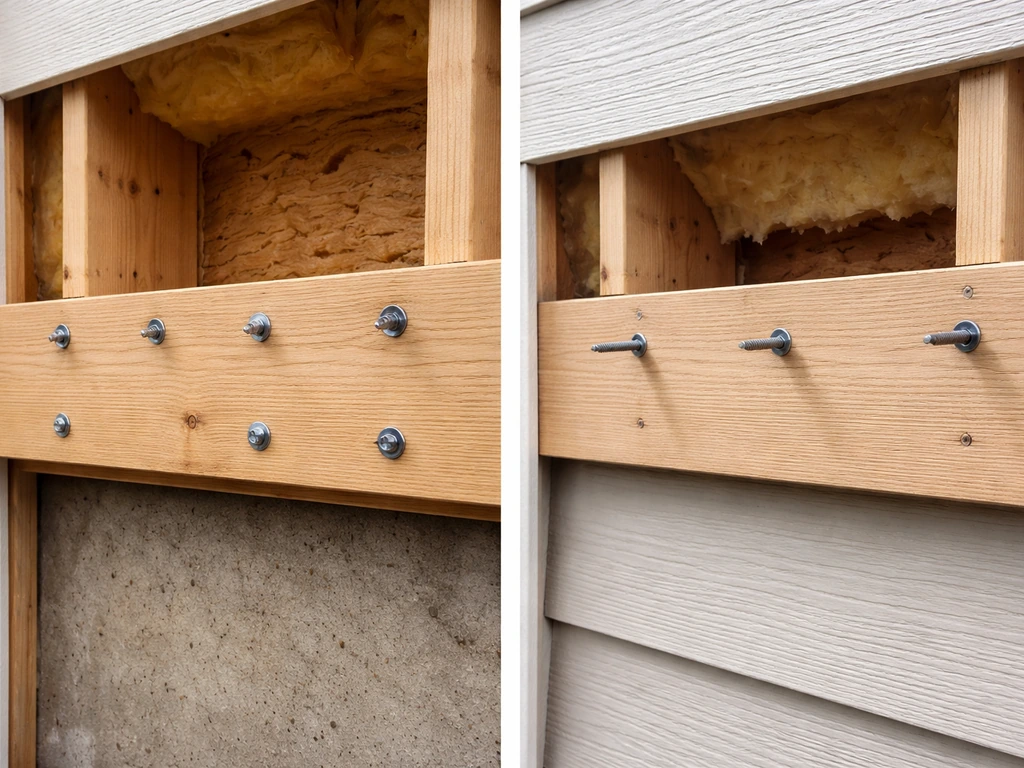
The standard fastener is a 1/2-inch diameter lag screw or a purpose-made structural ledger screw. Lag screws require you to drill a pilot hole first, a slightly undersized hole through the ledger and into the rim joist. Structural screws like LedgerLOK are designed to drive without predrilling, which saves time and reduces splitting. Either way, the fastener must be long enough to fully penetrate the rim joist and protrude about 1/4 inch past the interior face. If there's wall sheathing between the ledger and the rim joist, add that thickness to your fastener length calculation. Most structural screws and lag screws used in this application end up being 3 to 4 inches long or more, depending on sheathing thickness.
The fastener pattern matters. IRC Table R507.9.1.3(1) prescribes fastener spacing based on your joist span and design load. As a general rule, fasteners are installed in two staggered rows along the ledger, not in a single line down the middle. Staggering distributes load and reduces the chance of splitting the rim joist. A common pattern for moderate spans is fasteners every 16 inches in a staggered arrangement, but check the specific table for your load conditions. If you're using LedgerLOK screws, FastenMaster's own table (Table 1 in their technical bulletin) gives you the required fastener spacing for that product specifically.
One thing that trips people up: do not fasten through siding that's still in place. The ledger must bear directly against the sheathing (or directly against the rim joist if sheathing is removed in that zone), not be held off the wall by the siding thickness. Some builders use small standoff spacers to allow drainage behind the ledger, but that's a design-specific approach and changes your fastener length requirements. If you also need the fascia-side details later, see how to attach patio cover to fascia as a related consideration for where the finishing pieces land. The default is direct contact with the sheathing, proper flashing above, and the fastener reaching through to the rim joist.
| Fastener Type | Predrilling Required | Best For | Key Limitation |
|---|---|---|---|
| 1/2-inch lag screw | Yes (pilot hole required) | Standard installs, widely code-accepted | More labor-intensive, needs proper pilot sizing |
| LedgerLOK structural screw | No (self-drilling) | Faster installs, good for DIY | Not for masonry, stucco, or concrete backing |
| 1/2-inch through bolt | Yes (full through-hole) | Highest strength, open framing access | Requires interior access to tighten nut |
| Standard wood screw (not structural) | Depends | Do not use for ledger connections | Not rated for structural shear loads |
Connecting your roof joists and rafters to the ledger
Once the ledger is fastened and inspected (schedule that inspection now before you cover anything), you can start hanging your roof structure. For a lean-to patio cover, your roof rafters or joists will run perpendicular to the ledger, with the high end connecting to the ledger and the low end sitting on the outer beam. Use corrosion-resistant joist hangers at the ledger to make these connections, do not just toe-nail rafters into the ledger face. Joist hangers are engineered for this load path, they're quick to install, and they make the connection inspectable.
Install the joist hanger at each layout mark you made on the ledger earlier. Drive every nail hole in the hanger with the correct nail (usually 10d or specified by the hanger manufacturer, don't skip holes). The rafter or joist slides into the hanger, gets nailed through the hanger flanges, and that's your connection at the house end. At the outer beam, the rafter can either sit on top of the beam with a metal connector, or notch into it depending on your design. Make sure the outer beam is supported by posts with proper post bases anchored to footings, the whole load path from roof to ground needs to be continuous.
If you're building with aluminum patio cover panels or a kit system rather than stick-framing with wood, the ledger attachment process is largely the same. The ledger still connects to the rim joist the same way. What changes is how the aluminum rafters or extrusions connect to the ledger, typically with manufacturer-supplied brackets or a continuous aluminum header channel that sits against or bolts to the ledger. Follow the kit manufacturer's connection instructions for that part, but don't skip the flashing and structural fastening steps described here just because it's a kit.
Mistakes people make (and when it's smarter to call a pro)
The most common mistake is fastening into the wrong thing. Studs, sheathing alone, blocking that's not the actual rim joist, these don't have the shear capacity of a proper rim joist connection. If you're not sure what's behind the wall at your target location, cut a small inspection hole before committing to the full ledger installation. It takes 10 minutes and can save you from a serious structural problem.
The second most common mistake is skipping or shortcutting the flashing. It doesn't seem urgent because the damage is slow and hidden. But water intrusion behind a ledger is one of the most common causes of major structural rot repairs, and it can take years before you even notice. Do the three-layer flashing system. It's not complicated, and it's the difference between a structure that ages well and one that silently destroys your wall framing.
- Attaching to studs instead of the rim joist (not code-compliant and structurally insufficient)
- Leaving siding in place behind the ledger instead of removing it at that section
- Using non-structural screws or nails for the ledger-to-rim connection
- Skipping or incorrectly installing Z-flashing (most common source of water intrusion)
- Not staggering fasteners into two rows as required by the IRC
- Using incompatible metals (e.g., standard steel hardware against pressure-treated lumber with newer preservatives, which requires hot-dipped galvanized or stainless)
- Fastening into masonry, stucco, or concrete with a ledger screw not rated for those materials
- Not getting a permit and missing the required framing inspection before closing up
Call a structural engineer or licensed contractor if: your house is slab-on-grade with no accessible rim joist at the right height, you open up the wall and find rot or damaged framing, you're working on a masonry or concrete wall where standard ledger screws don't apply, your patio cover is unusually large or you're in a high-snow or high-wind zone with elevated design loads, or if your local jurisdiction requires engineered drawings for your project size. There's no shame in getting engineering help on the connection and doing the rest of the build yourself. The ledger attachment is the one place where getting it wrong has real consequences.
Working at height also deserves a direct mention. OSHA requires fall protection for residential construction work at 6 feet or more above grade. Even if you're a homeowner DIYing your own project, set up proper scaffolding or use a safety harness when you're working on the upper portions of a wall. A fall from a 10-foot ladder onto a concrete patio is a life-altering event. Take the extra 20 minutes to set up safely.
Once your ledger is in, flashed, fastened, inspected, and your rafters are hung, you're well into the structural phase of your patio cover build. The ledger is the hardest part to get right because it involves the most variables, your house's specific framing, your siding type, your local code requirements. Different siding materials like vinyl, stucco, or composite each add their own wrinkles to the removal and flashing process. But the core principles stay the same: connect to real structure, manage water religiously, and use the right hardware for the load.
FAQ
How do I confirm I’m hitting the rim joist, not blocking or other framing members?
Use a stud finder plus measurements from known framing bays, then verify with a small inspection opening at one fastener location before removing all siding. Look for the rim joist edge and grain orientation, confirm it is continuous along the perimeter, and only then drill pilot holes or install the full ledger.
What should I do if the rim joist is at the wrong height for my desired roof slope?
Don’t force the ledger onto an area without solid backing. Either adjust the pitch by changing the outer beam height, change post height at the outer support, or have an engineer review alternative framing. A wrong ledger height often leads to inadequate slope, poor drainage, and connection to non-structural framing.
Can I fasten through the siding and sheathing into the rim joist, without exposing the sheathing?
No. The ledger must bear against sheathing (or directly to structure if sheathing is removed) and be flashed properly. Keeping siding on typically prevents correct water management and can lead to fasteners missing the rim joist or being too short.
Do I need to remove all siding along the full ledger length or just the ledger footprint?
Expose at least the full ledger footprint plus enough area to install the back flashing and to lap housewrap over the Z-flashing above it. Practically, that means cutting a continuous strip wide enough for flashing overlap, not just drilling individual holes.
What if my fasteners are getting too close to the edge of the rim joist or causing splitting?
Reduce the chance of splitting by using the correct pilot hole for lag screws (slightly undersized) and by following the specified staggered pattern and spacing for your load. If splitting still occurs, stop and get a pro to reassess wood condition, rim joist size, and fastener type or diameter.
How do I choose between lag screws and structural ledger screws?
Lag screws usually require predrilling and can be more prone to splitting if pilot holes are not right. Structural ledger screws often install without predrilling and can save time, but you must use the product-specific spacing requirements and ensure the screw reaches full penetration of the rim joist plus required protrusion.
My patio cover roof will have gutters or heavier snow loads, do I need different ledger spacing?
Yes. Fastener spacing depends on design load and joist span. If you anticipate higher-than-average snow, wind, or additional loads like snow guards, confirm the spacing using the code table for your condition or a manufacturer engineering table for the specific screw, ideally before starting installation.
Is it OK to use different metals for flashing, fasteners, or ledger board?
Avoid mixing incompatible metals in contact where moisture is present. Use the fastener type required for treated lumber and your climate (hot-dipped galvanized or stainless are common in corrosive areas) and keep flashing and hardware selections consistent, because galvanic corrosion can degrade the connection over time.
What is the best way to manage the gap below the ledger after installation?
If there is a cavity between the ledger bottom and the siding below, close it with a lower flashing piece so water cannot travel into that space. The goal is layered drainage where water always has a path down and out, not a pocket that can trap moisture behind the ledger.
How much should the ledger slope or roof slope be, and how do I calculate it quickly?
Use at least the minimum typical slope (commonly 1/4 inch per foot) for patio cover drainage, then verify against your local code and any approved detail your jurisdiction provides. For quick math, multiply the horizontal run by the slope per foot, then set the ledger height so the outer edge ends up that amount lower than the ledger end.
Should the ledger be level or sloped when I install it?
The ledger itself should be set to the intended roof pitch, not necessarily perfectly level. Use a level or straightedge to check the ledger line, then confirm the resulting rafter angle and drainage slope using your calculated heights from the door threshold or other datum points.
How do I handle situations where the ledger would land near a window, door, or siding trim?
Keep the ledger top below the door threshold or window sill as your guide, and factor in roofing material thickness so water does not pool toward openings. If the ledger interferes with trim or flashing continuity, you may need modified flashing layout or an engineer review to maintain both structural and water-control performance.
Do I need joist hangers at the ledger, or can I toe-screw rafters directly into the ledger?
Use joist hangers for the connection at the ledger, because they are engineered for the load path and provide an inspectable, consistent attachment. Toe-screwing alone is a common weak link and can fail to transfer loads the way code expects.
What inspection issues should I expect with a patio cover ledger?
Inspectors usually look for correct structural attachment into the rim joist, proper fastener type and spacing, and a complete water-control system (back flashing and Z-flashing that laps correctly). Schedule the inspection before you cover up exposed flashing so corrections are still possible.
If I have a slab-on-grade home with no rim joist, what are my practical options?
Do not assume a ledger can attach safely without the rim joist. Options typically include engineer-designed anchorage into suitable structural elements, modifications to the framing layout, or adding an approved structure that transfers loads correctly. Treat this as an engineering case, not a standard prescriptive install.
How far above grade am I considered high-risk for fall protection?
If you are working at 6 feet or more above grade, fall protection is generally required on residential construction tasks. Plan scaffolding or proper harness use, especially when removing siding, installing flashing, and drilling or fastening at the upper ledger line.