Attaching a patio cover to a stucco house is absolutely doable as a DIY project, but stucco adds a layer of complexity that trips up a lot of homeowners. The core rules are: always fasten into the wood framing behind the stucco (never rely on the stucco itself to hold load), use the right masonry anchors or lag screws depending on what's behind the wall, install proper step flashing or a continuous Z-flashing above the ledger, and seal every penetration so water can't sneak behind the stucco and rot out your wall framing. Get those four things right, and you'll have a solid, leak-free structure. Skip any one of them, and you'll be dealing with a wobbling cover or a wet wall within a few years.
How to Attach a Patio Cover to a Stucco House

Celia Vaughn
4 Jul 2026
Understanding stucco attachment points and water management
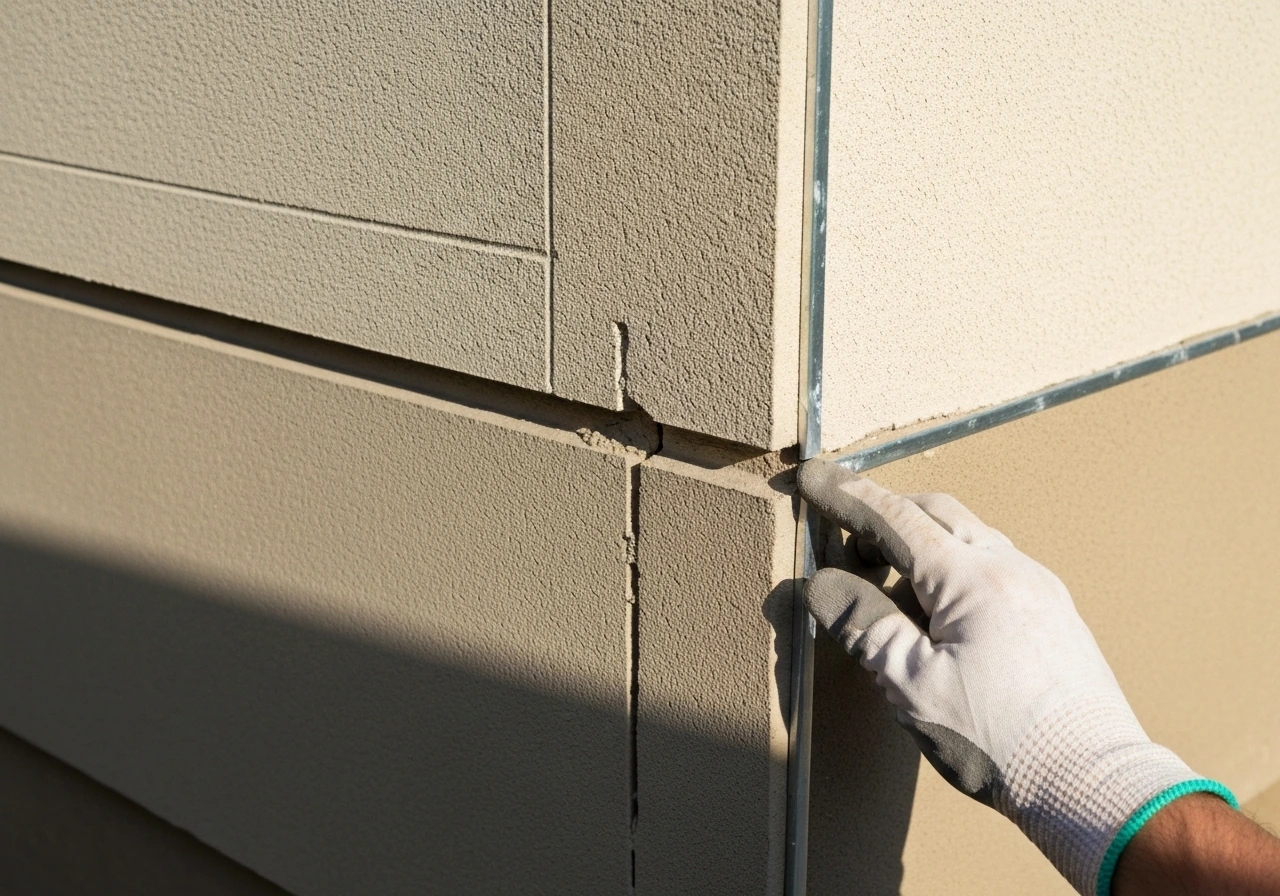
Stucco is a finish material, not a structural one. It's typically 3/4 inch to 1 inch thick (three-coat systems) or around 3/8 inch (one-coat synthetic stucco), applied over metal lath and a weather-resistive barrier (WRB), which in turn sits over your sheathing and wall studs. That whole assembly is what makes stucco both a blessing and a headache for attachment work: you can't just drill in anywhere and expect it to hold, and you can't penetrate the wall without thinking carefully about what happens to water.
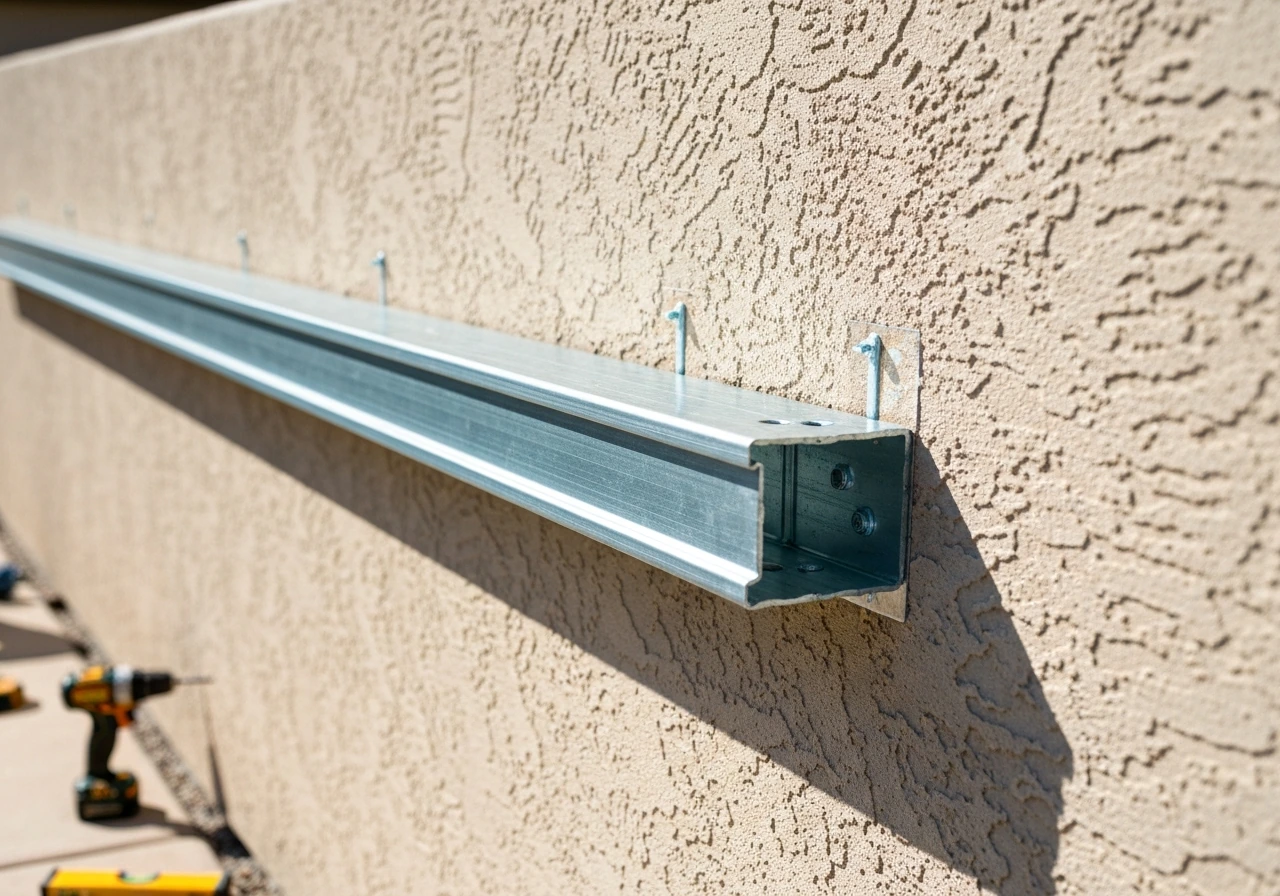
The two things you need to locate before you touch a drill are (1) your wall studs and (2) the rim joist or band joist behind the wall at the floor-line level. The rim joist is the horizontal framing member that runs along the perimeter of your house at the floor level, and it's the ideal attachment point for a patio cover ledger because it's thick, continuous, and load-bearing. Studs are typically spaced 16 inches or 24 inches on center. You can find them from inside the house and transfer measurements out, or use a strong rare-earth stud finder on the exterior, though stucco's metal lath can create false positives, so always confirm with a test drill.
Water management is the other half of this puzzle. Stucco is not waterproof. Water gets behind it regularly, sheds down the WRB layer, and exits at the bottom. When you attach a ledger or beam bracket flush against the stucco, you create a dam. Water collects behind the ledger, soaks into the wall, and eventually rots your framing. The fix is flashing above the ledger that diverts water away from the wall, standoffs that keep the ledger slightly away from the stucco surface so moisture can drain, and sealant that closes the path without trapping water. More on all of that in the flashing section below.
Choosing the right patio cover type and attachment approach
Before you buy hardware, decide what you're actually building. The attachment method differs depending on the patio cover style and the material you're using.
| Cover Type | Attachment Approach | Best For |
|---|---|---|
| Lean-to (shed roof) | Continuous ledger board or aluminum ledger channel attached to wall framing | Most common DIY build, works well on single-story walls |
| Pergola / open-beam | Post-and-beam with a ledger or wall-mounted beam brackets | Partial shade, lower structural load than roofed covers |
| Solid roofed cover (insulated or corrugated panel) | Ledger board with rafter hangers, needs full flashing above | Full weather protection, highest water-management demands |
| Freestanding structure | No wall attachment needed — footings and posts only | Best option when stucco attachment is too complex or blocked |
For most homeowners, a lean-to style roofed cover attached with a ledger board is the most practical choice. If your house has vinyl siding, the attachment needs different mounting points and flashing so you can secure the ledger without damaging the siding or trapping moisture. If your stucco wall is directly over concrete block or CMU (common in Southwest-style homes), you'll need masonry anchors instead of lag screws, and the process shifts noticeably. If you're dealing with EIFS (exterior insulation and finish system, a foam-backed synthetic stucco), stop and read the manufacturer's guidance carefully before drilling. EIFS requires specific penetration methods to avoid moisture intrusion into the foam layer, and it often makes a freestanding design the smarter call.
Material choice matters too. Wood ledger boards (typically 2x10 or 2x12 pressure-treated lumber) are the standard for roofed lean-to covers and handle rafter loads well. Aluminum patio cover systems often come with their own aluminum ledger channels designed to surface-mount to the wall. Both work fine on stucco when fastened correctly. What doesn't work well is attaching a heavy wood ledger with anchors that are sized for a light decorative bracket. Size your fasteners to match your actual loads.
Tools, materials, and hardware for attaching to stucco

Get this kit together before you start. Running to the hardware store mid-project because you're missing a drill bit or the wrong anchor is how mistakes happen.
- Rotary hammer drill with a 1/2-inch SDS masonry bit (a standard drill can work, but a rotary hammer goes through stucco cleanly without cracking it)
- Stud finder (magnetic or electronic) plus a long level for layout
- Chalk line for marking the ledger run horizontally
- 1/2-inch impact driver or drill for driving lag screws
- Tin snips and aviation shears for cutting metal flashing
- Caulk gun and a tube of high-quality polyurethane or silicone-modified sealant rated for exterior masonry/stucco
- Pressure-treated 2x10 or 2x12 lumber for the ledger (use #2 or better Douglas fir or southern yellow pine)
- Structural lag screws: 1/2-inch diameter, at least 3 inches of thread engagement into the framing (so 1/2 inch stucco + 5/8 inch sheathing + 3 inches into framing = roughly 4-1/4 inch total lag length minimum)
- Standoff spacers or slotted shim washers to create a 1/4 to 1/2 inch gap between ledger and wall surface
- Heavy-duty masonry anchors (Tapcon XL or Hilti KB-TZ type) if attaching to CMU or concrete block
- Galvanized or stainless-steel joist hangers and post bases sized for your lumber
- Step flashing (aluminum or galvanized steel, 4x4 inch minimum) or a continuous Z-flashing for the top of the ledger
- Self-adhering flashing membrane tape (Grace Vycor or equivalent) for sealing around lag penetrations
- Paintable exterior caulk or stucco patch compound for cosmetic touch-ups after drilling
On fastener choice: if you're going into wood framing through stucco, 1/2-inch structural lag screws are the right call. Hollow-wall anchors and toggle bolts are not structural fasteners. Don't use them for this application. If you're going into concrete or CMU, use wedge anchors or heavy-duty Tapcon screws rated for the load you're hanging. Check the manufacturer's load tables, not just the box label.
Step-by-step: attaching a ledger or support beam to a stucco wall
Work through this sequence carefully. how to install patio cover to house. The most expensive mistakes on stucco jobs come from rushing the layout or skipping a step because it seems like extra work.
- Determine the ledger height. Account for the roof pitch, final beam/rafter height at the house, and the finished roof height at the outer posts. Mark a level line across the full width of the planned patio cover using a chalk line and a 4-foot level (or a laser level, which makes this much faster).
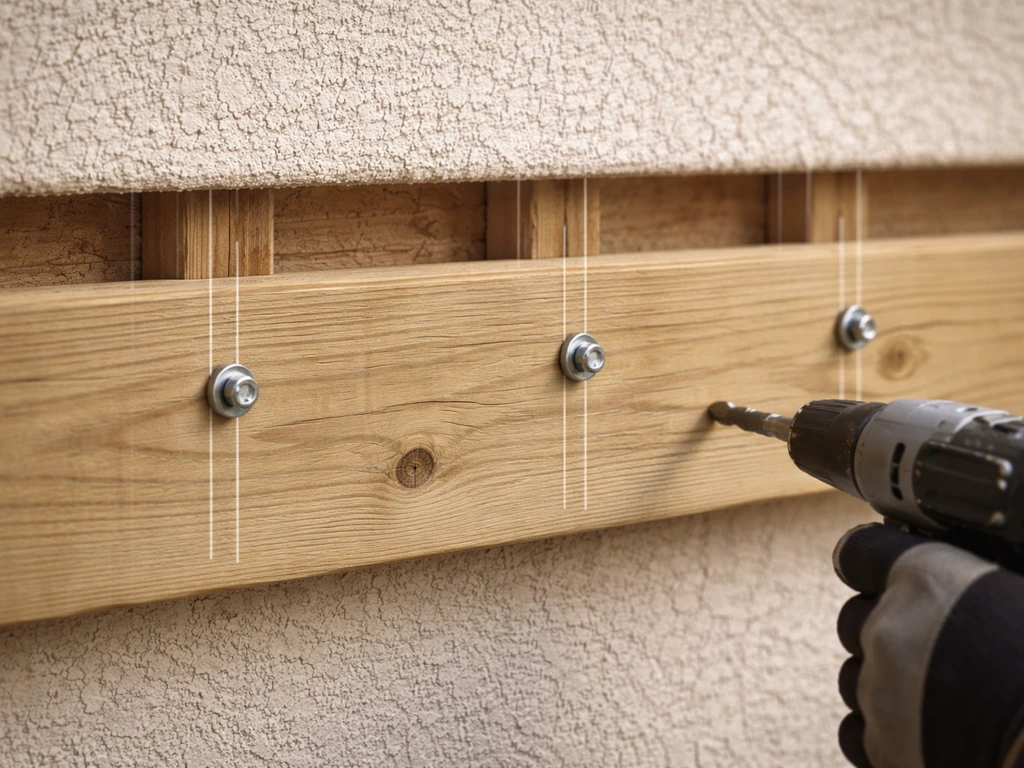
- Locate your framing. From inside the house, find the rim joist and the first row of studs above it. Use a stud finder from the exterior and confirm with a 1/8-inch test drill — drill until you feel the stucco give way, then check for solid wood behind. Mark all stud locations clearly with tape or pencil.
- Cut and dry-fit the ledger board. Don't attach it yet. Hold it against the wall and make sure it lines up with your level mark and that your pre-drilled pilot holes will hit framing. Space pilot holes every 16 inches to match stud spacing, or 24 inches minimum for double-lag patterns.
- Drill the stucco cleanly. Use the rotary hammer with a masonry bit just slightly larger than your lag screw shank (not the thread). Drill slowly through the stucco and lath, then switch to a wood bit for the framing pilot hole. Work carefully to avoid cracking the stucco around the hole — sudden pressure changes are what cause spider cracks.
- Install standoff washers or spacers on each lag before driving. You want a consistent 1/4 to 1/2 inch gap between the back of the ledger and the stucco surface. This gap is the drainage path for any water that gets past the flashing.
- Drive lag screws with an impact driver. Don't overtighten — you want the ledger snug against the spacers, not crushing them. Check level again after each lag to make sure the board isn't shifting.
- Install flashing above the ledger immediately. Slip Z-flashing or step flashing under the stucco above the ledger before anything else is attached to the ledger. This is the step people skip. See the next section for details.
- Attach rafter hangers, beam hardware, or post bases to the face of the ledger using approved structural connectors. Don't skip this in favor of toenailing — hanger hardware is engineered for the load.
A common mistake here: people drill all their holes, then realize the ledger doesn't align with any framing because they used a stud finder that was fooled by the metal lath. Always confirm stud location with a physical test before committing to a hole layout. An inch off-center on a 1/2-inch lag means you're in the edge of a stud at best, and missing entirely at worst.
Flashing, sealing, and preventing leaks
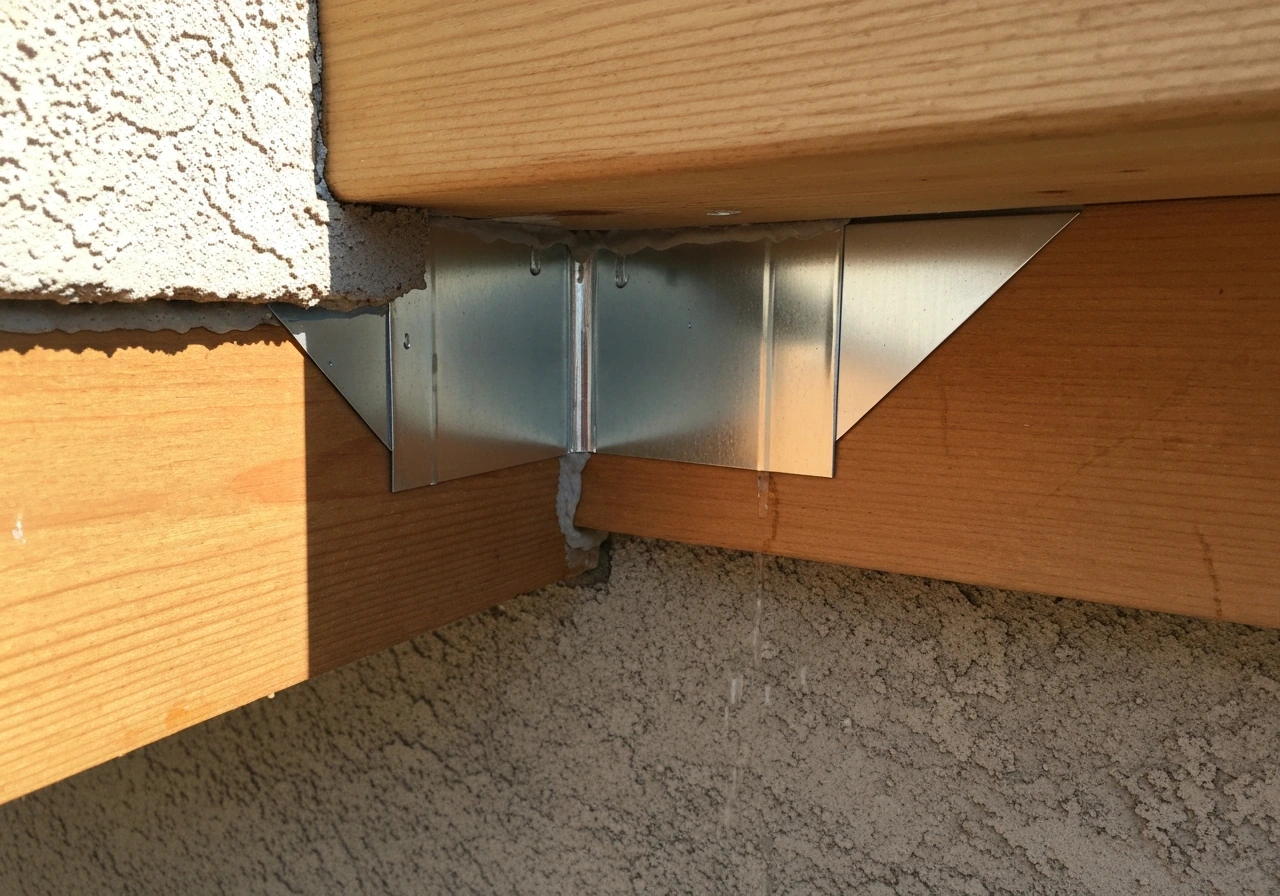
This is where most stucco patio cover jobs either win or lose. The 2024 IRC requires flashing above any ledger attached to wood-frame construction specifically to prevent water entry into the wall cavity. It's not optional, and it's not just a code technicality. Water that gets behind your ledger will travel down the wall sheathing, pool at sill plates, and rot out framing over two to five years without showing visible exterior symptoms until the damage is serious.
The right approach depends on what's above your ledger. If there's stucco that can be cut or lifted, you want to cut a horizontal kerf line in the stucco about 1 inch above the top of the ledger, slip Z-flashing or continuous step flashing behind the stucco's WRB layer (or at minimum behind the cut edge of the stucco), and lap it over the top of the ledger.
The Building America Solution Center describes step and kick-out flashing concepts for roof-to-wall intersections and notes that specific IRC editions require step and kick-out flashing for those conditions step flashing. The flashing must shed water forward, not backward.
If you want to get the fascia connection right, start by planning the attachment points and flashing so water doesn't get trapped how to attach patio cover to fascia. What the JLC field guides call '[reverse shingling](https://www. jlconline. com/wp-content/uploads/sites/4/2023/jlc-exterior-weather-barriers-and-flashing.
pdf)' is the most common installation error here: if your flashing laps under the ledger instead of over it, or if it diverts water into the wall instead of away from it, you've created the exact problem you were trying to prevent.
Here's the sequence for installing flashing correctly at a stucco ledger:
- Score a horizontal cut in the stucco 1 inch above the ledger's top edge using an angle grinder with a masonry blade. Cut just deep enough to get through the stucco coat, not into the sheathing.
- Carefully pry the cut edge of the stucco up slightly and slip the back leg of your Z-flashing or step flashing behind it, underneath the WRB if possible.
- Seal the back leg to the wall with self-adhering flashing tape (like Vycor). Press it firmly and run it continuously with no gaps.
- Let the horizontal face of the flashing lap over the top of the ledger by at least 2 inches. This is your drip edge.
- At the ends of the ledger where it meets an inside or outside corner, install kick-out flashing to direct water away from the wall rather than letting it run down the face of the stucco into any gap between ledger and wall.
- Once flashing is set, seal the cut stucco edge above the flashing with a paintable polyurethane sealant rated for masonry. Tool it smooth and slightly sloped outward.
- Apply self-adhering flashing tape around each lag screw penetration on the face of the wall before final tightening, then seal the washer face with sealant.
One thing to keep in mind: you want weep paths at the bottom of the ledger-to-wall gap, not a sealed perimeter. If you caulk all four sides of the ledger tight against the stucco, water that does get in has nowhere to go. Leave the bottom gap open or use a foam backer rod with weep channels. The top and sides are sealed; the bottom stays free to drain.
Structural safety: loads, spacing, anchors, and permits
Don't skip this section. A patio cover that's attached correctly to the wall but undersized for the loads it will see is still a safety hazard. Here are the key structural considerations for attaching to a stucco house.
Load types to plan for
- Dead load: the weight of the structure itself (rafters, roofing material, ledger). A standard corrugated polycarbonate roof is light; a solid aluminum insulated panel system is heavier; a full shingle-over-framing roof is heaviest.
- Live load: temporary loads like snow accumulation. In most of the continental US, 20 psf (pounds per square foot) is a common ground snow load, but check your local code for actual design snow load. In high-snow areas (mountain regions, northern states), this can be 40-100+ psf.
- Wind load: uplift and lateral force from wind. Coastal or open-exposure areas may require hurricane ties and additional shear anchoring at the ledger.
- Seismic load: in zones 3 and 4 (California, Pacific Northwest), shear connections and holdown hardware may be required.
Fastener spacing and anchor sizing
For a typical residential patio cover ledger, 1/2-inch lag screws at 16-inch spacing (one lag per stud) into the rim joist provides adequate attachment for most light-to-medium load applications. If your rafters are spanning more than 10 feet, if you're in a high-snow or high-wind area, or if you're using heavy panel roofing, space lags at 12 inches and use two lags per stud in a staggered pattern (top and bottom, offset by 1.
5 inches vertically to avoid splitting the rim joist). Each lag should have a minimum of 3 inches of thread engagement into solid framing. If you're attaching to CMU or concrete, use wedge anchors (1/2 inch diameter minimum) with a 3-inch embedment depth and follow the anchor manufacturer's load tables.
Permits: don't skip them
In nearly every jurisdiction in the US, an attached patio cover with a solid roof requires a building permit. An open pergola may or may not, depending on local rules, but the moment you attach any structure to your home's framing, you're almost certainly in permit territory. This isn't just a legal formality. The permit inspection process will catch flashing errors, undersized fasteners, and missing hangers before they become expensive problems. Check with your local building department before starting. Budget 1-4 weeks for permit approval and plan for at least one inspection mid-project (framing inspection before you install roofing) and a final inspection.
When to DIY and when to call a pro
Most homeowners with basic carpentry skills and the right tools can handle a standard lean-to patio cover attachment to a stucco house. But there are specific situations where bringing in a structural engineer or a licensed contractor is genuinely the smarter move, not just a conservative one.
| Situation | DIY or Pro? | Why |
|---|---|---|
| Standard lean-to on single-story home, wood frame behind stucco, low-to-moderate snow/wind zone | DIY with permit | Well within homeowner skill range with this guide |
| EIFS (foam-backed synthetic stucco) exterior | Hire a pro or switch to freestanding | EIFS penetrations require specific methods; mistakes cause widespread moisture damage |
| Two-story attachment or ledger above 10 feet off grade | Consult engineer | Fall risk, structural loads increase, and permits often require stamped plans |
| High snow load area (40+ psf design load) | Engineer review at minimum | Rafter sizing, fastener spacing, and post loads all need engineering for heavy snow |
| Coastal or hurricane zone (wind zone 3+) | Engineer required in most jurisdictions | Uplift loads and shear demands exceed prescriptive tables |
| CMU or concrete-block wall, unsure of reinforcing | Pro or engineer for attachment design | Need to confirm block is grouted/reinforced at anchor locations |
| Existing visible stucco cracking, moisture staining, or soft spots near attachment zone | Stop and call a contractor | Existing water damage must be resolved before adding new penetrations |
| Pulling permit triggers requirement for stamped structural drawings | Hire engineer | Many jurisdictions require this for attached shade structures over a certain size |
Common mistakes that cause real problems
- Fastening only into the stucco with masonry screws: stucco has no structural value. Anchors set only in the stucco coat will pull out under load.
- Skipping the standoff gap: mounting the ledger flush against the stucco traps moisture and causes rot within a few years.
- Reverse flashing installation: lapping the flashing so water is directed into the wall cavity rather than away from it. This looks fine from the outside but causes hidden rot.
- Drilling with a standard drill at high speed: this spiderwebs the stucco surface. Use a rotary hammer at low pressure and let the bit do the work.
- Using construction adhesive as a substitute for mechanical fasteners: adhesive is not a structural fastener for patio cover loads.
- Not sealing lag penetrations: each hole through the stucco is a direct water entry point if not covered with flashing tape and sealant.
- Skipping the permit: unpermitted attached structures can complicate home sales, void homeowner's insurance claims, and require demolition if discovered.
One last thing worth noting: if you're planning an aluminum patio cover kit system, many of those systems come with their own ledger channel and installation instructions specifically for masonry or stucco walls. Follow those instructions closely because the channel geometry affects how the flashing integrates. The general sequence in this guide still applies, but the hardware details will be system-specific. For wood-framed structures where you're sourcing all your own lumber and hardware, the process described here is the full picture. Take your time on the layout and flashing, and the rest of the build follows logically.
FAQ
What should I use to find studs through stucco without drilling in the wrong place?
Use a stud finder as a first pass, then confirm with a small pilot hole or exploratory bit before laying out the full ledger hole pattern. Metal lath can make magnets and sensors report false locations, and being even an inch off can put a lag screw in the stud edge or miss entirely.
Can I just attach the patio cover ledger directly into stucco for convenience?
No. Stucco is a finish layer, it is not structural. You must fasten into the wood framing behind it, or into masonry framing when the wall system supports it. If you rely on stucco, the ledger can loosen and you can trap water where it matters most.
Do I need flashing if my patio cover isn’t directly above a window or door?
Yes. Any ledger attached to a stucco, wood-framed wall should be flashed at the ledger line. Water will run down and find the path of least resistance inside the wall cavity, causing rot even when there are no obvious “wet” spots on the exterior.
What is the correct amount of standoff or gap between the ledger and the stucco?
Plan on the ledger not being sealed tight against the wall surface. The top and sides should be sealed to prevent water entry into the cavity, but the bottom needs a drain path. Many builders use foam backer rod with weep channels to maintain that drainage without leaving a fully open gap.
Is caulking the bottom of the ledger always a good idea?
No. Caulking all sides can block the drain route. The bottom should either be left open with controlled weep paths, or achieved with backer rod/weell-channel details so any incidental water can exit instead of pooling at sill plates and rim framing.
How do I know whether I’m attaching to the rim joist or the wall studs, and does it matter?
It matters. The ledger line is typically ideal when it intersects the rim joist or band joist at the floor level because it is thick and continuous. You can still use stud penetration, but confirm the ledger height and framing location so your fasteners hit solid framing with the required thread engagement.
What should I do if my ledger lines up between studs when using 16-inch spacing?
Re-layout the ledger so each fastener lands on framing, or switch the design so you use a different spacing strategy. Avoid drilling arbitrary holes based on a questionable stud finding, because “near misses” are common on stucco and can weaken the connection or cause splitting at the fastener edge.
What anchor type should I use for stucco over CMU or concrete?
Use anchors rated for structural loads, such as wedge anchors (with minimum diameter and embedment depth as specified by the manufacturer) or heavy-duty load-rated Tapcons for concrete. Also confirm embedment depth and edge distance before drilling, because the substrate condition and spacing control how much load the anchors can actually take.
Are toggle bolts or hollow-wall anchors acceptable for stucco wall installs?
No for structural ledger loads. Hollow-wall anchors and toggle bolts are intended for light loads in hollow drywall conditions, not for supporting patio cover roofs. For stucco, choose fasteners that engage the actual backing material and follow the load tables for the selected hardware.
How do I prevent the flashing from being installed in the wrong direction?
Aim for “water sheds forward.” Dry-fit the flashing pieces and visualize where water will flow as it hits the ledger edge. A common failure mode is reverse shingling, where the flashing laps the wrong way and sends water into the wall cavity instead of away from it.
Can I cut or lift stucco to install Z-flashing behind it?
Often yes, when done correctly, but only if you can maintain proper WRB continuity and seal the cut edge to prevent uncontrolled water paths. The flashing should be installed behind the WRB layer or at minimum behind the cut/stucco edge and lapped so it sheds toward the exterior, not into the wall.
Does the permit requirement change if I’m using an aluminum patio cover kit?
Usually you still need a permit when the system is attached to the house framing with a solid roof. Kits may come with engineered specs, but you typically still must meet local requirements for flashing details, structural connections, and inspection stages. Check with your building department using the kit model and wall type.
When should I hire an engineer or contractor instead of DIY?
If your roof span is long, you are in a high wind or snow zone, the attachment involves EIFS foam layers, or the hardware load path is unclear, professional input is often the safer call. Also consider hiring help if you can’t reliably locate framing and achieve minimum thread engagement into solid backing.
How much thread engagement do I need for lag screws in wood framing?
Plan for at least 3 inches of threaded portion into solid framing. Short engagement reduces holding strength, and with stucco you often lose usable length if you buy the wrong lag length for the wall thickness and ledger thickness.