
Yes, you can walk on an aluminum patio roof, but only when you know where to step, what the structure underneath can handle, and what fall protection you have in place. The short version: always step directly over a purlin or rafter, never on the unsupported panel span between them, keep your weight distributed, and never get up there without a harness and anchor point. Do those three things and you can inspect, install flashing, or replace fasteners without damaging panels or putting yourself at serious risk. Skip any of them and you're either punching through thin aluminum or sliding off the edge.
How to Walk on Aluminum Patio Roof: Inspection & Safety Steps

Celia Vaughn
14 Jul 2026
Who this guide is for
This is written for DIY homeowners who are planning or maintaining an aluminum or metal patio cover and need to actually get up on it, whether that's to install flashing, tighten loose fasteners, add roll roofing, check for leaks, or complete a new panel installation. For a step-by-step walkthrough on setting up and installing a patio roof, see our guide on how to install patio roof. If you're in the middle of a build or doing routine maintenance, you'll eventually have to put your body weight on that roof. This guide walks you through doing that safely, from verifying your structure beforehand to stepping off the ladder correctly. For step-by-step installation instructions, see how to install aluminum patio roof. For step-by-step plans and materials lists to build one from scratch, consult a how to build aluminum patio roof guide. I've been through this process on my own covered patio build and on several community projects, and the mistakes I've seen (and made) are predictable and avoidable.
Quick safety rules to know before anything else
Before getting into the details, here are the non-negotiable rules. Read these once, then keep them in your head the entire time you're on the roof.
- Always wear a harness connected to an anchor rated for at least 5,000 lbs per person. OSHA's fall-arrest standard (29 CFR 1926.502) sets this as the minimum, and it applies to you even as a homeowner doing your own work.
- Never step on unsupported panel spans. Step over purlins or rafters only. The panel between supports will dent, crease, or flex under your weight.
- Never walk on translucent skylight panels. They look identical to aluminum panels and will not support your weight.
- Wipe off any shipping oil before walking. Freshly manufactured metal panels have a protective coating that makes them dangerously slick.
- Do not work on the roof in rain, ice, snow, or wind above roughly 23 mph. Wet aluminum is extremely slippery even with good footwear.
- Extend your ladder at least 3 feet above the roof edge before stepping off and maintain three-point contact on the ladder at all times.
- Use walkboards (crawl-boards) supported by roof jacks whenever you need to cover more than one or two panel spans.
- Never walk on unsecured, loose panels. A panel that isn't fastened at both ends can shift under your foot.
Aluminum patio roof types and what they can handle
Not all aluminum patio roofs are built the same, and the panel profile directly affects where and how safely you can walk on them. Before you even think about getting up there, you need to know what type of panels you have and what the manufacturer says about their load capacity. The IRC specifies a minimum roof live load of 20 psf for typical residential roofs (per R301.5/R301.6), but whether your specific panels actually meet that at your purlin spacing is a different question. Always pull the allowable load/span table from your panel manufacturer's website for your specific profile and gauge.
| Panel Type | Typical Walkability | Where to Step | Key Caution |
|---|---|---|---|
| Corrugated aluminum (exposed fastener) | Moderate — ribs add some stiffness | Over purlins only; step on flat between ribs, not on the rib crest | Ribs can collapse under point load if span is long; check purlin spacing |
| Solid flat aluminum (patio kit panels) | Low — least structural depth | Over every framing member; use walkboards for any span over 24 in. | Most prone to permanent denting; do not step mid-span under any circumstances |
| Standing-seam aluminum | Best — seams add significant rigidity | Over purlins; you can walk along the flat pan but never on the seam itself | Seam clamps needed for non-penetrating anchors; never compress the seam with body weight |
| Framed insulated panels (aluminum skins) | Good — rigid core adds load capacity | Over internal framing or support ribs; consult manufacturer data sheet | Core damage is invisible from outside; heavy point loads can crack internal foam |
If you're not sure which panel type you have, look at the profile from the end. Corrugated panels have a wave or sinusoidal shape. Standing-seam panels have raised seams running ridge to eave with flat pans between them. Solid flat panels look like smooth sheet metal. Framed insulated panels are noticeably thicker, usually 1 to 3 inches, with a composite core. When in doubt, look up the model or contact the manufacturer before you step on anything.
Structural checks before you go up
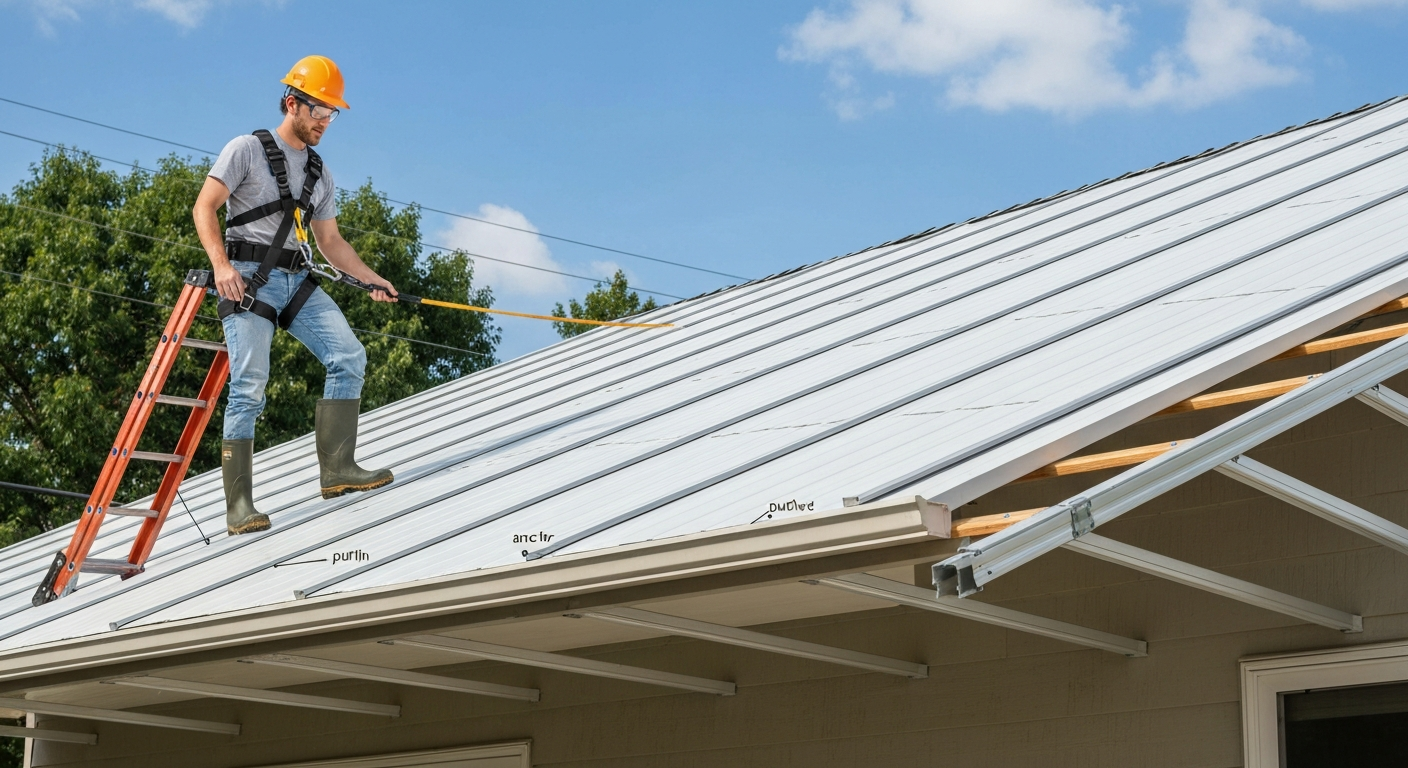
The panels themselves aren't what holds your weight, the framing underneath them is. Purlins are the horizontal members that run perpendicular to the rafters, and they're the lines you're aiming for with every step. Rafters run from the house (or ridge) down to the outer beam. Together, they form a grid, and your safe stepping points are at every intersection or directly over any single member.
Common purlin spacing for metal patio panels runs from 24 to 36 inches on center for corrugated and lighter exposed-fastener panels, and 36 to 48 inches on center for deeper-rib or standing-seam systems. Typical contractor/manufacturer guidance and span tables give practical purlin spacing ranges by panel type and gauge (see Roof Purlin Spacing Standards, New England Metal Roof (trade/manufacturer guidance) for specific examples) Roof Purlin Spacing Standards — New England Metal Roof (trade/manufacturer guidance). That spacing has to match your panel manufacturer's load/span table for the live load in your area. If your purlins are spaced at 48 inches but your panel is only rated for 36-inch spans at 20 psf, you have a problem before anyone steps on the roof.
- Locate your purlins from underneath before going up. Mark their positions on the fascia or take a photo so you know exactly where to step from above.
- Check rafter size and spacing. IRC span tables for 20 psf live load give you a baseline. If rafters feel springy or bounce when you push on them from underneath, stop and assess before going further.
- Look for any rafter or purlin that has been notched, cut, or damaged. A compromised framing member can fail at loads well below design capacity.
- Verify that the outer beam and ledger board (or house attachment) are solid. A roof that moves or flexes at the perimeter is a warning sign.
- Check the pitch. Even a low-slope patio roof at 1: 12 or 2:12 pitch is slippery on metal. Anything above 4:12 significantly increases the risk of sliding and requires additional precautions or a different access method entirely.
Pre-walk inspection checklist
Run through this checklist from the ground and from a ladder at the edge before stepping onto the roof surface. The NRCA recommends checking all of these before placing any personnel on a metal panel roof, and I'll tell you from experience that skipping even one item is how you end up dealing with a bigger problem than the one you went up to fix.
- Fasteners: Are all visible panel fasteners present, tight, and not pulling through? Missing or backing-out screws mean the panel is partially unsecured.
- Panel condition: Any visible dents, creases, or buckled areas? Those indicate the panel has already been overloaded at some point and the aluminum may be weakened.
- Corrosion and pitting: Surface oxidation is normal, but pitting that goes through the panel thickness means structural weakness. Check panel edges and anywhere water pools.
- Seams and overlaps: Lifted seam edges or separated overlaps on corrugated panels reduce both weathertightness and panel stability underfoot.
- Flashings: Loose or lifted flashing at the wall attachment or valley points is a repair target, but also a tripping hazard on the roof.
- Framing visibility: Can you confirm purlin locations from underneath before going up? If not, use a stud finder from the eave edge or count fastener rows across the panel.
- Debris: Leaves, dirt, or organic material on the panel surface add slip risk and can conceal damaged areas. Clear debris from the ground level using a soft-bristle brush on a pole.
- Nearby hazards: Power lines, tree branches, and overhead obstructions within the fall zone. Know where you'd land if you slipped.
- Weather: Is the surface dry? Is wind calm (under 23 mph)? If not, postpone.
PPE and fall protection: what to use and where to put it
A harness and anchor point are not optional for roof work at height, even on a low patio roof. A fall from 8 feet onto concrete causes serious injury. OSHA's fall-arrest anchor requirement is 5,000 lbs minimum capacity per attached person (29 CFR 1926.502(d)(15)), and that standard exists because softer anchor points can fail before they arrest your fall. Here's what you need and how to set it up.
Footwear
Wear rubber-soled boots with a slip-resistant rating. Look for ASTM F2413-compliant footwear with an SR or SRO marking, which indicates tested slip resistance on wet and oily surfaces. Hard-soled work boots with smooth leather soles are not appropriate for aluminum panels. Soft rubber soles grip the panel surface better and also help you feel the framing members beneath the panel, which becomes useful when you're stepping deliberately.
Harness and lanyard
Use a full-body harness with a shock-absorbing lanyard or a self-retracting lifeline (SRL). A shock-absorbing lanyard reduces the peak force on your body and the anchor during a fall. Set the lanyard length so that if you did slip, you'd be arrested before reaching the roof edge. On a short patio roof (say 10 to 12 feet from ridge to eave), a 6-foot lanyard may allow you to go over the edge before it engages. In that case, use a shorter lanyard or an SRL, which pays out only the length you need.
Anchor points
For standing-seam aluminum roofs, use a non-penetrating seam clamp anchor (products like the SSRA1 system or S-5! seam clamps are built for this). These attach to the standing seam without drilling through the panel, preserving your waterproofing. They are certified to the 5,000-lb requirement when installed per manufacturer instructions. For corrugated or exposed-fastener panels, you'll need to use a structural anchor screwed into a rafter or purlin below, not just into the panel. Use a rafter anchor designed for metal roofing and fastened with appropriate structural screws into the framing. The anchor must be independent of any platform or scaffold you're also using.
- Helmet or hard hat: protects against edge strikes and falling tools from above
- Safety glasses: metal shavings from drilling or cutting are a serious eye hazard
- Work gloves: aluminum panel edges are sharp, especially cut edges
- Knee pads: if you need to kneel on the roof surface for flashing or fastener work
How to actually walk on the roof: step by step
Once you've confirmed the structure is sound, your anchor is set, and your harness is on and connected, here's the correct technique for moving on an aluminum patio roof. The core principle is this: your weight needs to travel through your foot, through the panel, and directly into a framing member. Every step should land over a purlin or rafter.
- Climb the ladder and establish your first step onto the roof while still maintaining three-point contact with the ladder. Step your first foot onto the roof directly over a purlin, not onto open panel span.
- Bring your second foot up and onto the same purlin line or the next one. Keep your weight centered and low. Do not stand up fully if the pitch is more than 2:12. Keep your center of gravity over your feet at all times.
- Before each step, identify your target purlin visually. On corrugated panels you can usually see the fastener line as a visual guide for where purlins are. On standing-seam panels the seams themselves mark the panel edges but not the purlin lines, so you need to know the purlin spacing from your prep work.
- Step flat-footed, not heel-first. Flat-footed contact spreads your weight over more surface area and keeps you from concentrating force on the panel edge where panel deformation is most likely.
- Never shuffle or drag your feet. Lift and place each foot deliberately.
- Keep your body weight slightly forward (toward the ridge on the way up, toward the eave on the way down). Leaning forward keeps your center of gravity over the roof surface rather than behind you, which reduces the chance of backward slipping.
- Maintain three-point contact with the roof surface and your walkboard or any other handhold whenever possible. If you're moving along the roof horizontally (parallel to the ridge), move one foot at a time, not both simultaneously.
- When working in one spot (tightening fasteners, installing flashing), kneel with your knees over a purlin or on a walkboard. Never kneel on open panel span.
- To descend, reverse the process. Face the roof surface, back down toward the ladder, and step back onto the ladder rungs one at a time while keeping three points of contact.
Using walkboards and roof jacks
If you need to cover more than a few feet of roof, set up roof jacks with walkboards before you start. Roof jacks hook over a purlin or fasten into a rafter, and you lay 2x10 or 2x12 planks across them to create a walking platform. The planks spread your weight across multiple panel spans instead of concentrating it on a single point. Position jacks so the plank is supported at no more than 8-foot intervals, and make sure each jack is anchored to structure, not just to the panel surface. Per OSHA scaffold capacity rules, your platform must support its own weight plus at least four times the maximum intended load, so don't improvise with lightweight boards or unrated equipment.
Working on wet, icy, or steep roofs
Don't. That's the honest answer for ice. If the surface has any ice or frost on it, postpone the work. Aluminum becomes nearly frictionless when iced over, and no rubber-soled boot will give you reliable grip. For wet conditions, the risk is significantly elevated even with good footwear, and most experienced contractors stop roof work in rain. Manufacturer erection and safety manuals note that freshly shipped metal panels can have protective shipping oil that makes walking surfaces slick and explicitly warn to wipe panels clean and to never step on translucent skylight panels Panels may be slick; never step on skylights.. If you absolutely must inspect a wet roof, consider using a drone or ladder-edge inspection with binoculars for a visual check before committing to putting boots on the surface. For roofs steeper than 4:12, scaffolding or a lift is a much better choice than attempting to walk the surface directly.
Moving tools and materials on the roof without causing damage
One of the most common ways people damage aluminum patio roof panels isn't from stepping wrong, it's from dragging tools, dropping materials, or carrying loads that concentrate too much weight in one spot. Here's how to handle this correctly.
Tool management
Use a tool belt or vest to keep everything on your body rather than setting tools on the panel surface. A drill or hammer set down on a sloped aluminum panel will slide and potentially fall, either off the roof (a hazard for anyone below) or into a seam (causing damage). Tether any tool you're actively using with a tool lanyard attached to your wrist or harness D-ring. This is especially important for power tools and anything heavy. A dropped impact driver from roof height can injure someone on the ground and will almost certainly dent the panel it lands on.
Staging materials
Never carry a full bundle of panels, a roll of flashing, or a heavy material load onto the roof by yourself. Staged loads on aluminum roofs should go directly onto roof jacks and walkboards, not on the panel surface. If you need to get panels up for installation, stage them at the eave on jacks first, then slide them into position one at a time. For step-by-step guidance on installing shingles on a patio roof, see our guide on how to install shingles on a patio roof. Two-person handling is strongly recommended for anything over about 8 feet long, because a long panel acts as a lever and concentrates load at the lift point in a way that can exceed local panel capacity even if the total weight is within limits.
Two-person tips
- One person on the roof, one on the ladder or ground: the ground person hands materials up rather than both workers loading onto the roof at once.
- Communicate before every move. 'I'm lifting, ready?' avoids the sudden weight shift that causes slips.
- Use a rope and pulley or a material hoist for anything over about 30 lbs. Pulling a heavy item while standing on a sloped aluminum surface puts you in a compromised balance position.
- Distribute fastener boxes, caulk tubes, and other small materials across your tool belt or a bucket hoist rather than carrying them all in one load.
- Never stack materials on the roof and walk away. A stack of panels sitting on an unsupported span adds sustained load that can cause creep deformation in the aluminum over time.
When to use scaffolding or a lift instead
Sometimes walking on the roof directly is simply the wrong approach, and recognizing that before you're up there is important. If your patio roof is more than about 10 to 12 feet off the ground at the eave, if it has a pitch steeper than 4:12, or if you're doing significant material handling (installing a full set of new panels or replacing large flashing sections), scaffolding or a scissor lift gives you a stable working platform at the edge without requiring you to put body weight on the roof surface at all. If you need step-by-step guidance for installing roll roofing on a patio, see a how-to on how to install roll roofing on a patio for proper techniques and staging tips. For step-by-step instructions on how to install metal patio roof, see our detailed installation guide. Scaffolding must be assembled and loaded per OSHA 29 CFR 1926.451, which requires each component to support its own weight plus at least four times the intended load. Renting scaffolding for a weekend project typically costs $150 to $400 depending on height and your area, and it eliminates most of the panel-walking risk entirely for edge and eave work.
When to call a pro
Most inspection, fastener, and flashing work on a patio-scale aluminum roof is realistic for a careful DIYer who preps properly. But there are clear situations where hiring a professional roofer or structural inspector is the smarter call. If you get on the roof and discover that purlins are spaced significantly wider than your panel's rated span, that multiple fasteners have pulled through, that the framing has visible rot or damage, or that the entire structure flexes when you stand on a rafter, get down and get a professional assessment. Those are structural issues that go beyond what a maintenance visit should address. Similarly, if you're not comfortable with harness setup, aren't sure your anchor points meet the 5,000-lb requirement, or have any doubt about the roof's capacity, the cost of hiring a roofing contractor for a half-day job is far less than a fall injury or a damaged roof that needs full replacement.
FAQ
When is it acceptable for a DIY homeowner to walk on an aluminum (metal) patio roof?
You may walk on a metal patio roof only after confirming the roof and panels are designed or secured to support a person: verify panel manufacturer load/span tables for the profile and span, confirm purlin/rafter spacing and condition, ensure panels are fully fastened to structural supports, and avoid walking in wet/icy/snowy/windy conditions. If any of these cannot be positively confirmed, use temporary access (walkboards, scaffold, lift) or hire a pro.
What are the clear safety rules I must follow before and while on the roof?
Key safety rules: confirm structural support and panel fastening; never walk on unsecured single panels or on skylight/translucent panels; step only over purlins/rafters or onto secured walkboards; use fall protection (anchored personal fall-arrest rated 5,000 lb per OSHA or accepted alternative) or guardrails when exposure to a fall exists; wear slip-resistant footwear and PPE; avoid roof work in rain, ice, heavy snow, or high winds; keep tools tethered and maintain three‑point contact when climbing ladders.
What personal protective equipment (PPE) and fall‑protection gear should I use?
Wear slip-resistant boots (ASTM F2413 recommended), gloves, eye protection and a hard hat if others are working below. For fall protection use certified anchors and a personal fall‑arrest system (full‑body harness + shock‑absorbing lanyard or self‑retracting lifeline) rated per OSHA (anchors supporting 5,000 lb per attached employee or designed/installed per manufacturer instructions). Use roof anchors designed for the roof type (standing‑seam clamps or tested temporary anchors) and inspect all gear before use.
How do I inspect the roof and supporting framing before stepping onto panels?
Pre-walk inspection checklist: 1) Identify panel type, gauge and manufacturer; 2) Check panel fastening and whether panels are fully secured to purlins/rafters; 3) Locate purlins/rafters and confirm spacing/condition (rot, deflection); 4) Look for loose/failed fasteners, corrosion, oil or slick residues; 5) Check flashings, seams and penetrations; 6) Verify weather conditions and surface traction; 7) Confirm available anchor points for fall protection. If you find missing supports, excessive deflection, or unknown panel ratings, do not walk on the roof.
What is a safe, step‑by‑step method to walk on an aluminum patio roof for inspection or minor repair?
Step‑by‑step method: 1) Plan: review load/span tables, pick a low-risk day, assemble PPE and anchors; 2) Access: set ladder per OSHA (3 ft above roof edge, secure, maintain three‑point contact); 3) Anchor: install certified temporary anchors or attach to pre‑rated anchors and connect harness before putting weight on the roof; 4) Position: locate and mark purlins/rafters from eaves before stepping out; 5) Walk technique: step only directly over purlins/rafters or on secured walkboards, keep weight centered over support, take short deliberate steps, avoid stepping in panel ribs/valleys; 6) Tools/materials: carry only what you need, tether tools, move materials using a hoist or roof jacks/walkboards; 7) Finish: remove temporary anchors/walkboards, inspect fasteners you worked on, and tidy debris.
Where exactly should I step on different panel types (corrugated, solid, standing‑seam, framed panels)?
General rule: step where the panel is supported (over a purlin/rafter) or on a secured walkboard. Avoid stepping in unsupported flats between supports and avoid stepping in high‑stressed ribs or thin valley areas. For standing‑seam roofs, step on the seam only if manufacturer allows and only when seams and clips are secured—but preferred is to step over framing or use walkboards supported by roof jacks or anchors.