
Roll roofing is one of the most practical, budget-friendly choices for covering a patio roof, especially on low-slope surfaces where asphalt shingles simply are not code-compliant. A standard patio lean-to or flat-topped freestanding pergola often sits at a 1:12 to 3:12 pitch, and at those angles roll roofing (mineral-surfaced asphalt or modified bitumen) is exactly what the material was designed for. You can complete a basic installation on a typical 12x16-foot patio cover in a weekend, with materials running roughly $100 to $400 depending on product type and local pricing.
How to Install Roll Roofing on a Patio: Complete DIY Guide

Celia Vaughn
12 Jul 2026
What roll roofing actually is (and why patios are a good fit)
Roll roofing is a factory-made asphalt product that comes in 36-inch-wide rolls, typically 33 to 36 feet long, covering about 100 square feet per roll (one roofing 'square'). The most common type you will find at any home center is mineral-surfaced roll roofing (ASTM D3909), which has a granule coating on one side for UV protection and a smooth selvage strip along one edge where laps are made. A step up from that is modified bitumen, which comes in SBS (rubber-modified, ASTM D6162/D6163) and APP (plastic-modified, ASTM D6222/D6223) varieties. Modified bitumen is thicker, more flexible, and more durable, but it costs more and some types require a torch for installation.
Where roll roofing really shines is on low-slope surfaces. The 2022 International Residential Code (IRC Chapter 9) explicitly prohibits standard asphalt shingles below a 2:12 pitch, directing builders toward mineral-surfaced roll roofing or other low-slope assemblies instead. Most patio covers fall right in that zone: lean-tos are often built at 1:12 to 2:12, freestanding structures at 1:12 to 4:12, and even gable roofs over a patio are sometimes pitched lower than a house roof to keep headroom. Roll roofing handles all of those comfortably.
Is roll roofing the right call for your patio?
Before you buy a roll, it is worth a quick reality check. Roll roofing works best on wood-framed decks with solid sheathing. It does not attach well directly to open rafter bays or spaced purlin framing without adding a solid deck first. Here is how it lines up by patio style:
| Patio Style | Typical Pitch | Roll Roofing Suitability | Key Consideration |
|---|---|---|---|
| Lean-to (attached) | 1:12–3:12 | Excellent | Flashing the wall-to-roof transition is critical; plan for step flashing or counterflashing |
| Gable (attached or freestanding) | 3:12–6:12 | Good | Works well at lower gable pitches; ridge cap requires careful overlapping or a separate cap sheet |
| Flat/Low-slope freestanding | 1:12–2:12 | Excellent | Drainage direction matters; a cricket or scupper may be needed to prevent ponding |
| High-pitch gable (>6:12) | 6:12+ | Marginal | Roll material can slide or wrinkle at steeper slopes; shingles or metal are better choices |
The main tradeoff with roll roofing is longevity. A quality mineral-surfaced roll roof will last 10 to 15 years with proper installation and basic maintenance. Modified bitumen systems can push 20 years. Compare that to a metal panel or aluminum patio cover system, which can last 30 to 50 years with almost no maintenance. If you are building a permanent covered patio you plan to keep for decades, the longer lifecycle of metal may justify the higher upfront cost. If you want a cost-effective solution now with the expectation of eventually upgrading, roll roofing is a reasonable starting point.
Roll roofing vs the alternatives: an honest comparison
Most homeowners comparing roofing options for a patio are weighing roll roofing against aluminum panels, corrugated metal, and asphalt shingles. Here is how they stack up in practice. For another relevant comparison, see how to install flashing on patio roof. If you are leaning toward metal options, see our guide on how to install metal patio roof for step-by-step instructions on metal panels and corrugated systems.
| Material | Approx. Cost per 100 sq ft | Lifespan | Min. Slope | DIY Friendliness | Best For |
|---|---|---|---|---|---|
| Mineral-surfaced roll roofing | $30–$80 | 10–15 years | 1:12 | High | Budget builds, low slopes, temporary or starter covers |
| Modified bitumen (SBS/APP) | $80–$180 | 15–25 years | 1:12 | Medium (self-adhered) to Low (torch) | Long-term low-slope patio roofs where budget allows |
| Aluminum panels | $150–$400 | 30–50 years | 1:12 | Medium | Permanent attached or freestanding patio covers, low maintenance |
| Corrugated/standing seam metal | $200–$500 | 40+ years | 1:12 (some profiles) | Medium | Durable, modern look; heavier framing may be needed |
| Asphalt shingles | $100–$250 | 20–30 years | 2:12 min (IRC) | Medium-High | Gable or hip patio roofs at 3:12 or steeper only |
My honest recommendation: if your patio roof is below 2:12 pitch, roll roofing or modified bitumen is your practical DIY option. If it is at 3:12 or steeper and you want something that will look good for a long time, asphalt shingles or metal panels are worth the extra investment. Aluminum panel systems are covered in depth in our guides on building and installing aluminum patio roofs, and metal panel installation has its own walkthrough as well, so use this article to decide which path fits your project.
Permits, codes and inspections: check this before you buy anything
This is the part a lot of DIYers want to skip, and I get it. But patio covers are structural additions, and most jurisdictions require a permit for any permanent covered structure attached to a house. Getting caught without one can mean forced removal or complications when you sell. Here is what to verify before you start:
- Contact your local building department and ask whether a permit is required for a patio cover or roof addition of your planned size and attachment type
- Confirm the minimum slope requirement for your chosen roofing material (IRC 2022/2024 requires low-slope assemblies for pitches below 2:12)
- Check HOA rules if applicable — some associations restrict roofing material color, finish, or material type
- Verify fire rating requirements: in fire-prone zones or near property lines, Class A or B fire-rated assemblies may be required (many modified bitumen systems carry a Class A rating when installed over a rated deck)
- For torch-applied (torch-down) modified bitumen, check whether your jurisdiction requires a hot-work permit under NFPA 51B — many do, and this is one of the strongest arguments for choosing a self-adhered or cold-applied product as a DIYer
- If your patio roof attaches to your house, confirm whether the wall connection requires a ledger permit and inspection, and whether flashing details are specified
- Ask about inspection stages: most jurisdictions want to inspect the framing before sheathing goes on, and the roofing before any interior finish work is closed up
- Confirm load requirements: patio covers typically need to meet local ground snow load, wind speed, and seismic requirements, which affect rafter size and spacing
If your project requires structural permits, the permit drawings need to show rafter sizes, span tables, post sizes, and beam calculations. This is one area where having a structural engineer or experienced designer review the plans for a modest fee (typically $150 to $400) is money well spent. Roof installation itself is very DIY-able once the structure is permitted and approved.
Your complete materials, tools and fasteners list
This list covers a typical 200-square-foot patio roof (two roofing squares). Scale quantities up or down proportionally for your actual footprint. I have broken it into materials and tools separately so you can take it to the store as a checklist.
Materials
| Item | Quantity (200 sq ft) | Notes |
|---|---|---|
| Mineral-surfaced roll roofing (or modified bitumen cap sheet) | 2–3 rolls | Buy 3 to allow for waste and laps; ASTM D3909 or D6163 for modified bitumen |
| 15 lb or 30 lb asphalt felt underlayment (or self-adhered ice/water barrier) | 1–2 rolls | Use self-adhered (ASTM D1970) at eaves in cold climates or for best waterproofing |
| APA-rated plywood (3/8" min) or OSB (7/16" min) sheathing | As needed for deck | Required only if adding or replacing the roof deck; panel edge gap 1/8"–1/4" |
| Asphalt roof cement (ASTM D4586 Type I for dry, Type II for damp) | 1–2 gallons | Use for lap sealing, flashings, and edge sealing |
| Metal drip edge (aluminum or galvanized) | Linear footage of all eaves + rakes | Standard 1.5" or 2" face; pre-paint if exposed |
| Step flashing (aluminum or galvanized, min 4"x4") | As needed | Only for wall-to-roof transitions; individual pieces per shingle/course |
| Roofing nails (corrosion-resistant: hot-dipped galvanized, aluminum, or stainless) | 1–2 lbs | 11–12 gauge, length to penetrate 3/4" into solid wood or through deck |
| Lap cement or cold-process adhesive | 1 quart–1 gallon | For sealing laps on standard roll roofing if not using torch or self-adhered product |
| Roof flashing tape or butyl tape | 1 roll | Useful for sealing penetrations and transitions |
| Gutter hangers and gutter (optional) | Per eave length | Aluminum K-style gutter is common; see drip edge termination detail |
Tools
- Tape measure (25 ft minimum) and chalk line
- Utility knife with hooked roofing blades (keeps cuts clean on granule-surfaced material)
- Roofing hammer or pneumatic roofing nailer (set pressure so nails drive flush, not overdriven)
- Tin snips for cutting drip edge and flashing
- Stiff-bristle brush or broom for sweeping the deck before installation
- Caulk gun for applying roof cement and lap sealants
- 80 lb or heavier roller (available at equipment rental) for pressing self-adhered sheets and lap areas
- Straight edge or rafter square for cutting roll material
- Extension ladder rated for your weight plus tool weight (Type I or IA, 250 or 300 lb rated)
- Safety harness and anchor point if slope exceeds 4: 12 or roof height requires fall protection
- Knee pads and rubber-soled work boots
- Safety glasses and work gloves
Cost snapshot
For a 200-square-foot patio roof using standard mineral-surfaced roll roofing with felt underlayment, budget roughly $150 to $280 for materials. Upgrading to a self-adhered SBS modified bitumen system brings that to $250 to $450. Tools, assuming you already own a ladder and basic hand tools, add another $40 to $80 for roofing-specific items. Renting an 80-lb roller for a day typically costs $20 to $40.
Pre-installation: prep work that makes or breaks the job
Good installation starts well before the first roll is opened. Rushing this stage is where most DIY roofing problems originate. Take the time to do it right and the actual installation will go smoothly.
Measuring and confirming slope
Measure the roof area carefully: width times length, then add 10 percent for waste and overlaps on a simple shed or lean-to. For a gable, measure each slope separately. To check your slope, set a level on the roof surface (or on a rafter from below), measure exactly 12 inches horizontally, then measure the vertical rise at that point. A 2-inch rise over 12 inches of run is a 2:12 pitch. Confirm this meets the minimum for your chosen product. Standard mineral-surfaced roll roofing is typically specified for slopes down to 1:12 by most manufacturers, but check your specific product data sheet.
Overlay vs tear-off
If you are re-roofing an existing patio cover, you have to decide whether to overlay (install over existing material) or tear off. Most codes allow one overlay, but check locally. Overlaying saves time and disposal cost, but only works if the existing surface is flat, firmly attached, and free of bubbles, rot, or wet spots. Any soft or spongy areas when you walk on the deck mean the sheathing has absorbed water and must be replaced before new roofing goes on. When in doubt, tear off and inspect. It is a few extra hours of work versus a roofing failure two years from now.
Deck and framing inspection
Per Owens Corning's technical requirements, the minimum acceptable deck for asphalt roofing products is 3/8-inch APA-rated plywood or 7/16-inch APA-rated OSB, with panel edge gaps between 1/8 inch and 1/4 inch. If you are using spaced deck boards (not common but seen on older patio covers), they must be at least 3/4 inch thick, 6-inch nominal width, with gaps no wider than 1/4 inch. Walk the entire deck and probe any discolored or soft areas with a screwdriver. Replace any deteriorated panels before going further. Also check that all rafters and framing members are solid, that ledger bolts (if attached to a house) are tight and properly flashed, and that the framing is square.
Installing drip edge
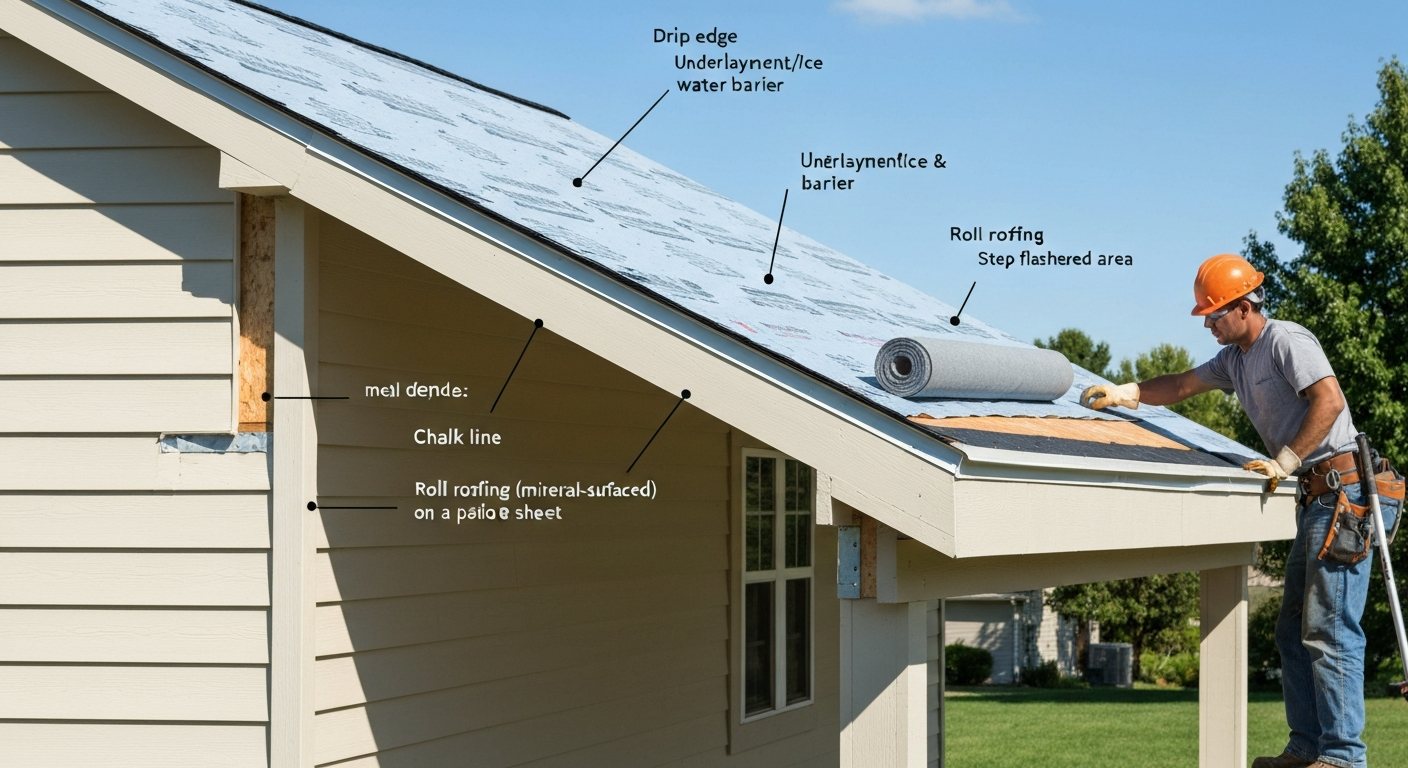
Drip edge goes on before underlayment at the eaves and after underlayment at the rakes (sides). Owens Corning TruDefinition/DURATION series installation instructions specify drip‑edge and starter sequencing (starter overhang typically 1/4"–3/4", or 1/2" when noted) and call for sealing underlayment‑over‑drip‑edge eave details with asphalt cement per the product bulletin. Nail it every 10 to 12 inches with roofing nails. Overlap joints by at least 2 inches. At corners, cut and fold the material cleanly rather than trying to bend it. The drip edge directs water off the deck edge and into the gutter or away from the fascia, which is especially important on low-slope roofs where water moves slowly.
Installing underlayment
Roll out 15 lb or 30 lb felt underlayment starting at the lowest edge (eave) of the roof, parallel to the eave. Lap each successive course uphill, with a minimum 2-inch side lap and 6-inch end lap. In cold climates or on very low slopes, replace the felt at the eave with a self-adhered ice and water barrier (meeting ASTM D1970) for the first 3 feet or up to the inside of the wall line, whichever is greater. Nail or staple the underlayment to hold it in place, especially on windy days. For self-adhered products, follow the manufacturer's roller instructions, using an 80-lb roller to press the sheet firmly after placement, as called out in products like the GAF Liberty SBS system.
Step-by-step roll roofing installation
These steps cover standard mineral-surfaced roll roofing with exposed or concealed nailing. Modified bitumen steps are called out separately where the process differs. Read through all the steps before you start so nothing surprises you mid-installation.
- Unroll and condition the material: Roll roofing is stiff, especially in cool weather. On cold mornings (below 50°F), store the rolls in a warm space overnight or lay them flat in the sun for 30 minutes before cutting. Never try to unroll cold material forcefully — it will crack.
- Snap a chalk line at the eave: Measure up from the drip edge the width of your first course minus the intended overhang (typically 1/4 to 3/8 inch over the drip edge). Snap a chalk line parallel to the eave across the full width of the roof. This gives you a straight reference line for aligning the first course.
- Cut the first course to length: Using your utility knife and a straight edge, cut the roll to the measured width of the roof plus 1/2 inch on each rake edge. Score firmly and snap the material, or run the blade through in one pass. Hooked roofing blades cut granule-surfaced material much more cleanly than standard utility blades.
- Position and align the first course: Lay the cut piece along your chalk line with the granule side up and the selvage (smooth strip) edge toward the ridge. Align the bottom edge with your chalk line and make sure both ends are flush with or slightly overlapping the rake edges.
- Fasten the top edge: Drive roofing nails along the top edge of the first course, 1 inch down from the top edge, spaced 6 inches apart across the full width. Use corrosion-resistant nails long enough to penetrate at least 3/4 inch into solid wood. Drive nails straight and flush — overdriven nails punch through the material and create leak points.
- Seal or nail the bottom edge: Depending on the manufacturer's method, either nail the lower edge 1 inch up from the bottom at 6-inch spacing, or apply a 2-inch-wide bead of roof cement (ASTM D4586) under the lower edge and press it down. On very low-slope roofs, sealing the bottom edge is strongly recommended.
- Start the second course with the correct overlap: The second course overlaps the first by a minimum of 2 inches (for some products) up to 3 inches for the selvage lap. Snap another chalk line to keep it straight. Align the bottom edge of the second course so the lap covers the nails from the first course top edge.
- Apply lap cement at overlaps: Lift the lower edge of the new course and apply a continuous bead of roof cement (or use the manufacturer's cold-process adhesive) to the top surface of the previously nailed course in the overlap zone. Press the new course down firmly and hand-roll the lap with your roller.
- Nail through the overlap and new course: Drive nails 1 inch down from the top edge of the new course at 6-inch spacing, and add a second row of nails 6 inches below the first row through the lap zone. This is the exposed nail method. Some manufacturers specify concealed nailing (nails hidden under the next lap) — follow your specific product data sheet.
- Continue courses to the ridge: Work up the slope, maintaining consistent overlap, straight lines, and full sealing of each lap. At the ridge on a gable roof, run both sides past the ridge by 6 inches and lap one side over the other, cementing fully. Or use a separate cap sheet cut from roll material (18 inches wide, folded lengthwise) centered over the ridge and nailed and cemented on both edges.
- Seal all edges and rake terminations: At the rake edges, nail and cement the material to the drip edge. Apply a bead of roof cement along all exposed cut edges. End laps (where one piece of roll roofing ends and another begins in the same course) require a minimum 6-inch overlap, with cement applied to the full lap area and two rows of nails through the lap.
Fastening patterns, adhesives and torch-down methods
Nailing schedules for wood framing
For wood-decked patio roofs, the standard nailing schedule for mineral-surfaced roll roofing is: one row of nails 1 inch from the top edge at 6-inch on-center spacing, and (where exposed nailing is used) a second row through the lap at 6-inch spacing. At end laps, two full rows of nails 6 inches apart through the 6-inch overlap zone are recommended. Nail gauge should be 11 to 12 gauge, hot-dipped galvanized or aluminum, with length sufficient to penetrate at least 3/4 inch into solid wood or pass completely through the deck. Always drive nails straight and flush, a crooked nail or an overdriven nail head creates a puncture point.
Cold adhesive (roof cement) application
Cold-process adhesive or asphalt roof cement (ASTM D4586) is your friend on a DIY project. Type I cement is for dry surfaces (most common for planned installations). Type II is formulated for damp or wet conditions. Apply cement with a putty knife or trowel in a continuous layer, no gaps, no voids. For lap areas, you want full coverage across the entire lap width, not just a bead at the edge. Press the lap firmly and roll it with your 80-lb roller to remove air pockets. This is the single most common DIY mistake I see: people apply cement only at the edge of a lap and then wonder why water tracks under it a year later.
Self-adhered modified bitumen systems
Self-adhered SBS modified bitumen (like GAF Liberty or similar products) comes with a peel-and-stick backing. Some decks require an asphalt primer applied and allowed to dry before the sheet is adhered. The sheet is then positioned, the release film is peeled back progressively as you press the sheet down, and the entire surface is rolled with an 80 to 150 lb roller per GAF's installation guidance. Side laps are typically 3 inches and end laps 6 inches, with the lap film pulled back and the lap pressed and rolled. Self-adhered systems are the best DIY choice for modified bitumen because they eliminate open-flame risk entirely.
Torch-applied modified bitumen: what you need to know
Torch-down (torch-applied APP or SBS) modified bitumen is installed by heating the back of the sheet with a propane torch as it is unrolled, melting the bitumen compound so it bonds to the substrate. The result is a very durable, fully bonded membrane. However, this method carries serious fire risk on combustible wood decks and requires significant skill to do without damaging the material or starting a fire. NFPA 51B (Standard for Fire Prevention During Welding, Cutting, and Other Hot Work) covers torch-applied roofing specifically, and many jurisdictions require a formal hot-work permit and a documented fire-watch period (typically 30 to 60 minutes after work ends) for any torch application. OSHA's welding and cutting rules (29 CFR 1910.252 and related 1926 subparts) also apply to open-flame work. CertainTeed's Flintlastic GTA product, for example, requires that side laps be a minimum 3.25 inches and end laps a minimum 6 inches, with offset of at least 3 feet between adjacent end laps, and that a visible 3/8-inch bead of melted compound bleed out from the lap edge confirming full bond. My honest advice: unless you are an experienced roofer who has done torch work before, choose a self-adhered or cold-applied product for a patio DIY project. The fire risk on a structure attached to or near your house is not worth it.
Attaching to metal framing
Some patio covers use aluminum or steel framing with a plywood or OSB deck on top. In that case, the roll roofing attaches to the wood deck as described above. If your structure has metal purlins with no solid deck (common in corrugated metal panel systems), you cannot install roll roofing directly to the purlins without first adding a solid wood deck. For metal-framed patios, screwing 1/2-inch plywood or OSB panels to the purlins first creates the necessary substrate. Use self-tapping screws at 12 inches on center to fasten the panels to metal purlins, then install roll roofing over the wood deck using the standard nailing and cement methods.
Flashing, transitions and leak prevention
Leaks on patio roofs almost never come through the field of the roofing material itself. They come from the transitions: where the roof meets a wall, where it meets a post, where two planes meet, or where water is directed off the edge. Getting these details right is the difference between a dry patio and a frustrating drip every time it rains.
Wall-to-roof transitions (lean-to and attached patio roofs)
Where a lean-to roof meets an existing house wall, you need step flashing (for sloped roofs) or continuous base flashing with counter-flashing (for very low-slope or flat sections). Step flashing consists of individual L-shaped pieces of aluminum or galvanized steel, each at least 4 inches tall and 4 inches wide, woven between each course of roofing material. Per CertainTeed's installation guidance, counter-flashing must not be nailed into the step flashing itself, the two pieces need to move independently as the structure expands and contracts seasonally. The counter-flashing (the upper piece that tucks into the wall or a saw-cut reglet) covers the top edge of the step flashing. Install roofing cement behind the step flashing at the wall and at the top edge of each piece. This is one area where investing in properly cut and fitted flashing is worth every minute. A detailed walkthrough of patio roof flashing is also covered in our guide on how to install flashing on a patio roof. For a full step-by-step walkthrough on how to install patio roof, see our detailed guide in our project library.
Post and beam penetrations
If any structural posts pass through the roof deck (uncommon but seen in some freestanding designs), they need to be flashed with either a custom-fabricated metal collar or a high-quality pitch pocket filled with roof cement. Pitch pockets require regular maintenance, so a metal collar sealed with a flexible sealant at the post-to-flashing joint is a better long-term solution. On a patio cover where posts typically support the perimeter and the deck is clear of penetrations, this is usually not an issue.
Drip edge, gutters and scuppers
Drip edge should be installed at all eave and rake edges. On low-slope patio roofs, water moves slowly, so a clean drip edge termination that directs water into a gutter (or at least away from the foundation) is important. Gutters are not always required but are strongly recommended for any attached patio cover where water could saturate the ground next to the foundation or drip onto a concrete patio surface. For flat or nearly flat freestanding structures, a scupper (an opening through the low side parapet or fascia board leading to a downspout) is often the cleanest drainage solution. Size scuppers to handle your local peak rainfall rate, a 3x4-inch scupper opening handles most residential patio drainage needs.
Sealing seams and terminations
Every cut edge, every lap, and every termination at a wall or fascia should be sealed with a continuous bead of ASTM D4586 roof cement. Do not rely on nails alone to seal a lap. Once all rolls are installed, do a final inspection from the eave looking upslope: confirm every lap is pressed flat with no lifted edges, every end lap is fully cemented, and all drip edges are nailed. Apply a final bead of cement at the rake edge terminations where the roofing meets the fascia or drip edge.
Safety and working on the roof
Low-slope patio roofs are easier to work on than steep house roofs, but they still require respect. Roof cement and roll roofing material can be slippery, especially in the morning when dew is present. Here are the non-negotiables: For tips on moving safely on metal surfaces, see our guide on how to walk on aluminum patio roof.
- Wear rubber-soled boots with good grip — not sneakers, not smooth-soled work boots
- Use a properly rated extension ladder (Type I or Type IA, 250 or 300 lb capacity including tools and materials); set the ladder so it extends at least 3 feet above the roof edge
- At slopes above 4: 12 or for any roof over 10 feet from the ground, use a fall-protection harness anchored to a ridge anchor or structural anchor point
- Never walk near the edges without being tied off or working from a properly secured ladder
- On aluminum patio roof panels (if part of your structure), follow specific load-bearing guidance — aluminum panel sections are not designed to support foot traffic, and you can crack or deflect them; always step on structural members
- Keep the work area clear of roll material tubes, tools, and buckets that could roll or trip you
- Do not work on the roof in wet conditions, high winds, or extreme heat (asphalt cement softens significantly above 90°F and fresh roll roofing on a hot black surface can be slicker than it looks)
- Keep a fire extinguisher accessible any time you are using a propane torch; torch work on combustible decks has caused serious house fires
Troubleshooting: what goes wrong and how to fix it
Wrinkling and bubbling
Wrinkling usually means the roll was not conditioned properly before installation (too cold and stiff), or it was laid on an uneven deck surface. Bubbles or blisters form when air is trapped under a self-adhered or cemented layer. Small blisters that are not cracked can often be left alone, they typically do not leak unless they rupture. Larger bubbles should be slit open with a knife, allowed to dry, filled with roof cement, and then covered with a patch of matching roll material at least 6 inches larger than the defect on all sides. Press and nail the patch edges and seal with cement.
Leaks at laps
This is the most common failure. It almost always traces back to an incomplete or thin bead of cement in the lap zone, or a lap that was pressed but not rolled. To repair: lift the edge of the lap carefully (heat from a heat gun makes this easier), clean out any debris, apply fresh roof cement across the full width of the lap zone, press down and roll firmly, then nail 1 inch from the lap edge at 6-inch spacing and seal nail heads with cement.
Leaks at wall transitions or edges
Water tracking down a wall and entering at the roof-to-wall joint usually means the counter-flashing is not sealed at the top or is allowing water behind it. Check that the top edge of the counter-flashing is either tucked into a saw-cut slot and sealed with polyurethane caulk, or sealed tightly against the siding with roofing cement. If step flashing has corroded or been fastened incorrectly (both pieces nailed together rather than independently), it may need to be replaced.
Ponding water
On very low-slope or flat roofs, water that ponds and sits for more than 48 hours after a rain will degrade the roofing material over time. If you are seeing consistent ponding, the roof does not have enough slope (minimum 1/4 inch per foot, or roughly 1:48, is the practical minimum for any flat roof to drain). Adding tapered insulation under the deck or re-pitching a section of framing is the real fix. As a temporary measure, ensure all drains or scuppers are clear of debris.
Routine maintenance
Roll roofing does not need much attention, but a quick annual inspection extends its life significantly. Every spring or fall, walk the surface and look for lifted lap edges, cracked seams, exposed nail heads, or blisters. Re-seal any lifted laps with fresh roof cement. Clear debris (leaves, branches) from the roof surface and gutters, wet debris sitting on a low-slope roof traps moisture and accelerates granule loss. Check all flashings for lifted edges or sealant cracks and re-seal as needed. A 30-minute annual check can add years to a roll roof.
Time and cost estimates for your project
| Project Phase | Estimated Time (200 sq ft patio) | Estimated Cost |
|---|---|---|
| Permitting and plan review | 1–3 weeks elapsed (1–2 hours active) | $0–$150 permit fee depending on jurisdiction |
| Framing/deck inspection and repair | 2–4 hours | $0–$100 (materials only if minor repairs) |
| Drip edge, underlayment, flashing prep | 2–4 hours | $50–$120 |
| Roll roofing installation (field) | 3–5 hours | $80–$200 (materials) |
| Sealing, finishing, gutter install | 1–2 hours | $20–$80 |
| Total (DIY labor + materials) | 8–15 hours over 1–2 days | $200–$550 depending on product choice |
Professional installation of the same scope typically runs $800 to $1,800 total for a 200-square-foot patio roof, depending on region, access, and material choice. The DIY savings are real, assuming you have a solid deck to start with and no major structural repairs needed.
When to call a professional
I am a big believer in DIY for projects like this, but there are situations where calling a licensed contractor or structural engineer is the right call. Here is my honest list:
- The structure needs a structural permit and your local building department wants stamped engineer drawings — pay for a structural review rather than guessing on rafter sizes or post loads
- The framing is rotted, undersized, or shows significant damage — structural repairs to a roof attachment point or a load-bearing beam are not the place to learn on the job
- You want torch-applied modified bitumen and have no prior experience with torch work on a combustible deck — the fire risk is too high for a first-time application near your home
- The roof is above a single story or has a steep pitch that requires a full safety harness system and you are not comfortable with that setup
- Your project involves complex multi-plane flashing details (e.g., a valley where a patio roof intersects a house gable or hip) — flashing errors in complex transitions are among the hardest leaks to diagnose and fix
- Your jurisdiction requires a licensed contractor for work over a certain dollar threshold or for permitted structural additions — check local rules before assuming you can pull your own permit
For everything else, a standard single-slope or gable patio roll roofing project is very manageable for a careful DIYer with a free weekend, the right materials, and a willingness to read the product data sheets. For guidance on installing asphalt shingles on a patio roof, see our guide on how to install shingles on a patio roof. The installation itself is not complicated, the prep work and the details are what separate a roof that lasts from one that leaks.
FAQ
What core technical specifications and standards must the article include for accurate roll‑roofing guidance?
List applicable codes and standards (IRC/IBC chapters on roof assemblies; ASTM specs for roll roofing and modified bitumen such as ASTM D3909, D6162/D6163/D6164, D6222/D6223, and ASTM D1970 for self‑adhered underlayments). Include manufacturer installation requirements (lap widths, fastener spacing, primer/roller instructions) and references to NFPA 51B and OSHA hot‑work rules when torch methods are discussed. State roof‑deck minimums (APA‑rated plywood/OSB thickness, panel spacing) and fastener minimums (corrosion‑resistant nails, penetration requirements). Emphasize that the final method must follow the product data sheet and the authority having jurisdiction (AHJ).
How should the article help readers decide if roll roofing is right for their patio type (lean‑to, gable, free‑standing)?
Provide a quick decision matrix: lean‑to/attached patios with slopes ≥2:12: roll roofing is economical for simple slopes, but confirm flashing at wall transitions; gable roofs with moderate slope: roll roofing ok on secondary structures but consider shingles/metal for aesthetics and longevity; low‑slope patios (<2:12) or near‑flat: use mineral‑surfaced roll roofing or self‑adhered/mod‑bitumen products rated for low slope per ASTM and manufacturer guidance; free‑standing pergolas with open framing: roll roofing only when a solid deck exists and weight/attachment can be supported. Compare durability, expected lifespan (roll roofing 7–15 years vs fiberglass shingles 15–30 vs metal 30–50+), maintenance, and noise/thermal properties. Include visuals-friendly examples for each patio style.
Which materials, fasteners and tools must the article list for a DIY roll‑roofing project?
Provide full lists separated by categories: Materials—mineral‑surfaced roll roofing or modified bitumen rolls (product, width/length), underlayment (self‑adhered ASTM D1970 or felt), drip edge, starter strip, roof cement (ASTM D4586) or lap mastic, flashing (step/counter, headwall, pipe boots), fasteners (corrosion‑resistant roofing nails—galvanized/aluminum/stainless, ring shank where required), seam tape/heat weld supplies if applicable, primer for self‑adhesives, roof edge metal, gutter materials, scuppers. Tools—tape measure, chalk line, utility knife/snips, tin snips, hammer or coil roofing nailer, 80–150 lb roller for self‑adhered sheets, caulking gun, ladder/roof jacks, pry bar, circular saw for deck work, PPE (gloves, eye protection, respirator for solvents, non‑slip boots), fire extinguisher and fire‑watch equipment if torching. Fastener details—nail length to penetrate ~3/4" into solid wood or fully through deck; nail gauge per manufacturer (11–12 ga typical); use recommended corrosion class.
What permit and code checklist should readers follow before starting?
Advise contacting local building department to confirm whether reroofing a patio requires a permit. Checklist items: confirm scope permitted work, whether structural changes need engineered plans, whether torch‑down/hot work allowed (hot‑work permit/fire watch may be required), local wind/uplift fastener requirements, eave/ice‑and‑water barrier requirements in cold climates, disposal rules for old roofing, and AHJ‑specific details (historic districts, HOA rules). Recommend keeping manufacturer data sheets and ASTM references on site for inspector review.
What prep and inspection steps are essential before installing roll roofing?
Provide a stepwise prep list: measure roof area and calculate roll counts and waste; check slope/pitch—determine if product is rated for the slope (shingles require ≥2:12; many roll products fine to lower slopes per ASTM); inspect and repair roof deck (meet APA minimums: 3/8" plywood min, 7/16" OSB, proper spacing), replace rotten sheathing, ensure solid decking for nail holding; remove or decide on overlay vs full tear‑off—manufacturer may permit only single overlay; remove old flashing and install new drip edge and eave details; install underlayment/ice & water at eaves and around penetrations per product instructions; layout and mark chalk lines for courses and overlaps.
What are the step‑by‑step installation procedures for mineral‑surfaced roll roofing?
Give clear course steps: 1) Install drip edge at eaves and rakes per manufacturer sequence; 2) Apply starter strip at eave so roll roofing overhangs drip edge 1/4"–3/4" as specified; 3) Lay first roll at lower left, align, and unroll across deck; 4) Maintain side laps (typically 2–3") and end laps (typically 6")—follow product sheet; 5) Nail pattern: exposed‑nail spacing per product (example 6–12" along lightweight roll edge and 12" in field) with nails covered by overlap; 6) Stagger end laps at least 3 ft between courses; 7) For seams, dress mineral surface into the lap and bed with asphaltic cement where recommended; 8) Finish ridge/peak with appropriate capping or turnups; 9) Install step flashing at walls and headwall flashing; 10) Seal seams and flashings with ASTM‑rated roof cement and manufacturer sealants. Stress following the product installation sheet for exact lap and nailing dimensions.