
Updating an aluminum patio cover usually means one of four things: a fresh coat of paint and new trim, replacing cracked or damaged panels, reinforcing the framing to handle better wind or snow loads, or adding something new like a ceiling fan, gutters, or shade screens. Most of these are real DIY projects if you spend a couple of hours inspecting the structure first, pick the right fasteners, and take the permit question seriously before you touch a single bolt.
How to Update an Aluminum Patio Cover: DIY Guide & Checklist

Celia Vaughn
16 Jul 2026
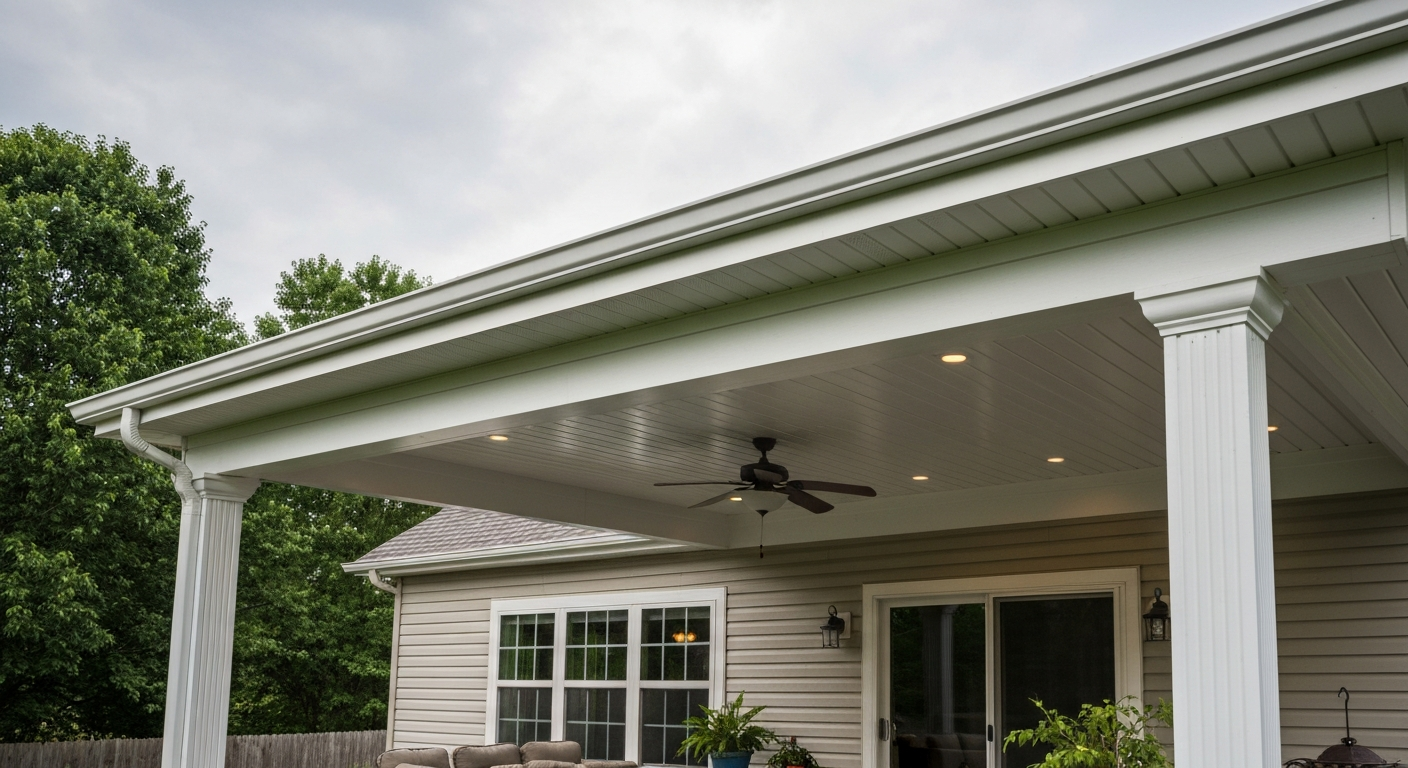
Repair, upgrade, or replace: making the call before you start
Before buying a single tube of sealant, figure out which category your project actually falls into. A cover that is fundamentally sound just needs cosmetic or functional updates. One with structural problems needs repair or reinforcement first, and one that is past repair is a rebuild or full-replacement job. Getting this wrong costs real money.
| What you find on inspection | Right call | Approximate DIY cost range |
|---|---|---|
| Faded finish, chalking paint, minor surface oxidation | Cosmetic refresh: clean, prime, repaint | $80–$250 in materials |
| One or two cracked/bent panels, intact framing | Panel replacement only | $100–$400 depending on panel type |
| Loose fasteners, minor flashing gaps, weeping seams | Fasten, reseal, re-flash | $50–$150 |
| Sagging beams, permanent deflection >L/240 of span | Structural reinforcement or hire a pro | $300–$1,000+ depending on scope |
| Widespread corrosion on posts, cracked footings, >30% of panels damaged | Full replacement or rebuild | Compare to new install cost |
| Electrical outlet or fan needed | Electrical upgrade, likely needs permit | $200–$600 including box, fan, wiring |
The rough rule: if the framing is straight, posts are plumb, and footings are solid, almost any update is a DIY candidate. Once beams are permanently bent or posts have rotted connections at the base, you are into structural territory that deserves a licensed contractor or at minimum a structural engineer's eye before you proceed.
Inspection and assessment checklist
Do a thorough inspection twice a year (spring and fall) and after any significant storm. Budget about 30 to 45 minutes. Bring a flashlight, a flat-blade screwdriver, a tape measure, a wrench, and a notepad. Work systematically from the house connection outward to the posts and footings.
Connections to the house (ledger and flashing)
- Look for gaps between the ledger board and the house wall — even a 1/8-inch gap lets water wick behind the flashing.
- Check flashing continuity: it should run in a single piece (or properly lapped sections) with no lifted edges.
- Inspect caulk or sealant at the ledger joint — look for cracking, shrinkage, or separation.
- Check every lag bolt or through-bolt at the ledger for backed-out heads or stripped threads.
Framing: beams, purlins, and posts
- Sight down each beam from one end — a permanently bent or sagging beam has visible bow. Measure any sag with a tape measure: more than 1/240th of the span (about 1/2 inch in a 10-foot span) is a flag.
- Probe wood-to-aluminum connection points for soft wood — a screwdriver tip that sinks easily means rot is present.
- Try to physically move each post by pushing it from multiple angles — any movement at the base warrants a footing inspection.
- Look for white powdery or pitted surfaces on aluminum members, which signals active corrosion.
Fasteners and panels
- Check representative fasteners across the cover — put a wrench on them. A fastener that spins freely without resistance has lost its grip.
- Look for rust staining below fastener heads, which indicates ferrous (steel) fasteners corroding into the aluminum.
- Inspect panel seams and overlaps for lifted edges, cracked sealant, or holes where debris has punched through.
- Look for standing water or watermarks on top of panels after rain — this signals low slope or blocked drainage.
Load capacity check
If you plan to add accessories (fans, lights, hanging plants, shade sails), check your manufacturer's installation guide or engineering documents for the original design loads. Most residential aluminum patio cover systems are engineered for specific wind and tributary live loads, adding concentrated loads like a ceiling fan requires checking that the structural member you are fastening to can handle it. If you cannot find the original paperwork, contact the manufacturer with the model details stamped on the extrusions.
Can you screw into an aluminum patio cover?
Yes, you can fasten into aluminum extrusions and panels, but the method matters a lot. Aluminum is softer than steel, so the two main failure modes are stripping the material during driving and creating a galvanic corrosion problem by using the wrong fastener material. Here is how to do it right. For detailed guidance on whether and how you can screw into an aluminum patio cover, see can you screw into aluminum patio cover.
Pre-drilling and pilot holes
Pre-drill a pilot hole whenever you are driving a screw into an aluminum extrusion. The pilot hole should be slightly smaller than the screw's major diameter, for a #10 screw, a 9/64-inch (3.5 mm) pilot hole works well in most aluminum extrusions. For thin-gauge aluminum sheet or panels, a step drill bit reduces burring. Simpson Strong-Tie's fastening guidance specifically recommends pre-drilling for austenitic stainless screws because those screws are somewhat softer than carbon steel screws and can seize if driven too fast. Use a low drive speed (300–500 RPM) and moderate downward pressure. Over-torquing is the most common mistake here, once you feel resistance stop increasing, you are at torque.
Fastener materials and galvanic risk
Aluminum sits near the anodic end of the galvanic series, which means it corrodes preferentially when it contacts more noble (cathodic) metals like copper or bronze in the presence of moisture. The practical implication: never use plain steel or brass fasteners directly against aluminum. Use 304 stainless steel for standard exterior environments and 316 stainless if you are within a few miles of salt water. Aluminum fasteners (rivets, aluminum screws) are also a good choice for low-load panel attachment because they are essentially galvanically inert relative to the aluminum structure.
Recommended fasteners, washers, anchors, and sealants
| Application | Recommended product type | Notes |
|---|---|---|
| General panel attachment to aluminum framing | 304 SS self-drilling screws or aluminum screws with neoprene/EPDM bonded washers | Neoprene washer seals hole and isolates metals |
| Ledger-to-house structural connection | 1/2" 316 SS lag bolts or through-bolts | 316 SS for any coastal or high-moisture environment |
| Beam-to-post connections | 304 SS carriage bolts and lock nuts | Back out any corroded steel hardware and replace |
| Panel seams and flashing laps | Neutral-cure silicone or polyurethane sealant (e.g., Sikaflex 221, Tremco Dymonic) | Avoid acetoxy silicone — off-gasses acetic acid, attacks aluminum |
| Ledger-to-wall gap seal | Polyurethane or MS-polymer sealant rated for exterior metal joints | Paintable, UV-stable, flexible enough for seasonal movement |
| Fasteners through polycarbonate panels | Stainless or aluminum screws with EPDM washers, oversized clearance holes | Oversized holes allow thermal expansion — do not snug tight |
| Anchors into concrete footings or masonry | Stainless hex-head wedge anchors or SS Tapcon equivalents | Use 316 SS for coastal zones |
One product note worth repeating: avoid acetoxy-cure silicones (the type that smells like vinegar when curing) on aluminum. The acetic acid off-gassed during cure attacks aluminum oxide and can accelerate corrosion under the bead. Neutral-cure silicone or a polyurethane/MS-polymer sealant is the right call for every aluminum joint.
Safety, permits, and code considerations
Check with your local building department before starting any work that involves structural changes, new electrical runs, or changes to the footprint of the cover. Many jurisdictions have a 'standard patio cover' plan or allow minor repairs under existing permits, but any structural modification, new electrical circuit, or addition of a permanent fixture typically triggers a permit requirement. Getting caught without a permit is not just a fine risk, it complicates home sales and may void your homeowner's insurance coverage for that structure.
- Cosmetic work (painting, replacing like-for-like panels, adding gutters): typically no permit required, but confirm locally.
- Re-paneling with a different panel type or thickness: may require plan check if it affects load calculations.
- Structural reinforcement (adding members, upsizing beams): almost always requires a permit.
- Any new electrical circuit, fan, or hardwired light: requires an electrical permit and inspection in most jurisdictions.
- Adding a shade structure, awning, or screen enclosure over an existing cover: often requires a separate permit.
For electrical work specifically: the National Electrical Code (NEC) requires a fan-rated electrical box for any ceiling fan installation. Manufacturers' catalogs such as the WESCO/Cooper catalog (ceiling fan boxes & hanger products; UL/listed load ratings) document fan-rated box load limits and listed hanger products supporting typical fan loads (around 70 lb) and higher for fixtures. A standard junction box is not listed for fan support. Outdoor boxes and fixtures must also be rated for damp or wet locations depending on exposure. If you are not comfortable running conduit and making panel connections, this is the one area of aluminum cover updates where hiring a licensed electrician is genuinely the safer call, not a hedge.
Prepping the site before you start work
Temporary supports and shoring
If you are removing panels or disconnecting any structural members, install temporary shoring before you remove anything. A couple of adjustable steel post shores (available at rental yards for $15–$25/day each) placed under the beam at roughly third-points of the span is enough for most residential covers. Do not rely on ladders as shoring, they can kick out. Shoring goes in before fasteners come out, period.
Fall protection and working at height
- Use a stable, rated ladder (Type I or IA) positioned so you do not have to overreach — your belt buckle should stay between the rails.
- Never stand on the top two rungs of a stepladder.
- For panel work across the whole roof surface, set scaffold planks across sawhorses on the ground and work from below where possible, or use a properly tied-off extension ladder.
- Do not walk on installed aluminum panels — most are not rated for foot traffic and will buckle or crack.
- If working near the roofline of the house, use a roof anchor and safety harness for any work above the eave.
General site prep
- Clear the patio of furniture before starting — panels and tools fall unpredictably.
- Lay down plywood sheets on the patio deck to protect it from dropped hardware and tools.
- If working near the house wall or HVAC units, cover them with tarps before painting or grinding.
- Disconnect power to any existing lighting circuit at the breaker before touching wiring — use a non-contact voltage tester to confirm.
General materials and tools checklist
Most aluminum patio cover updates draw from the same core toolkit. Have these on hand before starting any project on this list.
- Cordless drill/driver with variable speed and torque clutch
- Step drill bit set (for sheet aluminum) and standard HSS twist drill bits
- Impact driver (for structural fasteners only — not for panel screws)
- Tin snips: straight-cut and aviation (left/right) for aluminum trim and flashing
- Caulking gun (smooth-rod type for better sealant control)
- Non-ferrous wire brush (stainless or brass bristles — never plain carbon steel on aluminum)
- Paint scraper and 80/120-grit wet-dry sandpaper or sanding sponges
- Tape measure, speed square, and chalk line
- Safety glasses, work gloves, and hearing protection
- Extension ladder (Type I, rated 250 lb) or scaffolding for elevated work
- Adjustable post shores for any work requiring member removal
- Non-contact voltage tester (essential before touching any wiring)
- Torque wrench or driver with bit for checking/setting fastener torque
Project-specific materials and tool lists
| Project | Key materials | Additional tools |
|---|---|---|
| Repainting and refinishing | TSP cleaner or aluminum-safe degreaser, self-etching primer (aerosol or spray-grade), exterior metal topcoat, painter's tape, drop cloths | HVLP spray gun or quality 4-inch foam roller, airless sprayer (optional for large areas) |
| Panel replacement | Matching or upgraded panels (aluminum, insulated, or polycarbonate), neoprene-washer screws, aluminum J-channel or trim, compatible sealant | Circular saw with aluminum-rated blade, jigsaw for trim cuts, rubber mallet |
| Framing reinforcement | Additional aluminum extrusions or steel sister members, 304 SS bolts and lock nuts, gusset plates if required | Drill press or drill guide for straight bolt holes, torque wrench, level |
| Flashing and sealing | Pre-bent aluminum flashing (match existing metal), neutral-cure silicone or polyurethane sealant, backer rod (for gaps >1/4 inch) | Heat gun (for careful bending of flashing), putty knife and sealant tool |
| Gutters and downspouts | Aluminum gutter sections, end caps, slip-joint connectors, downspout elbows and straps, 304 SS fascia screws | Gutter sealant, pop-rivet gun, level, string line, hole saw for downspout outlets |
| Shade fabric or solar screens | UV-rated shade cloth or solar screen fabric, grommeted edges, bungee/ball-bungee hooks or track system, stainless eye hooks or screw-in anchors | Seam tape or grommet punch kit if custom sizing fabric |
| Electrical: fan or light install | Fan-rated electrical box (listed for wet/damp location), mounting bracket, outdoor-rated ceiling fan or fixture, appropriate gauge wire, conduit and fittings, wire connectors rated for wet locations | Non-contact voltage tester, fish tape or wire push rods, conduit bender (if rigid conduit) |
Cosmetic refreshes: what's possible and how to prep
Cosmetic updates, including repainting, installing new trim, replacing a panel or two, adding gutters, or hanging screens, are the most accessible aluminum cover projects for a first-time DIYer. The cover stays structurally in place, no permit is typically required, and the materials are widely available at home centers. The biggest prep mistake people make is skipping the cleaning and priming steps and going straight to topcoat, on aluminum, that guarantees peeling within a season.
Before any cosmetic work begins, complete your inspection checklist. Fix any structural issues first. There is no point painting over a beam that needs to be sistered, or caulking over a ledger connection with a backed-out lag bolt. Once the structure is confirmed sound, cosmetic updates become satisfying, straightforward weekend projects.
Step-by-step: repainting and refinishing an aluminum patio cover
Estimated time: half-day for a single-car-garage-size cover (roughly 10 x 12 feet). Materials cost: $80–$200. Difficulty: moderate (mostly preparation labor).
- Clean every surface with a TSP substitute or dedicated aluminum-safe cleaner mixed per the label. Scrub with a non-ferrous brush and rinse thoroughly. Let dry completely — at least 2 hours in warm weather.
- Remove all loose paint, flaking corrosion product, and chalking finish. Use 80-grit sandpaper or a scotch-brite-style pad. Do not use a carbon-steel wire wheel — it embeds ferrous particles that will rust.
- Spot-treat any visible pitting or white powdery corrosion: scrub with a phosphoric acid-based prep wash (follow label safety requirements — gloves and glasses), rinse, and let dry.
- Mask off the house wall, any glass, and surfaces you do not want painted using painter's tape and drop cloths.
- Apply a self-etching metal primer to all bare aluminum surfaces. Aerosol self-etching primers (Rust-Oleum, Sherwin-Williams Prep-Rite) work well for field touch-up. For a full cover, use a spray-grade etch primer with an HVLP gun or airless sprayer. Follow the product TDS for cure time before topcoating — typically 30–60 minutes before recoat, but check your specific product.
- Apply the exterior metal topcoat. A quality 100% acrylic exterior enamel rated for metal works well. Apply two thin coats rather than one heavy coat. Allow the first coat to dry to touch (usually 1–2 hours) before applying the second.
- Remove masking while the final coat is still slightly tacky to get clean paint edges.
- Allow full cure (most metal topcoats reach full hardness in 7 days) before heavy handling.
Common mistake: applying topcoat the same day as primer without checking the TDS. Some etch primers require a minimum cure window before topcoating, skipping this causes intercoat adhesion failure and the whole job peels in sheets within a year.
Step-by-step: replacing damaged panels and re-paneling
Estimated time: 3–6 hours for a partial replacement; full day-plus for complete re-paneling. Materials cost: $100–$500+ depending on panel type and area. Difficulty: moderate.
Panel options worth knowing: matching aluminum roof panels maintain the original look and are the easiest structural match; insulated sandwich panels (two aluminum skins over a foam core) add meaningful R-value and are surprisingly DIY-friendly; multi-wall polycarbonate panels from manufacturers like Palram allow filtered natural light through and weigh very little. Each type has specific installation requirements, so pull the installation guide for whatever panel you choose before ordering fasteners.
- Install temporary post shores under the beam span if removing multiple panels at once — this prevents any flex during the work.
- Remove fasteners from the damaged panel using a drill driver in reverse. If the screws are corroded in place, use a screw extractor bit. Do not beat the panel sideways — you will distort the framing channel.
- Slide or lift the panel out. Inspect the framing beneath for any corrosion or damage — treat and prime any bare metal before installing the new panel.
- Measure the opening carefully. Cut the replacement panel to length using a circular saw with an aluminum-rated carbide blade (fine-tooth, 60-80 TPI equivalent for thin aluminum). Cut polycarbonate panels with the protective film still on.
- If installing polycarbonate panels: drill fastener holes at least 1/2 inch in from the panel edge and make the clearance holes 1/8 inch larger than the fastener shank to allow thermal expansion. Orient the UV-protected face upward (marked on the film).
- Position the panel, align it with existing panel laps, and drive neoprene-washer stainless screws snugly — not cranked down tight on polycarbonate, where you want slight give.
- Seal all exposed panel edges and seams with the appropriate J-channel trim and a bead of neutral-cure silicone or polyurethane sealant.
- Check the roof slope from below after installation to confirm no water-ponding geometry was introduced.
Step-by-step: reinforcing framing for wind and snow loads
Estimated time: 4–8 hours depending on scope. Materials cost: $150–$600. Difficulty: moderately hard, this is the project where honest assessment of your skills matters most.
What often goes wrong here: homeowners sister a beam without fixing the root cause, which is usually an undersized original member for the new load (added fan, heavier panels, higher snow zone). Before adding material, confirm the issue is correctable by adding a member rather than by replacing the original.
- Identify the specific members showing deflection or inadequate capacity. Photograph and document the existing condition.
- Shore the span from below before touching any fasteners on the affected member.
- For sistering: cut the sister member to the same length as the original, slide it into position alongside the existing beam, and bolt through both members at 12–16 inch intervals using 304 SS carriage bolts and lock nuts. Do not rely on self-drilling screws for structural connections.
- For adding intermediate purlins (to reduce panel span): measure existing purlin spacing, cut new purlin to length, and fasten to main beams using the manufacturer's specified connection hardware or equivalent-strength stainless bolted bracket.
- Gusset plates at beam-to-post connections can be added using aluminum flat bar stock and SS bolts if the original connection hardware has inadequate bearing area.
- After any structural modification, re-check all member alignments with a level and straightedge before reloading the cover with panels.
- If you are in a high-wind zone (ASCE 7 exposure C or D) or a snow-load environment above 20 psf ground snow load, have your reinforcement plan reviewed by a structural engineer before building — the cost is typically $200–$500 and it is worth every dollar.
Step-by-step: flashing, sealing seams, and fixing leaks
Estimated time: 2–4 hours. Materials cost: $40–$120. Difficulty: easy to moderate. NRCA Guidelines for Architectural Metal Flashings (corrosion and compatibility guidance) recommend continuous metal flashing at the house ledger with a bed of compatible sealant, back‑primed contact surfaces where required, weep/drain provisions, and either matching-metal flashing or isolation to prevent bimetallic corrosion.
- Find the leak source first — do not guess. On a dry day, run a garden hose on the roof surface in sections while a helper watches from below. Mark where water appears inside.
- Cut out any old sealant at the problem joint using a utility knife and putty knife. Do not apply new sealant over old — it will not bond and will fail faster.
- Clean the joint surfaces with isopropyl alcohol or an acetone wipe (gloves required) to remove residual sealant, grease, and oxidation.
- If the gap is wider than 1/4 inch, install closed-cell backer rod first — press it in with a flat tool until it sits about 1/4 inch below the surface. This gives the sealant a proper backing and prevents three-sided adhesion.
- Apply neutral-cure silicone or polyurethane sealant in a single continuous bead, tooling it smooth with a wet finger or plastic spoon. The bead should slightly crown, not cup.
- For flashing replacement at the ledger: remove the old flashing by carefully prying it away from the wall (it may be stucco-embedded — cut the sealant edge rather than forcing). Clean and prime the metal and wall surface. Install new aluminum flashing (same thickness, back-prime the wall-contact side), bed it in a bead of polyurethane sealant, and fasten the top edge into the wall. Integrate the flashing correctly with the exterior cladding — it should lap over, not under, the cladding below.
- Check all weep holes at the bottom of panel channels and clear any debris blocking drainage — pooled water above a failed seam is usually the actual failure mechanism.
Step-by-step: installing gutters and downspouts
Estimated time: 3–5 hours for a standard two-side cover. Materials cost: $80–$250. Difficulty: easy to moderate.
- Confirm the fascia board or aluminum fascia extrusion is solid and can carry the gutter load — probe for rot in any wood fascia before fastening.
- Establish slope: gutters need at minimum 1/16 inch of drop per linear foot toward the downspout outlet. Snap a chalk line on the fascia at the high point and measure down at the downspout end to confirm your slope.
- Cut gutter sections to length using tin snips or a miter saw with an aluminum blade. Deburr all cut ends.
- Install end caps and seal all joints and miters with gutter-specific sealant from inside the gutter. Allow to cure before testing.
- Mark the downspout outlet location on the fascia, cut the opening with a hole saw or jigsaw, and install the outlet fitting, sealing the flange with gutter sealant.
- Hang the gutters using aluminum fascia brackets (304 SS screws) at 24-inch spacing. Start at the high end.
- Run downspouts using elbows as needed to direct water at least 6 feet away from the house foundation. Fasten downspout straps to the wall every 5–6 feet.
- Test with a garden hose and check for leaks at all joints. Touch up any weeping seams with additional sealant.
Step-by-step: attaching shade fabric, awnings, and solar screens
Estimated time: 1–3 hours. Materials cost: $50–$300 depending on fabric area and attachment system. Difficulty: easy.
Shade cloth and solar screens attach to aluminum covers in three common ways: bungee-ball hooks looped through grommets and over the existing frame (easiest, zero drilling); screw-in stainless eye hooks or cup hooks into the aluminum frame (fast, low-profile); or a dedicated track-and-channel system that runs along the beam and allows the fabric to slide and tension. The track system is the cleanest look for a permanent installation.
- Measure the coverage area and add 6–8 inches on each edge for grommet attachment distance from the fabric edge.
- Choose a shade percentage appropriate to your climate: 70% block is comfortable for partial shade, 90% block is near-opaque but useful in extreme heat. Solar screens with specific visible light transmittance (VLT) ratings work best on the sun-facing sides.
- Pre-drill pilot holes for any screw-in eye hooks: use a 7/64-inch bit for standard #10 hooks into aluminum extrusion. Space hooks at 12–18 inch intervals to distribute fabric load.
- Attach the top edge of the fabric first, working from the center outward to prevent bunching. Keep tension even.
- On the exposed sides, use wind-rated ball-bungee connectors rather than fixed attachment if the cover is in a high-wind zone — allowing some flutter prevents tearing under load.
- For a track system: screw the aluminum track to the beam underside with SS screws, load the fabric edge into the channel, and tension the fabric using the manufacturer's tensioning hardware.
For more detailed attachment methods and hardware options, the topic of attaching shade to an aluminum patio cover covers fastener selection and track systems in greater depth.
Electrical upgrades: rules for adding fans and lights
Adding a ceiling fan or light fixture to an aluminum patio cover is one of the most-requested upgrades and also the one most likely to have safety or code issues when done wrong. The NEC has clear requirements that apply here, and most jurisdictions have adopted them.
- A fan-rated electrical box is mandatory — not optional — for any ceiling fan. Standard junction boxes are not listed for fan support because fans impose both static weight and dynamic cyclic loads.
- Fan-rated boxes are listed to support fans typically up to 70 lbs. Heavier items (large light fixtures, heavy fans) require a separately framed structural hanger tied to a structural member, not just the thin-gauge aluminum sheet of the cover.
- Outdoor boxes and any fixtures in a covered patio are minimum damp-location rated; if the installation is directly exposed to rain, wet-location rating is required.
- Any new circuit requires an electrical permit. The inspector will check the box rating, wire gauge, overcurrent protection, and GFCI protection (required by NEC for outdoor receptacles and luminaires in wet/damp locations).
- Wiring must run in appropriate conduit on the exterior — exposed NM (Romex) cable is not approved for exterior or wet locations. Use THWN wire in EMT or schedule 40 PVC conduit, or an outdoor-rated cable assembly specified by your local code.
Step-by-step: mounting and wiring a ceiling fan or light on an aluminum cover
Estimated time: 3–5 hours including conduit run. Materials cost: $150–$400 (box, fan, conduit, wiring, GFCI breaker or outlet). Difficulty: moderate to hard, hire a licensed electrician if you are not comfortable with panel work.
- Turn off the circuit (or the whole panel if needed) and confirm dead with a non-contact voltage tester before touching any wire.
- Identify a structural mounting location — ideally directly beneath a main beam or purlin. If the fan location does not align with a structural member, install a 2x4 or steel cross-brace between adjacent purlins to create a solid nailing/bolting surface for the fan box bracket.
- Install a listed fan-rated electrical box. Most come with a brace bar that expands between joists or beams — expand it to span and lock it against the structural members per the manufacturer's instructions. Confirm the box is UL-listed for damp or wet locations matching your installation.
- Route wiring from the nearest junction point using the appropriate conduit. EMT conduit is sturdy and has a clean look on aluminum covers. Use waterproof connectors and fittings throughout.
- Pull the wire through the conduit before fastening the conduit to the cover. Fish tape makes this much easier. Leave 6–8 inches of wire extending from the box for connections.
- Make all wire connections inside the box using wire connectors rated for the wire gauge and location (look for the wet-location listing on the connector package). Connect ground to the green screw on the box.
- Mount the fan's mounting bracket to the fan box, then hang the fan motor body and make the final wire connections per the fan manufacturer's wiring diagram. Outdoor-rated fans have specific outdoor mounting instructions — follow them.
- Restore power and test the fan on all speeds before installing blades. Check for wobble and use the balancing kit typically included with the fan if needed.
- Schedule the electrical inspection if your permit requires it — do not conceal any conduit or wiring before the inspector approves.
For more detail on the structural fan support question specifically, the topic of how to install a fan on an aluminum patio cover covers box types, hanger products, and load limits in more depth. For specifics, see how to install a fan on an aluminum patio cover (reference 9a0b5374-9b19-45f6-85cc-d2d4334366f6) for box types, hanger products, and load limits. Learn how to install an aluminum patio cover for step‑by‑step guidance on foundations, framing, and finishing details.
Accessory installs: screens, roll shades, and hanging solutions
Beyond shade fabric and fans, aluminum covers accommodate several other practical accessories. Each has a best-practice attachment method.
Screen enclosures
Screen panels that enclose the sides of a patio cover typically use an aluminum frame splined with fiberglass or aluminum screen mesh. Attach the frame to the existing cover posts using 304 SS screws through pre-drilled pilot holes (3/32-inch bit for #8 screws into 0.080-inch-wall aluminum post). At the bottom, anchor the screen frame to a concrete slab using stainless Tapcon concrete screws. Corners are typically mitered and screwed, then covered with aluminum corner trim.
Roll shades
Exterior roll shades (manual or motorized) mount with a pair of heavy-duty L-brackets through the beam face or beam underside. Use 1/4-inch SS bolts (not sheet metal screws) for brackets carrying a shade wider than 6 feet, the combined weight and wind load on a large roll shade is substantial. Always attach into solid extrusion wall, not into a hollow panel section. Most roll-shade manufacturers publish a load table for mounting hardware, follow it.
Hanging plants, lanterns, and lightweight decor
For lightweight hanging items (under 10 lbs), stainless cup hooks or eye hooks screwed into the aluminum extrusion flange work fine with a 3/32-inch pilot hole. For anything heavier, bolt through the extrusion with a 1/4-inch SS carriage bolt and back nut rather than relying on screw thread engagement alone. Avoid drilling into panel material for any hanging load, panels are not structural.
When to stop DIY-ing and call a pro
Most of the projects in this guide are genuinely doable for a handy homeowner with basic tools and a willingness to read instructions carefully. But a few situations should send you to a phone instead of a hardware store.
- Cracked or heaved concrete footings at any post: this is a foundation issue that needs a structural assessment, not patch caulk.
- Post rot at the base or beam sag greater than 1/2 inch across a 10-foot span: the structure is overloaded or the member is inadequate — repair without analysis risks failure.
- Any electrical work you are not confident executing: mis-wired outdoor circuits are a fire and shock hazard. An electrician charges $50–$100/hour and will do the work with a permit that protects your insurance coverage.
- Work on a second-story-attached cover or any cover where a fall would be from height greater than one story: get scaffolding and a helper or hire it out.
- Any project in a hurricane-zone wind design area (ASCE 7 >130 mph): structural upgrades here need engineered connections, not field-improvised additions.
If you are on the fence about whether your existing cover is worth updating versus replacing entirely, the topic of how to build an aluminum patio cover and how to install an aluminum patio cover walk through what a full replacement involves in terms of cost, scope, and effort, which gives you a useful comparison point before deciding which path makes more sense for your situation.
FAQ
What are the first steps to inspect an existing aluminum patio cover safely?
Inspect twice a year and after storms. Check: posts for movement or settling; visible corrosion, pitting or bare aluminum; bent, buckled or sagging beams/purlins; loose, missing or backed‑out fasteners; panel seams, flashing and weep/drain paths for leaks or pooling; separation at the house ledger and any cracked/heaved footings. Probe wood connections for rot and measure permanent deflection across spans. Photograph issues and note locations for repair planning.
Can I fasten into aluminum and what fasteners should I use?
Yes, you can fasten into aluminum but follow manufacturer guidance: pre‑drill pilot holes where specified and avoid over‑torquing. Use corrosion‑resistant fasteners—300‑series (304) stainless for general exterior use and 316 stainless in marine or severe chloride exposure. Aluminum fasteners or isolation washers are acceptable when specified to reduce galvanic action. Use neoprene/EPDM washers for panel attachments.
How do I avoid galvanic corrosion when working on aluminum covers?
Prevent dissimilar‑metal contact and electrolyte paths: use compatible metals (aluminum with aluminum, or specified isolation), add non‑conductive washers/gaskets between dissimilar metals, apply protective coatings or sacrificial coatings where needed, and choose stainless grades and sealants recommended for the exposure. Ensure flashing and fasteners are isolated or matched to avoid preferential aluminum corrosion.
What are the basics for repainting or refreshing the aluminum finish?
Clean and degrease thoroughly; remove loose finish or corrosion with non‑ferrous brushes; rinse salts. Mechanically scuff or use an etch cleaner, apply a self‑etching or metal primer per product TDS, then an exterior topcoat rated for metal. For spot repairs, contractor aerosol etch primers can be used but follow cure times and compatible topcoat instructions. Do priming and painting in suitable temperature and humidity.
Which sealants and flashing work best on aluminum patio covers?
Use durable, low‑modulus, UV‑stable sealants rated for metal‑to‑metal joints: polyurethane, neutral‑cure silicone or MS‑polymer (hybrid) products are common (Sikaflex, Tremco, etc.). Flashing should ideally be the same metal or properly isolated per NRCA guidance. Install continuous ledger flashing with a compatible bed of sealant and provide weep/drains where panels can collect water.
What panel replacement options are practical and when should I choose each?
Options: matching aluminum roof panels for like‑for‑like replacement; insulated sandwich metal panels for improved thermal performance; multi‑wall or solid polycarbonate (e.g., Palram/SunTuf) for light transmission; or metal flat/standing seam panels for a new look. Choose based on desired R‑value, light, weight limits of existing framing, span capability and appearance. Follow each panel manufacturer's fastening, flashing and expansion recommendations.