Building an aluminum patio cover is a realistic weekend-to-two-weekend DIY project for most homeowners. You pour concrete footings, set posts, attach a ledger board to the house, frame the roof with beams and purlins, then snap or screw aluminum panels into place. Done right, it's a durable, low-maintenance structure that can last 20-plus years without rotting, warping, or painting.
How to Build an Aluminum Patio Cover: DIY Step-by-Step

Celia Vaughn
4 Jun 2026

If you already have an aluminum patio cover, the update process typically involves inspecting the roof panels and flashing first, then repairing or replacing fasteners, sealants, and drainage components before reinstalling anything that’s loose or damaged update an aluminum patio cover. The biggest hurdles are getting a permit, digging footings to the right depth, and making a weathertight connection at the house wall, and this guide walks you through every one of them.
Choose the right aluminum patio cover style and design
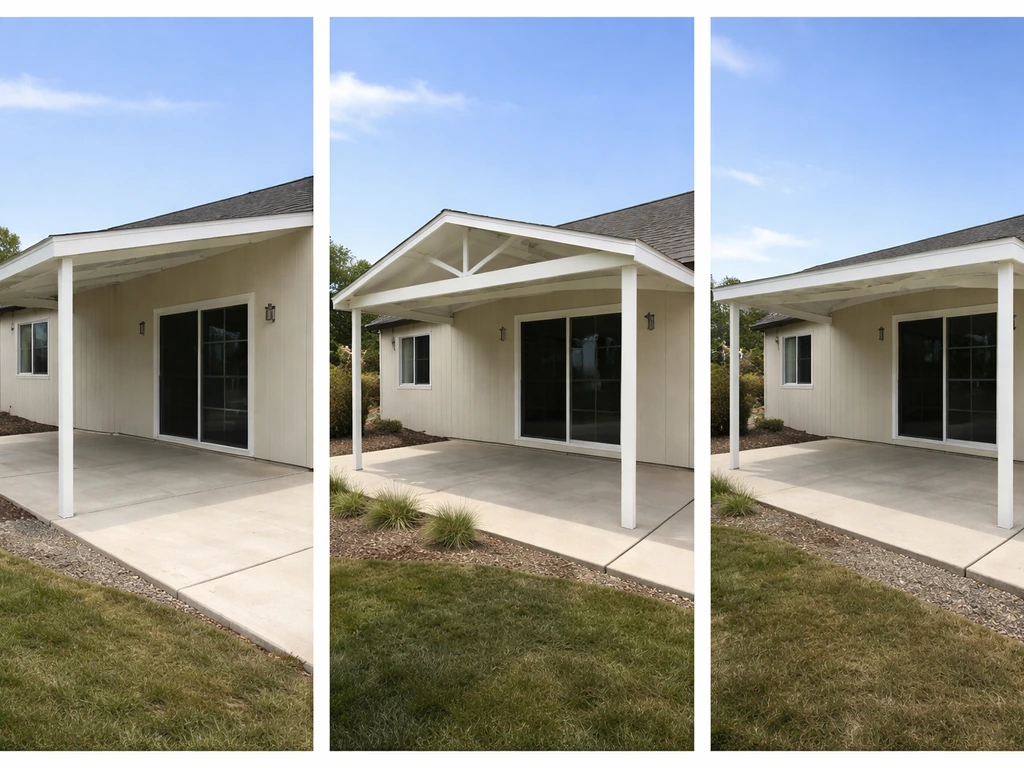
Before you buy a single piece of aluminum, spend real time on the design. The three most common configurations are lean-to (also called a shed or attached cover), gable, and flat/solid-pan. Each has different framing complexity, drainage needs, and permit requirements.
| Style | Best for | Pitch/drainage | Complexity |
|---|---|---|---|
| Lean-to (shed) | Most attached covers, easiest DIY | Single slope drains toward gutter at outer edge | Low |
| Gable | Larger spans, higher aesthetics | Dual slopes, ridge beam required | Medium-High |
| Flat/solid-pan | Modern look, small-to-mid spans | Minimal slope (still needs drainage) | Low-Medium |
| Freestanding pergola-style | No house attachment needed | Slope toward perimeter | Medium |
For most first-time builders, a lean-to attached cover is the right call. You're working with one slope, one ledger connection to the house, and a straightforward rectangular frame. Gable covers look great but add a ridge beam, extra rafters, and more complex attachment points, save that for a second project or bring in a structural engineer if you go that route.
Size and pitch matter a lot. A standard lean-to cover pitches toward the outer gutter, the roof must slope away from the house so water runs off the cover panels and into the drip edge or gutter system. Even a subtle pitch is enough; most aluminum panel systems work well with a 1:12 to 2:12 slope (about 1 to 2 inches of drop per foot of run). Going flatter than 1:12 causes pooling and panel deflection over time. Going steeper than 3:12 looks awkward on most houses and creates clearance problems at the house wall connection.
Standard post sizes for aluminum patio cover kits are 3x3 inch aluminum posts, with options to upgrade to 4x4 or 6x6 for wider spans or heavier loads. If your cover is wider than 16 feet or you live in a high-wind or snow-load area, go up a post size. Clearance from the ground to the bottom of the cover framing is typically a minimum of 7 feet, check your local code, but 8 feet is more comfortable and looks better proportionally.
Materials, tools, and hardware checklist
Aluminum patio cover kits from manufacturers like Alumawood, Alumcenter, or similar suppliers ship most of the structural components pre-cut and pre-painted. That simplifies sourcing considerably. Even so, you'll need to source some items locally, concrete, fasteners, post bases, and weatherproofing materials especially.
Structural and cover materials
- Aluminum cover panels (solid pan, lattice, or snap-lock style depending on your kit)
- Aluminum beams and purlins (typically included in kit; size varies by span)
- Aluminum posts: standard 3x3 inch, or 4x4/6x6 for larger spans
- Ledger board (pressure-treated wood, typically 2x8 or 2x10) or aluminum ledger if kit-specified
- Aluminum ledger cover/flashing strip (protects the wood ledger and creates weathertight finish)
- Drip edge or drip flashing for the outer perimeter
- Gutters and downspouts if not draining onto existing concrete or landscape
- Concrete (80 lb bags or ready-mix) for footings
- Rebar (1/2 inch, 2 to 3 bars per pier) for footing reinforcement
- Gravel (3 to 4 inches as a base layer under each footing)
Fasteners and hardware
- Tek screws #14 x 4-7/8 for fastening roof panels (2 inches from each end, then 11-inch spacing along the run)
- 1/2-inch lag screws or structural bolts for ledger attachment, staggered top-to-bottom per IRC R507 requirements
- Simpson Strong-Tie ABA adjustable post bases (or equivalent), secured with 1/2-inch Titen HD concrete screw anchors if setting on existing slab
- Sealing washers for all exterior-exposed fasteners
- Butyl tape or sealant for trim/flashing interfaces
- Self-adhering flashing tape for the ledger-to-house interface
- Silicone or polyurethane exterior sealant
Tools
- Post-hole digger or rented power auger (hand digger works for shallow frost lines; auger is faster for anything deeper than 18 inches)
- 4-foot level and torpedo level
- String line and line level for layout
- Circular saw with metal-cutting or fine-tooth blade for aluminum cuts
- Drill/driver with impact driver capability
- Chalk line
- Tape measure, speed square
- Caulking gun
- Ladder (8-foot minimum; 12-foot if your eave height is above 9 feet)
- Safety glasses, gloves, hearing protection
Permitting, site prep, and safety considerations
Pull a permit. I know it feels like extra hassle, but a patio cover attached to your house is a permanent structure in virtually every jurisdiction, and skipping the permit can create real problems when you sell the house or make an insurance claim. Most municipalities follow the International Building Code (IBC) or IRC, and IBC 2018 Appendix I specifically governs patio covers: your structure must be designed for a minimum vertical live load of 10 psf plus dead load, and must resist the applicable wind and seismic loads for your area. In snow country, the snow load will likely exceed 10 psf and governs the design.
For the permit application, you'll typically need a site plan showing the cover's location relative to property lines and the house, a basic framing plan with post locations and beam sizes, and sometimes a manufacturer's engineering letter if you're using a kit. Many kit manufacturers supply stamped engineering drawings for an additional fee, worth every dollar because it satisfies most plan checkers immediately.
Site prep starts with marking the post locations with stakes, then calling 811 (in the US) to have underground utilities marked before you dig anything. Clear the area of furniture and overgrown vegetation. Check that the area under the cover drains away from the house, if it doesn't, address the grading before you build.
Safety on this project comes down to three things: working at height safely (always have a second person when you're on a ladder and handling panels), structural stability during construction (brace posts before you walk away from them), and load design (don't guess at your snow or wind zone, look it up or ask your building department). Aluminum panels and trim are lightweight but have sharp edges; wear gloves every time you're handling cut pieces.
Footings, posts, and structural framing setup
This is the foundation of everything, so take your time here. Mistakes in post placement are hard to fix once the concrete sets.
Footing depth and size
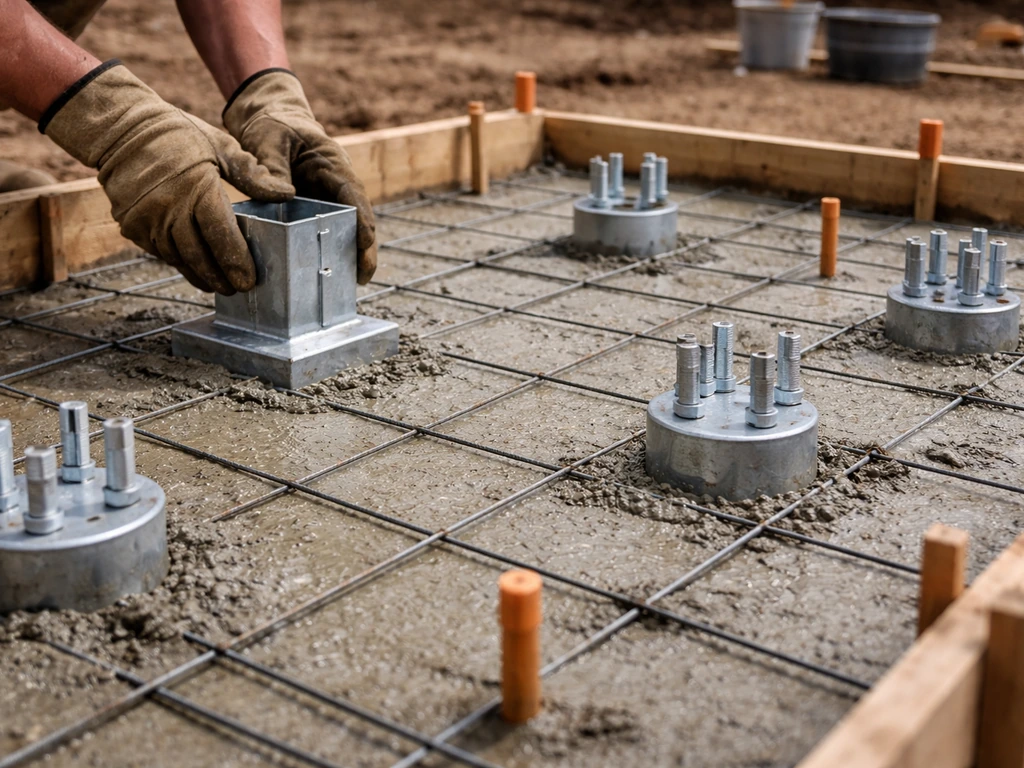
Footing depth depends on your local frost line. In warm climates like Florida or Southern California, 12 inches may be enough. In the Midwest or Northeast, you may need 36 to 42 inches. The rule: [the bottom of the footing must be at or below the local frost line to prevent heaving.
](https://jbnpatiocovers. com/patio-cover-footings-depth-width/) Add 3 to 4 inches of compacted gravel at the bottom of each hole before you pour. A typical pier for a patio cover post is 10 to 12 inches in diameter with 2 to 3 vertical rebar bars tied into a cage. If you're setting posts directly in concrete (embedded), wrap the post base in a post-base standoff hardware piece so the aluminum or wood post doesn't sit in standing water.
If your cover is going on an existing concrete patio slab, you can skip digging and use a Simpson Strong-Tie ABA adjustable post base anchored with 1/2-inch Titen HD concrete screw anchors. This is a common and code-acceptable approach, but check with your building department, some require through-bolts or epoxy anchors for higher wind zones.
Setting posts plumb and level
Once concrete is poured and footings have cured (minimum 24 to 48 hours, longer in cold weather), set the post bases and then the posts. Check each post for plumb on two adjacent faces with a 4-foot level. Brace the posts with temporary 2x4 diagonal braces screwed to stakes in the ground, this is non-negotiable. A post that tips while you're framing above it can bring the whole structure down on you. Leave braces in place until beams and the ledger are fully secured.
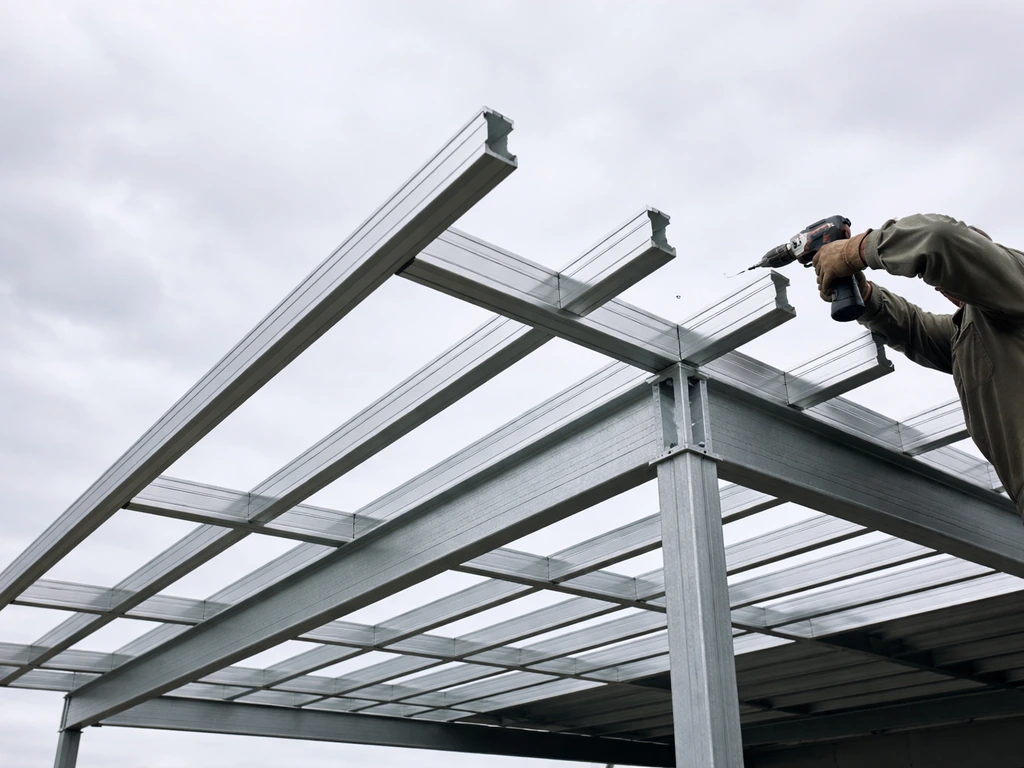
Beams and header installation
The outer beam (sometimes called the header or fascia beam) ties the post tops together. Most aluminum cover kits include a beam that slides over or clips to the posts. Measure carefully from the ledger attachment point at the house down to the outer beam to confirm your pitch before you lock anything in. A string line from the ledger to the outer beam, checked with a level, gives you your actual slope, adjust post cap heights as needed before final fastening.
Install roof framing, beams, and aluminum panels
With posts and outer beam set, you're ready for the roof framing and panels. This is where the project starts to look like something.
Purlins and framing members
Purlins are the horizontal framing members that run perpendicular to the outer beam, spanning from the ledger to the outer beam and supporting the roof panels. Kit-based systems tell you the spacing, follow the manufacturer's spec exactly because it's tied to the panel's load-rating. Snap or bolt purlins into the beam pockets or hanger hardware per the kit instructions. Double-check that all purlins are co-planar (same plane) by sighting down the row and using a string line; a purlin that's even 1/4 inch high or low will telegraph as a visible bump in the finished roof panels.
Installing the aluminum roof panels
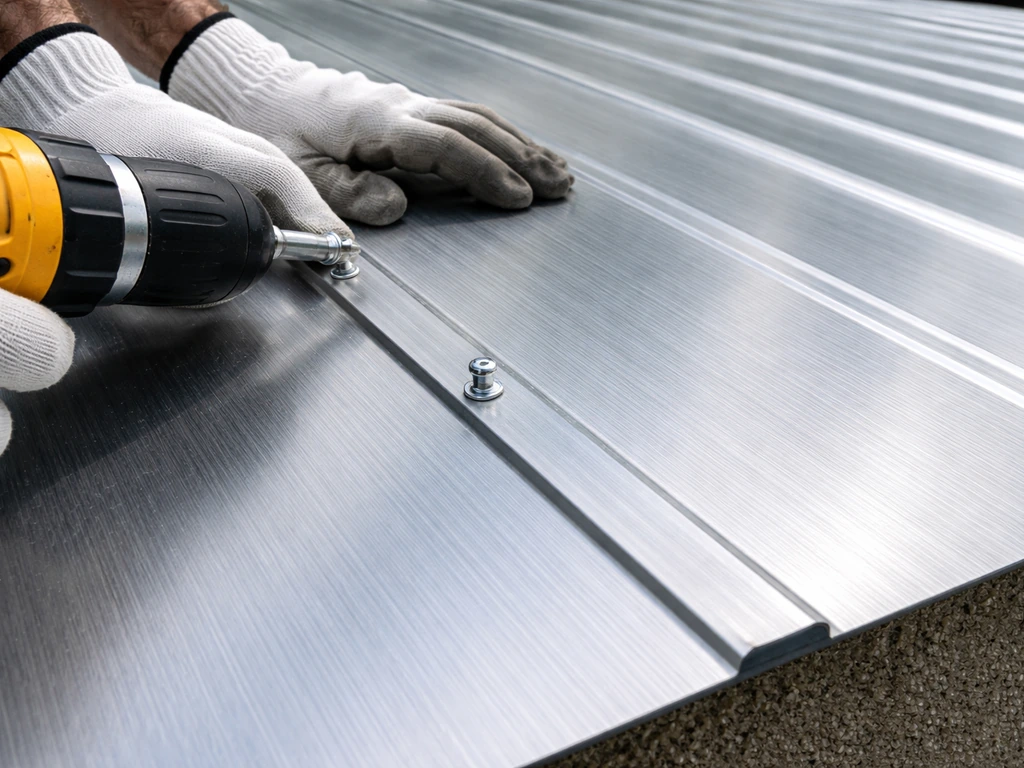
Start panel installation at one end of the cover and work across. Most snap-lock or solid-pan aluminum panel systems require a 4-inch seam overlap between adjacent panels side-to-side, and a minimum 6-inch overlap at panel ends where panels meet end-to-end. SunSet Metal Forming’s Snaplock Installation Guide gives snap-lock overlap guidance of at least 6 inches at panel ends and 4 inches at panel sides minimum 6-inch overlap at panel ends and 4-inch overlap at panel sides. Apply a bead of butyl tape or sealant at every overlap joint before setting the next panel, this is what keeps the system watertight, not just the mechanical connection.
Fasten panels with Tek screws, the #14 x 4-7/8 size is standard for most aluminum cover panel systems. Drive one screw 2 inches from each end of the panel, then every 11 inches along the purlin line. Use sealing washers on every screw. Don't overtighten: aluminum panels expand and contract with temperature, and crushing the sealing washer kills its ability to seal. Snug and tight, not gorilla-tight.
What often goes wrong here: oil-canning, which is that wavy, rippled appearance in metal panels. It's caused by over-fastening, misaligned purlins, or panels installed under tension. If you see it happening, back off screw tension slightly, and make sure your framing plane is flat before you get too far into the panel installation. It's much easier to fix at panel 3 than at panel 15.
Anchoring to the house and sealing for weather protection
The ledger connection and the house-to-cover interface are the most structurally and weatherproofing-critical parts of the whole project. Get these right and the cover will last for decades. Rush them and you'll be dealing with water damage inside your walls within a few years.
Ledger board attachment
The ledger board (typically a pressure-treated 2x8 or 2x10) bolts horizontally to the house rim joist or wall framing. Fastener size and spacing follow IRC R507 prescriptive rules: use 1/2-inch lag screws or bolts, staggered in a top-bottom pattern along the ledger length. The exact spacing depends on your joist span and deck/cover width, look up the IRC R507.9.1.3 table or use an online ledger bolt calculator for your specific numbers. Do not guess at this: under-fastening the ledger is a leading cause of patio cover collapse.
Before bolting the ledger, remove any existing house siding in the ledger zone (or cut it back) so the ledger bears directly on the house sheathing. Apply self-adhering flashing tape to the sheathing, then set the ledger, then install flashing over the top of the ledger that tucks up under the house siding above. This is the water management sequence that keeps rain from getting behind the ledger and rotting your wall.
Ledger cover and flashing
Most aluminum cover systems include a ledger cover or ledger flashing component, a formed aluminum piece that snaps or screws over the exposed ledger face and integrates with the roof panels. The design goal is that water flows from the house wall, onto the patio cover panels, and toward the outer drip edge or gutter. The flashing runs under the fascia drip edge so water is directed outward at every handoff point. Apply butyl tape at the ledger cover-to-panel joint and seal the ends with exterior sealant.
Drip edge and gutters
Install drip edge along the outer perimeter with sections overlapped (one piece over the next in the direction of water flow). If you're adding a gutter, install it so it slopes 1/4 inch per 10 feet toward the downspout. Seal all end caps and gutter-to-downspout connections with gutter sealant. Common mistake: installing the drip edge after the panels are already down, which means you can't properly tuck it under the panel edge. Install drip edge first, then panels over it.
Step-by-step build order, inspections, finishing, and troubleshooting
Here's the sequence that keeps things from going sideways. If you want a clear walkthrough, follow this step-by-step guidance on how to install aluminum patio cover. Don't jump ahead, each step depends on the previous one being verified before you move on.
- Pull your permit and get approved plans in hand before you buy materials or dig anything.
- Call 811 and have utilities marked. Wait the required period (usually 2 to 3 business days).
- Lay out post locations with stakes and string lines. Confirm measurements twice: overall width, depth, and diagonal (both diagonals should be equal for a square layout).
- Dig footings to the required depth for your frost line. Add gravel base. Set rebar cages.
- Pour concrete footings. If setting post-base hardware, position and level bases while concrete is still wet. Let cure 24 to 48 hours minimum.
- Schedule your first inspection if required (footings before pour, or footing inspection after pour in some jurisdictions — ask your inspector).
- Set and brace posts plumb. Install temporary diagonal bracing.
- Attach ledger board to the house: flash, bolt, and flash again per the water management sequence above.
- Set outer beam across post tops. Confirm pitch with string line. Adjust if needed before final fastening.
- Install purlins between ledger and outer beam. Check that all are co-planar.
- Install drip edge at outer perimeter edge.
- Install aluminum roof panels working from one end to the other: overlap, sealant, Tek screws at specified spacing.
- Install ledger cover/flashing strip at the house wall.
- Install gutters, downspouts, and end caps if applicable.
- Apply exterior sealant at all trim joints, end cuts, and penetrations.
- Schedule framing and final inspections as required.
- Remove temporary bracing only after framing inspection is passed and all structural connections are complete.
Realistic pacing
A typical 12x16 foot lean-to aluminum patio cover takes two people about 2 to 3 weekends from footing pour to final trim. Weekend 1: layout, footing dig, and pour. Weekend 2: post and beam framing, ledger attachment. Weekend 3: panels, flashing, gutters, and finishing. Factor in permit wait time (can range from same-day to 4 weeks depending on your city) and concrete cure time.
Troubleshooting common problems
- Posts are out of plumb: Catch this early. Before concrete fully cures, a post base can still be nudged. After cure, you'll need to shim at the beam or replace the footing — fix it before you frame.
- Panels won't align: Usually caused by purlins not being in the same plane. Pop a string line across the tops of all purlins before installing panels. A bent or high purlin needs to be corrected at the hanger, not shimmed with the panel.
- Water pooling on panels: Your pitch is insufficient or you have a sag. Check that the outer beam is lower than the ledger connection by the correct amount for your slope. Mid-span sag in a long beam means you need a mid-span post or a larger beam size.
- Leaks at the ledger: Almost always a flashing installation sequence error — the flashing over the ledger wasn't tucked under the siding above it. This means water is running behind the flashing. Fix it before calling it done.
- Fastener pull-through or stripped holes: You've over-driven Tek screws. Back them out, use a slightly larger Tek screw with a sealing washer, and re-drive at lower torque.
- Oil-canning (wavy panels): Reduce fastener tension and check that purlins are level and co-planar. Some minor oil-canning in aluminum panels is cosmetic and normal, but significant waves indicate an installation or framing plane issue.
When to call a pro
This is a DIY-friendly project, but there are specific situations where professional help is the right call. If your cover span exceeds 20 feet in any direction, you're in a high-wind zone (140+ mph design wind speed), you're dealing with significant snow loads above 25 psf, or your building department requires a stamped engineer's letter that the kit manufacturer can't provide, get a structural engineer involved before you build.
Similarly, if the ledger must attach to a masonry wall, the fastening approach is fundamentally different and often requires a masonry-specific anchor evaluation. Once you've nailed a simpler lean-to, attaching shade sails or fans to the finished structure are great next-step projects that build on this same skill set.
Attaching a fan to your finished aluminum patio cover is usually a matter of finding solid framing, using the right fasteners, and sealing any penetrations properly fans to the finished structure. If you want shade afterward, review how to attach shade to aluminum patio cover safely, including where to fasten so the roof structure stays sound.
FAQ
Do I need to remove siding behind where the ledger board will mount, or can the ledger go over siding?
You generally want the ledger to bear on the house sheathing or rim board, not just the siding. If you leave siding in place, water can get trapped at the ledger line and the flashing stack-up will not work correctly. A practical approach is to cut back siding in the ledger zone, then use self-adhering flashing tape under the ledger and install the ledger flashing above it.
Can I build an aluminum patio cover using the existing slab and skip footings entirely?
Sometimes, but only if your local code and wind design allow it. For many setups, a slab-on-grade requires anchored post bases and a verified foundation capacity, sometimes with through-bolts or epoxy anchors in higher wind zones. If your kit or building department does not explicitly approve slab anchorage, you may need poured footings or drilled piers.
What should I do if the inspector or permit reviewer says my kit needs stamped engineering?
First, ask whether they want stamped drawings for the specific site conditions, like higher wind or snow, rather than just the kit model. If the manufacturer does not provide stamped plans for your jurisdiction, you will likely need a structural engineer to stamp the design or validate load paths, especially the ledger and beam-to-post connections.
How do I prevent leaks at the house-to-cover connection around the ledger?
Treat this like a layered water-management system. Remove or cut back siding so flashing can be installed to the sheathing, apply flashing tape before the ledger goes on, then install the upper flashing over the ledger and under the siding edge. Also verify butyl tape is applied at the ledger flashing-to-panel joint and that ends are sealed, not just caulked randomly.
What is the correct pitch to use, and how do I verify it before panels are installed?
A common target for lean-to systems is roughly 1 to 2 inches of drop per foot (about a 1:12 to 2:12 slope). Before you lock in components, measure from the ledger attachment point to the outer beam and confirm with a level or string line. If the slope is off after framing, adjusting post caps is much easier than trying to correct it once panels are fastened.
Why do aluminum panels look wavy, and can I fix it after fastening?
Oil-canning often comes from over-fastening, misaligned purlins, or panels installed under tension. Early symptoms are visible ripples, especially near fastener lines. If it happens, loosen or reduce screw tension, confirm the framing plane is straight, and replace sections if needed, because patching a large area later usually means removing multiple panels.
Do I really need sealing washers on every Tek screw?
Yes. Sealing washers are part of how the system stays weathertight at each fastener penetration. If you omit them or crush them by overtightening, water can work into the overlap seams and cause corrosion or staining over time. Use snug tight pressure, so the washer compresses without deforming.
How far apart should I place screws along the purlin line?
Follow the spacing pattern required by your panel system, but a typical approach is one screw near each end of a panel and then at regular intervals along the purlins, such as around every 11 inches. The key is consistency along the run and maintaining the kit-specified Tek size so the washer, panel gauge, and hole fit work together.
What clearance should I plan for between the ground and the underside of the cover?
Most codes and kit instructions set a minimum clearance, often around 7 feet for general usability, but 8 feet is commonly more comfortable and visually proportioned. Use local code as the deciding factor, especially if the cover is over a walkway, stairs, or a driveway where safety and vehicle clearance may matter.
If I live in a snow or high-wind area, what’s the safest next step before I build?
Do not guess your design loads. Identify your wind speed and snow load requirements from local building resources, then compare them to the kit’s engineering limits. If your snow load is above the kit’s baseline or the design wind is very high, hire a structural engineer or ask the kit manufacturer whether they can provide stamped verification for your county.
Can I attach ceiling fans or shade sails to the finished aluminum patio cover?
You can, but only if you fasten into the structural framing members, not just the panels or trim. Fans need a solid mounting location and correct fasteners rated for vibration loads, and penetrations must be sealed properly. Shade sails also require proper bracing and tension management so they do not pull on panel seams or distort the roof plane.