You can securely attach shade to an aluminum patio cover using stainless steel fasteners, purpose-made aluminum-compatible brackets or tracks, and the right sealant at every penetration point. The exact method depends on which type of shade you're working with (shade sail, shade screen panel, roller shade, or retractable shade) and how your aluminum cover is built, but the core principles are the same: find solid structure to anchor into, use corrosion-resistant hardware, seal every hole against water, and account for wind uplift loads before you call the job done.
How to Attach Shade to an Aluminum Patio Cover

Celia Vaughn
12 Jun 2026
Start by figuring out exactly what you're working with
Before you buy a single bolt, spend ten minutes assessing your patio cover. Aluminum covers come in a few common configurations: flat pan-style covers with hollow extruded beams, louvered covers where the roof panels can tilt, and lattice-style aluminum structures with open framing. Each one has different mounting zones and weight limits. Walk the perimeter and look at how the main beams run, where the posts are, and whether there's a fascia board or a continuous rail along the outside edge.
Now figure out what shade product you're installing. These four are the most common:
- Shade sail: A tensioned fabric triangle or rectangle that clips to anchor points at its corners. Requires strong, well-spaced anchor points that can each handle 100 lbs of pretension minimum, and considerably more in wind.
- Shade screen or privacy screen panel: A rigid or semi-rigid fabric panel that mounts flat to the cover frame, typically along a side or end. Usually attaches with screws, clips, or a track system.
- Roller or retractable shade: A tube-mounted shade that rolls up or retracts. Needs a bracket rail mounted to a solid structural member, not just to thin aluminum skin.
- Shade panel or pergola-style shade insert: A solid or semi-solid insert dropped into the existing cover frame, or layered on top. Often the heaviest option and the one most likely to require engineering input.
Also check your existing cover's condition. If screws are backing out, the aluminum is visibly corroded, or any connection points feel loose, fix those issues first. Attaching shade to an already-compromised structure just transfers the problem to a bigger failure later. This is closely related to thinking through how the cover was originally installed, which matters a lot when you start drilling new holes.
Picking the right attachment method for aluminum
Aluminum has some quirks that matter here. It's softer than steel, so it strips easily if you use the wrong screw or overtighten. It reacts with dissimilar metals (especially untreated steel) to produce galvanic corrosion over time. And thin-wall aluminum extrusions don't have a lot of thread engagement, so screw length and thread pitch actually matter more than people expect. If you need to drive a screw into your aluminum patio cover, stick with corrosion-resistant hardware and avoid overtightening to prevent stripping.
Fasteners
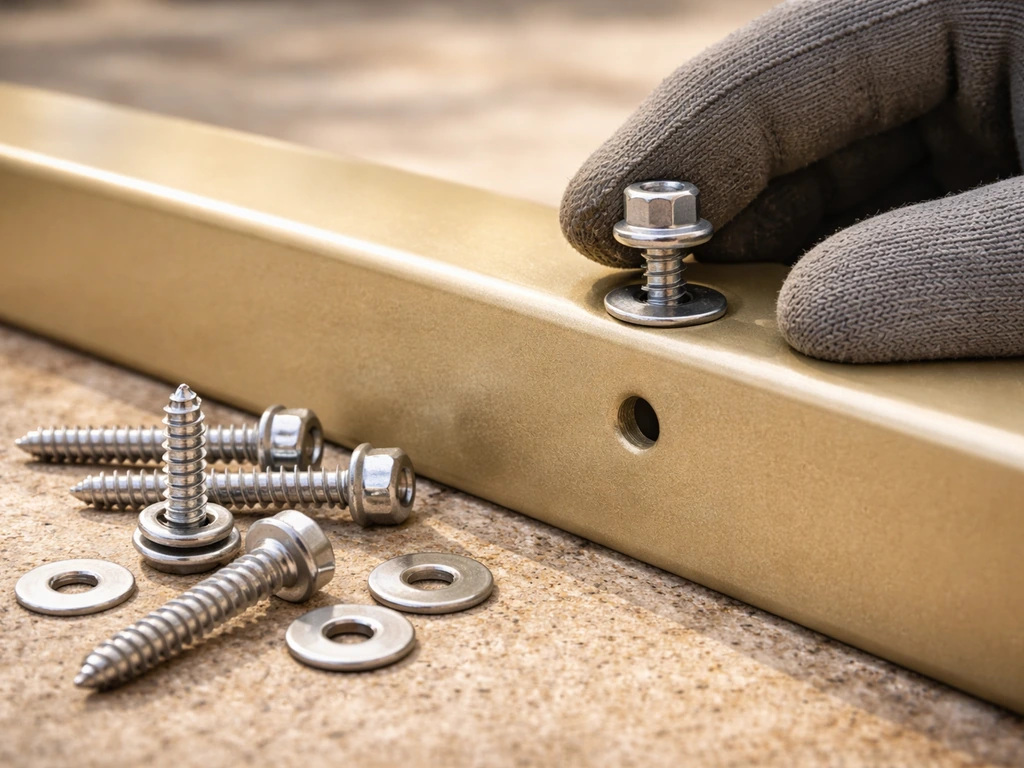
Use stainless steel or coated aluminum fasteners everywhere they contact the aluminum frame. Self-tapping sheet metal screws in stainless (or zinc-plated as a minimum) work well for light-load applications like screen panels or guide tracks. For anchor points that will carry real tension loads (shade sail corners, roller shade bracket rails), use through-bolts with large fender washers if the extrusion is hollow, or thread-forming screws sized to the wall thickness of your specific extrusion. Common mistake: people grab a pack of zinc drywall screws because they're handy. Those will corrode against aluminum within a season or two and back themselves right out.
Brackets and tracks
For roller and retractable shades, the manufacturer will supply or specify mounting brackets. Follow their bracket spacing rules carefully. A standard approach is to place brackets about 4 inches in from each end of the shade, then add a center bracket for any shade wider than 40 inches. These brackets need to land on a solid structural member, which on most aluminum patio covers means the main beam or the fascia-mounted end rail, not the decorative trim piece or the thin roof panel between beams.
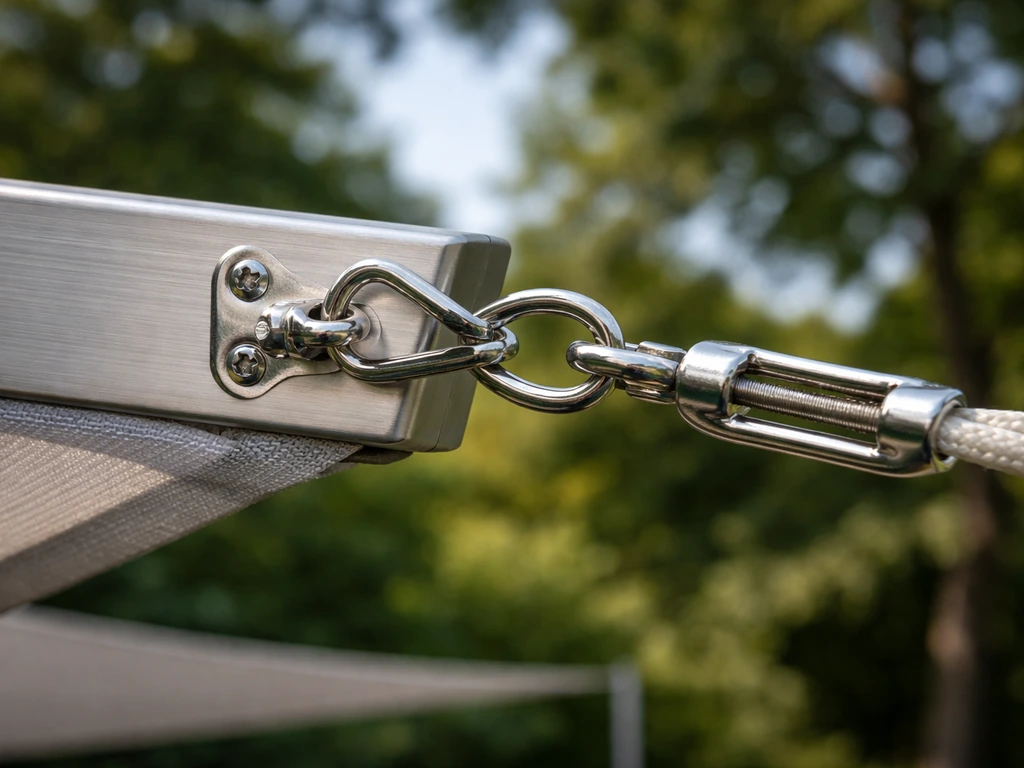
For shade sails, you need anchor hardware at each corner: typically a stainless steel eye bolt or eye strap, a snap hook or carabiner-style connector, and a turnbuckle. The turnbuckle is what lets you tension the sail correctly and re-tension it when it stretches over time. Attach the last turnbuckle after you've connected the other corners first, then use it to bring the sail to full tension at the end. The D-rings sewn into the sail corners hook to the snap hooks; the snap hooks connect to the turnbuckles; the turnbuckles thread to your eye bolts in the structure.
A quick comparison of attachment methods by shade type
| Shade Type | Primary Hardware | Best Anchor Point on Aluminum Cover | Key Caution |
|---|---|---|---|
| Shade sail | Stainless eye bolts, snap hooks, turnbuckles | Main structural beam or post cap | Each corner handles 100+ lbs pretension; verify structure |
| Shade screen panel | Self-tapping stainless screws or track clips | Beam flange or fascia rail | Don't anchor into roof pan skin only |
| Roller / retractable shade | Manufacturer brackets + stainless screws | Main beam (solid member) | Center bracket required over 40 in. wide; no drywall anchors |
| Rigid shade panel insert | Through-bolts with fender washers, or press-fit into frame | Full perimeter frame support | Heaviest option; check cover load rating first |
Step-by-step: attaching shade to your aluminum cover
These steps are organized around the most common scenario: attaching either a shade sail or a roller shade to an existing aluminum patio cover. If you want the full process, use these steps for how to build aluminum patio cover attachment details, from choosing anchors to weatherproofing the penetrations. Adjust to your specific product, but the layout and drilling sequence applies broadly. For a complete walkthrough of the process, see how to update an aluminum patio cover for your specific shade type.
- Measure and lay out the shade position. For a shade sail, stake or temporarily clip the sail into position with it lying loose to confirm corner placement before you drill anything. For roller shades, hold the bracket rail up against the beam and mark both end bracket positions first. Use a tape measure and a level; a shade that's installed even slightly crooked will look worse over time as it stretches or sags.
- Identify structural members at every anchor point. Tap along the aluminum extrusion with your knuckle or a screwdriver handle. Hollow pan sections sound different from beam walls and flanges. You want to drill into the thick wall of the extrusion, not the thin roof skin. When in doubt, look at the underside of the cover to see where the actual support structure runs.
- Mark and center-punch your hole locations. Use a marker to spot each hole, then use a center punch (or a sharp nail) to create a small indent. This stops the drill bit from walking on the slick aluminum surface when you start drilling.
- Drill pilot holes. Use a sharp HSS (high-speed steel) or cobalt drill bit sized for your fastener. Go slow with moderate pressure on aluminum; high speed creates heat that gums up the bit and deforms the hole edge. A drop of cutting oil helps. For shade sail eye bolts, drill through both walls of the extrusion if possible so you can use a through-bolt for maximum strength.
- Apply butyl tape or silicone sealant before inserting fasteners. This is the step most DIYers skip and regret later. Put a small ring of butyl tape or a dab of silicone around the shank of each fastener before it goes in. This seals the hole against water intrusion at the point of penetration. Butyl-backed aluminum flashing tape works well around eye bolt bases on top-exposed locations.
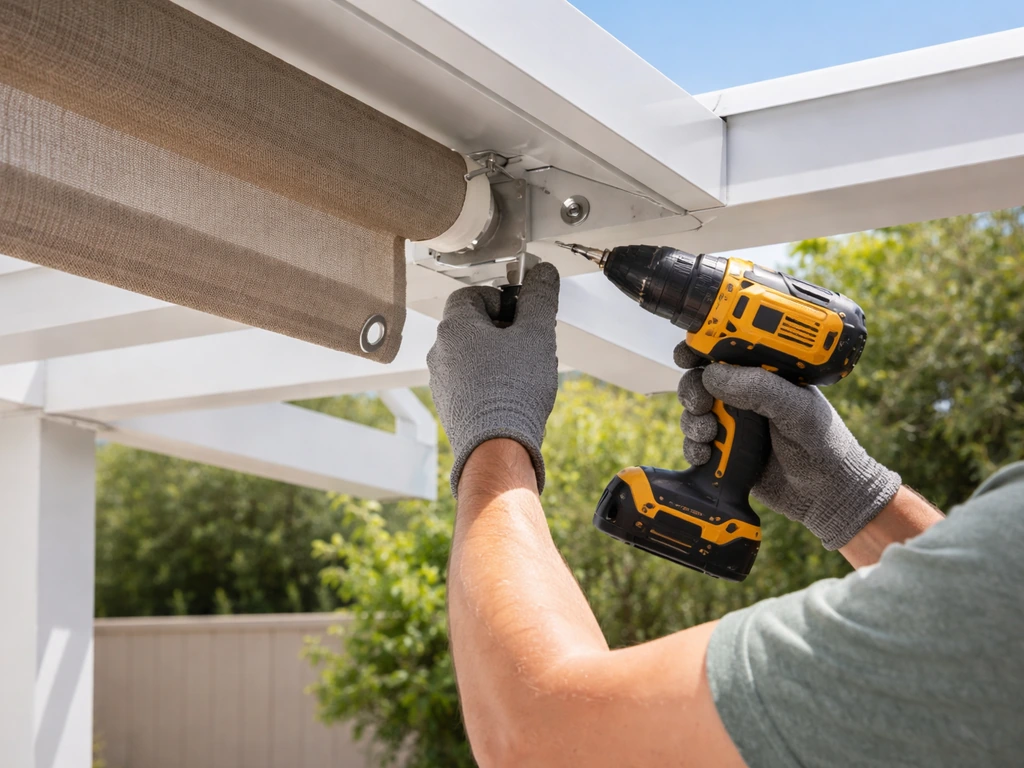
- Install fasteners and brackets. For screws, run them in by hand or at low torque on a drill until snug, then give a quarter-turn more. Do not crank them down hard on aluminum; you'll strip the threads or deform the extrusion wall. For through-bolts, tighten with a wrench until the washer just compresses against the metal, then stop.
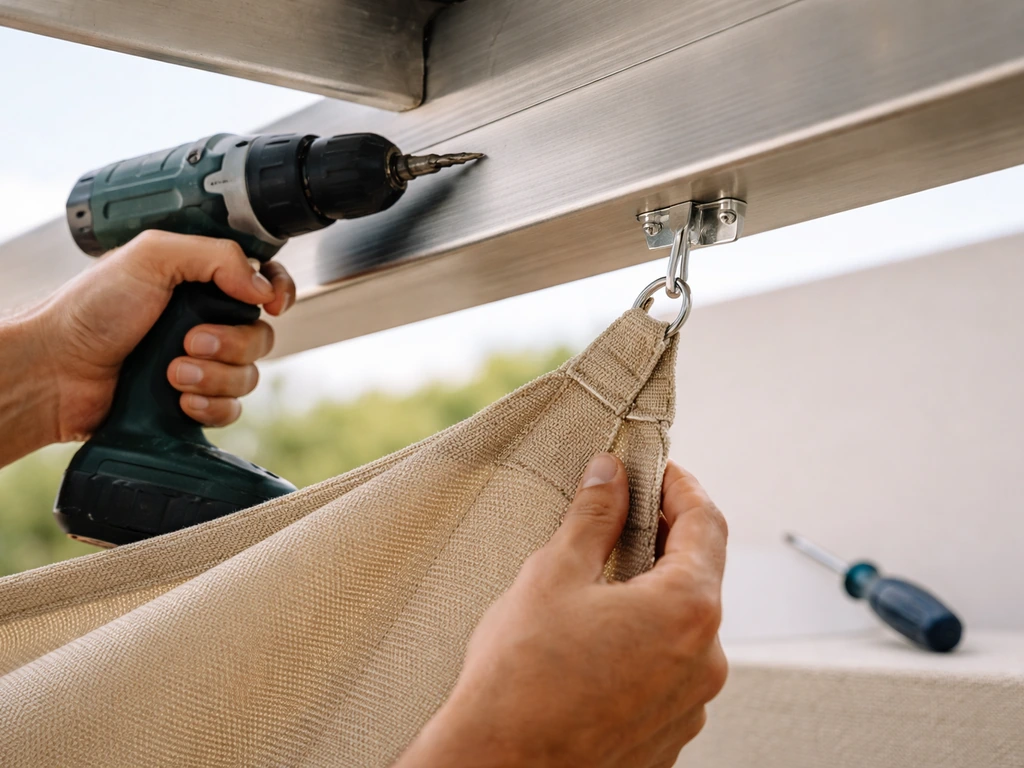
- Attach the shade. For roller shades, snap the roller into the brackets per the manufacturer's instructions. Leave screws slightly loose until the roller is seated and aligned, then tighten fully. For shade sails, attach all corners except the last one, then connect the final corner via the last turnbuckle and use it to tension the sail. Tension should be firm but not drum-tight; overtensioning puts excessive lateral load on anchor points and can deform aluminum beams over time.
- Final alignment check and tighten-up. Step back, sight down the shade from multiple angles, and confirm it's level, centered, and lying flat without wrinkles or bunching at the corners. Then do a final fastener check all the way around.
Weatherproofing, wind loads, and common aluminum pitfalls
Wind uplift is the problem that surprises people most. A shade sail or screen doesn't look heavy, but a 16-foot triangular sail in moderate wind can generate several hundred pounds of load at each corner. The IBC and ASCE 7 wind load standards (the same ones that govern your patio cover's structural design) apply to shade attachments too, and in high-wind zones this is not a number you want to estimate loosely. FEMA’s ASCE 7-22 tornado loads design guide provides guidance such as design pressure coefficients and related roof overhang loading concepts for severe wind events The IBC and ASCE 7 wind load standards (the same ones that govern your patio cover's structural design) apply to shade attachments too. If you're in a coastal area, hurricane zone, or anywhere with regular gusts over 90 mph, treat every anchor point as a structural engineering question, not a hardware-store question.
For everyday weatherproofing, every hole you drill into aluminum is a potential leak path. Seal them all with silicone or butyl tape on installation day, not as a follow-up task. To maximize waterproofing performance with butyl tape on metal-roof applications, follow the manufacturer’s best-practice installation guidelines Silicone or butyl tape on installation day. Butyl tape is particularly good for eye bolt bases and bracket footprints because it conforms to uneven surfaces and stays flexible. Silicone works well for screw heads and smaller penetrations. What often goes wrong here: people use latex caulk because it's what was on the shelf. Latex caulk degrades outdoors within a year or two; use 100% silicone rated for metal or butyl-based flashing tape instead.
A few other aluminum-specific issues to watch for:
- Galvanic corrosion: Any untreated steel fastener touching bare aluminum will eventually corrode at the contact point. Always use stainless steel, coated aluminum, or galvanized hardware as a minimum. If you can see rust streaks around a screw after one season, that's galvanic corrosion telling you to upgrade the fastener.
- Overtightening: Aluminum extrusions have thinner walls than steel or wood. Crushing the wall of a beam with an overtightened bolt compromises both the fastener hold and the structural integrity of that beam section.
- Missing load path: Anchoring into a decorative cap or a thin roof panel instead of into the main beam or post is by far the most common structural mistake. That thin aluminum panel will pull through or deform under real load.
- Retractable shades in wet climates: If you're in a humid area, roll the shade down occasionally to let both sides air-dry and prevent mold buildup in the rolled tube.
- Forgetting to re-tension: Shade sail fabric and some screen materials creep and relax over the first few weeks. Plan to re-tension your turnbuckles about two to four weeks after initial installation.
On the topic of severe weather: if a storm is coming, take down your shade sail. This is not a design flaw; it's standard operating procedure. Even well-engineered installations are better protected by removal during hurricanes or severe thunderstorm events. Shade screen panels and retractable shades that roll up fully are more storm-resilient than open-air sails.
Tools and materials you'll need before you start
Having everything on hand before you start saves the most common frustration: stopping mid-install because you're missing a specific size of hardware. Here's a realistic checklist for most shade attachment jobs:
- Tape measure (25 ft) and a 4-ft level
- Center punch and hammer
- Cordless drill/driver with variable speed
- HSS or cobalt drill bits in the sizes for your fasteners (typically 3/16 in. to 3/8 in. for shade work)
- Cutting oil or WD-40 for drilling aluminum
- Stainless steel self-tapping screws (pan head, size matched to your bracket hardware)
- Stainless steel eye bolts and/or eye straps (for shade sail anchor points)
- Stainless steel snap hooks and turnbuckles (one per shade sail corner)
- Manufacturer-supplied brackets (for roller or retractable shades)
- 100% silicone sealant (clear or color-matched) and a caulk gun
- Butyl-backed aluminum flashing tape for eye bolt bases and larger penetration points
- Fender washers (large OD, stainless) for through-bolt applications
- Adjustable wrench and screwdrivers
- Safety glasses and work gloves
- Ladder rated for your working height (minimum 300-lb duty rating for most adults with tools)
For layout, here's the practical advice: measure the shade twice and dry-fit everything before drilling. For shade sails, use a chalk line or string to map out the three or four corner positions on the structure before you commit to any holes. For roller shades, hold the bracket rail in position and use a pencil to trace the bracket footprints directly, then double-check with a level. On aluminum surfaces, a silver or white paint marker shows up better than a regular pencil.
Safety, permits, and when to call a pro
Most straightforward shade attachment jobs are solid DIY territory: hanging a roller shade from an aluminum beam, attaching a shade screen panel to an existing frame rail, or running a small shade sail between two structural posts. If you're comfortable using a drill and following manufacturer instructions, you can do these confidently in an afternoon.
Where to pump the brakes and consider professional help:
- Large shade sails (over 12 to 14 feet on any side) in any wind zone, or any sail in a high-wind coastal or hurricane-prone area. The corner loads are high enough that a structural engineer should evaluate your anchor points.
- Shade panels or shade structures that add meaningful weight (more than 5 to 10 lbs per linear foot) to the existing cover. The original patio cover was designed to a specific load, and you don't want to exceed it.
- Any situation where you need to attach to the house wall behind the aluminum cover. Drilling into a ledger or rim joist for an anchor point involves waterproofing the house envelope, which is a separate and serious concern. A bad anchor point here can allow water intrusion that damages framing over time.
- If your existing aluminum cover has any structural problems (bent beams, pulling-away connections, significant corrosion at joints), fix those first or have a pro assess them before you add any shade load.
- Permit requirements vary by jurisdiction, but any permanent structure or substantial attachment may require a building permit in your area. Check with your local building department before you start, especially if you're in a subdivision with an HOA or in a coastal county with strict wind-load enforcement.
On ladder safety: most of this work happens 8 to 12 feet off the ground. Set your ladder on firm, level ground, never overreach, and have a helper hold the base when you're drilling with any real force. Aluminum shavings are sharp, so wear safety glasses the entire time you're drilling.
Your next step today is to go assess your specific cover: note the beam layout, measure the span where you want the shade, and pull the installation instructions for the specific shade product you're buying. Before you start drilling, make sure you follow a verified guide for how to install aluminum patio cover components and attachments for your specific setup. Most quality shade manufacturers (including roller shade brands like Coolaroo and most shade sail suppliers) include good install guides that specify the right hardware for their product. Match those hardware specs to what you now know about your aluminum cover's structure, and you'll have a clear picture of exactly what to buy and where to anchor it. If you are specifically installing a fan on an aluminum patio cover, use those same hardware specs and attachment points, then make sure the wiring route stays properly sealed and protected from moisture how to install fan on aluminum patio cover.
FAQ
Can I use the same fasteners for every shade type on an aluminum patio cover?
Not always. If your patio cover uses hollow extruded beams, you usually need through-bolts with large fender washers so the fastener clamps the structure without relying on thin threads. If the main member is solid or you have a fascia-mounted end rail with adequate wall thickness, thread-forming screws may be acceptable. Before drilling, check whether the member is hollow by looking for end caps or measuring wall thickness, and match the attachment hardware to that condition.
How do I avoid drilling into the wrong part of the aluminum cover?
Dry-fit everything before sealing. Once you seal and drill, you should not be repositioning the brackets or eye bolts because misalignment can leave water paths around the penetrations. Use a chalk line or bracket rail template to confirm alignment, then drill one pilot hole first to verify you hit a structural member and not a thin panel or trim piece.
What’s the simplest way to prevent galvanic corrosion and fastener loosening?
Use hardware compatible with aluminum and the outdoor environment. A practical approach is stainless steel where possible, or coated aluminum for low-tension applications, and never plain zinc hardware when it directly contacts aluminum because it can corrode and loosen. Also confirm the screws are sized for the extrusion wall thickness so you get full thread engagement without overtightening.
Do I still need structural anchoring if I’m installing a roller or retractable shade?
Yes, but it’s easy to get it wrong. For roller or retractable shades, you still need brackets to land on the main beam or a structural rail, but the product’s bracket spacing rules control the load path. Don’t assume the “4 inches from each end and a center bracket over 40 inches” guideline applies to your exact roller model, use the manufacturer spacing chart if it differs.
How can I tell if my shade sail or screen attachment is strong enough before using it?
Consider dynamic load, not just the static tension. Shade sails and screen panels experience gust loads that can rack the corners and peel anchors off if the attachment is only lightly clamped. If you get any flex when you push the connection by hand, that’s a sign the fastener is not anchored into a main structural member or the hardware is undersized.
Should I seal penetrations with silicone or butyl tape (and where exactly)?
Your waterproofing choice depends on what you are sealing. Use butyl tape under bracket footprints and under eye bolt bases because it conforms and stays flexible, then use 100% silicone for sealing screw heads and small irregular penetrations. Avoid latex exterior caulk because it degrades faster outdoors and can open gaps at movement points.
What’s the best way to avoid stripping aluminum when installing shade brackets?
Yes, and you can often prevent stripping with two checks. First, drill the correct pilot diameter if the method calls for it, and second, stop tightening as soon as the fastener clamps firmly, don’t exceed snug torque by guesswork. If the aluminum extrusion is thin-wall, using the wrong thread pitch or too-long a screw can also damage the member, so match screw length to your specific extrusion thickness.
Why does wind uplift matter even for shades that don’t feel heavy?
They’re different in how wind load is resisted. A taut shade sail uses corner anchors and tensioning hardware to share loads, while screen panels and roller shades often rely more on bracket rails that resist racking and movement. For any installation, treat wind uplift as the design driver and ensure the mounting points are braced to the structure you would expect the patio cover itself to be designed around.
If a storm is forecast, when should I remove or retract my shade?
Take-down timing depends on wind conditions and your region, but a good rule is removal before the storm window when sustained winds begin to climb, not after gusts start. If you cannot safely remove it, prioritize retractable models that roll up fully, and for open sails keep them loosened or lowered if the product allows, because flapping increases loads and stress on anchors.
What maintenance should I do after installing shade on an aluminum patio cover?
For common nuisance failures, check three areas: water intrusion at sealed penetrations (look for stains or soft sealant), corrosion or discoloration where dissimilar metals contact, and bracket movement that creates squeaks or visible gaps. Retension shade sail turnbuckles periodically because the fabric stretches, and re-check fasteners after the first heavy wind season.