
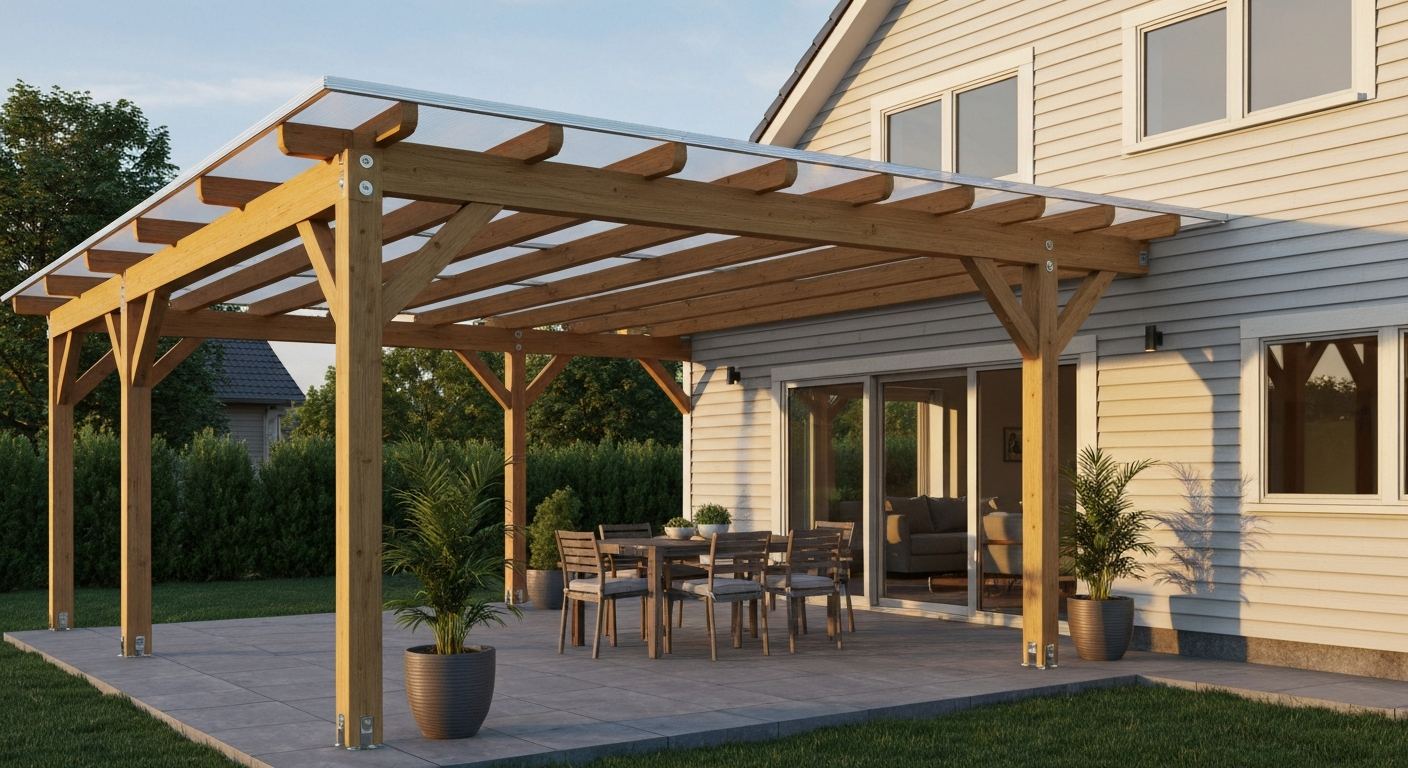
You can build a patio awning yourself over a weekend or two using wood, aluminum, or fabric, depending on the style and size. A basic fabric canopy on a simple wood frame is a one-day project. A solid lean-to with a ledger board and polycarbonate roofing takes a weekend with a helper. A free-standing gable structure is a 2-to-3-day build that will need footings, posts, and possibly a permit. This guide walks you through every decision from planning and permits through material selection, step-by-step construction for three common styles, fastening details, drainage and pitch, rough sizing rules, costs, and when it genuinely makes sense to call in a professional.
How to Make an Awning for a Patio: DIY Plans & Guide

Celia Vaughn
27 Jul 2026
Who this guide is for and what you'll end up with
This guide is written for homeowners who are comfortable with basic carpentry and power tools, you've hung a gate, built a raised bed, or replaced a section of fence. You don't need to be a contractor, but you should be able to read a tape measure accurately, drive lag screws, and work safely on a ladder. By the end, you'll have enough information to plan a code-compliant patio awning, choose the right materials and style for your climate and budget, and either build it yourself or have an intelligent conversation with a contractor if you decide to hand it off.
The project scope here covers three styles: a simple lean-to attached to your house, a small gable-roof awning attached to the house, and a free-standing post-supported shade structure. Fabric canopy awnings are also covered as a lower-cost, lower-effort option. A well-built patio awning adds usable outdoor living space, reduces solar heat gain through adjacent windows, and can meaningfully increase your home's value.
Before you start: quick decision checklist
Run through this before you price materials or pull out a pencil. Getting clear on these four things early saves a lot of back-and-forth later.
- Size: How wide and how deep does the shade structure need to be? Measure your patio slab or intended footprint. Note the height of the eave or wall where it would attach. Standard residential awnings run 8 to 16 feet wide and 8 to 12 feet deep.
- Style: Do you want it attached to the house (lean-to or gable) or free-standing? Attached structures are more sheltered from wind but require flashing and ledger work. Free-standing structures need footings but don't penetrate your house envelope.
- Budget: Fabric canopy systems can run $150 to $800 in materials. A wood or aluminum lean-to with polycarbonate roofing typically costs $500 to $2,500 in materials for a 10x12 ft structure. A full gable or free-standing structure can reach $1,500 to $5,000+ depending on materials and size.
- Skill level: Be honest. If you've never used a circular saw or aren't comfortable on a 10-foot ladder with a drill, a fabric canopy kit is a better starting point than a framed structure. Most ledger-attached framed awnings are rated at a medium DIY difficulty level — doable, but not beginner-level.
Planning, permits, and what triggers an inspection
This is the step most people skip and later regret. A permit that gets flagged after the fact can require you to tear down work or bring in an engineer retroactively, which costs far more than the permit application itself. Here's what to know before you build.
When you typically need a permit
In most U.S. jurisdictions, any structure attached to your house, including a patio awning with a ledger board connection, is treated as a building addition and requires a permit. The International Residential Code includes a dedicated appendix (Appendix AH) specifically for patio covers, which sets limits of one story and a maximum 12-foot height for prescriptive (non-engineered) designs. Cities like Austin, Los Angeles, and Phoenix explicitly require building permits for attached patio covers and may require structural drawings. Seattle's permitting rules extend to awnings and canopies that protrude from the building envelope.
Detached structures under 120 square feet of roof area are commonly exempt from a permit in many jurisdictions, but that exemption disappears the moment the structure is attached to the house. When in doubt, call your local building department before you start, not after. A five-minute phone call is free.
Planning checklist before you submit or build
- Measure the patio: width, depth, and the height from the ground to the attachment point on the house wall.
- Identify your wall structure: is there a rim joist or band joist behind the siding where you plan to attach a ledger? Ledger boards must fasten directly to structural framing, not just through stucco or lap siding.
- Check your local frost depth: footing depth for any posts must extend below the frost line. This varies from zero inches in southern states to 48+ inches in northern climates. Your local building department posts this figure.
- Look up wind and snow loads for your area using the ASCE Hazard Tool (asce7hazardtool.online) or ask your building department. These directly affect rafter sizing and connection requirements.
- Confirm HOA rules if applicable — some HOAs restrict awning colors, materials, or configurations separately from the municipal code.
- Prepare a basic site plan (a hand-drawn sketch with dimensions is usually acceptable for simple structures) showing the awning footprint, distance to property lines, and attachment point.
- Submit for permit if required. For simple prescriptive designs using standard materials, many jurisdictions issue over-the-counter permits without a full structural engineer. More complex spans, high snow loads (above roughly 30 psf ground snow load), or non-standard configurations typically trigger an engineering review.
When you need an engineer to sign off
For most standard-size attached lean-tos and awnings using prescriptive construction (standard lumber sizes, spans within the AWC span tables, standard post spacing), you won't need an engineer. You will likely need engineering review if your span exceeds about 14 feet between supports, if your ground snow load is above 30 psf, if you're in a high-wind zone (ultimate design wind speed above roughly 130 mph), or if your local code office specifically requires it for attached structures. ASCE 7-22 updated its snow load maps and procedures, so if you're working in an area with variable snow loads, use the current ASCE Hazard Tool rather than older regional tables. For site-specific ground snow loads and ultimate wind speeds, consult the ASCE Hazard Tool, site-specific design data (ASCE 7) for the project coordinates ASCE Hazard Tool — site-specific design data (ASCE 7).
Choosing the right awning style
Each style has a different construction complexity, cost range, and best use case. Here's an honest breakdown.
Lean-to (shed-roof) awning
A lean-to awning attaches at the top to a ledger board on your house wall and slopes downward to a beam supported by posts at the outer edge. It's the most common DIY patio awning style because it's structurally simple, uses the house as one support, and is relatively fast to frame. It works best when you want a permanent, solid shade structure and have a house wall that's suitable for ledger attachment. The single slope means water runs away from the house toward the yard, which is ideal for drainage. This is the style most people are thinking of when they search for how to make an awning for a patio. For a step-by-step walkthrough on how to build a wooden awning for your patio, see this detailed guide on building a wooden patio awning. If you want step-by-step instructions and material lists, see our detailed guide on how to build an awning over a patio (b9d90ebd-09f1-46a5-a62e-0072f5cc9161).
Gable awning
A gable awning has a peaked roof with two slopes meeting at a ridge. It looks more architectural than a lean-to and handles rain and snow better because pitch angles are steeper. The trade-off is more framing complexity: you need a ridge board, two sets of rafters, and often a knee wall or collar ties for a larger span. For a small gable attached to the house, the extra work adds maybe half a day compared to a lean-to. It's a good choice if your patio is deep (more than 12 feet from the house) or if you want the finished look to blend with the roofline of the home.
Free-standing post awning
A free-standing structure doesn't attach to the house at all. Four or more posts support beams and rafters independently. This eliminates ledger flashing risk and avoids penetrating the house envelope entirely, but it requires proper footings under every post and careful attention to racking (lateral movement). It's the right choice when your patio is detached from the house, when your house wall isn't suitable for a ledger, or when you want a pergola-style shade structure further into the yard.
Fabric and canopy awnings
A fabric awning uses a light aluminum or steel frame (or wall-mounted brackets) to support a canvas, acrylic, or polyester fabric cover. Retractable fabric awnings are common on storefronts but increasingly popular in residential settings. These are the easiest to install, the cheapest to buy, and the least permanent, fabric degrades faster than hard materials and won't shed heavy snow loads. They're ideal for renters, for homeowners who want a quick seasonal shade solution, or as a first step before committing to a permanent structure. Good-quality acrylic fabric (like Sunbrella-grade material) lasts 8 to 12 years with proper care.
Materials overview: what to use and what to avoid
Wood
Wood is the most accessible material for most DIYers. It's easy to cut, fasten, and modify on-site, and it's available at any lumber yard. For structural members (posts, beams, rafters), use pressure-treated (PT) lumber for any members in contact with concrete, masonry, or within 6 inches of grade. Above that, you can use Douglas fir, Southern yellow pine, or hem-fir for rafters and beams. Cedar and redwood are naturally rot-resistant and commonly used for finish-visible members like fascia boards and decorative beams. What often goes wrong with wood: people use standard dimensional lumber in ground contact without PT treatment, or they use the wrong grade. Always check the lumber grade stamp. For structural rafters, look for No. 2 or better. Common mistake: buying cedar 4x4 posts because they look nice, then setting them in concrete contact without PT treatment, cedar resists rot better than pine but is still not rated for ground contact the way PT lumber is.
Aluminum and steel
Extruded aluminum patio cover systems (like Alumawood and similar products) are popular in western U.S. climates. They're lightweight, rust-proof, and require essentially no maintenance. The trade-off is cost, a prefabricated aluminum cover kit for a 12x16 ft patio typically runs $1,200 to $3,500 in materials, more than a comparable wood frame. DIY installation is possible with aluminum kits, which come with pre-cut extrusions and hardware, but you'll still need to handle the ledger attachment and any required footings correctly. Steel is heavier and requires rust-proof coating or galvanizing for outdoor use. For most DIYers, steel makes sense mainly as brackets and connectors rather than primary framing.
Polycarbonate panels
Polycarbonate sheets (twin-wall, corrugated, or solid) are a popular roofing surface for DIY patio awnings. They let in diffused light while blocking rain and most UV. Palram's SUNTUF and SUNGLAZE lines are widely available at home improvement stores. Key installation notes from the manufacturer: always pre-drill oversized holes to allow for thermal expansion (polycarbonate moves significantly with temperature changes), install with the UV-protected side facing up, and follow the minimum slope requirements (typically 1:12 or 1.5:12 depending on the product). Using too little slope is a common mistake, pooling water on polycarbonate panels causes algae growth and panel discoloration within a season or two.
Fabric
Solution-dyed acrylic fabric (the category Sunbrella leads) is the best choice for permanent fabric awnings. It's mildew-resistant, colorfast, and can handle moderate rain. Polyester with a PVC coating is cheaper but degrades faster in UV exposure. Avoid thin canvas tarps for anything meant to be a semi-permanent fixture, they won't last more than a couple of seasons and will look weathered within the first year.
PVC and vinyl
PVC pipe and vinyl fabric are sometimes used for low-cost DIY shade structures, typically as a quick canopy frame rather than a permanent awning. PVC schedule 40 pipe can work for lightweight frame structures but is not rated for structural loading. Don't use PVC as your primary post or rafter material for anything that needs to support snow load or significant wind pressure. As a lightweight pergola-style shade frame in mild climates, it's workable at very low cost.
How the materials compare
| Material | Approx. material cost (10x12 ft) | Durability | Maintenance | Typical lifespan | DIY friendliness |
|---|---|---|---|---|---|
| Pressure-treated wood | $300–$700 | Good | Stain/seal every 2–3 years | 20–30 years | High — easy to cut and fasten |
| Cedar / redwood | $500–$1,200 | Very good | Oil or seal every 2–3 years | 25–35 years | High — lightweight and workable |
| Aluminum kit system | $1,200–$3,500 | Excellent | Minimal — occasional wash | 30–50 years | Medium — kit-specific instructions |
| Polycarbonate panels (roofing only) | $100–$300 | Good | Annual cleaning, check seals | 10–20 years | High — lightweight, pre-drill required |
| Solution-dyed acrylic fabric | $150–$600 | Good | Clean seasonally, store in winter | 8–12 years | Very high — no structural work |
| PVC pipe frame | $50–$150 | Low | Minimal | 3–7 years | Very high — but limited use cases |
Attachment methods: how the awning connects to your house or ground
Ledger board to house
The ledger board is the horizontal piece of lumber (typically a 2x8 or 2x10) that bolts to your house wall and carries the upper end of all your rafters. Getting this right is the most critical part of an attached awning build, a failed ledger connection is the number one structural failure point. The ledger must fasten directly into the rim joist or band joist of your house framing, not just through the siding. That means removing siding and housewrap in the attachment zone, shimming or using standoff spacers to allow drainage behind the ledger, and using the correct fastener type, size, and spacing. Simpson Strong-Tie's Deck Connection and Fastening Guide specifies approved fasteners and spacing, commonly 1/2-inch lag screws or structural bolts in a staggered pattern. Corrosion-resistant hardware (hot-dipped galvanized or stainless steel) is required where treated lumber is used. After fastening, the gap between the ledger and the house sheathing must be flashed properly with metal flashing and sealant to prevent water intrusion. This is where leaks almost always start when a DIY awning fails, skipped or improper flashing.
Post-mounted connections
Posts can be set directly in concrete (embedded post method) or mounted on post bases bolted to concrete footings (preferred for wood posts). The embedded method is simple but permanent and leads to post rot at the concrete interface over time, even with PT lumber. Post bases like the Simpson ABA or ABU series elevate the post slightly off the concrete, improving drainage and dramatically extending post life. Footings under posts must extend below the local frost line per IRC R403.1.4, and footing dimensions should be sized per IRC Table R507.3.1 based on the load area each post carries. In practice for a standard 10x12 patio awning in moderate climates, a 12-inch diameter, 12-inch deep footing (below frost) under each post is a common minimum, but check your local requirements.
Bracket and anchor connections
For lightweight fabric awnings or canopy frames, wall-mounted brackets are often the primary attachment. These are typically lag-screwed into studs at 16 or 24 inches on center. Find the studs before you start, a magnetic stud finder is more reliable than an electronic one on stucco walls. For attaching post bases or brackets to an existing concrete patio slab, concrete screw anchors (like Simpson Titen HD) are a reliable option. Follow the ICC-ES report for your specific anchor: embedment depth, spacing from edges, and installation torque matter. A common mistake is installing anchors too close to the edge of a slab, which causes concrete splitting under load.
Step-by-step builds for three common styles
Build 1: simple lean-to awning attached to the house
Difficulty: Medium. Time: 1 to 2 days with one helper. This covers a 10x12 ft patio awning using a ledger board, two front posts, a front beam, and rafters topped with polycarbonate or corrugated metal roofing.
Tools needed: circular saw, drill/driver, impact driver, hammer, level (4-foot), tape measure, chalk line, post hole digger or rented auger, ladder, safety glasses, and hearing protection.
Materials needed: one 2x10 ledger board (length = awning width), two 4x4 or 4x6 PT posts (height based on desired awning height plus footing depth), one 2x8 front beam doubled or a single LVL beam, 2x6 rafters at 24 inches on center, polycarbonate panels or corrugated metal roofing, post bases and hardware, lag screws (1/2" x 4"), joist hangers, ridge flashing and Z-flashing, concrete for footings.
- Mark the ledger location on the house wall at your desired height, accounting for slope: the ledger sits higher than the front beam to create drainage slope (see pitch guidelines below).
- Remove siding in the ledger zone, install Z-flashing above, attach the ledger with lag screws into the rim joist at the prescribed spacing (typically every 16 inches staggered), and seal all penetrations with flashing tape.
- Dig post holes at your two front corners to the required depth below frost line. Set post bases in concrete, or set PT posts directly in concrete. Check plumb in two directions before concrete sets.
- Once footings cure (minimum 24 hours, ideally 48), set posts in bases or trim embedded posts to height. Height should put the front beam low enough for your desired pitch.
- Install the front beam across the two posts, check level, and secure with post caps (Simpson BC or similar). Double-check that the beam and ledger have the correct height difference for your target pitch.
- Install rafters: set them in joist hangers at the ledger end and notch or use rafter ties at the beam end, at 24 inches on center. Check for plumb and square as you go.
- Install fascia board across the front of the rafters for a finished look.
- Install roofing panels: for polycarbonate, pre-drill oversize holes, install with manufacturer-supplied closure strips at each end, and use roofing screws with rubber washers. Overlap panels per manufacturer instructions (usually 2 to 3 corrugations).
- Re-seal all flashing at the ledger-house junction. Run a bead of exterior silicone along the top of the Z-flashing. Do not seal the bottom of the ledger — you want any incidental water to drain out, not pool.
Build 2: small gable awning attached to the house
Difficulty: Medium-high. Time: 2 to 3 days with one helper. A gable awning adds a ridge and two rafter slopes but is more visually finished and handles weather better on deeper patios.
Materials needed: all the above for a lean-to, plus a ridge board (1x8 or 2x8), doubled or LVL header if creating a gable end opening, gable end framing lumber, and roofing material for both slopes. Polycarbonate, metal, or asphalt shingles are all options, asphalt shingles require 3:12 pitch minimum.
- Install the ledger board on the house wall at the center height of your intended ridge, not at rafter height. The ridge will connect here or just above.
- Set four posts (two at each front corner of the gable end) and install two side beams running from the house ledger supports to the front posts.
- Cut and install a ridge board from the house wall to a free-standing ridge support (either a knee wall at the gable end or a post-and-beam at the front).
- Cut rafters in pairs — each pair shares a peak at the ridge and a seat cut at the beam. Use the same rafter template for all pairs for consistency.
- Install rafters on 24-inch centers on both sides of the ridge. Use hurricane ties at the beam connection for uplift resistance.
- Frame the gable end triangles with vertical studs for a finished look, or leave open for a more open pergola-style appearance.
- Install roofing per the material requirements. For polycarbonate on a gable, run panels down each slope from the ridge cap to the drip edge.
- Install flashing where the ridge meets the house wall — this is a critical leak point. Use step flashing or a continuous piece of metal flashing with a bend, sealed at the top.
Build 3: free-standing post awning
Difficulty: Medium. Time: 2 to 3 days. This builds a four-post pergola-style shade structure that stands independently of the house. You can put solid roofing on it or leave it open with shade cloth.
- Lay out the four post locations using batter boards and string lines. Check square by measuring diagonals — they should be equal.
- Dig and pour four footings below frost line at each post location. Use tube forms (Sonotube) for clean cylindrical footings. Set post base hardware in wet concrete, check position with a template.
- Set posts in bases once concrete has cured. Brace each post temporarily with diagonal 2x4 bracing staked to the ground — do not rely on the post base alone to hold the posts plumb while you build.
- Install the two side beams first, running the length of the structure, resting on post caps at each end. Check level.
- Install the front and back beams (or if it's a simple rectangle with all four beams, install all four at the same height for a flat-roof look, or drop the two end beams slightly for a lean-to effect).
- Install rafters across the beams at 24 inches on center. Add decorative tails (angled cuts at the end of each rafter extending past the beam) for a finished pergola look.
- Install roofing, shade cloth, or leave open. For free-standing structures in windy areas, add diagonal knee braces from post to beam for racking resistance — this is often overlooked and is the most common reason free-standing shade structures fail in high winds.
Roof pitch and water drainage guidelines
Pitch is expressed as rise over run: a 2:12 pitch rises 2 inches for every 12 inches of horizontal run. The right pitch depends on your roofing material, your climate, and the visual style you're after.
| Roofing material | Minimum recommended pitch | Preferred pitch range | Notes |
|---|---|---|---|
| Polycarbonate panels (corrugated) | 1:12 | 2:12 to 3:12 | Too flat causes algae and pooling |
| Polycarbonate panels (twin-wall) | 1.5:12 | 2:12 to 4:12 | Follow Palram/manufacturer spec |
| Corrugated metal / metal roofing | 1:12 | 2:12 to 3:12 | Seal all laps and screw washers well |
| Asphalt shingles | 3:12 minimum | 4:12 to 6:12 | Under 3:12 requires self-adhesive underlayment |
| Fabric canopy (tensioned) | Varies by tension | 10–15 degrees minimum | Must drain to edges, no flat pools |
| Built-up or membrane (EPDM) | 0.25:12 minimum | 0.5:12 to 2:12 | Best left to professionals for retrofit |
To calculate the height difference between your ledger and your front beam for a lean-to: multiply the pitch rise by the run in feet. For a 10-foot deep awning at a 2:12 pitch, the ledger needs to sit (2 x 10) = 20 inches higher than the top of the front beam. Mark this before you set anything, it's much easier to get right before posts are in concrete.
For drainage, always direct water away from the house. Install a drip edge or gutter at the low end of the roof. For polycarbonate and metal panels, seal the open ends of corrugations with closure strips (available from the panel manufacturer) to block insects and debris while still allowing thermal movement. Don't fully seal the lower edge, water needs to exit.
Rough sizing and beam span rules of thumb
These are non-engineered rules of thumb for typical residential awnings in moderate climates (ground snow load under 20 psf, no extreme wind). If you're outside those conditions, use the AWC Span Tables for Joists and Rafters (2021 edition) with your specific load inputs, or have an engineer size your members.
- Rafters at 24-inch spacing: 2x6 Douglas fir No. 2 spans up to about 10 feet under typical roof loads; 2x8 spans to about 13 feet; 2x10 spans to about 16 feet. These are rough guides — always verify with the AWC tables for your specific lumber species, grade, and load.
- Beams supporting rafters: A doubled 2x8 (two 2x8s nailed together) spans approximately 8 to 10 feet between posts for moderate loads. A doubled 2x10 extends this to about 12 feet. For spans above 12 feet or higher loads, use a glulam, LVL, or have a beam sized by an engineer.
- Post sizing: 4x4 PT posts are adequate for single-story awnings with a post height up to 8 feet and moderate tributary areas. Use 6x6 posts for heights above 10 feet or for wider tributary areas.
- Footing size: For a 4x4 post carrying a 10x12 ft awning with moderate loads, an 18-inch diameter footing at least 12 inches deep (below frost) is a common starting point. The IRC Table R507.3.1 gives more specific sizing based on tributary area and soil bearing capacity.
- When you need engineering: span over 14 feet between supports, ground snow load above 30 psf, design wind speed above 130 mph (ultimate), seismic design category D or higher, or if your local building department specifically requires stamped drawings.
Costs, budget options, and where to source materials
Cost varies enormously depending on style, material, and region. Here's a realistic range breakdown for common DIY builds, not including permit fees (which run $50 to $500+ depending on jurisdiction and project value).
| Awning type | DIY material cost (approx.) | Professional installed cost (approx.) | Time to build (DIY) |
|---|---|---|---|
| Fabric canopy awning (bracket-mounted) | $150–$800 | $500–$1,500 | Half day |
| Wood lean-to with polycarbonate roofing (10x12 ft) | $500–$1,200 | $2,000–$4,500 | 1–2 days |
| Aluminum kit lean-to (10x12 ft) | $1,200–$3,000 | $2,500–$5,500 | 1–2 days |
| Wood gable awning (10x14 ft) | $900–$2,000 | $3,000–$6,000 | 2–3 days |
| Free-standing wood pergola (12x16 ft) | $1,000–$2,500 | $3,500–$8,000 | 2–3 days |
For budget-conscious builds, consider these options: buy a prefabricated aluminum kit (cuts waste and comes with hardware), source reclaimed lumber from architectural salvage yards or Facebook Marketplace (fine for non-structural decorative members, don't use unknown-grade reclaimed lumber for rafters or beams), or start with a fabric awning over a simple bracket frame and upgrade to a solid roof later. For a detailed, budget-focused walkthrough on how to build a cheap patio awning, see the step-by-step guide focused on low-cost materials and shortcuts. Polycarbonate panels bought in standard sheet sizes from a big-box store are significantly cheaper per square foot than custom-cut sizes.
For sourcing: most lumber, hardware, post bases, and polycarbonate panels are available at Home Depot and Lowe's. For aluminum kit systems, look at local patio cover dealers or online suppliers like Amerimax or Palram distributors. For fabric canopy systems, retailers like Amazon, Wayfair, and outdoor specialty stores carry a wide range. Always compare the per-square-foot cost of a DIY build against installation quotes, the labor savings on a simple lean-to are substantial, but on a complex gable or large free-standing structure, a quote from a licensed contractor can be surprisingly competitive once you factor in your time and tool rental. If you’re wondering where to buy an awning for your patio, check specialty patio-cover dealers and major retailers for kits, polycarbonate panels, and fabric systems.
Safety practices worth taking seriously
None of this is meant to be preachy, but a few things genuinely hurt people on these projects, and they're all avoidable.
- Ladder safety: most patio awning injuries happen on ladders. Use a 6-foot step ladder for wall work up to 10 feet and an extension ladder rated for your weight plus tools for anything higher. Never stand on the top two rungs. Have a helper stabilize the base.
- Dig safe: call 811 (in the U.S.) before you dig any post holes. Hitting a buried utility line is dangerous and expensive.
- Treated lumber handling: wear gloves and a dust mask when cutting PT lumber. The preservatives are not something you want to inhale or absorb through skin contact. Wash hands before eating.
- Structural connections: don't skip joist hangers, hurricane ties, or post caps to save time. These connectors are inexpensive and are the difference between a structure that stays standing and one that fails in the first significant wind event.
- Electrical clearance: if your patio has overhead electrical service lines, check required clearance distances before framing anything near them. Contact your utility company if you're unsure.
- Don't overload what you build: an awning designed only for shade and rain should not have heavy planters, string lights powered by extension cords draped across the frame, or anything else adding significant load or fire risk.
Common mistakes to avoid
- Skipping the permit on an attached awning — this can block a home sale or require demolition on inspector demand.
- Attaching the ledger board through siding without removing it — the siding traps water, accelerates rot, and the connection isn't structural. Remove the siding, add standoffs or drainage mat, and flash properly.
- Wrong pitch for the roofing material — too flat causes ponding, leaks, and staining within a single season.
- Using standard lumber in ground contact — only use lumber rated for ground contact (marked 'Ground Contact' on the stamp) for embedded posts and members near grade.
- Forgetting about thermal expansion in polycarbonate — using tight holes instead of oversize ones causes panels to buckle and crack within one summer.
- No knee bracing on free-standing structures — without diagonal bracing, the structure racks and can collapse in wind. This is the most common structural error in DIY pergolas.
- Undersizing the beam — a 2x8 spanning 14 feet between posts looks fine until it deflects 2 inches under load. Use the AWC span tables or double/triple the beam for longer spans.
- Poor flashing at the house junction — this is the number one source of water damage from attached patio covers. Take your time here.
When to call a pro instead
Most homeowners with basic carpentry experience can handle a straightforward lean-to or free-standing shade structure. Here's when it genuinely makes sense to hire a licensed contractor or structural engineer: your local building department requires stamped engineering drawings; you live in a high-wind, high-snow, or high-seismic zone; your house wall isn't suitable for a ledger (stucco over foam insulation, for example, requires special detailing); the structure is larger than about 14x16 feet; or you're not comfortable working on a ladder with a drill at 10 feet. Hiring out the ledger attachment and footing work while doing the framing and roofing yourself is also a reasonable middle path that many DIYers take.
If you want to explore professional cost benchmarks before deciding, cost guides for patio awning installation can give you a sense of what contractors charge in your region and help you evaluate whether the DIY savings justify the time and effort for your specific project.
FAQ
What is the project scope and expected outcome for a DIY patio awning?
Scope: design and build a sheltered patio cover (attached lean‑to, small gable, or free‑standing post awning) sized to your patio area, resist local wind/snow loads, tie into house or independent posts, provide drainage, and meet local code/permit requirements. Outcome: a weather‑resistant overhead structure (wood, metal, polycarbonate, or fabric) that shades and shelters the patio, with flashing and attachments installed to prevent water intrusion and with safely anchored posts/footings or a code‑compliant ledger attachment.
How do I know if I need a permit for a patio awning?
Permits depend on jurisdiction. Common triggers for a building permit: attached covers, structures exceeding a local roof area or height threshold, or any structure requiring foundations or electrical work. Some jurisdictions exempt small detached covers under ~120 ft², but attached covers are often treated as additions and require plan submittal and inspections. Always check your local building department—many follow IRC Appendix AH or local amendments and will state permit thresholds.
What should be on my planning checklist before starting?
Planning checklist: accurate patio measurements (width, projection, existing roof eave/soffit heights); property lines and setback requirements; roof pitch and desired drainage path; local snow/wind load values (ASCE 7 data); soil bearing capacity and frost depth for footings; ledger attachment details or post locations; material list and finish choices; permit requirements and inspection schedule; budget and timeline; and safety gear and tools required. Also verify HOA rules if applicable.
Which awning styles are best for homeowners and why?
Common styles: 1) Lean‑to (attached): simple, space‑efficient, ties to house—good for direct roof drain but requires careful ledger/flashings. 2) Small gable (attached or partially attached): more headroom, better ventilation and aesthetics, slightly more complex framing. 3) Free‑standing (post‑mounted): flexible placement, avoids house attachments—requires deeper footings and more materials. 4) Fabric/canopy: fastest and cheapest, minimal structure, good for seasonal use but less durable. Choose by attachment preference, aesthetics, budget, and load resistance needs.
What are the material options and pros/cons (including wood guidance)?
Materials vs cost/maintenance (summary): - Pressure‑treated wood: moderate cost, good appearance, easy to work, needs paint/stain and periodic maintenance, susceptible to rot if not detailed; follow treated‑wood fastener and flashing practices. - Cedar/redwood: higher cost, naturally rot‑resistant, less maintenance than pine, attractive. - Aluminum/metal (prefab or custom): moderate to high cost, low maintenance, lightweight, requires thermal expansion detailing. - Polycarbonate panels: low–moderate cost, lightweight, lets light through, needs UV‑side out, predrill for expansion; limited insulation. - PVC/fabric canopy: lowest cost, easy install, seasonal options, shorter lifespan. Wood‑specific guidance: use pressure‑treated or naturally durable species for posts; separate wood from concrete with approved post bases; use corrosion‑resistant fasteners when in contact with treated lumber; apply flashing at ledger and wall penetrations to prevent rot.
What are the basic tool and materials lists for three common builds (lean‑to, small gable, free‑standing)?
Lean‑to (simple): Tools: circular saw, drill/impact, level, framing square, ladder, chalk line. Materials: ledger board (pressure‑treated), rafters/2x material, beam/headers, posts (if partial), roof sheathing or polycarbonate/metal panels, flashing, fasteners, post bases, concrete (if posts). Small gable: Tools: same plus miter saw and plumb bob. Materials: ridge beam or ridge board, opposing rafters, collar ties/struts, gable end framing, roofing material, flashing, fasteners, possibly attic ventilation. Free‑standing post awning: Tools: auger or posthole digger, concrete mixer or wheelbarrow, same carpentry tools. Materials: footings and rebar, post anchors/post bases, beams/girders, rafters, roofing material, lateral bracing, fasteners. For all: safety gear, flashing, gutter/drain provisions, and appropriate anchors.