Building an awning over a patio is a project most DIY-minded homeowners can handle in a weekend or two. The core build is a lean-to frame: a ledger board bolted to the house, a beam across the front supported by posts (or wall-mounted brackets), and rafters running between them at a slope that sheds water. You cover that frame with fabric, polycarbonate panels, aluminum roofing, or wood, whichever fits your budget and climate.
How to Build an Awning Over a Patio: DIY Steps

Celia Vaughn
3 May 2026
Done right, the result is a weatherproof, structurally sound shade structure that adds real living space. Done wrong, the most common failures are a ledger that leaks behind the wall, a slope too flat to drain, or a frame that isn't anchored for wind uplift. This guide walks through every step so you avoid those mistakes.
If you want the fastest path to building one, follow this walkthrough step by step for how to make an awning for a patio.
Choose the right patio awning style and coverage goals first
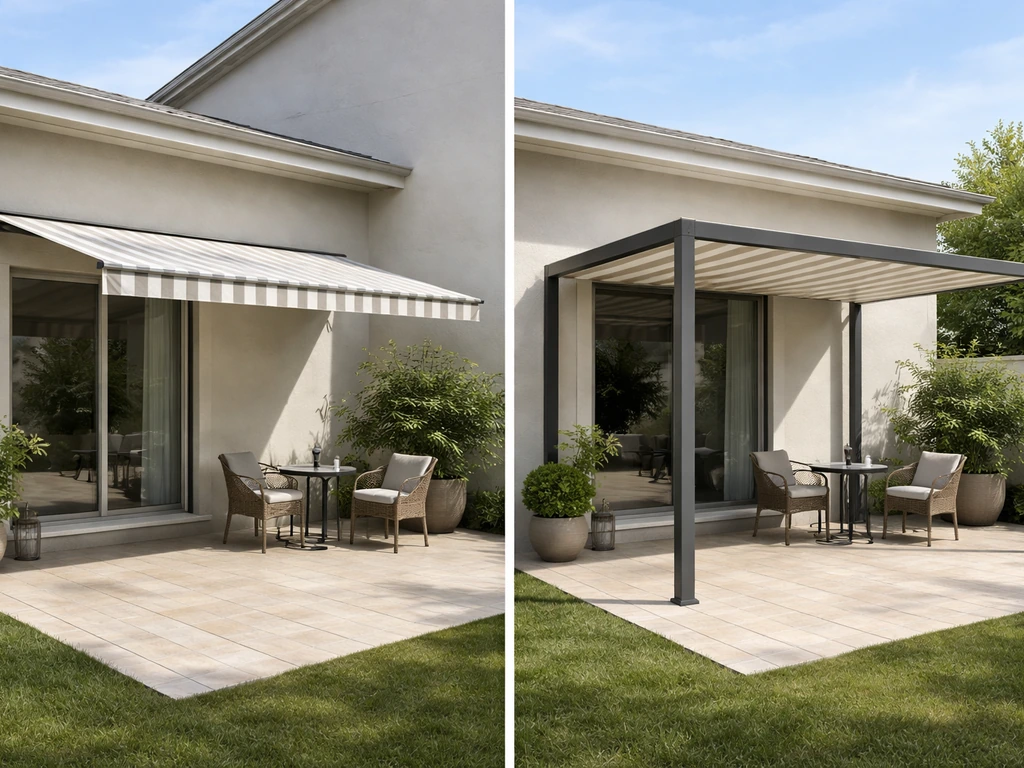
Before you touch a tape measure, decide what problem you're actually solving. If you mostly want shade on sunny afternoons and don't need to sit outside in the rain, a fabric awning (either fixed or retractable) is lighter and cheaper to build. If you want year-round dry outdoor space, you need a rigid roof: aluminum panels, polycarbonate sheeting, corrugated metal, or wood sheathing with a waterproof finish. Lattice and open-style pergola covers look great but provide zero rain protection, good to know before you commit.
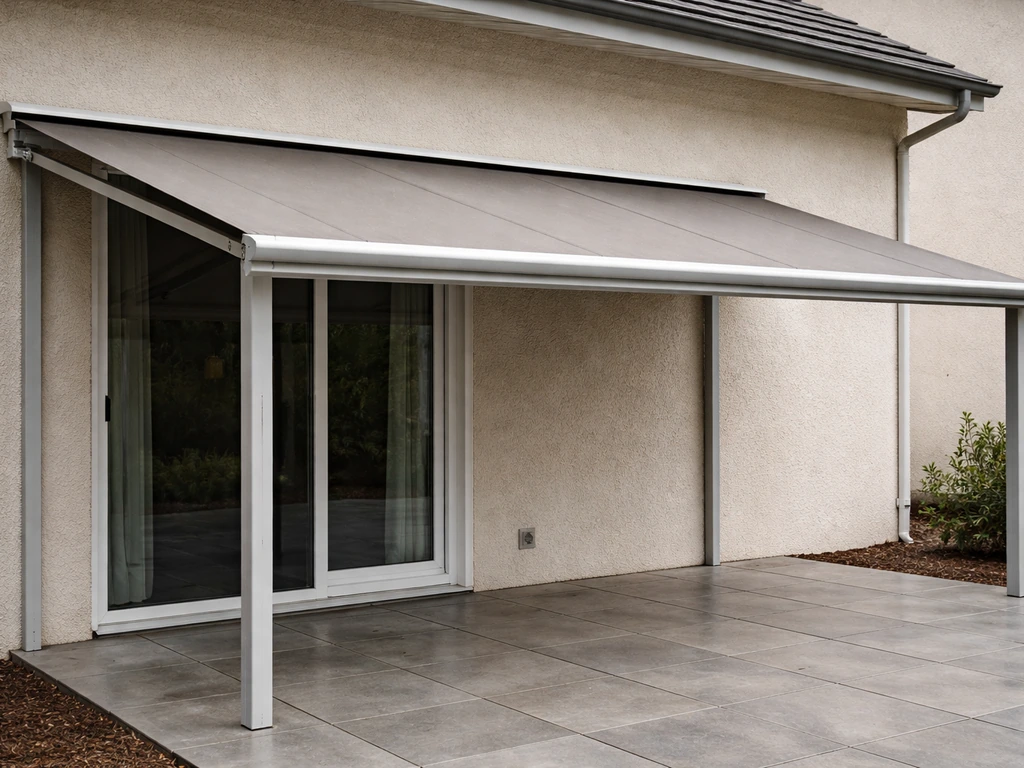
The two main structural approaches are attached (lean-to) and freestanding. An attached awning ties directly to the house wall, shares the house's structure for one side of support, and is the most common DIY choice. A freestanding awning stands on its own posts and requires cross-bracing at corners to stay rigid, more materials, more footings, but no penetrations into the house wall. For most backyard patios, the attached lean-to is the practical starting point, and that's what this guide focuses on.
Within attached awnings, you also choose between fixed and retractable. Fixed awnings are structurally simpler: the frame stays up permanently and handles higher wind loads because of that heavier, anchored frame. Retractable awnings fold or roll away, which is great for flexibility, but the fabric support arms and beam spacing are more constrained (support beam spacing typically ranges from about 2 to 5 feet depending on wind pressure requirements). If you live somewhere with real wind or snow, a fixed rigid-roof structure is the safer long-term bet. A retractable fabric option makes more sense in mild climates where you want control over sun and shade.
Measure the patio and plan your dimensions, slope, and clearance
Get your measurements right before you buy anything. Start by measuring the width of the area you want to cover along the house wall, then decide how far out from the house you want the awning to project. A projection of 8 to 12 feet is typical for most patios. Add a few inches of overhang on the sides if you want to minimize wind-driven rain getting in at the edges.
Slope is the detail most people underestimate. A minimum pitch of about 3. 5 inches of drop per foot of run (roughly 16 degrees) is the conventional standard for awnings to drain well and stay rigid under wind load. That means on a 10-foot projection, the outer edge of your awning will be about 35 inches lower than where it attaches to the house wall.
Factor this into your ledger height before you bolt anything. If you want the front posts to be at a comfortable standing height, work backwards: if your posts will be 7 feet tall and your projection is 10 feet at 3. 5 inches/foot drop, the ledger needs to be at about 9 feet 11 inches on the wall (7 feet plus 35 inches of drop, minus any header-to-rafter adjustments).
Clearance is non-negotiable. You need at least 80 inches (6 feet 8 inches) of vertical clearance at head height anywhere someone will walk under the awning, that's the ADA minimum for accessible circulation paths and a reasonable practical standard for any outdoor space. Aim for 7 feet at the lowest point (the outer edge) for comfortable use. A mounting height of 8 to 10 feet at the house wall gives you plenty of working room and still hits that 7-foot minimum at the outer edge on most projection lengths.
Materials, tools, and hardware for an awning build
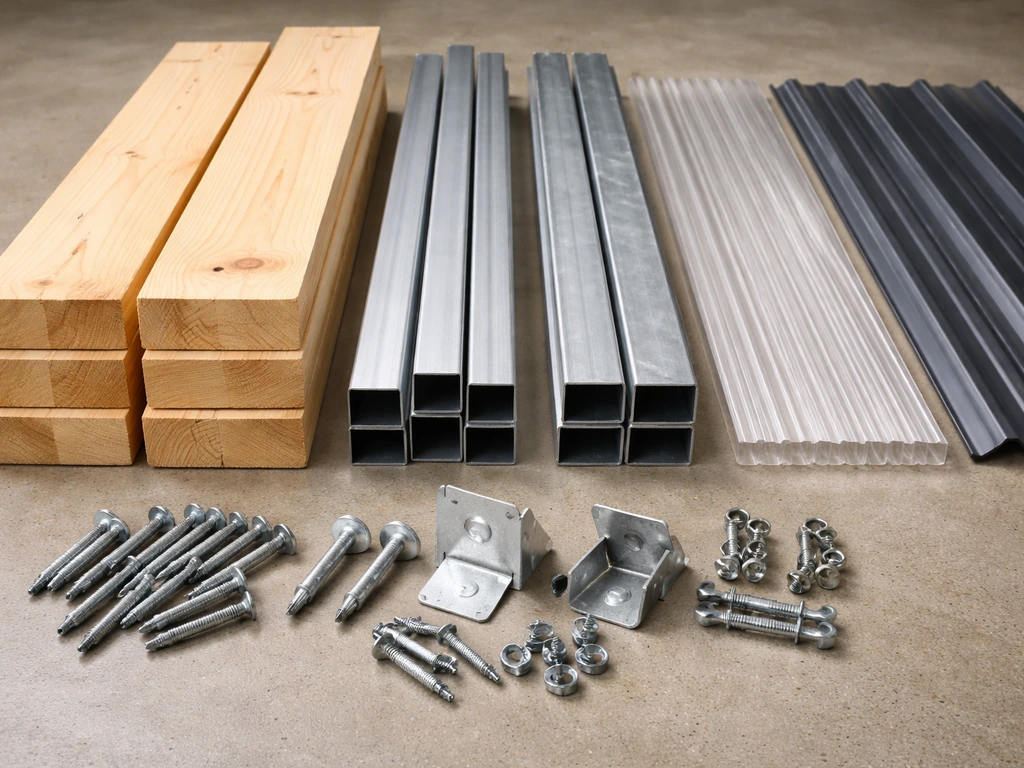
Your three main material choices for the frame are wood, aluminum, and steel. Wood (typically 2x6 or 2x8 lumber for rafters, 4x4 or 4x6 for posts) is the easiest to work with standard tools and the most forgiving for DIY first-timers. If you’re going with a wood cover, plan for rot-resistant materials, proper flashing, and a drainage slope before you start cutting rafters.
Pressure-treated lumber is required for any member close to or touching the ground; use naturally rot-resistant species like cedar or redwood for exposed overhead framing if you want longevity without painting. Aluminum framing is lighter, won't rot, and looks clean, but requires metal-specific cutting tools and different fastening techniques. Steel is heavier and best suited to prefab kit systems rather than field-fabricated DIY builds.
For the cover material, polycarbonate panels are a popular middle ground: they let in diffused light, shed rain well, and are lighter than metal roofing. Corrugated or standing-seam metal panels are the most durable option and handle snow load best. Fabric (acrylic canvas or solution-dyed polyester) is the lightest and cheapest but needs re-tensioning or replacement every several years. Wood sheathing with a weatherproof membrane and finish is the most traditional and blends well with house aesthetics but requires the most ongoing maintenance.
Fastener and hardware selection matters more than most guides admit. Any fastener going into the house wall or used outdoors needs to be corrosion-resistant: hot-dip galvanized, stainless steel, or coated exterior screws. If you're fastening into a masonry wall (brick or block), you need specialized masonry anchors rated for structural loads, standard wood screws in plastic anchors are not acceptable for a ledger carrying roof loads.
Flat Rock's Wood Deck Construction guideline PDF recommends using approved expansion/adhesive anchors that are rated for structural loads when attaching a ledger board to concrete or solid masonry masonry anchors rated for structural loads.
Fasteners in contact with pressure-treated lumber should be specifically rated for ACQ-treated wood (stainless or hot-dip galvanized) because standard zinc plating corrodes rapidly in contact with the chemicals in modern pressure-treated wood.
| Material | Best for | Main trade-off | DIY difficulty |
|---|---|---|---|
| Pressure-treated wood | Budget builds, easy cutting | Needs painting/staining, heaviest | Easy |
| Cedar or redwood | Looks, no-paint longevity | Higher cost than PT lumber | Easy |
| Aluminum framing | Low maintenance, light | Needs metal tools, specialty connectors | Moderate |
| Polycarbonate panels | Light, some rain and UV protection | Can yellow over time | Easy-Moderate |
| Metal roofing panels | Best durability, snow/rain loads | Harder to cut cleanly, noisy in rain | Moderate |
| Fabric/canvas | Cheapest, retractable-friendly | Shorter lifespan, limited rain protection | Easy |
Basic tool list
- Circular saw (and a metal-cutting blade if using aluminum or metal panels)
- Drill/driver with a bit set and long auger bits for lag screws
- Level (a 4-foot level is minimum; a laser level saves a lot of time on ledger alignment)
- Tape measure and chalk line
- Post hole digger or rented auger for footing holes
- Wrench set for lag screws and carriage bolts
- Caulk gun and tube of 100% silicone sealant
- Safety glasses, work gloves, and a solid ladder rated for your weight plus tool weight
Frame and support structure: ledger, posts, and bracing
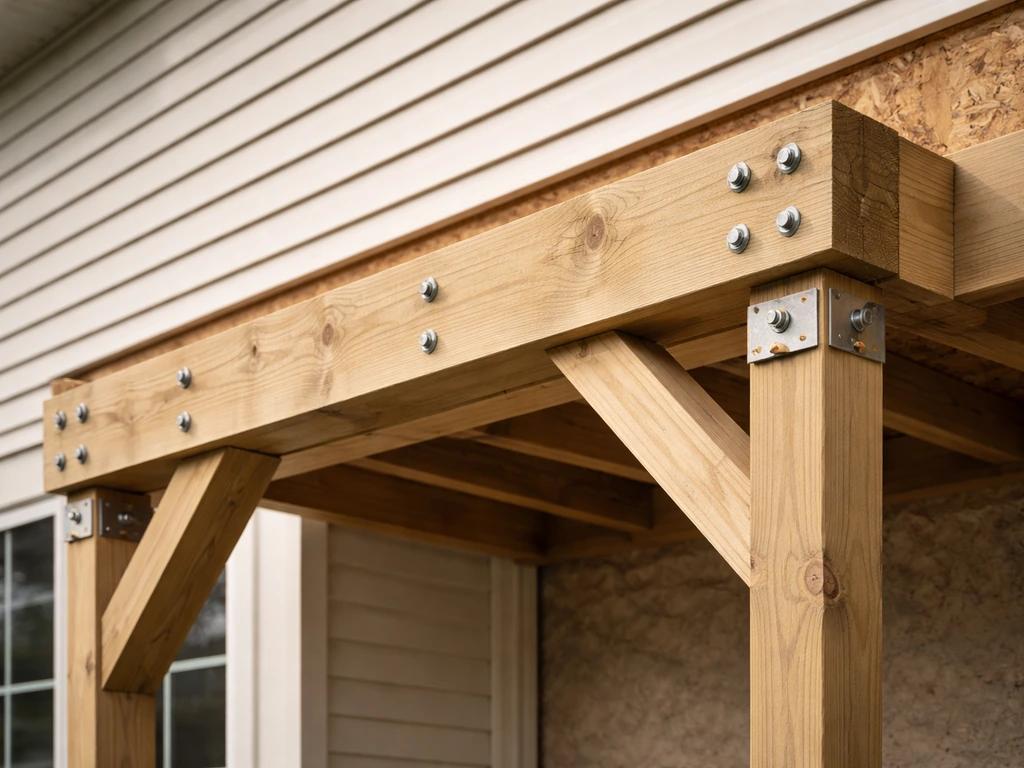
The ledger board is the backbone of any attached awning. It's a horizontal piece of lumber (typically 2x8 or 2x10) bolted directly to the house's structural framing, not just into siding or sheathing. Locate the wall studs or rim joist behind the siding using a stud finder. The ledger needs to hit at least two studs and should be fastened with 1/2-inch by 5-inch lag screws, one per stud, staggered slightly vertically to avoid splitting. Space the lag screws according to local code requirements, but hitting every 16-inch stud bay is a good starting point. Pull each screw snug but don't overtighten to the point of crushing the wood.
Install a beam across the outer edge at the front of the awning. This beam sits on top of (or is bolted to) the support posts. For wood framing, a doubled 2x8 or 2x10 is typical for spans up to about 12 feet; longer spans need engineered lumber or a steel beam. Posts should be at minimum 4x4 for spans under 8 feet wide and 4x6 or 6x6 for anything wider or taller. Posts need concrete footings: dig below your local frost line (check your county's frost depth requirement) and pour a tube-form footing. Set a post anchor in the wet concrete so the post base sits above grade and doesn't wick moisture.
Rafters run from the ledger to the front beam at your chosen slope. Common rafter sizing for a patio cover is 2x6 at 24 inches on center for spans up to about 10 feet, or 2x8 at 24 inches for spans up to 14 feet. Allowable spans depend on your local code tables and lumber species, so check a span table for your region. Use hurricane ties (also called rafter ties or H-clips) at every rafter-to-ledger and rafter-to-beam connection. These metal connectors create a direct load path that resists uplift in wind, skipping them is one of the most common mistakes on DIY patio covers and one of the first things an inspector will check.
If your awning is wider than about 10 feet or taller than 8 feet, add diagonal knee braces from the posts to the beam. These can be 2x4s cut at 45 degrees and bolted between post and beam, and they prevent the structure from racking sideways in wind. Free-standing structures need cross-bracing at the corners for the same reason. Even on attached structures, a little lateral bracing goes a long way in high-wind areas.
Attach the awning to the house and weatherproof the connection
This is where most DIY awning builds eventually leak, and it's completely preventable if you think about water management before you bolt the ledger on. The principle is simple: water running down the house wall must be directed over and past the ledger connection, not into the gap between the ledger and the wall.
Trex's flashing guidance for a deck ledger board emphasizes that proper flashing helps prevent rot and water damage at the ledger-house connection water running down the house wall must be directed over and past the ledger connection, not into the gap between the ledger and the wall. If water gets behind the ledger and sits against the house sheathing, you'll get rot and mold within a few years, even if the awning itself looks fine.
The right sequence is: cut back or remove the siding where the ledger will sit, install a piece of galvanized or aluminum Z-flashing tucked up under the siding course above, then mount the ledger against the house framing (on standoffs or a drainage mat if possible to allow a small air gap). After the ledger is bolted on, seal the top edge and any exposed fastener penetrations with backer rod and 100% silicone caulk. A self-adhering flashing membrane (like a peel-and-stick butyl or bitumen tape) applied over the lag screw holes before the ledger is final-tightened is an extra layer of protection that professional installers use routinely.
Where the awning roof surface meets the house wall above the ledger, you need step flashing or a continuous piece of metal counter-flashing. The flashing tucks under the siding above and laps over the top edge of the roofing material below. Think of it as a shingle-style overlap: each piece always sheds water over the piece below it. Use aluminum or galvanized steel for flashing, not zinc-coated sheet metal, which corrodes faster in contact with moisture and treated wood. Seal every exposed flashing edge and fastener hole with silicone.
If you're attaching to a masonry wall (brick, block, or stucco over CMU), the fastening approach changes significantly. You need sleeve anchors or wedge anchors rated for structural loads in masonry, drilled with a hammer drill at the correct diameter. Standard wood-screw technique does not work here, and improper masonry anchors in a ledger carrying roof load is a genuine structural safety risk. If you're not familiar with masonry anchoring, this is a good moment to consult a contractor or at least have a building inspector review your fastening plan.
Install the awning cover and make sure it drains properly
Once the frame is up and the ledger connection is weatherproofed, installing the cover is usually the most straightforward part, but sequencing and fastener placement matter for drainage. Whatever material you're using, the principle is the same: start at the low end (outer edge) and work up toward the house so each panel or course overlaps the one below it. Water should always flow over a seam, never into one.
For metal roofing panels, follow the manufacturer's recommended fastener spacing closely. Panel-lap screws typically space at 12 inches on center maximum, and every fastener through the panel should use an EPDM rubber sealing washer to prevent water intrusion at the hole. Don't over-tighten to the point of compressing the washer flat, snug with slight resistance is correct. Keep screw lines straight and even; crooked fastener lines cause panels to pull out of alignment and create low spots that pool water.
For polycarbonate panels, use the system's dedicated closure strips and H-channel connectors at panel joints, don't just butt panels together and caulk. The thermal expansion in polycarbonate is significant; panels need room to move, and the closures are designed to allow that while keeping water out. Pre-drill oversize holes at fastener locations for the same reason.
For fabric awnings, the fabric attaches to a front bar (or hem pocket over a rod at the outer edge) and either slides into a track or laces to the rafters. Tension matters: under-tensioned fabric sags, pools water, and flaps in wind, which stresses the attachment points. The fabric should be drum-tight when installed. Most fabric awning failures come from loose attachment at the house-end pocket or a corroded front bar, check and re-tension at the start of every season.
Regardless of cover type, make sure rainwater that reaches the outer edge has somewhere to go. On a simple lean-to awning, the water just drips off the front, fine for most situations but potentially problematic if it's dripping right onto a walkway or against a fence. A drip edge or gutter along the outer beam channels water to a downspout, keeps the area under the awning drier, and is worth adding if your patio sees significant rain.
Safety, permits, and knowing when to hire a pro
Permits are not optional in most jurisdictions for a permanently attached structure. A patio awning or cover attached to the house, with a solid roof, almost universally triggers a building permit requirement. Requirements vary by city and county, but a typical permit submittal includes a framing plan showing lumber species, dimensions, rafter spacing, post/footing details, and a ledger attachment detail. Some jurisdictions also require a plot plan showing the structure's setback from property lines. The permit process exists to get a second set of eyes on your structural connections, not to make your life harder.
Even if your local rules technically exempt a small structure from a permit, the building code still applies. You're still responsible for meeting minimum structural requirements for wind, snow, and load. In high-wind areas, design loads for patio covers are governed by standards like ICC-ES AC340, which address wind uplift and lateral forces. In snow country, rafter sizing and spacing need to account for snow load, the default 2x6 at 24 inches on center that works fine in Phoenix may be insufficient in Colorado or Minnesota.
Here's an honest breakdown of where the DIY line typically falls for this type of project:
| Situation | DIY-friendly? | Consider a pro if... |
|---|---|---|
| Wood-framed lean-to on wood-framed house | Yes, with permit | Span exceeds 14 ft or two-story attachment |
| Masonry wall attachment (brick, block) | Proceed carefully | You're unfamiliar with structural masonry anchors |
| High-wind or hurricane zone | Borderline | Local code requires engineer-stamped drawings |
| Heavy snow load area | Borderline | Load calcs exceed standard span table values |
| Steel or aluminum frame (custom fab) | Moderate skill required | Welding or custom extrusion work is needed |
| Complex flashing into existing roof | Risky without experience | The existing roof is tile, metal, or has complex valleys |
| Permit plan preparation | Manageable for simple builds | City requires engineer or architect stamp |
Work-at-height safety is worth saying plainly: most injuries on projects like this happen on ladders, not from structural failures. Use a ladder rated for your weight plus tools, keep three points of contact, and don't lean out past the ladder's side rails. When you're setting rafters or installing roof panels, work with a helper, trying to hold a 12-foot 2x8 level while driving lag screws solo is how things go wrong fast.
Your build checklist and next steps
Here's the practical sequence to follow once you've decided on your design and confirmed you have (or don't need) a permit:
- Measure the patio width and desired projection; determine your ledger height based on the minimum 3.5 in/ft slope and 7-foot minimum clearance at the outer edge.
- Locate studs or rim joist in the house wall; confirm the wall framing is wood (or masonry, and plan accordingly).
- Check local permit requirements and frost-line depth before ordering materials.
- Dig and pour post footings with tube forms; set post anchors while concrete is wet.
- Cut back siding, install Z-flashing under the siding course above the ledger location, and bolt the ledger to wall studs with 1/2-inch by 5-inch lag screws.
- Set posts on anchors, plumb and brace temporarily, then install the front beam.
- Cut and install rafters at your planned spacing with hurricane ties at every connection.
- Install step flashing and any counter-flashing at the house wall above the ledger.
- Install roofing panels or fabric starting at the outer (low) edge and working toward the house; use EPDM-washered screws or system-specific closures.
- Seal all fastener penetrations and flashing edges with 100% silicone.
- Add a drip edge or gutter if water runoff at the outer edge is a concern.
- Schedule a rough framing inspection before adding cover material if your permit requires it.
If budget is a constraint, the cover material is usually where you have the most flexibility. A simple wood frame with a polycarbonate or corrugated metal roof can come in significantly cheaper than a factory-kit aluminum system while delivering similar durability, and the build process is nearly identical. If you want to explore where costs break down by material and installation method, the cost breakdown for patio awning installation covers that in detail.
If you want to ballpark your total patio awning installation cost, pricing usually depends on the size, cover material, and whether it is fixed or retractable. If you're specifically looking at a wood-only build or trying to find where to source awning components, those are worth looking at separately.
If you’re wondering where to buy a patio awning, look for local home improvement stores, online awning retailers, and custom shade companies that can match your measurements where to source awning components.
The most important thing is to not skip the planning phase in a rush to start cutting. An hour with a pencil, a tape measure, and a slope calculation prevents the two most common rework situations: a ledger mounted too low (not enough clearance at the front) and a roof that drains toward the house instead of away from it. Get those two numbers right before you drill a single hole in your wall, and the rest of the build follows logically.
FAQ
Can I mount the ledger board into siding or sheathing instead of studs?
For an attached patio awning, the ledger must fasten to the home’s structure behind siding. Use a stud finder to hit at least two studs, and if you only find studs on one side of the ledger location, adjust the span or add a structural member so the ledger is continuous and load-bearing. Avoid bolting to trim boards, sheathing, or siding.
What should I do if I can’t find studs where I want to place the ledger?
Not always. Many wood structures use a rim joist or band joist, which is still part of the structural framing. If your siding hides the rim joist detail, remove a small section near the ledger line or confirm with probing plus a few exploratory pilot holes before committing, because hitting only OSB or sheathing is not a safe ledger attachment.
Can I build a rigid roof now and switch to a retractable later?
Yes, but design changes. Replacing fixed rafters with a retractable system often requires different arm geometry, beam spacing, and wind load assumptions, and the track or front bar needs corrosion-resistant mounting. If you’re in snow or high-wind areas, a rigid fixed roof usually performs better than a retractable fabric build, even if the fabric is retractable.
Why can’t I just butt-joint polycarbonate panels and seal them with caulk?
Polycarbonate usually needs dedicated components. Use the manufacturer’s closure strips, H-channels, and specified fasteners, and pre-drill oversize holes because panels expand and contract. If you just butt panels together and caulk, you can create leaks or fastener-driven cracking as temperatures change.
How do I keep the awning looking level if the roof needs slope to drain?
You can, but you must still verify slope and drainage. A flatter look is often achieved by combining a lower front height with a compliant pitch, or by using a different rafter layout. The key is the drainage pitch, about 3.5 inches per foot as a conventional minimum for reliable runoff on patio covers.
What flashing details matter most to prevent leaks behind the ledger?
Z-flashing on the top of the ledger is great, but water can also get behind the wall-side flashing. Use a proper counter-flashing or step flashing at the wall interface, and ensure each flashing layer overlaps correctly from the top down so water sheds outward, not into the ledger gap.
How can I tell if my awning leak is behind the ledger or coming from the roof seams?
If you see water staining or a softening rim joist area, don’t just re-caulk. Inspect the ledger screws for corrosion, check the flashing overlap, confirm there is an air gap or drainage mat behind the ledger, and look for trapped moisture at the top fastener penetrations.
What are common mistakes when fastening metal roofing panels to an awning frame?
For metal panel roofs, use EPDM sealing washers with the correct screw type and do not overtighten. If washers are crushed flat or mispositioned, you can create a leak path even if the panels seem intact. Also keep your fastener lines straight so you do not create low spots that pool water.
How do I know if I need knee braces or extra cross-bracing?
In high-wind zones, even small lateral movement can stress joints. Add diagonal knee braces when the awning is tall or wide, and consider extra bracing if you notice any sway when pushing lightly by hand. If your design has long spans, also ensure post sizing and beam sizing match local load requirements.
Do I really need a gutter or drip edge under a patio awning?
A gutter or drip edge is most helpful when water would otherwise land on concrete slabs, stairs, steps, or a fence line. If runoff hits a walkway, it can become slippery and accelerate cracking, so route water to a downspout or a splash block area away from foundations.
What if my city says permits are optional, can I still get in trouble?
Yes, if the roof is solid and attached, permits are commonly required. Even when you think you qualify for an exemption, you are still responsible for meeting structural code loads for wind and, in some climates, snow. A quick call to your building department can save you from correcting an installed but noncompliant ledger connection.
What anchor type should I use when mounting the ledger to brick or block?
Use an anchor system that matches the masonry material and load. Sleeve anchors or wedge anchors rated for structural loads are typical, drilled with a hammer drill at the specified diameter, and installed at correct embedment depth. Don’t assume a plastic anchor plus wood screw can hold a roof ledger.
What clearance should I plan for so the awning feels usable, not cramped?
Yes. If your patio cover is over a walkway, aim for at least 80 inches of headroom where people pass, and plan the slope so the outer edge maintains the clearance, not just the ledger height. Also account for the thickness of rafters, decking, and the cover material so your final finished height doesn’t drop below comfort or code targets.
How do I plan where the rainwater will go so it doesn’t create new problems?
If the awning drains toward a nearby wall or into a low area, you may still be compliant on slope but create nuisance problems, pooled water, or staining. Confirm the outer edge discharge path, and if needed add a drip edge and re-route with a short gutter or downspout placement plan before installing the roof surface.
If my design matches a typical rafter size, do I still need to check snow or wind loads?
Start by matching the span and rafter spacing to your local conditions, not just the “typical” dimensions. Your choice of lumber species, roof surface weight, and your region’s wind and snow design loads can require larger members or closer spacing. If you’re unsure, a local span table or a quick engineered check is worth it.