
You can build a solid, weather-resistant patio awning for $150 to $600 in materials if you choose a lean-to wood frame or a basic shade sail setup and do the work yourself. A prefab kit pushes that closer to $400–$900, still well below the $2,500–$6,000+ you'd spend on a professionally installed motorized awning. This guide walks you through every step: which low-cost style fits your situation, what permits to pull, how to size and attach the structure safely, and a full measured build plan for a simple wood lean-to that any homeowner comfortable with a drill and circular saw can complete in a weekend. For a quick breakdown of typical prices and installation cost factors, see the detailed section on how much does it cost to install a patio awning. For a full measured plan, materials list, and step-by-step instructions on how to build an awning over a patio, see the detailed build guide (UUID: b9d90ebd-09f1-46a5-a62e-0072f5cc9161).
How to Build a Cheap Patio Awning: DIY Guide & Costs

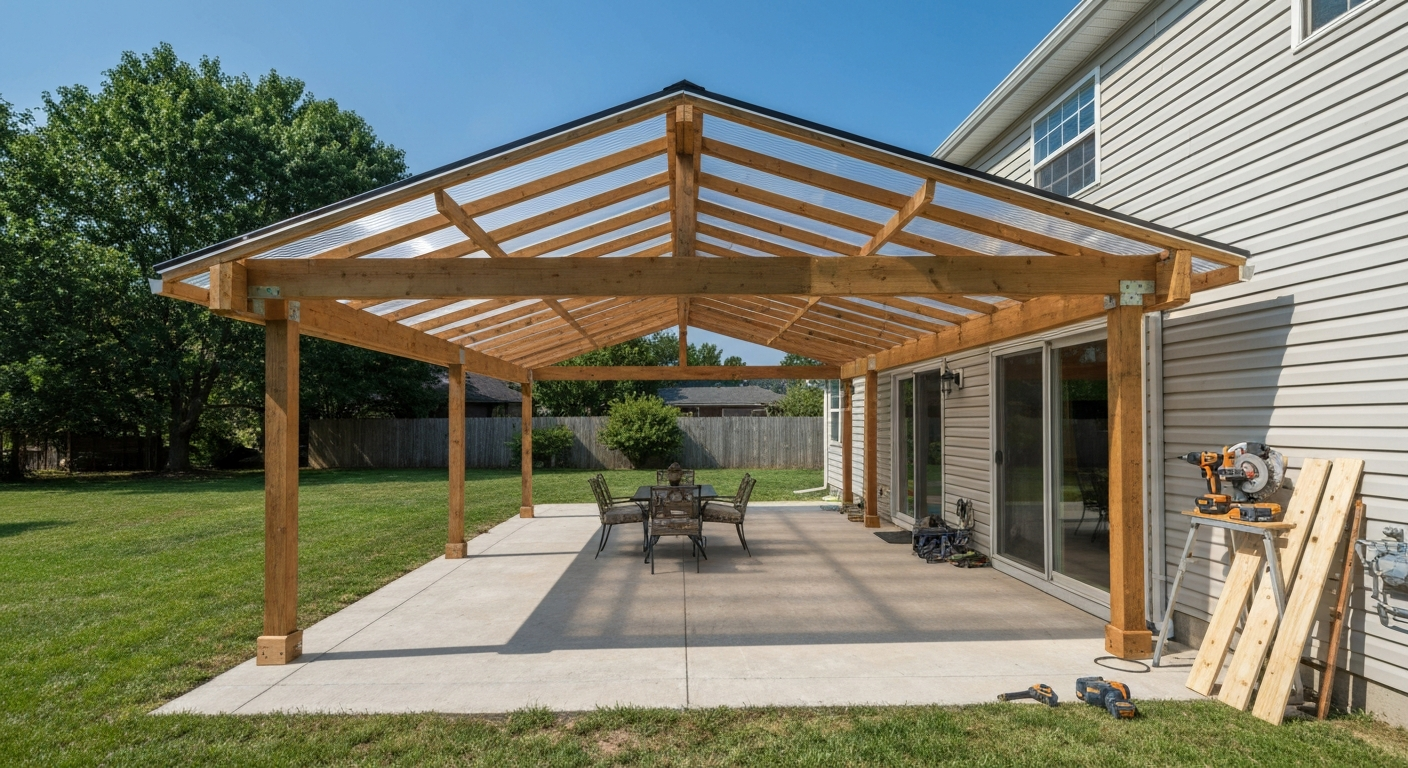
What you're getting into (and who this guide is for)
This guide is written for DIY homeowners who want shade over a patio without spending thousands of dollars on a contractor or a motorized retractable unit. You don't need to be an experienced builder. A basic lean-to awning is genuinely one of the more beginner-friendly outdoor projects you can tackle, but it does involve structural fastening to your house and basic roof framing, which means you need to take measurements seriously, use the right fasteners, and check your local permit rules before you start. If your goal is maximum coverage with minimum cost and you're comfortable following a measured plan, you're in the right place.
The full step-by-step in this guide covers a 10×12-foot wood lean-to with corrugated polycarbonate or metal panel roofing, which is the sweet spot for DIY budget builds. I also cover four faster, cheaper alternatives for people who want shade without any framing: shade sails, prefab kits, PVC/fabric covers, and simple wooden awning panels. Each option has real trade-offs, and I'll be straight with you about where each one falls short.
Low-cost awning styles at a glance
There are five main options in the budget range, and they differ significantly in cost, skill level, and how long they'll actually last.
- Wood lean-to: A sloped roof frame attached to the house wall on one side and supported by posts on the outer edge. Most durable DIY option, best long-term value, and the focus of the full build section below. Typical material cost: $300–$700 for a 10×12-ft structure.
- Simple wooden awning panel: A smaller, shallower projection (usually 2–4 feet deep) built from 2x4 or 2x6 framing and covered with solid or translucent panels. Good for doorways and narrow patios. Typical material cost: $100–$300.
- Shade sail: A tensioned fabric triangle or rectangle anchored to posts or existing structures. Zero framing required, but it provides rain protection only at steep angles and doesn't hold up well in sustained wind. Typical cost: $50–$200 including hardware.
- Aluminum or prefab kit awning: A packaged metal-frame awning (brands like Outsunny or ALEKO) that bolts to the wall. Quick to install, but lower-end units have thin fabric and short warranties. Typical cost: $150–$900 depending on size.
- PVC/fabric cover: A simple framework of PVC conduit or lightweight metal tubing draped or stretched with outdoor fabric or a polyethylene tarp. Very cheap to build ($50–$150), but expect to replace fabric every 1–2 seasons in sun-heavy climates.
Choosing the right option for your situation
The honest question here is not just 'what's cheapest' but 'what's cheapest over five years.' A $60 shade sail that shreds in year two has a worse cost-per-season than a $500 lean-to that lasts fifteen years. Here's a side-by-side comparison of the key trade-offs.
| Option | Approx. Material Cost | Typical Lifespan | Rain Protection | Wind Resistance | Skill Level | Permit Usually Required? |
|---|---|---|---|---|---|---|
| Wood lean-to | $300–$700 | 15–30 years | Yes (full cover) | Good if built correctly | Intermediate | Often yes |
| Simple wooden awning | $100–$300 | 10–20 years | Yes (partial) | Good | Intermediate | Sometimes |
| Shade sail | $50–$200 | 2–5 years | Limited (fabric, angled) | Low–moderate | Beginner | Rarely |
| Aluminum/prefab kit | $150–$900 | 3–10 years | Yes (retractable/cover) | Moderate | Beginner–intermediate | Sometimes |
| PVC/fabric cover | $50–$150 | 1–3 years | Limited | Low | Beginner | Rarely |
Climate is a major deciding factor. If you're in a high-wind coastal area or get heavy snow, a shade sail and a PVC fabric cover are not viable permanent solutions. In those zones, you need a framed structure with properly sized rafters and posts. Similarly, if your patio is narrow (under 4 feet deep), a full lean-to is overkill and a simple wooden awning panel or kit awning makes more sense. If you want the most structure for the least money and you have a standard 10–12-foot patio depth, the wood lean-to is the best value, and that's where I'll spend the most time.
Realistic cost ranges and budget planning
These numbers reflect U.S. retail pricing from 2024–2026. Lumber prices have stabilized somewhat, but you'll still see regional variation of 15–25%. Always get local quotes before finalizing your budget.
| Cost Category | Wood Lean-To (10×12) | Shade Sail | Prefab Kit Awning | PVC/Fabric Cover |
|---|---|---|---|---|
| Lumber/framing | $150–$350 | N/A | Included in kit | $20–$60 (PVC pipe) |
| Roofing panels/fabric | $80–$200 | $20–$80 (sail) | Included in kit | $20–$60 (tarp/fabric) |
| Hardware/fasteners | $40–$80 | $20–$50 (anchors) | $20–$40 | $10–$20 |
| Post hardware/footings | $30–$60 | $30–$60 (posts/anchors) | Minimal | Minimal |
| Flashing/sealant | $20–$40 | None | Varies | None |
| Permit fee (if needed) | $50–$200 | Rarely needed | $50–$150 | Rarely needed |
| Tools (if renting) | $0–$80 | $0 | $0–$30 | $0 |
| Contingency (10–15%) | $40–$100 | $10–$30 | $25–$80 | $10–$20 |
| Total estimate | $410–$1,110 | $80–$220 | $265–$800 | $60–$160 |
A few honest notes on that table: the wood lean-to range is wide because roofing material choice drives cost significantly. Standard corrugated polycarbonate panels (like Suntuf 2.2x8-ft panels at roughly $40–$80 each from Home Depot) cost more than basic corrugated metal panels (~$25–$50 per panel) but let in diffused light. Asphalt shingles over plywood sheathing are the cheapest solid roofing option at roughly $25–$57 per bundle, but they add weight and require steeper pitch. For a 10×12 lean-to, plan on six to eight corrugated panels or three to four bundles of shingles plus a sheet of 3/4-inch plywood sheathing. Permit fees vary widely by municipality, from $50 in some rural counties to $200+ in larger cities, and some areas waive them for structures under a certain square footage. Check before you build, not after.
Materials and tools by awning option
Wood lean-to (10×12 ft)
- Lumber: (3) 2x8x12 rafters, (1) 2x8x12 ledger board, (2) 4x4x10 or 6x6x10 support posts, (2) 2x6x12 or 2x8x12 beam/header pieces, additional blocking
- Roofing: corrugated polycarbonate or metal panels to cover 120 sq ft, OR 3/4" plywood sheathing + 3 bundles asphalt shingles + roofing felt
- Hardware: (8–12) 4.5" structural lag screws (GRK or equivalent) for ledger, joist hangers or rafter ties (Simpson Strong-Tie LUS or H2.5A), 3" structural screws, post base hardware (Simpson ABA or equivalent), carriage bolts for beam-to-post connections
- Footings: (2) pre-cast concrete pier blocks OR 60-lb bags of concrete (4 per post) for poured footings
- Flashing: 10-ft roll of galvanized or aluminum step flashing, exterior sealant/caulk, self-adhesive flashing tape
- Misc: pressure-treated lumber for any ground-contact pieces, exterior wood primer/paint or stain, roofing screws with neoprene washers for panels
- Tools: circular saw, drill/driver, level (48" or longer), tape measure, speed square, chalk line, post-hole digger or auger, hammer, ladder, safety glasses, hearing protection
- Optional but helpful: miter saw, reciprocating saw, clamps, string line and stakes
Simple wooden awning panel (2–4 ft projection)
- Lumber: (4–6) 2x4x6 or 2x6x4 rafter arms, (1) 2x6x12 ledger, (1) 2x4x12 fascia board
- Roofing: corrugated panels or solid wood paneling to cover the projection area
- Hardware: 3" lag screws for wall attachment, joist hanger screws, flashing strip above ledger
- Tools: drill, circular saw, level, tape measure, ladder
Shade sail
- 10×12 ft HDPE or polyethylene shade sail (commercial-grade 185–200 gsm fabric holds up better; basic retail sails run $20–$80 at Home Depot and similar retailers)
- Stainless steel D-rings, turnbuckles, and carabiner attachment hardware kit ($20–$50)
- Anchor points: existing posts, house fascia anchors, or new 4x4 posts set in concrete (the most common weak point in DIY shade sail installs is poor anchoring)
- Tools: drill, socket wrench for turnbuckles, level or string line to set post angles correctly
Aluminum or prefab kit awning
- Prefab awning kit (brands: Outsunny, ALEKO, Palram) sized to your opening — typically 10×8 or 10×10 ft for budget models in the $150–$800 range
- Wall anchors appropriate for your wall type (wood stud, masonry, or concrete — the kit usually specifies; check this before ordering)
- Additional sealant/caulk for the wall bracket penetrations
- Tools: drill, level, socket wrench, ladder — most kits include all fasteners and mounting brackets
PVC/fabric cover
- 1.5" or 2" PVC conduit or EMT for frame (schedule 40 PVC is cheapest; EMT conduit is stronger and not much more expensive)
- PVC fittings: tee joints, elbow joints, end caps sized to your conduit diameter
- Outdoor fabric, UV-resistant polyester, or a heavy-duty polyethylene tarp (6-mil minimum)
- Zip ties, bungee cords, or grommets and rope to attach fabric to frame
- Ground anchors or wall brackets to secure the frame
- Tools: PVC pipe cutter or hacksaw, drill, tape measure
Attachment methods and structural considerations
How you attach your awning to the house or ground matters more than almost any other decision you'll make on this project. A poorly attached ledger board or an undersized post footing is where DIY awnings fail, and 'fail' can mean the whole structure coming down in a storm. Here's what you actually need to know.
Wall-mounted (ledger) attachment
For a lean-to awning, the ledger board is the horizontal piece that anchors one end of your rafters to the house wall. This is the most structurally critical connection in the whole build. The ledger should be 2x8 lumber for a 10–12-foot span and must be fastened into the rim joist or structural wall studs behind your house's exterior sheathing, never just into the siding itself. Use 4.5-inch structural lag screws or Simpson Strong-Drive SDWH/SDWS screws at 16-inch on-center spacing, staggered in two rows to avoid splitting. Pre-drill to prevent cracking. Common mistake: people fasten the ledger into the exterior foam or vinyl siding without hitting solid framing behind it. That will pull out. Use a stud finder and mark your studs before touching a drill.
Flashing above the ledger is non-negotiable. Water will find the gap between the ledger and the house wall and rot your framing from the inside out within a few years if you skip this step. Standard practice is to slide a piece of metal step flashing or aluminum L-flashing under the siding above the ledger, then run a bead of exterior sealant at the top edge. Self-adhesive flashing tape as a secondary layer adds insurance. This detail takes 30 minutes and prevents thousands of dollars in water damage.
Attaching to masonry or concrete
If your house has a brick, block, or concrete wall, you can't use lag screws into studs. Instead, you need post-installed mechanical anchors: wedge anchors or sleeve anchors from Simpson Strong-Tie or Hilti work well here. The anchor must be sized to the load and installed at the correct embedment depth per the manufacturer's data sheet, which will specify drill diameter, minimum embedment (typically 2.5–3.5 inches for ledger loads), and torque requirements. For light loads (a shade sail anchor bolt or a small awning bracket), a 1/2-inch wedge anchor at 2.5-inch embedment is common. For a full lean-to ledger board into masonry, get the Simpson or Hilti datasheet for the specific anchor you're using and follow it exactly.
Post footings for freestanding or outer-post support
For a lean-to with outer posts (the most common low-budget build), each post needs a footing that goes below your local frost depth. In warm climates (USDA zones 8–10), a pre-cast concrete pier block set on compacted gravel at 6–12 inches below grade is often sufficient for a small awning. In colder climates, you need a poured concrete footing below the frost line, typically 12–48 inches depending on your region, with a J-bolt or post base anchor cast into it. Post base hardware like the Simpson ABA series keeps the post above the concrete and prevents ground-contact rot. Plan on two 60-lb bags of concrete per post for small footings, or rent a power auger if you're going deep.
Rafter sizing and load resistance
For DIY awning framing, the standard rule used by most municipalities is to design for a 20 psf (pounds per square foot) live roof load and 10 psf dead load. See the Rafter Span Guide & Roof Rafter Spacing Chart (TradeMasterCalc) for municipal-style span tables that use a 20 psf live roof load and 10 psf dead load as a common prescriptive basis. IRC Chapter 8 (R802) rafter span tables, which are also reproduced in many city-published span guides, show that 2x8 rafters at 24-inch on-center can safely span roughly 12–15 feet depending on species and grade. For a 10–12-foot-deep lean-to, 2x8 rafters at 24 inches on-center using #2 Douglas Fir or Southern Yellow Pine is the standard prescriptive spec. If you're in a high-wind coastal zone or a heavy-snow region (over 30 psf ground snow load), these standard tables don't apply and you need an engineer to size your members. Don't guess on this if you're in a storm-prone area.
Permits, inspections, and what to check locally
Skipping permits is tempting when you're trying to build cheap, but it can cost you more than the permit itself. An unpermitted structure attached to your house can complicate your homeowner's insurance, cause problems at resale, and in some jurisdictions result in a forced removal order. Here's a practical checklist of when permits are typically required and what the process involves.
- Check your local building department's threshold for permit exemption. Many jurisdictions require permits for any attached structure or for any structure over 120–200 square feet. A 10×12 lean-to is 120 sq ft, which sits right at the common threshold.
- Attached structures (where the awning connects to the house) almost always require a permit, even when freestanding structures of the same size might not. The attachment to the house is the trigger.
- Submit a simple site plan showing the patio awning's dimensions, its location relative to property lines and the house, and its attachment method. Most municipalities don't require engineered drawings for standard prescriptive lean-to builds in moderate climates, but they will want to see your rafter sizing and ledger attachment details.
- Expect at least one framing inspection before you add roofing. The inspector wants to see the ledger connection, post footings, rafter connections, and any hardware used. Schedule this before you cover anything up.
- In HOA communities, get HOA approval in writing before pulling the permit. Some HOAs restrict awning materials or colors.
- Freestanding structures (shade sails, freestanding pergolas) are often exempt if they're under the square footage threshold, but attached awnings nearly always require a permit. When in doubt, call your building department and describe what you're building. Five minutes on the phone can save a lot of headaches.
- Wind and snow load requirements for your specific zone may affect rafter sizing requirements at permit review. If your area has a design wind speed over 110 mph (common in coastal regions) or ground snow load over 30 psf, the inspector may require stamped engineering drawings.
Step-by-step: building a simple wood lean-to awning
This plan is for a 10-foot-wide by 12-foot-deep lean-to awning attached to a wood-framed house wall, with two 4x4 outer support posts and a corrugated panel or shingle roof at a 2:12 pitch. For a step-by-step walkthrough on how to make an awning for a patio, see this detailed project guide covering materials, measurements, and fastening techniques. For a focused step-by-step tutorial and downloadable plans on how to build a wooden awning for patio, see this detailed build guide. Skill level: beginner to intermediate. Time: 8–14 hours over one to two days for a solo builder, 6–10 hours with a helper. You'll need a permit in most jurisdictions, so have that approved before you start.
Cutting list and measured plan
| Piece | Material | Qty | Cut Length | Notes |
|---|---|---|---|---|
| Ledger board | 2x8 PT lumber | 1 | 10 ft (120") | Attach to house wall into studs/rim joist |
| Rafters | 2x8 lumber | 5 | ~12 ft 4" (148") | Includes 1.5" bird's mouth notch at ledger end; 2" overhang at fascia end |
| Outer beam/header | 2x8 lumber | 2 | 10 ft (120") | Doubled and bolted to post tops |
| Support posts | 4x4 PT lumber | 2 | Cut to height (see below) | Height depends on your wall height and 2:12 pitch |
| Fascia board | 2x6 lumber | 1 | 10 ft (120") | Nailed to rafter tails at outer edge |
| Blocking | 2x8 lumber | 4–6 | 22.5" (for 24" OC bays) | Fills between rafters at ledger and beam for lateral stability |
Post height calculation: A 2:12 pitch means the roof rises 2 inches for every 12 inches of horizontal run. For a 12-foot-deep awning, total rise = 24 inches (2 feet). If you want the outer beam at 7 feet finished height, set your outer post tops at 7 feet. The ledger board on the house wall then goes at 9 feet (7 ft + 2 ft rise). Measure from your finished floor or patio surface, not from the ground. Double-check that 9 feet doesn't put the ledger behind a window or door header. Adjust your pitch or depth if needed.
Step 1: lay out and dig footings
Mark the two post locations on the ground, 10 feet apart (matching the ledger width) and 12 feet out from the house wall. Use batter boards and a string line to set exact positions, and check for square by measuring the diagonal from the house wall corner to each post location. Dig your footing holes to the required depth for your frost zone. Pour concrete, set a J-bolt or Simpson post base anchor at the correct position (centered and oriented to your string line), and let the concrete cure for at least 24 hours before loading it. In warm climates using pre-cast pier blocks, set them level on 6 inches of compacted gravel.
Step 2: install the ledger board
Mark the ledger height on your house wall (remember: 2 feet above your intended outer beam height for a 2:12 pitch, for a 12-foot run). Snap a level chalk line at that height. Remove any siding in the ledger area so the board will sit flat against the house sheathing. Locate and mark all studs or the rim joist behind the wall. Hold the 2x8 ledger in place and drill 5/16-inch pilot holes at each stud location, staggered in two rows (top row and bottom row, offset 2 inches from each edge). Drive 4.5-inch lag screws with a 1/2-inch socket wrench, or use 3.5-inch structural screws at each stud. Slide metal step flashing or L-flashing under the siding above the ledger, lap it over the top of the board, and seal the top edge with exterior caulk. This is the most important waterproofing step in the entire project.
Step 3: set the posts and outer beam
Set your 4x4 posts in the post base hardware and bolt them in. Brace the posts temporarily with 2x4 diagonal braces nailed to stakes in the ground so they stay plumb while you work. Cut the posts to the correct height (outer beam height, typically 7 feet), checking with a level. Assemble the doubled 2x8 outer beam by face-nailing the two pieces together with 3-inch nails at 12 inches on-center, then lift it onto the post tops and secure with carriage bolts or post cap hardware (Simpson BC or LCE post caps work well here). Check that the beam is level across its full 10-foot length.
Step 4: cut and hang the rafters
Cut your five 2x8 rafters to length. Each rafter needs a plumb cut at the house end (matching your roof pitch angle, which is 9.5 degrees for a 2:12 pitch), a bird's mouth notch where it sits on the ledger (a small L-shaped notch, typically 1.5 inches wide and 1.5 inches deep), and a tail cut at the outer end where it overhangs the beam by about 2 inches. Mark and cut one rafter as a template, test-fit it, then trace and cut the rest from that template. This saves a lot of measuring. Hang the rafters using Simpson rafter ties (H2.5A or equivalent) at the ledger and structural screws or joist hangers at the outer beam. Space them at 24 inches on-center (approximately: one at each end flush with the outer edges of the ledger, and three equally spaced between them).
Step 5: add blocking and the fascia
Cut 2x8 blocking pieces to fit between rafters at the ledger end and at the outer beam end. These pieces fill the bays between rafters, provide lateral stability, and give you a solid nailing surface at the edges. Toenail them in place with 3-inch nails or structural screws. Then nail the 2x6 fascia board across the rafter tails at the outer end. This gives the roof edge a finished look and a base for the roofing panels to terminate against.
Step 6: install the roofing
For corrugated polycarbonate or metal panels: start at one end and work toward the other, overlapping each panel by one corrugation (about 2 inches). Fasten with roofing screws with neoprene washers, which compress to create a watertight seal, don't overtighten or you'll crack polycarbonate panels. Run screws into the high points of the corrugation, not the low points, to avoid pooling water around fasteners. Seal the peak at the house wall with a foam closure strip (sold at roofing suppliers) under the panels and a bead of sealant against the flashing above. For shingles: lay 30-lb roofing felt over the 3/4-inch plywood sheathing, starting at the bottom edge and overlapping each course by 6 inches. Install drip edge along the lower edge first, then lay shingles starting at the bottom and working upward, nailing with roofing nails. Cap the ridge with cut shingles or ridge cap pieces.
Step 7: finish, inspect, and seal
Go back to every penetration point and every gap where the roof meets the house wall and apply exterior sealant. This is tedious but essential. Apply exterior primer and paint or stain to exposed lumber within a few weeks of completion to prevent weathering. Schedule your permit inspection before you add any finish materials that cover the structural connections. After inspection approval, apply your finish and do a final check of all post base hardware bolts and ledger lag screws for tightness.
Faster, cheaper alternatives worth knowing
If the full lean-to build is more than you want to tackle right now, two alternatives are genuinely useful. A shade sail is the fastest option: buy a 10x12 HDPE sail from a home improvement store for $20–$80, anchor the corners to posts or existing structures with stainless steel hardware and turnbuckles, and you have shade in an afternoon. The real key is anchor point strength, not the sail itself. Loose, wobbly anchor posts will let the sail flop and tear. Set your corner posts in concrete and tension the sail at about 10–15 degrees above horizontal so rain sheds off rather than pooling.
Prefab kit awnings from brands like Outsunny and ALEKO cost $150–$800 and come with all the hardware. They're worth considering if your patio is a standard size and you don't want to frame anything. The honest trade-off is durability: independent user comparisons of budget imported awnings note thinner fabric, shorter warranties (often 1–2 years vs. 5+ for better brands), and occasionally lighter-gauge frames than advertised. If you go this route, buy from a retailer with a clear return policy and check that the wall mounting hardware matches your wall type. Brands like SunSetter offer motorized retractable awnings starting around $2,350, which is significantly more expensive but represents a different product category entirely in terms of longevity and usability. If you’re wondering where can I buy an awning for my patio, major home-improvement retailers and online marketplaces carry prefab awning kits from brands like Outsunny, ALEKO, and SunSetter.
Maintenance and safety reminders
Whatever you build, maintenance is what makes a cheap awning stay cheap. For a wood lean-to, inspect the ledger flashing and all sealant joints every spring. Reapply caulk wherever you see gaps or cracking. Re-tighten lag screws and post base bolts annually, as seasonal movement can loosen them. Repaint or restain exposed lumber every 3–5 years. For polycarbonate panels, clean with mild soap and water only (abrasives scratch the surface and accelerate UV degradation). For shade sails, take them down before major storms or winter in cold climates. The hardware anchors can stay, but the sail fabric should be folded and stored. This alone will triple the life of a basic sail.
On safety: any time you're on a ladder near the roofline, work with a helper and use a ladder stabilizer. Don't work on roofing in wet or windy conditions. When fastening the ledger, drilling into an existing wall always carries a risk of hitting electrical wiring or plumbing. Use a stud finder and an AC wire detector before drilling. If you're not confident about what's inside your wall at the ledger location, consult an electrician before proceeding. These aren't optional cautions. They're the things that turn a weekend project into a hospital bill.
When to hire a pro instead
Most homeowners comfortable with basic carpentry can handle a standard lean-to awning. But there are situations where calling a professional is the better call, and being honest about them is part of giving useful advice. If your house has a masonry or stucco exterior and you've never anchored into masonry before, pay a contractor for the ledger attachment at minimum. If your local building department flags your project for engineered drawings (common in high-wind or high-snow zones), hire a structural engineer for the design and then build it yourself from those plans. If your patio area involves any overhead electrical lines or service entrance equipment, stop and call an electrician before you build anything near that area. And if your framing inspection fails the first time, don't take it personally. Talk to the inspector about what specifically needs to change and fix it before re-covering the work.
FAQ
What low‑cost patio awning styles are best for DIY and how do they compare (cost, durability, skills needed)?
Common budget options: 1) Wood lean‑to (simple gable/lean‑to roof attached to house). Cost: $300–$1,200 material (10×12 typical) depending on lumber, roof covering. Durability: good if built with pressure‑treated or rot‑resistant lumber and flashing. Skill: moderate carpentry, some structural fastening. 2) Simple framed wooden awning with corrugated metal or polycarbonate panels. Cost: $250–$1,200. Durability: metal lasts long; polycarbonate resists rot but can yellow. Skill: moderate. 3) Shade sail. Cost: $20–$300 for fabric + $30–$150 for hardware. Durability: lower for fabric, vulnerable to wind/snow; easy install. Skill: basic. 4) Aluminum/prefab kit (assembled frames, optional fabric). Cost: $150–$800 (budget imports) to $1,800+ for higher‑end motorized. Durability: varies widely by brand; kits simplify installation. Skill: basic to moderate (some drilling/anchoring). 5) PVC/fabric lean‑to (PVC frame + tarp/awning fabric). Cost: $50–$350. Durability: lowest; best for short‑term/seasonal use. Skill: basic. Trade‑offs: cheapest options (shade sails, PVC) have lower wind/snow capacity and shorter life; wood and metal require more time/skill but are stronger and longer lasting.
What are realistic total cost ranges and where do major costs come from?
Ballpark totals for a small (≈10×12 ft) DIY awning: - Very cheap (shade sail/PVC): $50–$400. - Budget wood lean‑to with corrugated panels/polycarbonate: $300–$1,200. - Aluminum/prefab kit (import): $150–$800 (materials only). - Higher‑quality kit/motorized: $1,800–$6,000+. Major cost drivers: lumber size and treatment, roofing panels (corrugated metal/polycarbonate/shingles), fasteners/anchors/flashings, hardware/connectors, concrete for footings (if posts required), and any paid inspections/permits. Regional lumber and panel prices vary—get local quotes for final budget.
What materials and tools will I need for a simple budget wood lean‑to awning (itemized)?
Materials (typical 10×12 lean‑to): - Ledger: 2×8 or 2×10 pressure‑treated board (length to fit house wall). - Rafters: 8–12 pieces 2×8 at 24" OC (length per span). - Ridge/beam or headers: 2×8/2×10 as required. - Posts (if not full ledger): 4×4 or 6×6 pressure‑treated posts + concrete for footings. - Sheathing: 3/4" plywood or exterior OSB (optional) or purlins if using corrugated panels. - Roof covering: corrugated metal panels, polycarbonate panels, or shingles and underlayment. - Flashing: continuous ledger flashing and step/flange flashings. - Fasteners: structural screws (3–4½" ledger screws or lag bolts), joist hangers, hurricane ties, metal panel screws with neoprene washers, masonry anchors if anchoring to concrete. - Sealants: exterior caulk, roof sealant. - Corrosion‑resistant hardware: hot‑dip galvanized or stainless for exterior/exposed use. Tools: circular saw/miter saw, drill/impact driver, level, tape measure, framing square, ladder/scaffolding, posthole digger, sledge/hammer, chalk line, safety gear (glasses, gloves), caulking gun. Optional: reciprocating saw, nail gun.
How should I attach a ledger to the house and what waterproofing/fastening rules should I follow?
Ledger attachment basics: - Fasten ledger into rim joist or studs using structural through‑fasteners (long lag bolts or structural screws) sized per manufacturer guidance and spaced per code/connector tables (commonly 16"–24" o.c. depending on loads). - Avoid attaching only to siding—flash and sealback to house sheathing and into framing. - Provide continuous ledger flashing above the ledger to shed water and prevent rot. - Use corrosion‑resistant fasteners for treated lumber and exterior exposure. - If attaching to masonry/concrete, use approved mechanical anchors (wedge/sleeve) or epoxy anchors sized to manufacturer embedment and torque specs. - If unsure about existing house framing location or condition, open a small inspection hole or consult a pro. Follow deck/ledger guides (industry standards) for spacing and load capacity; if your area requires engineered design for wind/snow, follow local code or hire an engineer.
When do I need a permit, engineering review, or inspection for a small patio awning?
Permit checklist (typical triggers): - Permit usually required if structural attachment to house, new footings/posts, increase in roof area, or if the awning exceeds local small‑structure thresholds (varies by municipality). - Engineering required if span or roof framing exceeds local prescriptive span tables, if in high wind or heavy snow zones, or if you propose a large or nonprescriptive structure. - Inspection: city will typically inspect footing/post anchors and final structural connections. - Always check local building department rules: many municipalities have simple checklists for small patio covers vs. decks; some allow small unroofed shade devices without permit, but not structural roofs. When in doubt, call your local building department—permits protect property value and safety.
Give a step‑by‑step build overview for an inexpensive wood lean‑to awning (10×12) with typical time and skill level.
High‑level steps (typical 1–2 weekend DIY, moderate skill): 1) Plan & check code: confirm permit requirements, measure, and choose roof pitch (2:12–4:12 common). 2) Buy materials & tools: ledger, rafters (2×8), joist hangers, flashing, panels, fasteners. 3) Locate studs/rim joist and mark ledger height; set pitch drop across span. 4) Install ledger: flash wall, pre‑drill and install structural screws/lag bolts into rim joist/studs per spacing. 5) Set posts/footings (if freestanding or partial support): dig holes, set posts in concrete and level; cure per concrete instructions. 6) Install beam/header (if used) and attach to posts. 7) Cut and install rafters at chosen spacing (24" OC typical). Use hurricane ties or birdsmouths and joist hangers as needed. 8) Install sheathing or purlins depending on roof panels. 9) Install roofing panels (corrugated metal or polycarbonate) or underlayment and shingles; add drip edge and ridge/cap. 10) Install flashing, seal all terminations, paint/stain posts and exposed wood. 11) Final cleanup and anchor checks. Time: two experienced DIYers can finish 10×12 in 2–3 weekends; solo builders will take longer. Skill level: intermediate carpentry; comfort with structural fasteners, ladders and basic roofing work required.