
You can build and install a retractable patio awning yourself in a weekend, provided your wall framing is solid, you pick the right hardware for your projection and fabric weight, and you do not skip the load and permit checks first. A complete DIY retractable awning involves four real phases: structural assessment and planning, sourcing the right mechanism and fabric, mounting a level header or ledger, and fitting the roller tube, rafter arms, and fabric in sequence. Manual crank systems run around $300 to $800 in materials; motorized systems land between $900 and $2,500 depending on motor brand and controls. Labor savings over a professional install typically run $500 to $1,500 on a standard 12-foot-wide awning.
How to Make a Retractable Patio Awning: DIY Planning & Install

Celia Vaughn
26 Jul 2026
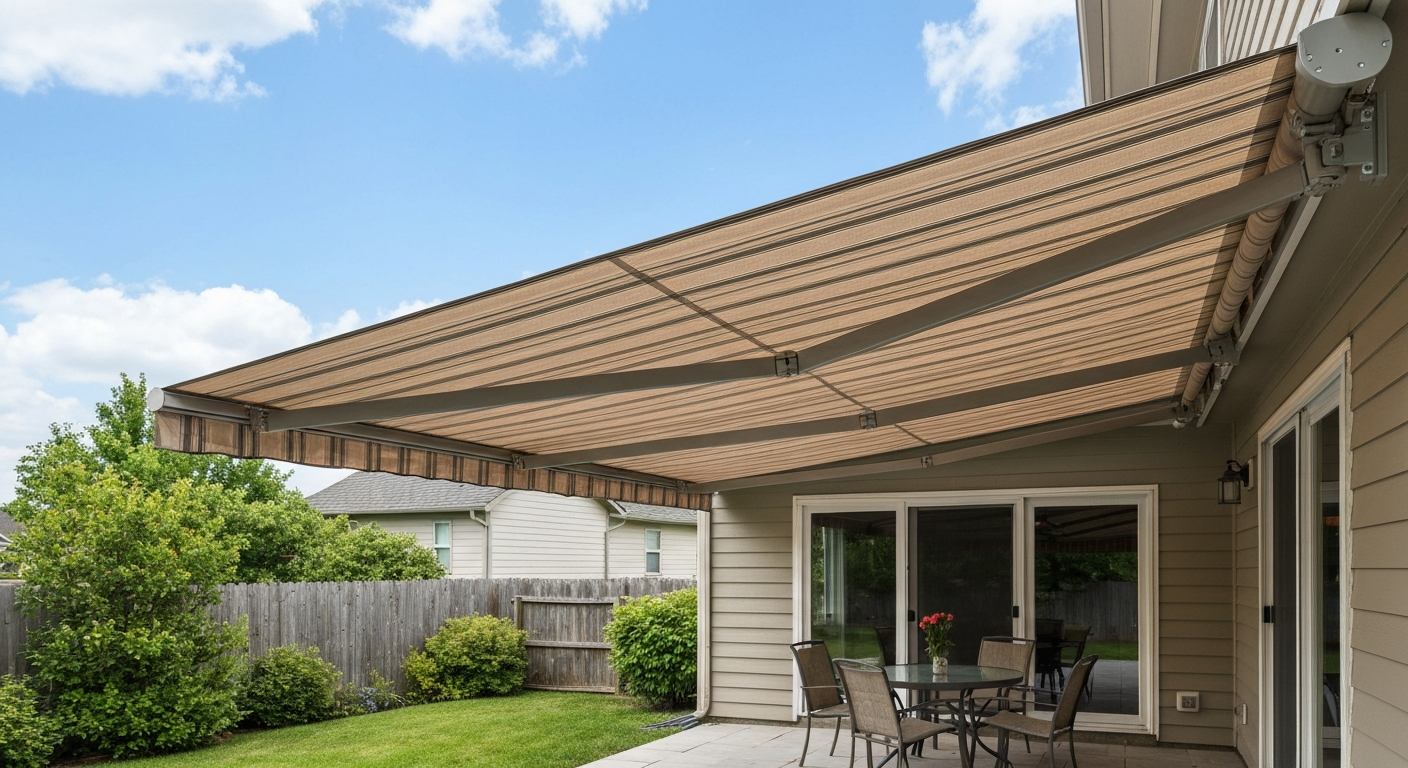
What this guide covers and who it's for
This guide is for DIY-minded homeowners who want to add a retractable fabric awning to an existing patio, deck, or back door opening. You do not need to be a contractor, but you do need to be comfortable working on a ladder, driving lag screws into wall framing, and following a wiring diagram for a low-voltage motor. If you have installed a ceiling fan, hung a heavy TV mount, or built a simple deck ledger, the skills here are within reach. The guide walks through every stage: deciding between fixed and retractable, manual and motorized; measuring and checking your structure; permits and wind-load rules; materials and mechanism types; a full tools and parts list; step-by-step installation including rafter-arm slider hardware; fabric replacement; and honest troubleshooting notes. Where tasks cross into roof penetrations, soffit framing, or freestanding structures, related topics on this site go deeper. For a focused step-by-step walkthrough on how to install patio awning, see the detailed installation guide on this site.
Fixed vs retractable, manual vs motorized: how to choose
Before you buy anything, work through these questions. The answers will narrow your options fast and prevent you from buying a mechanism that does not suit your site or lifestyle.
| Factor | Choose Fixed | Choose Retractable |
|---|---|---|
| Primary goal | Permanent shade, rain protection | Flexible shade, retract in bad weather |
| Wind exposure | Sheltered site, low wind zone | Moderate wind zone (must retract in gusts) |
| Seasonal use | Year-round use or mild climate | Seasonal use, want to close for winter |
| Budget | Lower (no mechanism cost) | Higher ($300–$2,500+ in materials) |
| Permits | Often simpler | Same or similar permit requirement |
| Maintenance | Lower moving parts | Annual lubrication, fabric tension checks |
Once you decide retractable is right, the next split is manual versus motorized. Manual crank systems use a gearbox and a hand crank rod to extend and retract the arms. They are reliable, cheap to fix, and need no wiring. The trade-off is that you must physically crank the awning in every time a storm rolls in. Motorized systems use a tubular roller motor wired to a wall switch, remote, or smart-home controller. They cost more upfront, but a sun sensor or wind sensor can retract the awning automatically, which matters if you travel or forget to close it. For an awning wider than 14 feet or for anyone with mobility limitations, I strongly recommend motorized.
| Factor | Manual Crank | Motorized |
|---|---|---|
| Typical material cost | $300–$800 | $900–$2,500 |
| Wiring required | No | Yes (low-voltage or 120V depending on motor) |
| Automation possible | No | Yes (wind/sun sensors, smart hub) |
| Failure point | Gearbox wear | Motor, wiring, or control board |
| Best for awning widths | Up to ~14 ft | Any width, especially 14 ft+ |
| DIY difficulty | Moderate | Moderate to advanced |
Site assessment and measurements
Measure before you order anything. Getting this wrong is the most common reason homeowners end up with an awning that does not fit, a roller tube that spans a gap in wall framing, or a projection that dumps rainwater directly onto a door threshold.
The five numbers you need
- Width: Measure the full opening you want shaded, wall edge to wall edge or post to post. Most folding-arm awnings are sold in standard widths from 8 to 20 feet. Your roller tube will be cut 2 to 4 inches shorter than nominal width, so the arms clear the wall brackets.
- Projection: How far out from the wall you want the awning to extend. Common residential projections run 8 to 14 feet. Longer projections require more arm segments and heavier hardware.
- Mounting height: Measure from finished patio floor to the underside of your chosen mounting point (fascia board, header, soffit, or wall surface). Manufacturer manuals typically require a minimum 7.5 to 8 feet of clearance from the ground to the front bar when the awning is fully extended and pitched downward.
- Slope (pitch): Retractable awnings must be pitched downward toward the front, typically 5 to 20 degrees, so water runs off the fabric. Most brackets allow pitch adjustment in this range. Do not pitch less than 5 degrees or water pools and stress-cracks the seams.
- Clearance and obstructions: Note any gutters, downspouts, light fixtures, security cameras, or door/window trim in the mounting zone. The roller tube and bracket assembly need at least 10 to 12 inches of clear vertical wall space above the mounting line.
Sketch your wall to scale with all five dimensions before contacting a supplier. Many OEM manuals (SunSetter's install guide is a good example) include a pre-installation measurement worksheet. Fill it out, because the bracket placement pattern is derived directly from those measurements.
Structure and load checks: ledger, fascia, rafters, and wall framing
A retractable awning in full extension exerts real downward and outward load on whatever it is fastened to, especially when the fabric catches wind before you can retract it. I have seen awnings pull fascia boards clean off the house because the installer drove lag screws into 1-inch trim rather than into rafter tails or rim joist behind it. Do not skip this step.
What to check on a wood-framed house
- Locate wall studs or roof rafters behind your planned mounting zone using a stud finder and a probe (a thin nail works fine). Studs are typically 16 or 24 inches on center.
- Confirm the band joist or rim joist is present and not rotted if you are mounting at the second-floor or roofline level. Probe with a screwdriver: solid resistance is good, easy penetration means rot.
- If studs do not align with your planned bracket spacing, you need to install a horizontal ledger board (minimum 2x6 Douglas fir or LVL) lag-screwed into at least three studs so the bracket screws land in solid wood regardless of spacing.
- For lag screws into wood framing, Simpson Strong-Tie fastener tables recommend 1/2-inch hot-dip galvanized or stainless steel lags with minimum 2.5-inch embedment into solid framing (not sheathing alone).
- Check that the fascia or soffit is not your only option. Fascia boards are typically 1-inch nominal trim with no structural backing. If that is all you have, you must add a ledger behind it.
Masonry and concrete walls
Brick, block, and poured concrete walls require sleeve anchors, wedge anchors, or epoxy-set threaded rod, not lag screws. Hilti and similar manufacturers publish ICC-ES evaluation reports that specify minimum embedment depths, edge clearances, spacing, and installation torque for each anchor diameter and base material. See blank" rel="noopener noreferrer">Hilti / ICC‑ES evaluation data (anchor embedment, torque, spacing) for specific embedment depths, edge clearances, spacing, and installation torque requirements for each anchor and base material. For a standard awning bracket on CMU block, a 3/8-inch or 1/2-inch wedge anchor at 2.5 to 3.5 inches embedment is a common starting point, but always verify against the specific anchor's ICC-ES data for your block type. Edge clearances typically run 3 to 6 anchor diameters minimum from the block face edge.
Permits, codes, and safety precautions
I know permit talk is tedious, but skipping this step can mean tearing the awning back down if a neighbor complains or you sell the house. Here is what you actually need to know.
Where permits are typically required
Most jurisdictions require at least a building permit or a sign/awning permit for a new awning attached to a structure. Seattle requires a Sign/Awning permit and enforces minimum clearance rules for projections toward the right-of-way. New York City classifies building-attached canopy and awning work under DOB rules and routes applicants through NYC311 for permit classification. Los Angeles (LADBS) requires a building permit for new awnings and has sign/awning-specific rules including limits on valance signage. Chicago often requires both a Department of Buildings sign/structure permit and a Public Way Use Grant of Privilege from BACP for projecting awnings. Your city or county may be less strict, but the only way to know is to call your local building department and describe the scope: attached, motorized or manual, dimensions, and mounting method. The call takes ten minutes.
Wind loads and ratings
In the U.S., wind loads for exterior elements are governed by ASCE 7, which is adopted by reference in most model building codes. The wind-speed maps in ASCE 7 will tell you the design wind speed for your location, which drives the required fastener size and count for your bracket attachment. European-sourced awnings are often rated under EN 13561, which defines wind-resistance classes 0 through 6. Class 2 corresponds to roughly 70 N/m2 nominal test pressure, and class 4 to roughly 170 N/m2. Any manufacturer-rated awning should display its EN 13561 class or equivalent wind-speed rating. Regardless of rating class, all folding-arm retractable awnings must be retracted in sustained wind, rain, snow, and ice. The SunSetter Owner’s Manual and Installation Instructions states owners must retract awnings in wind, rain, snow, and ice and includes detailed guidance on mounting, bracket types, pitch adjustment, and pre-installation checks. Every manufacturer manual I have read states this explicitly, because the fabric and arm geometry are not designed to resist sustained lateral wind load when extended.
Electrical and motor safety for motorized awnings
NEC Article 430 requires a disconnecting means for every motor and motor controller, sized and rated per the motor's horsepower and locked-rotor current. The disconnect must be readily accessible and in sight of the motor per NEC 430.102 and 430.109. For a typical 120V tubular awning motor, this usually means a dedicated circuit with an accessible switch or breaker within line-of-sight. If you are not comfortable with residential wiring and circuit work, hire a licensed electrician for that portion of the project. Everything else you can do yourself.
Fall and ladder safety basics
- Use a properly rated extension ladder (Type I or IA, 250 or 300 lb rated) set at the correct 4:1 angle.
- Have a helper on the ground to stabilize the ladder and hand up components. Manufacturer manuals recommend a two-person lift for the roller-and-fabric assembly, which can weigh 40 to 80 pounds on a 12-foot awning.
- Never work on a ladder in wind over 15 mph. If you can feel consistent gusts, stop for the day.
- Wear safety glasses when drilling into masonry. Anchor dust and concrete chips cause real eye injuries.
Materials and mechanisms: what you're actually buying
Frame materials
| Material | Pros | Cons | Best for |
|---|---|---|---|
| Aluminum (powder-coated) | Lightweight, rust-proof, low maintenance, widely available in kit form | Less rigid than steel at longer spans, dents more easily | Most residential installs, humid or coastal climates |
| Galvanized steel | Higher strength, better for long spans (16+ ft) and heavy fabrics | Heavier (adds ladder/lift difficulty), can rust at cut edges if not touched up | Wide or high-load awnings, commercial-grade installs |
| Wood (cedar, redwood, treated pine) | Natural look, can integrate with existing wood patio structures | Requires sealing/painting, can warp or crack, heavier than aluminum | Aesthetic-driven projects with covered ledger or pergola integration |
For most homeowners building a retractable awning from scratch, powder-coated aluminum is the practical first choice. It ships in kit form with pre-drilled brackets, it pairs with standard roller tube diameters, and it does not need annual painting. If you are matching an existing wood pergola or patio cover, a wood-framed header is fine as long as it is sealed and supported properly.
Fabric types
| Fabric Type | UV Block | Water Resistance | Durability | Cost Range |
|---|---|---|---|---|
| Solution-dyed acrylic (e.g., Sunbrella) | Excellent (94–98%) | High (resists mildew) | 8–12 years typical | $15–$35/sq ft installed |
| Polyester with PVC coating | Good (85–92%) | Very high (near waterproof) | 5–8 years | $8–$18/sq ft installed |
| Woven polyester (open weave) | Moderate (70–85%) | Low (shade only, not rain) | 5–7 years | $6–$14/sq ft installed |
Solution-dyed acrylic is worth the premium for any awning that will stay up for years. The color is dyed into the fiber rather than printed on the surface, so it resists fading dramatically better than coated polyester. If you are replacing existing fabric rather than building new, the replacement fabric topic covered elsewhere on this site walks through pattern cutting and roller attachment in detail.
Arm and roller options
Folding rafter arms (also called scissor arms or lateral arms) are the standard on retractable awnings. Each arm has two aluminum or steel segments connected by a spring-loaded elbow joint. The back end mounts to a wall bracket or to a slider track on the roller housing; the front end connects to the front profile bar that the fabric edge attaches to. Slider-type arm mounts allow the arm attachment point to travel along a rail on the roller housing, which gives the arms more flexibility in alignment during extension and retraction. This is particularly useful for wider awnings where arm alignment is harder to keep parallel.
Manual vs motorized systems: what is inside the box
Manual crank systems
A manual retractable awning uses a worm-gear gearbox mounted to one end of the roller tube. A crank rod (usually a telescoping pole with a hook end) engages a socket on the gearbox and you rotate the roller to extend or retract the fabric. The gearbox provides mechanical advantage so the effort is manageable, but on a wide or stiff awning you can expect 30 to 60 rotations to fully extend or retract. Gearbox quality varies enormously. Cheap cast-zinc gearboxes crack within a few seasons of heavy use. Look for steel-geared, cast-aluminum housing gearboxes from brands with available replacement parts. When the gearbox fails (and it will eventually), you want to be able to order a replacement rather than replace the entire awning.
Motorized systems
Tubular motors (also called roller tube motors) are cylindrical units that sit inside the roller tube itself. The motor shaft connects to the tube via a crown adapter and an end plug, so the tube rotates around the motor body. The motor's power lead exits from one end of the tube and runs to your wall switch or control box. Somfy's 500-series and Sonesse motors, among the most common in the aftermarket, require a tube internal diameter of at least 47 mm and specific crown/adapter kits matched to the tube manufacturer. Industry-standard tube IDs run 50 mm, 60 to 63 mm, 70 mm, and 78 mm. You must match the motor's shaft size and crown adapter to the tube ID you are using: mixing these causes off-center rotation, vibration, and early motor failure.
Control options for motorized awnings range from a simple hardwired wall switch to RF remote handsets, sun and wind sensors, and Z-Wave or Zigbee smart-home integration. A wind sensor is not a luxury if you are in a region with afternoon thunderstorms: it retracts the awning automatically when sustained wind exceeds a set threshold (typically 22 to 27 mph), which is exactly when you are least likely to notice the weather changing.
Full tools and parts checklist
Parts list
- Roller tube (pre-cut or field-cut to width, matched to motor or gearbox tube ID)
- Folding rafter arms (one pair per standard awning; wider units need additional arms at ~8 ft spacing)
- Rafter arm sliders or fixed-arm wall brackets (slider type recommended for widths over 12 ft)
- Wall/header mounting brackets (end brackets plus center supports per manufacturer spacing chart)
- Front profile bar (aluminum extrusion the fabric leading edge clips or staples into)
- Awning fabric (solution-dyed acrylic or polyester, pre-sewn to width with hem allowance)
- Gearbox (manual) OR tubular motor and crown/adapter kit (motorized)
- End caps and end plugs for roller tube
- Lag screws: 1/2-inch diameter, hot-dip galvanized or stainless, 3-inch minimum length for wood framing
- Expansion anchors or epoxy-set threaded rod for masonry mounting
- Stainless steel hex bolts and lock washers for bracket-to-ledger connections
- Low-voltage or 120V wire, conduit, wall plate, and weatherproof junction box (motorized only)
- Wire connectors and strain relief fittings
- Wall switch, RF receiver, and/or remote handset (motorized only)
- Wind/sun sensor and mounting hardware (optional but strongly recommended for motorized)
Tools by task level
| Task | Tools Needed | Skill Level |
|---|---|---|
| Layout and marking | Tape measure, chalk line, pencil, level (4 ft), stud finder | Basic |
| Drilling into wood framing | Corded or cordless drill/driver (18V+), 1/2" spade or auger bit, pilot bit set | Basic |
| Drilling into masonry | Rotary hammer drill, SDS carbide bits (3/8" and 1/2"), vacuum or blow pump for hole cleaning | Intermediate |
| Cutting roller tube | Miter saw with metal-cutting blade, or hacksaw with fine-tooth blade and miter box, deburring tool | Basic |
| Installing motorized wiring | Wire stripper, voltage tester, fish tape or wire snake, conduit bender (if using rigid conduit) | Advanced |
| Fabric tensioning and trimming | Utility knife, straight edge, awl or scribe, heat gun or hot knife for sealing cut edges | Basic |
| General assembly | Adjustable wrench, socket set (metric and SAE), Allen/hex key set, rubber mallet | Basic |
Mounting preparation: marking, finding studs, and setting the ledger
This is the phase that separates a solid installation from one that works loose in two years. Take your time here and do not move on until the ledger or header is level, fully fastened, and torqued.
- Snap a level chalk line at your mounting height across the full width of the awning location. Double-check it with a 4-foot level against the line.
- Use a stud finder to mark every stud or rafter behind the mounting zone. Transfer the marks above and below your chalk line so you can see them when the ledger board is held in position.
- If studs align with your bracket spacing, you can mount brackets directly to the wall. If not (which is common), cut a 2x6 or 2x8 ledger board to the full awning width plus 6 inches each side. Pre-drill it with a 7/16-inch clearance hole at each stud location.
- Hold the ledger board on the chalk line, get it level, and clamp it temporarily. Drive 1/2-inch lag screws through the ledger into each stud, minimum 2.5-inch embedment past the sheathing into solid framing. Tighten to snug, then go back and torque each lag fully. Do not strip the wood by over-torquing: firm resistance with no continued turning is the target.
- For masonry walls, drill anchor holes per the manufacturer's spacing with the rotary hammer. Clean each hole thoroughly with compressed air or a blow pump (this step is critical for anchor holding strength, not optional). Set expansion anchors and torque to the ICC-ES specified value for your anchor diameter and base material.
- Once the ledger or header is set, use a template or the actual bracket base plate to mark bracket hole locations along the ledger. The bracket spacing pattern comes directly from your awning manufacturer's installation manual based on your tube width.
Step-by-step installation
Step 1: Mount the wall brackets
Bolt the wall brackets (end brackets first, then any center supports) to the ledger or directly to the wall framing. Most brackets use 3/8-inch bolts with lock washers through slotted holes that allow vertical adjustment. Do not fully tighten yet: you want the ability to make small adjustments during roller installation. Check each bracket for plumb. A bracket that is tilted even a few degrees will cause the arms to track unevenly when extended.
Step 2: Install the tubular motor or gearbox into the roller tube
For a motorized system, slide the tubular motor into the roller tube from the drive end. The motor body is stationary; the tube rotates around it. Fit the correct crown adapter over the motor shaft and seat it into the tube end plug. The crown adapter and tube ID must match exactly: Somfy 500-series, for instance, specifies a minimum 47 mm tube ID, but most residential awning tubes run 60 to 63 mm or 78 mm, and each requires a different crown kit. Snap the end plug into the non-drive end of the tube. Route the motor power lead out through the end cap and confirm it has enough slack to reach your conduit entry point. For a manual system, insert the gearbox end cap assembly into one tube end and the plain end cap into the other, following the manufacturer's torque-stop and anti-drop spring instructions if supplied.
Step 3: Attach the fabric to the roller tube
Lay the roller tube on sawhorses at a comfortable working height. The fabric leading edge (the side that will attach to the front profile bar) should already have a sewn hem or pocket. The trailing edge attaches to the roller tube. Most systems use one of three methods: a fabric-to-tube staple strip (a plastic extrusion that clamps over the fabric edge and snaps into a channel on the tube), a flat aluminum clamp strip secured with machine screws, or a sewn pocket that slides over a spline channel on the tube. Follow your specific mechanism's method. Before rolling the fabric onto the tube, lay it out flat and confirm it is square: measure corner to corner diagonally and adjust until both diagonals are equal. A skewed fabric will roll up unevenly and cause arm tracking problems.
Step 4: Lift and hang the roller tube on the brackets
This is the two-person lift I mentioned earlier. On a 12-foot awning, the roller-tube-and-fabric assembly typically weighs 40 to 60 pounds. One person holds each end, and you hook the tube end plugs or cradle brackets over the wall brackets simultaneously. Once seated, install the locking pins or set screws that prevent the tube from lifting out of the bracket cradles. Route the motor lead into conduit or through the wall at this stage before you tighten everything down. Now go back and fully tighten the bracket bolts to the ledger.
Step 5: Fit the rafter arms and sliders
Rafter arms connect between a wall bracket (or slider on the roller housing) at the back and the front profile bar at the front. On a slider-type system, the rear arm fitting rides in an aluminum slider rail that is either mounted to the wall bracket assembly or integrated into the roller tube housing. To install slider hardware: open the slider channel end cap, insert the arm's rear fitting into the slider channel, and replace the end cap to retain it. The slider fitting should move freely along the channel but without slop. On fixed-bracket systems, pin or bolt the rear arm fitting directly to the wall bracket pivot point.
Attach the front end of each arm to the front profile bar using the pivot pin or bolt supplied. With both arms attached, manually extend the awning partway to check that both arms travel at the same rate and that the front bar stays parallel to the wall. Adjust arm tension springs or pivot-pin positions per the manufacturer's arm-adjustment procedure if one arm leads the other.
Step 6: Adjust the pitch
With the awning fully extended, adjust the wall bracket pitch bolts to set the front-bar drop angle. Target 5 to 15 degrees below horizontal for most fabric types. More pitch sheds water faster but reduces usable shade area and increases arm spring tension. Less than 5 degrees allows water to pool. Lock the pitch adjustment bolts once set.
Step 7: Tension the fabric and fit the front profile bar
Fully extend the awning and check the fabric tension. The fabric should be taut across its full width with no sags between arms. Minor sags can be corrected by adding one or two half-turns of tension to the roller spring (manual systems) or by adjusting the motor's limit switch end position (motorized systems). Trim any excess fabric overhang at the front bar using a straight edge and a hot knife or sharp utility knife, then seal the cut edge with a heat gun to prevent fraying. On solution-dyed acrylic, a clean hot-knife cut self-seals as you cut.
Step 8: Motorized wiring final connections
With the mechanical install complete, complete the motor wiring. The motor lead should already be routed to your junction box. Connect per the motor wiring diagram: most residential tubular motors are 120V with a common, extend, and retract lead (or 24V DC with positive, negative, and a direction-control signal). Install the wall switch or wireless receiver in an accessible location within line-of-sight of the motor per NEC 430.102. Test the full extend and retract cycle and set the motor's end-of-travel limit switches so the awning stops fully extended and fully retracted without binding. If you are adding a wind or sun sensor, mount it per the sensor manufacturer's instructions in an unobstructed location and pair it to the motor receiver.
Replacing awning fabric: when and how
Fabric replacement is the most common maintenance task on any retractable awning after five to ten years. Signs it is time: visible fiber breakdown (the fabric surface looks fuzzy or chalky), seam separation along the hem or roller attachment strip, color fading to a point the customer dislikes, or a tear larger than about 3 inches that cannot be patched cleanly. Replacing fabric yourself saves $200 to $600 over a professional re-cover on a standard-size awning.
- Fully extend the awning and unclip or unbolt the front profile bar from the fabric hem. Set the bar aside.
- Retract the awning slowly while a helper guides the fabric off the roller tube. Do not let the tube spin freely: control the speed to avoid damaging the arm springs.
- Remove the old fabric attachment strip from the roller tube (unscrew or unsnap it depending on type). Clean the tube channel of any staple remnants or adhesive.
- Lay the new fabric face-down on a clean surface. Transfer the old fabric dimensions to the new fabric if you are cutting from a roll, allowing 1 inch extra at the roller attachment end for the hem or clamp strip.
- Attach the new fabric to the roller tube using the same attachment method as the original. Roll the fabric onto the tube under even tension, keeping the selvage edges parallel to the tube ends.
- Reattach the front profile bar to the leading fabric hem, extend the awning fully, and check for even tension and pitch. Trim and seal any rough edges.
For a more detailed walkthrough of pattern cutting, hem sewing, and attaching fabric to different roller tube types, the fabric replacement topic on this site covers those specifics thoroughly.
Troubleshooting common problems
| Problem | Likely Cause | Fix |
|---|---|---|
| One arm extends faster than the other | Arm spring tension unequal or pivot pin binding | Adjust arm spring or clean/lubricate pivot pin; re-check arm parallelism |
| Fabric sags between arms when extended | Insufficient roller spring tension or arms too far apart | Add tension to roller spring or add a third arm at midspan |
| Water pools at center of fabric | Pitch below 5 degrees or fabric sagging at midspan | Increase pitch at brackets; check for arm sag under load |
| Gearbox slips or jumps on manual crank | Worn gearbox internals or overloaded gearbox | Replace gearbox; check that arm spring tension is not excessive |
| Motor runs but awning does not move | Drive crown adapter slipping inside roller tube | Remove tube, re-seat crown adapter, and confirm tube ID/motor size match |
| Motor hums but stops before full travel | Limit switch set too tight or fabric binding on bracket | Reset end-of-travel limit switches; check for fabric edge interference |
| Brackets pulling away from wall | Insufficient fastener embedment or fasteners missed framing | Remove awning, add ledger board, re-fasten with confirmed stud locations |
| Fabric fraying at side edges | Cut edges not sealed after trimming | Apply heat gun or hot-knife seal to edge; add side valance to protect edge |
Maintenance schedule
A retractable awning that is maintained seasonally will last two to three times longer than one that is ignored. The tasks are not time-consuming: most take under an hour twice a year.
| Frequency | Task |
|---|---|
| Monthly (in-season) | Visually inspect arm joints and pivot pins for wear; check that front bar is tracking parallel |
| Monthly (in-season) | Clean fabric with mild soap and water; do not use bleach on acrylic fabrics |
| Seasonally (spring and fall) | Lubricate all pivot pins and gearbox input shaft with dry PTFE lubricant (not grease, which attracts dirt) |
| Seasonally | Check all bracket lag screws and anchor bolts for tightness; re-torque any that have backed off |
| Seasonally | Test motor limit switches and run a full extend/retract cycle; check wiring for chafe at conduit entries |
| Annually | Inspect fabric seams under tension for stress cracking or separation; check roller tube for surface corrosion |
| Before winter storage (if applicable) | Fully retract and lock awning; cover roller with a fitted weather cover if the awning is not removed for winter |
Cost and time estimates
| Awning Type | Material Cost (DIY) | Professional Install Cost | DIY Time Estimate |
|---|---|---|---|
| Manual, 10 ft wide x 8 ft projection | $350–$600 | $900–$1,400 | 6–10 hours (2 people) |
| Manual, 14 ft wide x 10 ft projection | $550–$900 | $1,200–$1,800 | 8–12 hours (2 people) |
| Motorized, 12 ft wide x 10 ft projection | $1,000–$1,600 | $1,800–$2,800 | 10–14 hours (2 people + electrician for wiring) |
| Motorized with sensors, 16 ft wide x 12 ft projection | $1,800–$2,800 | $3,200–$5,000 | 14–20 hours (2 people + electrician) |
The two-person time estimates assume you have completed the site assessment, sourced all materials, and are starting with a solid, pre-located ledger zone. First-timers should add 30 to 50 percent to those estimates for measurement verification, problem-solving, and the inevitable hardware store run. The biggest variable in cost is fabric: solution-dyed acrylic from a name-brand mill runs $15 to $35 per square foot of finished fabric, which on a 12 x 10 awning adds $1,800 to $4,200 in fabric alone at the upper end of custom sizing.
When to hire a pro instead of doing it yourself
I am a strong believer in DIY, but I will also be direct about where this project exceeds what most homeowners should tackle alone. Call a professional (or at least a licensed inspector) if any of the following apply:
- Your mounting wall has no accessible studs or framing at the required height, and you are unsure how to engineer a ledger or header beam to carry the load safely.
- The wall is brick, stone, or historic masonry where drilling without assessment could cause structural cracking or void a historic preservation covenant.
- Your awning is wider than 18 feet or projects more than 14 feet: at that scale, point loads on the wall brackets are significant and warrant an engineer's review.
- The motor circuit requires a new dedicated circuit or sub-panel work: that is licensed electrician territory in virtually every jurisdiction.
- Your local permit requires stamped engineering drawings or a plan review: you can still do the physical install, but you need a licensed professional of record on the permit.
- You are mounting to a building in a high-wind or hurricane zone: ASCE 7 design wind speeds in these areas drive fastener requirements that go well beyond standard lag-screw tables.
For everything else on a standard single-story residential install, this is genuinely a manageable weekend project with careful planning. The work that intimidates most people (the structural check, the level layout, the roller lift) is more methodical than technical. Take the measurements twice, confirm the framing is solid, follow the manufacturer's bracket-spacing tables, and the install itself goes quickly.
FAQ
What is a retractable patio awning and is it right for my project?
A retractable patio awning is a fabric canopy on a roller and folding‑arm mechanism that extends or retracts to provide shade. Choose retractable over fixed if you want seasonal or on‑demand shade, lower visual impact when retracted, or easier snow/wind protection. Choose fixed if you need permanent weather protection, higher wind resistance, or a structural roof. Compare costs, maintenance and local wind exposure when deciding.
How do I choose between manual (crank) and motorized awnings?
Manual crank systems are lower cost, simpler to install and maintain, and suitable for smaller spans. Motorized systems add convenience, larger span capability, and integration with remotes/sensors but require an electrical supply, a properly sized tubular motor, and a disconnect per NEC Article 430. Choose motorized for large projections or frequent use; choose manual for budget or infrequent operation.
What measurements and structural checks do I need before buying an awning?
Measure clear wall width, desired projection, soffit/soffit overhang and minimum head clearance (for door/window operation). Verify supporting structure: locate studs/band joist or concrete/masonry backing, check for rot/decay, and confirm sufficient bearing area for awning loads. Use manufacturer load tables and local codes (ASCE 7 wind loads) to confirm attachment capacity. For masonry or concrete, plan for proper anchor embedment and edge spacing per anchor manufacturer guidance.
Do I need a permit to install a retractable awning?
Permit requirements vary by jurisdiction. Many cities require permits for awnings projecting over the public right‑of‑way or for commercial installations; examples include Seattle, New York City and Los Angeles. Check your local building department or permit portal before purchasing. If electrical work is needed for a motor, an electrical permit and inspection are commonly required.
What materials and mechanisms are commonly used for awnings?
Frames: extruded aluminum (lightweight, corrosion‑resistant), powder‑coated steel (stronger/heavier), and wood (aesthetic but heavier/maintenance‑intensive). Fabrics: solution‑dyed acrylic and polyester blends for UV and colorfastness; PVC‑coated polyester for higher waterproofing. Mechanisms: tubular roller with folding arms (folding‑arm awning) for wall mounting; cassette or half‑cassette housings for protection when retracted. For motors, choose tubular motor sized to tube ID and torque requirements; match crown/adapter per motor specs.
What tools and parts will I need for a DIY installation?
Tools: tape measure, level (4‑ft), stud finder, chalk line, drill/hammer drill, socket set, torque wrench, hex/allen wrenches, adjustable wrench, screwdrivers, ladder(s), sawhorses, ratchet straps, helper(s) (two‑person lift). Parts: awning kit (roller, fabric, arms, brackets), appropriate fasteners (stainless or hot‑dip galvanized lag screws for wood; sleeve/epoxy anchors or through‑bolts for concrete/CMU), backing plate/ledger if needed, motor and crown/adapters (if motorized), electrical conduit/switch/rewire/sensor, silicone sealant, end caps, tensioning pins, replacement fabric (if re‑covering). Refer to manufacturer lists for exact fastener sizes and motor tube compatibility.