
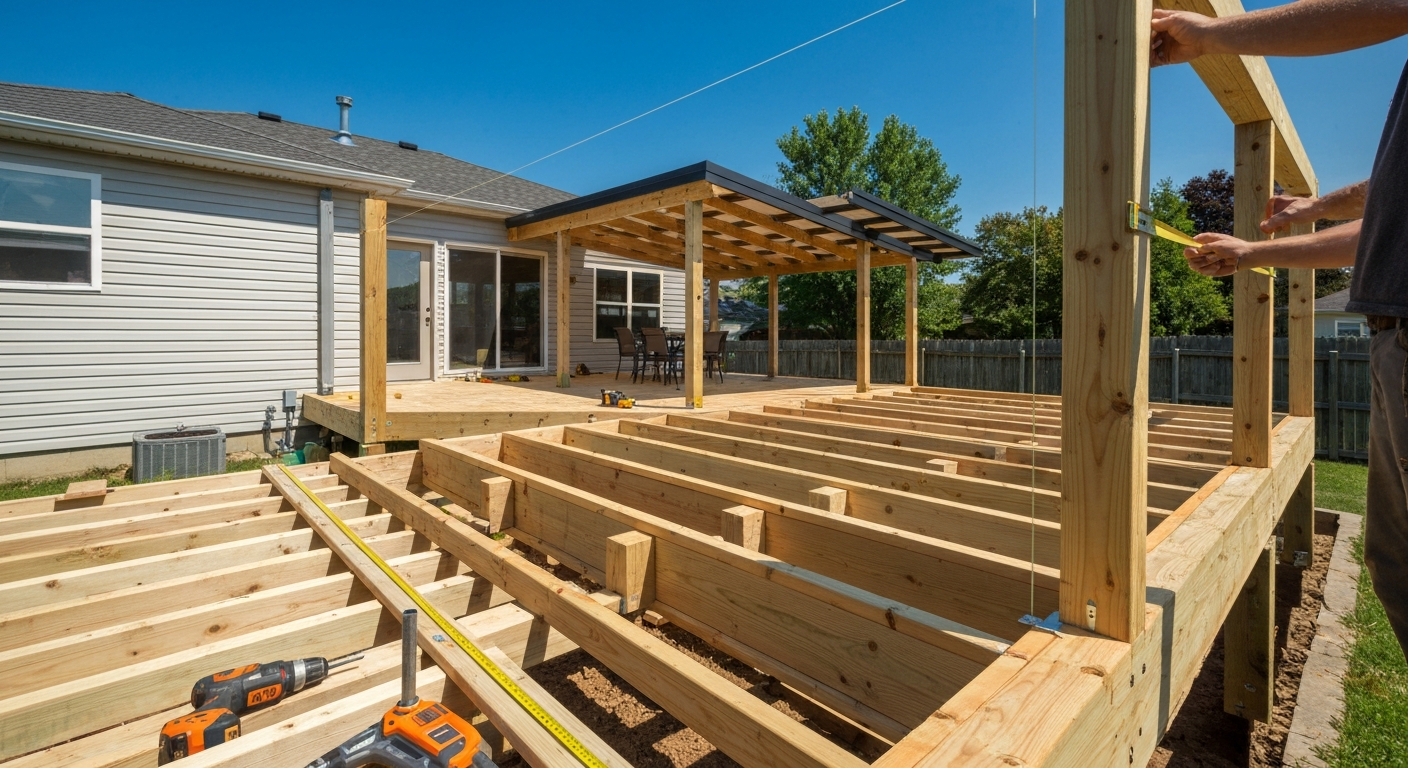
Extending a patio deck means either pushing the deck footprint outward with new framing and decking, adding a roof or cover overhead (lean-to, gable, or freestanding), or finishing the space underneath an elevated deck with a drainage ceiling. All three are genuinely DIY-friendly projects if you plan the structure correctly, pull the right permits, and respect a few non-negotiable load and attachment rules. This guide walks you through every decision point, from the first measurements to the final fastener.
How to Extend a Patio Deck: DIY Planning, Build & Cover

Celia Vaughn
13 Aug 2026
What this guide covers and who it's for
This is a practical planning and build resource for homeowners who want to expand an existing patio or deck, add overhead coverage, or make use of the area beneath an elevated deck. You do not need to be an experienced carpenter, but you do need to be comfortable with basic framing concepts, comfortable working at height, and willing to engage with your local building department. If you have already built or helped build a simple deck, everything here is achievable. If this is your first structural project, use this guide to get your plans right and take the build one phase at a time.
The three core project types this guide addresses are: (1) extending the deck footprint by adding new framing, posts, footings, and decking boards outward from the existing structure; (2) adding a cover or roof over an existing patio or deck, from a simple lean-to attached to the house to a freestanding shade structure; and (3) finishing the underside of an elevated deck with a waterproof drainage ceiling so the space below stays dry. Many projects combine two of these, for example extending a deck footprint and then covering the whole thing.
Extension vs. cover vs. under-deck finishing: decide your scope first
Before you price materials or draw a single line, you need to lock down exactly what you are building. The scope decision drives everything: permit type, footing requirements, structural connections, and budget. I have seen homeowners waste a weekend of planning because they changed their mind between a deck extension and a covered patio halfway through. Answer these questions up front. For a step-by-step walkthrough on how to extend covered patio, consult the dedicated section in this guide.
- Do you want more floor space, more shade, or both? A footprint extension gives you square footage. A cover gives you weather protection. If you want both, plan them together so footings and posts serve double duty.
- Is your existing deck structurally sound enough to attach to? Check for soft or spongy boards, rot at ledger connections, and wobbly posts. An extension attached to a failing deck is a safety hazard. Fix the existing structure first.
- How high is your existing deck above grade? Decks less than 30 inches above grade have more relaxed guard and permit requirements under most IRC-based codes. Elevated decks open the door to under-deck finishing but also bring more stringent lateral bracing requirements.
- Do you want the project attached to the house or freestanding? Attached structures are simpler to cover from a roof-tie-in standpoint but require a ledger connection into the house framing and proper flashing. Freestanding structures need independent footings on both sides but have no attachment water-intrusion risk.
- What is your real budget? Deck footprint extensions run roughly $15 to $35 per square foot in materials for pressure-treated wood. Basic aluminum patio covers start around $10 to $20 per square foot for DIY kit systems. Under-deck drainage ceilings (like Trex RainEscape or ZipUP UnderDeck) typically run $8 to $20 per square foot installed DIY. Knowing the budget before you design prevents over-engineering.
- How much time can you commit? A 10x12 deck extension with footings takes most DIYers two to three full weekends. A lean-to cover on an existing slab or deck takes one to two weekends. An under-deck drainage system on an existing elevated deck can often be done in a single long weekend.
Your pre-build planning checklist
Work through this checklist before you buy a single board. Skipping steps here is where projects stall, fail inspection, or become expensive mid-build corrections.
- Measure the existing structure: overall footprint, height above grade at all four corners, ledger height on the house, and distance from the house to the outermost beam or rim joist.
- Sketch a plan to scale, even a rough hand sketch, showing new footings, posts, beams, joists, and decking direction. Inspectors and lumber yards both need this.
- Calculate your live load requirement: IRC Table R301.5 requires 40 psf live load for residential exterior decks. If you are in a snow region, add a roof snow load calculation (use the ASCE 7 Hazard Tool for your ground snow load, then apply the appropriate roof snow load conversion for your roof pitch).
- Check your local frost depth: IRC R403.1.4 requires footings to extend below the local frost protection depth. This varies from 0 inches in the deep South to 48 inches or more in northern states. Your local building department or a quick search of your jurisdiction's frost depth table will give you the number.
- Contact your building department: ask specifically whether your project requires a building permit, whether a site plan is required, and whether inspections are needed at footing pour, framing, and final stages.
- Check HOA rules if applicable: many neighborhoods restrict cover materials, colors, heights, and setbacks independently of municipal codes.
- Identify setback requirements: most jurisdictions require structures to sit a minimum distance (often 5 to 10 feet) from property lines. Confirm this before you lay out footings.
- Inventory your tools: see the tool list in the span and beam section below. Rent what you do not own rather than buying tools you will use once.
- Order materials with a 10 percent overage for framing lumber and a 15 percent overage for decking boards to account for cuts and defects.
Measurements and load checks
Getting measurements right before you dig a single hole saves you from the most common and most expensive mistake in deck extensions: footings in the wrong place. Measure the existing deck's outside edge at multiple points, not just the corners, because decks drift out of square over time. Use batter boards and string lines to establish your new corners, then verify square with the 3-4-5 triangle method (or its larger multiples like 6-8-10). Pull a diagonal from corner to corner: if both diagonals match, you are square.
For load calculations, you need three numbers: live load, dead load, and (if adding a roof) roof load. The IRC prescribes a minimum 40 psf live load for exterior residential decks. Dead load for typical pressure-treated framing and composite or wood decking runs about 15 psf. So your total design load for sizing beams and joists is at minimum 55 psf. If you are adding a covered roof, the roof dead load (roofing material weight) and any applicable snow load stack on top of the structure below, which affects your post and footing sizing. In snow country, always use the ASCE 7 Hazard Tool to find your ground snow load, then work with your building department or an engineer to confirm the roof design load. Use the ASCE 7 guides and resources (ground snow load and hazard tool) to look up location-specific ground snow loads and related design parameters.
Roof drainage is a planning step that most DIYers forget until they are standing in the rain watching water pour off the new cover onto the house siding. Slope your roof cover a minimum of 1/4 inch per foot toward the outer edge (away from the house). Install gutters and downspouts at the low edge, and make sure downspouts discharge at least 6 feet from the foundation. For a lean-to attached to the house, a kick-out diverter flashing at the point where the cover roof meets the wall is not optional: it directs water away from the ledger/wall junction and prevents the most common source of rot and water intrusion in attached covered patios.
Permit and code checklist
Permits are not just bureaucratic paperwork. They are the mechanism that gets an inspector to verify your footings are deep enough, your ledger is bolted correctly, and your beam sizing will hold the load. I have personally seen unpermitted decks fail inspections at resale, costing the seller thousands in retroactive fixes. Pull the permit. It usually costs $100 to $400 for a residential deck or patio cover project and is worth every dollar.
A building permit is typically required when you are adding new structural footings, attaching a structure to the house, building anything that requires guards (drops more than 30 inches to grade, per IRC R312), adding electrical, or adding a roof structure over a certain size (thresholds vary by jurisdiction but 200 square feet is a common trigger). Some jurisdictions exempt small freestanding shade sails or pergolas under a specific square footage from permits, but this is not universal, so always ask.
What inspectors typically look for on a deck extension or patio cover project:
- Footing inspection (before concrete is poured): correct depth to local frost line, correct diameter, and correct location per approved site plan.
- Framing inspection: proper ledger attachment with code-compliant fasteners per IRC Table R507.9.1.3(1), beam and joist sizing matching the approved span tables, and lateral load connections (hold-down tension devices or L-clip arrangements) where required.
- Guard and handrail inspection: guards required where the deck surface is more than 30 inches above grade, minimum 36 inches high, with infill components that can resist 50 lb/sf loads per IRC R312.
- Roof framing (if adding a cover): rafter or purlin sizing, ridge connection, and connection to house framing if attached.
- Flashing: step flashing, counter-flashing, and kick-out diverter at any roof-to-wall intersection.
- Final inspection: decking, fasteners, guards complete, and any electrical rough-in.
Documentation to gather before you submit for permit: a site plan showing the property lines, house footprint, and new structure with dimensions; a framing plan showing footing locations, post spacing, beam sizes, and joist layout; a materials list specifying lumber species and grade (Southern Yellow Pine and Douglas Fir are most common); and any product spec sheets for prefabricated components like aluminum cover kits or under-deck drainage systems. If your design uses standard IRC prescriptive tables (no engineer required), note which tables you used on your drawings. This speeds up plan review considerably.
Span and beam guidance
Span tables tell you how far a given lumber size can reach between supports without excessive deflection or risk of failure. The IRC's Section R507.6 and associated tables give maximum joist spans, and Table R507.5 covers beam spans, all based on the IRC's standard 40 psf live load plus dead load combination. The American Wood Council's DCA-6 guide mirrors these tables and is free to download, it is the single most useful reference document for a DIY deck builder using wood framing. The American Wood Council’s DCA‑6: Prescriptive Residential Wood Deck Construction Guide (American Wood Council) publishes span tables, fastening schedules and prescriptive details that align with the IRC and are widely used by designers and builders for code‑compliant, engineer‑free deck designs.
Here are practical span rules of thumb for pressure-treated Southern Yellow Pine or Douglas Fir, which cover the majority of DIY deck projects. These are starting points: always verify against the IRC tables or DCA-6 for your specific lumber species, grade, and load conditions.
| Member | Common Size | Approximate Max Span | Typical Spacing |
|---|---|---|---|
| Deck joist | 2x8 | 10 to 12 feet | 16 inches on center |
| Deck joist | 2x10 | 13 to 15 feet | 16 inches on center |
| Deck joist | 2x12 | 15 to 18 feet | 16 inches on center |
| Beam (double 2x8) | 2-ply 2x8 | 6 to 8 feet between posts | N/A |
| Beam (double 2x10) | 2-ply 2x10 | 8 to 10 feet between posts | N/A |
| Beam (double 2x12) | 2-ply 2x12 | 10 to 12 feet between posts | N/A |
| Roof rafter (lean-to) | 2x6 | 8 to 10 feet (low pitch) | 24 inches on center |
| Roof rafter (lean-to) | 2x8 | 10 to 14 feet (low pitch) | 24 inches on center |
Beam cantilevers are limited by the IRC to one-quarter of the actual beam span. So if your beam spans 10 feet between posts, it can cantilever a maximum of 2.5 feet beyond the outer post. Do not exceed this without engineering. Common mistake: people eyeball cantilevers based on what looks good rather than what the lumber can actually support, then wonder why the outer edge of the deck bounces underfoot.
For aluminum or steel patio cover kits, the manufacturer's span charts replace the wood IRC tables. Follow them exactly, including their specified post sizes and anchor requirements. Aluminum kits are engineered as a system, and substituting a longer rafter span or a lighter post gauge voids the engineering and usually the warranty.
Tools you will need
- Tape measure (25-foot minimum), speed square, framing square, and level (4-foot and torpedo)
- Circular saw with a framing blade and a miter saw for angle cuts
- Drill/driver and impact driver (two separate tools speeds the job significantly)
- Post-hole digger or a rented power auger for footings deeper than 18 inches
- Concrete mixing tub or rented mixer, or use premixed 80 lb bags
- String line, line level, and batter boards for layout
- Reciprocating saw for cutting into existing framing when tying in
- Chalk line and pencil
- Safety gear: safety glasses, hearing protection, work gloves, and fall protection if working above 6 feet
Footings, frost depth, and post anchoring
Footings are the most consequential part of any deck or patio cover extension, and they are also the part most DIYers undersize or under-depth. A footing that is too shallow will heave in freeze-thaw cycles, pushing your posts up and cracking your structure. IRC R403.1.4 is unambiguous: exterior footings must extend to or below the local frost protection depth. In a state like Minnesota, that can be 42 to 48 inches. In Atlanta, it might be 12 inches. Look up your jurisdiction's frost depth before you dig anything.
For a standard deck extension, the most common footing type is a cylindrical concrete pier. Dig the hole with a power auger to the required frost depth, add 6 inches of compacted gravel at the bottom for drainage, set a tube form (Sonotube), and pour concrete. For most single-story residential deck projects, a 10-inch diameter tube footing is adequate for interior posts and a 12-inch diameter for corner posts carrying heavier beam loads. Always verify against your local building department's requirements, as some jurisdictions specify minimum footing diameters by post tributary area.
Post anchoring is where a lot of DIYers cut corners and regret it. There are two main approaches: setting the post directly in concrete (embedded post) or setting a metal post base anchor in the concrete and bolting the post to it above grade. Embedded posts are stronger for lateral resistance but the post end is vulnerable to rot even with pressure-treated lumber. Post base anchors (Simpson Strong-Tie ABA or equivalent) keep the post end above grade, dramatically improving longevity, and allow post replacement without breaking up the footing. For a new build, use post base anchors. Position the anchor bolt in wet concrete using a template, let the concrete cure a minimum of 24 to 48 hours before loading, and follow the manufacturer's installation instructions for the anchor model.
Uplift resistance matters for covered structures. A roof cover catches wind like a sail, and in a wind event the uplift forces on posts and anchors can exceed the dead weight of the structure. Post base anchors rated for both downward compression and uplift tension (such as the Simpson ABA series) handle this correctly. Verify the uplift rating on your chosen anchor against your local wind speed zone, which you can find through the ASCE 7 Hazard Tool. In coastal or high-wind areas, this is not optional and may require an engineer to confirm anchor sizing.
Attachment methods and structural connections
Ledger installations
The ledger is the horizontal board bolted to the house rim joist or band joist that carries the inner edge of your deck joists. It is the most critical connection in any house-attached deck extension. Done wrong, it causes deck collapses. Done right, it is a bombproof connection that distributes loads directly into the house structure.
Ledger fasteners must be hot-dipped galvanized or stainless steel per IRC Table R507.9.1.3(1). The table specifies fastener type (1/2-inch through-bolts, 1/2-inch lag screws, or code-listed structural screws like the Simpson SDS or LedgerLOK), bolt spacing, and row patterns based on joist span and sheathing thickness. Common mistake: using standard zinc-coated hardware store bolts or drywall screws. These corrode quickly in the wet/dry cycle of an exterior ledger and lose clamping force within a few seasons.
Before bolting the ledger, you must cut back siding, house wrap, and any foam sheathing to expose the band joist cleanly. Install a self-adhered flashing membrane over the top of the band joist area, then set the ledger against the house and bolt through. Apply a second strip of self-adhered flashing over the top of the ledger and up the wall, lapping under the house wrap. Cap this with a metal z-flashing bent so water runs outward over the ledger face. This layered flashing detail is what Building America and roofing manufacturers like GAF emphasize for keeping water out of the ledger-to-wall junction. Do not skip it.
Lateral load connections are required by the IRC for decks attached to the house. The standard prescriptive approach requires two hold-down tension devices with a 1,500 lb capacity each, installed within 24 inches of each end of the deck. An alternative is four L-clip connectors rated at 750 lb each in a specified arrangement. Simpson Strong-Tie's DTT2Z and similar devices are designed for exactly this application. Your inspector will look for these, and they are one of the most commonly missed items on DIY deck inspections.
Post, beam, and bracing connections
Beams sit on top of posts or are bolted alongside them. In post-on-top connections, the beam bears directly on the post cap (Simpson BC or similar) and is through-bolted or fastened per the cap manufacturer's requirements. In notched-post connections, the post is notched to receive the beam and through-bolted with two 1/2-inch bolts minimum. Post caps are faster and keep the post end grain protected; notched connections are stronger in shear but expose the notch cut to moisture. Either approach is code-acceptable when executed with the right hardware.
Beam sizing decisions come down to tributary load and span. For a deck extension using standard residential loads (40 psf live, 15 psf dead), the IRC beam span tables (Table R507.5) or the DCA-6 guide give you clear go/no-go sizing for common spans. When in doubt, go one size up: the cost difference between a doubled 2x10 and a doubled 2x12 is small, and undersized beams that visibly deflect underfoot are the most common structural complaint I hear from homeowners who DIY-built without checking the tables.
Diagonal bracing is required for freestanding structures and for tall posts on house-attached decks. For posts over 8 feet tall, add diagonal knee bracing at 45 degrees from the post to the beam in each direction. For freestanding covers, cross-brace between posts in the plane parallel to the house. Aluminum cover kit systems typically include precut diagonal bracing as part of the kit, do not omit it even if the structure feels rigid without it. Lateral forces from wind load are the primary reason freestanding patio structures fail.
Flashing and roof tie-in for attached covers
When you attach a lean-to cover roof to the house wall, the intersection between the cover roof and the house wall is the number one water intrusion point in the entire project. See our guide on how to build a patio cover on a deck for step-by-step instructions and diagrams. The correct detail uses step flashing woven with each course of roofing material as you go up the wall, counter-flashing embedded or caulked into a reglet in the wall, and a kick-out diverter at the lower end of the intersection to throw water into a gutter rather than behind the siding. House wrap must lap over the top leg of the step flashing, not under it. This is the detail that Building America's flashing guidance and roofing manufacturers consistently emphasize. If you are not confident with step flashing installation, this is the one subtask worth paying a roofer to complete while you handle the rest of the build.
Under-deck waterproofing and drainage systems
If you are finishing the space below an elevated deck, a drainage ceiling system is what keeps it usable in the rain. For step-by-step options and detailed methods on how to cover a patio under a deck, see our dedicated guide on that topic. There are four main approaches, each with real tradeoffs:
| System Type | Examples | Best For | Key Tradeoff |
|---|---|---|---|
| Above-joist membrane | Custom EPDM/TPO over joists | New construction only | Keeps framing dry but requires access from above; not a retrofit option |
| Below-joist tray/panel | Trex RainEscape, TimberTech DrySpace | Retrofit on existing elevated decks | Does not keep joists dry; loses 3 to 5 inches of headroom below |
| Vinyl/aluminum ceiling panel | ZipUP UnderDeck, aluminum soffit systems | Clean finished ceiling appearance | Higher cost; more complex installation; headroom loss similar to trays |
| DIY corrugated or EPDM | Corrugated PVC panels, DIY EPDM strips | Lowest cost, minimal headroom loss | Less finished appearance; requires careful slope and gutter detailing |
For most retrofit under-deck projects on an existing elevated deck, a below-joist tray system like Trex RainEscape is the most practical option. The trays slope to a perimeter gutter channel that is run to a downspout. Installation is straightforward: snap trays to the bottom of joists with the included clips, working from the house outward so each tray laps over the next toward the low end. Run the gutter channel along the outer beam and connect to a standard downspout. The whole system for a 12x16 deck can typically be installed in a day by two people. What these systems do not do is protect the joists themselves from moisture vapor from above, so maintain your deck board gaps and do not trap debris on the tray surfaces.
Material options and trade-offs
The right material depends on your budget, climate, maintenance tolerance, and the look you want. Here is an honest comparison of the three most common material choices for patio deck extensions and covers.
| Material | Upfront Cost | Maintenance | Lifespan | DIY Friendliness | Best Use |
|---|---|---|---|---|---|
| Pressure-treated wood | Low to medium ($3-$6/linear ft for framing) | Annual sealing/staining for decking | 20-30 years with maintenance | High — standard carpentry tools | Deck extensions, pergola framing, ledgers, posts |
| Composite decking (wood frame) | Medium to high ($5-$12/sf for decking boards) | Very low — occasional washing | 25-30+ years for decking surface | High for decking; wood framing skills still needed | Deck surface where low maintenance is priority |
| Aluminum patio cover kit | Medium ($10-$20/sf DIY kit) | Very low — hose off annually | 30-50 years | Medium — follows kit instructions, fewer custom cuts | Solid or louvered patio covers, lean-to roofs |
| Wood pergola/cover | Low to medium | Moderate — seal or paint every 2-3 years | 15-25 years with maintenance | High — standard carpentry | Open shade structures, traditional aesthetic |
| Polycarbonate roofing panels | Low to medium ($2-$5/sf for panels) | Low — annual cleaning | 10-15 years before UV yellowing | High — cuts with circular saw | Translucent lean-to covers, patio covers needing light |
| Steel/metal framing | Medium to high | Low if powder-coated | 40+ years | Lower — requires welding or bolted connections | Commercial-grade freestanding covers, high-wind areas |
For most DIY homeowners extending a wood deck, the practical recommendation is pressure-treated framing with either pressure-treated or composite decking on top. The framing is straightforward to work with using standard tools, every lumber yard stocks it, and the IRC prescriptive span tables cover it completely without needing an engineer. If low maintenance is your top priority and budget allows, upgrade just the decking boards to composite while keeping the framing in treated lumber. For the cover overhead, an aluminum kit system is the most forgiving DIY option because the engineering is done for you and the pieces are pre-cut to your order dimensions.
Common pitfalls to avoid
- Skipping the permit because the project 'looks small': even a modest deck extension with new footings almost always requires a permit. Getting caught mid-build means stop-work orders and potential tear-down.
- Attaching to a rim joist that cannot carry the load: the house band joist must be solid, straight, and accessible for full bolt penetration. If it is engineered lumber (LVL or I-joist), consult the manufacturer before drilling — not all engineered joists accept ledger bolting the same way.
- Using the wrong fasteners: standard zinc screws and bolts corrode rapidly in exterior pressure-treated lumber applications, especially with ACQ-treated wood. Use hot-dipped galvanized or stainless steel hardware throughout.
- Setting footings at frost depth for your old location, not the new one: if you move, look up frost depth for your actual new jurisdiction. It varies significantly even across short distances in hilly or transitional climate regions.
- Skipping lateral bracing on freestanding structures: a freestanding cover without diagonal bracing can rack and collapse under wind load even if it feels solid when pushed by hand.
- Running deck drainage downhill toward the house: always slope away from the house, minimum 1/8 to 1/4 inch per foot, and extend downspouts at least 6 feet from the foundation.
- Forgetting the kickout diverter at lean-to roof connections: this is the single most common source of wall rot and water damage in house-attached covered patios. Install it every time.
- Buying framing lumber without checking for straightness: pull boards from the pile and sight down the edge. Crown, bow, and twist in framing lumber cause headaches at every subsequent step. Take the time to select straight stock.
Finishing, utilities, and follow-up decisions
Once the structure is up and inspected, a few follow-up additions dramatically increase how much you actually use the space. Gutters and downspouts on a covered patio are not optional in most climates, without them, rain cascades off the cover edge right where you want to stand. A 4-inch K-style aluminum gutter with a downspout at one or both ends, sloped 1/4 inch per 10 feet toward the downspout, handles most residential cover roof drainage cleanly.
Outdoor lighting is the single highest-return finishing addition for evening use. Low-voltage LED string lights on a pergola or conduit-run weatherproof fixtures on a solid cover both work well. If you are running any hardwired electrical to the covered area, pull an electrical permit and have the work inspected, outdoor electrical is one of the areas where the consequences of DIY errors (shock, fire) are serious enough that I always recommend either following the NEC carefully with proper weatherproof boxes and GFCI protection, or hiring a licensed electrician for that portion of the project.
Screening in a covered patio is a popular next step, especially in mosquito-heavy climates. Aluminum screen frames attached to the existing posts and beams can be built in a weekend and make an enormous difference in usability. Composite or aluminum trim wrapping the posts and beams gives the whole structure a finished look and covers the post anchors and hardware. Outdoor ceiling fans on a solid cover make the space comfortable into late summer evenings. Plan any fan mounting for framing connections before you put up a finished ceiling.
When to call a pro instead of DIYing it
This guide covers the full range of what a capable DIYer can safely build without professional help. But there are specific situations where hiring a structural engineer, a licensed contractor, or a specialty sub is the right call, not a sign of failure.
- Your existing deck shows signs of structural damage (rot, failing ledger connections, cracked beams) and you are not sure of the extent: have a contractor or inspector assess it before you attach anything new to it.
- Your design exceeds the IRC prescriptive tables (very long spans, heavy roof loads, large freestanding structures): these require engineering calculations, not guesswork.
- You are in a high-wind or high-seismic zone: lateral load design becomes complex quickly and the consequences of errors are severe. An engineer review is worth the $500 to $1,500 fee.
- Your roofline integration requires cutting into existing rafters or roof sheathing: this is structural work on the house itself and is best done with professional involvement unless you are very experienced with roof framing.
- Any hardwired electrical beyond a single GFCI outlet if you are not comfortable with the NEC: outdoor electrical errors are dangerous and expensive to fix after the walls are closed.
- You discover your property is in a flood zone, a wildfire interface zone, or has unusual soil conditions: these trigger additional code requirements that go beyond standard IRC prescriptive design.
FAQ
What are the first planning steps before extending or covering a patio/deck?
Record accurate measurements (existing deck/patio footprint, distance to grade, house wall dimensions, overhead clearance). Check intended use and occupancy (furniture, hot tub, rooftop planters) to estimate loads. Locate underground utilities and property lines, confirm setback requirements. Take photos and sketch the existing framing, noting ledger/band joist, joist direction, post locations and rooflines. Decide finish level (simple roof, full ceiling/insulation, screened porch) to influence structural, drainage, and ventilation needs.
How do I check loads and decide if my existing deck can support an extension or roof?
Use the IRC prescriptive baseline: residential decks are typically designed for 40 psf live load. Check existing joist size, span, spacing and beam sizing against IRC (R507) or AWC DCA‑6 span tables. For roof or covered loads, calculate roof dead plus snow/wind loads using ASCE 7 data for your location. If framing, fasteners or ledger details aren’t clearly adequate, or if you need to support additional concentrated loads (hot tub, planters), consult a structural engineer. When in doubt, provide independent posts/footings for added loading rather than relying solely on existing framing.
What permits and approvals will I likely need?
Most jurisdictions require a building permit for deck extensions, roof covers, and under‑deck conversions. Permit checklist: building permit application, site plan showing setbacks and lot lines, framing plan/joist/beam spans, footing/post details with frost depth, ledger connection details, roofing and flashing details, guard/handrail plan if elevation >30 inches, electrical/plumbing/mechanical subpermits if adding services, and energy/insulation info if enclosing. Confirm local code edition and zoning rules with your building department before starting.
Which attachment methods are acceptable for house‑attached covers and ledger connections?
Common code‑compliant ledger attachments: through‑bolts/lag screws or structural ledger screws, following IRC Table R507.9.1.3(1) spacing and fastener type, using hot‑dipped galvanized or stainless steel. Ledger must be flashed (step flashing + kickout) and attached to sound structural band joist; avoid attaching to brick veneer without proper embedded ledger support. For heavier loads or where ledger attachment is not possible, use independent beams with posts bearing to new footings. Provide lateral restraint using hold‑downs or lateral connectors per IRC R507 requirements.
What flashing and roof tie‑in details prevent water intrusion where a cover attaches to the house?
Use full step flashing integrated with the house WRB/housewrap and roofing underlayment. Install a continuous cleat or Z‑flashing and interleave step flashing at each shingle course where the cover roof meets the wall. Include a kickout diverter where the roof runoff meets the wall/gutter to direct water into the gutter. Seal around fasteners and penetrations with compatible sealants and consider self‑adhered membrane under the ledger. Follow manufacturer roofing and local code guidance to avoid ledger rot and wall leaks.
What are practical material choices for covers and extended footprints, and pros/cons?
Wood (pressure‑treated or cedar/redwood): affordable, easy to work, customizable; needs regular maintenance and flashing care. Engineered/aluminum pergolas and metal roofs: low maintenance, durable, lightweight; higher upfront cost and more limited aesthetics. Polycarbonate panels: good light transmission, lightweight, low cost; can yellow over time and transmit heat. Fabric (retractable awnings): low cost, flexible seasonal use; shorter lifespan and wind limitations. For decks themselves, composite boards minimize drainage to below‑deck but may require special fasteners and affect drainage strategies.