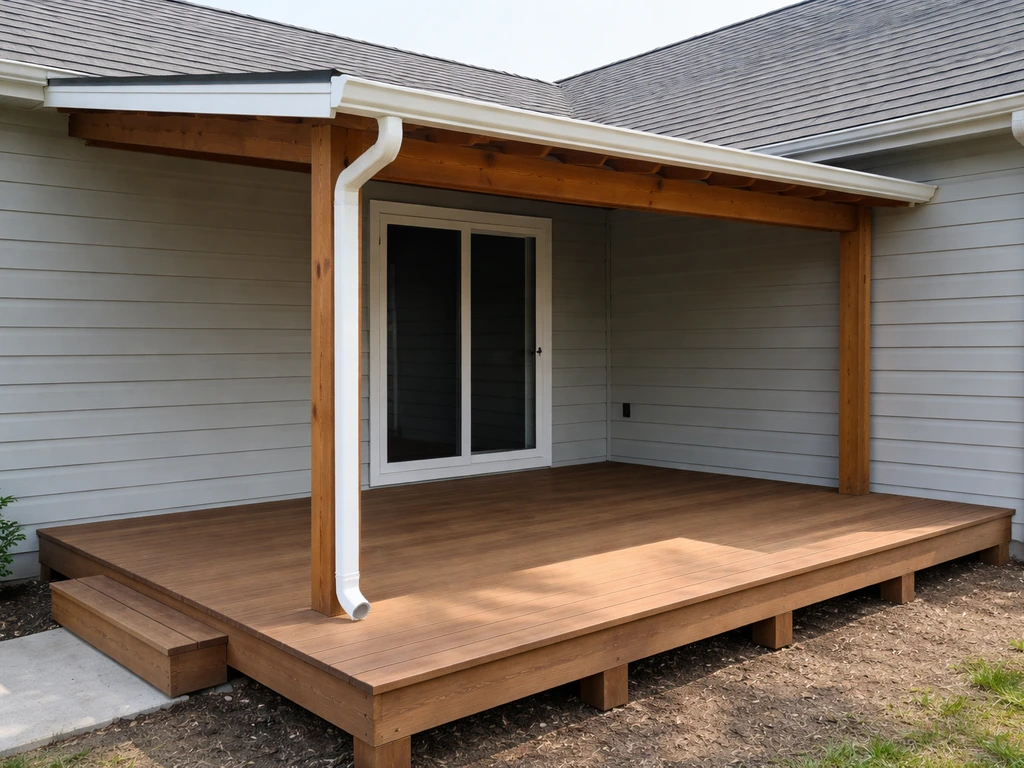
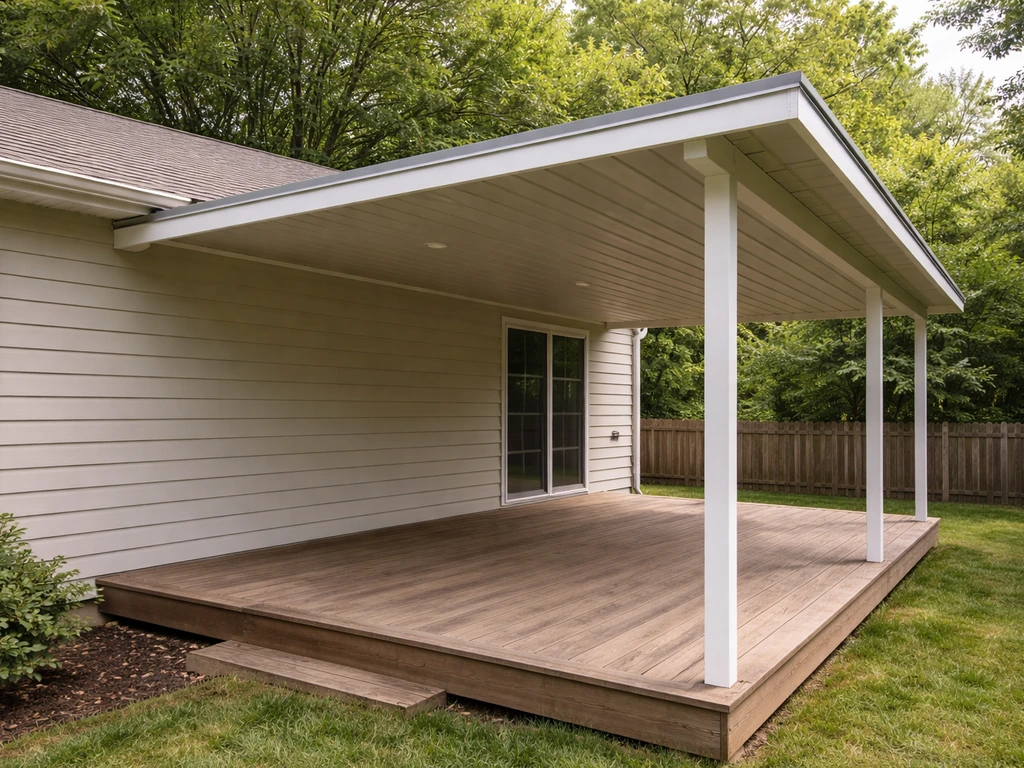
You can build a lean-to patio cover on an existing deck in a weekend or two if you plan it right. The basic approach is to mount a ledger board to your house (or to a beam above the deck), set posts at the outer edge of the deck, run rafters at a slope between them, and cover the whole thing with roofing panels or shingles. The lean-to (single-slope) style is the smartest choice for most DIYers because it has the fewest cuts, the least complicated framing geometry, and drains water away from the house naturally when pitched correctly.
How to Build a Patio Cover on a Deck: Step-by-Step

Celia Vaughn
26 Jun 2026
Choose the right patio cover design
The design you pick affects every step downstream, so settle this first. blank" rel="noopener noreferrer">A lean-to (also called a shed roof or single-slope) is a single flat plane that slopes from a high point at the house down to a lower outer beam. It is by far the most beginner-friendly option. A gable roof adds a ridge beam and two opposing slopes, which looks great but blank" rel="noopener noreferrer">roughly doubles your framing complexity and your cutting. A hip roof is even more involved and genuinely not worth attempting as a first build.
For a deck cover specifically, the lean-to wins on almost every count. It is lower in profile so you keep more headroom, it sheds rain quickly, it attaches cleanly to a ledger on the house wall, and it does not fight with second-story windows the way a peaked roof often does. Unless you have a strong aesthetic reason to go gable or hip, stick with the lean-to. The rest of this guide is built around that choice.
One thing to consider before committing to any design: is your deck attached to the house or freestanding? An attached deck makes ledger attachment easy. A freestanding deck means you will need a tall beam at the house-side end supported by posts, which adds cost and complexity but is totally doable.
Plan measurements, clearances, and layout
Start with two numbers: the width of the deck (parallel to the house) and the depth (how far it projects out from the house). These give you your rafter length and your beam span. Write them down, then figure out your roof pitch.
For a lean-to over a deck, a minimum slope of 1/4 inch per foot works for metal or polycarbonate panels, but a pitch of 1 to 2 inches per foot is safer for wood shingles and gives you more visual appeal. On a 12-foot-deep deck, a 2-in-12 pitch means your ledger (the high point) sits 24 inches above the outer beam (the low point). That math also tells you how high your ledger needs to be on the house wall to clear the door or window beneath it. Aim for at least 7 feet of clearance from the deck surface to the underside of the lowest rafter at the outer edge.
Mark post locations before you buy a single piece of lumber. Posts should land on deck joists or beams, not on decking boards alone. Typical post spacing is 8 to 12 feet on center. If your deck is 16 feet wide, you will probably want three posts along the outer beam: one at each corner and one in the middle. Sketch this out on paper and note the exact spacing, because it determines your beam size and rafter sizing.
- Minimum roof pitch: 1/4 in. per foot for panels, 2-in-12 recommended for shingles
- Minimum headroom at lowest rafter: 7 feet above the deck surface
- Post spacing: 8 to 12 feet on center, always over a joist or beam below
- Rafter spacing: 16 or 24 inches on center depending on roofing material and snow load
- Ledger height: calculated from pitch and depth, then checked against doors and windows
One common mistake here is forgetting to account for the roofing material's own thickness when calculating final heights. Add the rafter depth (say 7.25 inches for a 2x8) plus any roofing panel or sheathing thickness to your clearance math before you commit to ledger placement.
Materials and tools: wood, aluminum, and metal compared
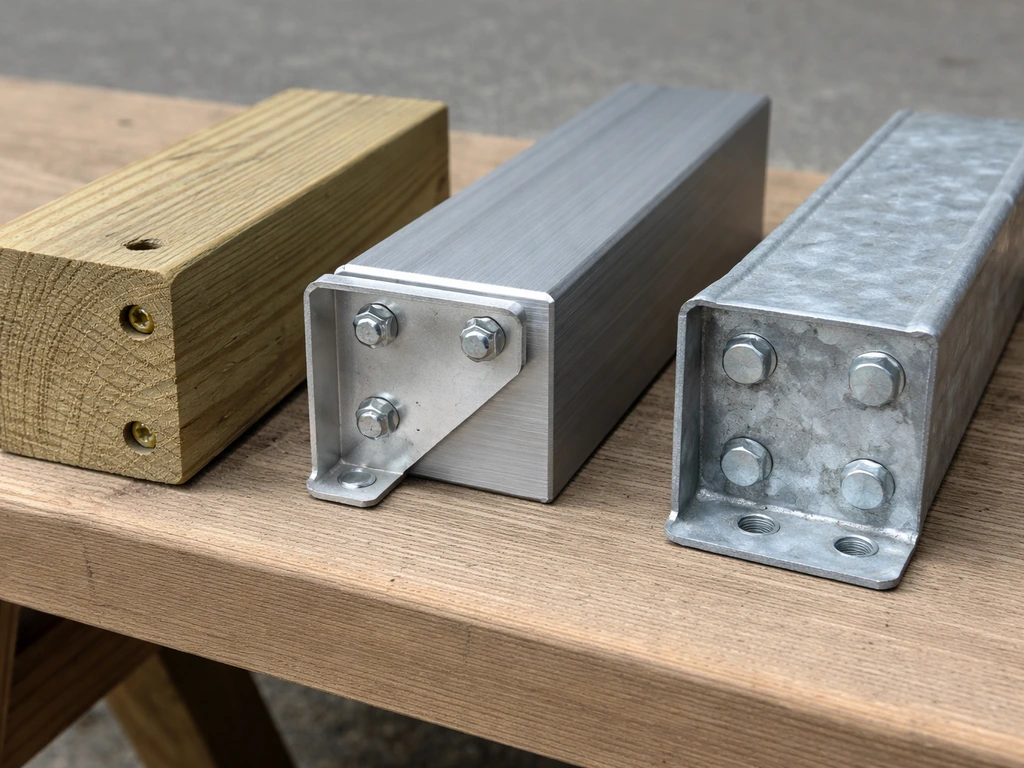
You have three realistic material paths for a DIY deck cover. Each has real trade-offs in cost, durability, weight, and how much skill they demand.
| Material | Typical Cost | Weight | DIY Difficulty | Lifespan | Best For |
|---|---|---|---|---|---|
| Pressure-treated wood framing + shingles | $$ | Heavy | Moderate | 20-30 years with maintenance | Traditional look, matches existing deck |
| Aluminum patio cover kit | $$$ | Light | Easy to moderate | 30-40+ years, low maintenance | Low maintenance, modern look |
| Steel or metal framing + metal roofing panels | $$-$$$ | Moderate | Moderate | 30-50 years | Strength, rural/industrial style |
Most DIYers building a cover over a wood deck go with pressure-treated framing because it matches what is already there, it is available at any lumber yard, and every carpenter tutorial online uses it. Use No. 2 or better pressure-treated lumber rated for ground contact (UC4B) for any posts that sit in post bases close to the deck surface where moisture accumulates. For rafters, standard PT pine or Douglas fir in 2x6 or 2x8 sizes works well for most spans.
Aluminum patio cover kits are worth serious consideration if you want something low-maintenance. They come with pre-engineered beams, rafters, and panels that snap or bolt together. The engineering is already done for you, which takes a lot of the code guesswork off the table. The downside is that you are locked into the kit's proportions and color options, and custom sizing costs more.
Metal roofing panels (corrugated steel or standing seam) paired with wood framing is a great middle path. The framing is familiar, and metal roofing is lightweight, fast to install, and extremely durable. It is also one of the easiest roofing materials for a DIYer to cut and fasten without specialized skills.
Tools you will need
- Circular saw or miter saw for cutting lumber to length and angle
- Drill driver and impact driver for fasteners
- Post level (not just a hand level — a post level clips to the post and frees your hands)
- Speed square and rafter square for marking rafter angles and bird's mouth cuts
- Tape measure, chalk line, and pencil
- Ladder tall enough to safely work at ledger height — a 6-foot step ladder rarely cuts it
- Safety glasses, work gloves, and hearing protection
- Caulk gun for sealing flashing and ledger connections
Structural and code considerations you cannot skip
Most jurisdictions require a permit for any permanent patio cover, and many will flag the project if it is over a certain square footage even if you think it is minor. If you are extending a patio deck instead of only adding a cover, plan the layout and structural load path so the new framing can support the added span and roof weight extend a patio deck. Pull the permit. It is not just bureaucratic box-checking: the inspector will verify that your ledger attachment, post footings, and beam sizing are adequate for your local wind, snow, and seismic loads. Getting caught without a permit when you sell your home is a much bigger headache than a $150 permit fee.
The 2018 International Residential Code (IRC) Appendix H covers patio covers specifically. It requires patio covers to be designed to handle dead loads (the weight of the structure itself) plus a minimum vertical live load of 10 pounds per square foot (psf). If your area has snow, the snow load governs instead and will be higher. For reference, 10 psf is relatively light: a basic wood-framed lean-to with metal roofing easily meets this if sized properly, but you need to confirm your rafter and beam spans match a span table for your region.
If you are setting posts on an existing concrete slab rather than digging new footings, IRC Appendix H allows this only if the slab is at least 3.5 inches thick and each column carries no more than 750 pounds of combined live and dead load. On a deck, you are usually setting posts on the deck framing itself, not on a slab, so the relevant question becomes whether your deck's existing posts, beams, and footings can handle the added load. If your deck was built to minimum code, it likely was not designed with a heavy roof in mind. Have a structural engineer or experienced contractor take a look if you are unsure, especially in high-snow or high-wind areas.
Wind uplift is a real concern that beginners overlook. Roofs act like wings in a storm. Every connection from the ledger to the rafter to the post to the footing needs hardware that resists pulling upward, not just pressing down. Use hurricane ties or rafter ties at every rafter-to-beam connection. Use code-rated post bases with uplift ratings at every post. These are inexpensive and non-negotiable.
How to attach the cover to your deck and handle loads
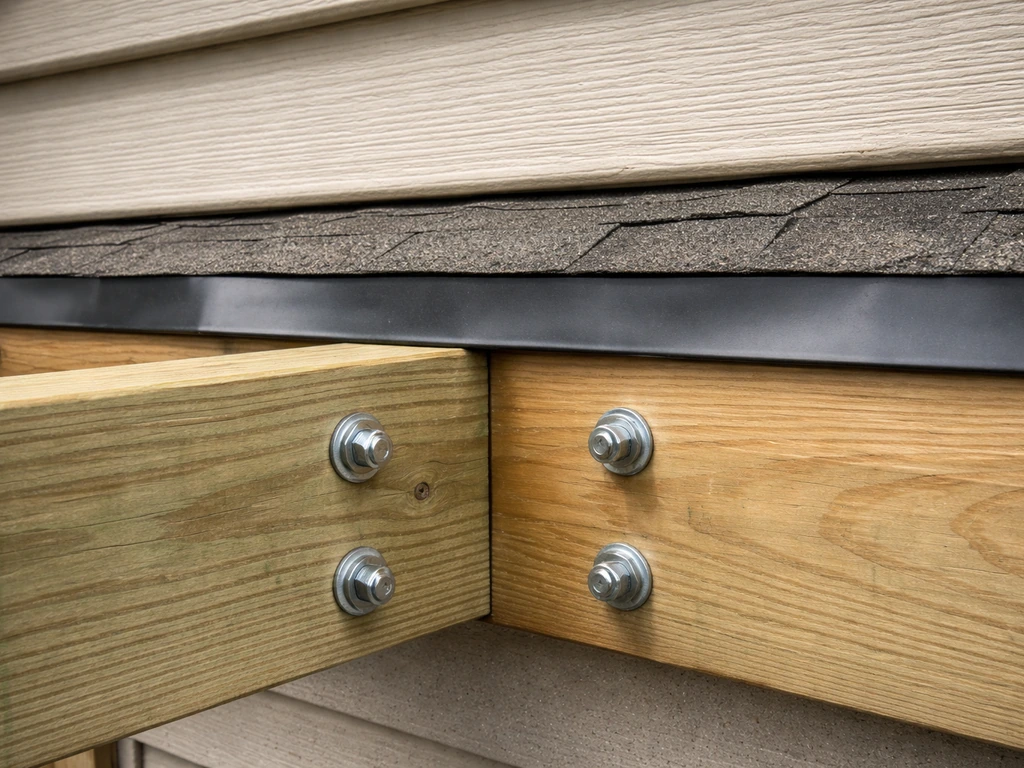
The ledger is the most critical connection in the whole build. It carries the upper end of every rafter and transfers that load into the house framing (or into a header beam if you are going freestanding on the house side). Attach the ledger to the house rim joist or wall studs using 1/2-inch structural lag screws or through-bolts, not just nails or standard wood screws. The standard pattern is two fasteners per stud, staggered vertically to avoid splitting. For a 16-foot-wide cover, you are looking at roughly 10 to 14 lag screws minimum.
Before you attach the ledger, install a piece of flashing behind the siding so water cannot sneak behind the ledger and rot the wall sheathing. This is the step that gets skipped most often and causes the most expensive repairs years later. Use a piece of aluminum or galvanized step flashing that tucks under the siding above and laps over the front face of the ledger.
For the outer posts, do not simply bolt them to the top of the decking boards. The decking is just a finish surface and has no structural capacity for a vertical column load. Instead, use post bases bolted to the deck's rim joist or to a doubled beam below. If the deck framing is not in a position that lines up with where you want your posts, you may need to add blocking between joists to create a solid anchor point. Take the time to do this correctly: a post that shifts or works loose under a roof is a real safety hazard.
Size your outer beam to handle the tributary load from all the rafters above it plus any snow or wind. A good rule of thumb for light residential loads with posts at 8-foot spacing: a doubled 2x10 beam handles spans up to about 10 feet in most low-snow regions. For anything longer, or any region with meaningful snow loads, run the numbers against a beam span table or have someone check it. Bigger is generally fine; undersized is a problem.
Step-by-step: framing a lean-to cover over your deck
Here is the actual build sequence assuming you have your permits, your materials delivered, and your measurements confirmed. This covers a standard attached lean-to with wood framing and metal or polycarbonate roofing panels. If you need a simple starting point for your exact roof dimensions, focus on choosing a lean-to design and the right pitch first how to cover a patio under a deck.
- Mark and snap a level chalk line on the house wall at your calculated ledger height. Double-check that this height gives you your target pitch across the full depth of the deck.
- Cut the ledger board to length (matching the deck width). For a 16-foot span, use a 2x8 or 2x10 ledger. Install the flashing first, then hold the ledger on your chalk line and fasten it to wall studs or the rim joist with 1/2-inch lag screws, two per stud, staggered.
- Set your post bases at the outer deck corners (and middle if needed), bolted to the rim joist or blocking. Check each base for level and square to the house.
- Cut and plumb your posts to height. The post height equals your outer beam height, which you calculate from the ledger height minus the total pitch drop over the deck depth. A 2-in-12 pitch over a 12-foot-deep deck drops 24 inches, so outer posts are 24 inches shorter than the ledger height (accounting for beam and rafter depths stacked on top).
- Install the outer beam across the post tops. Use post caps to connect beam to post, and again check for level. For a doubled beam, nail or screw the two members together with 16d nails in a staggered pattern every 16 inches.
- Lay out rafter locations on both the ledger and the outer beam at 16 or 24 inches on center. Mark with a speed square and pencil.
- Cut your rafters. Each rafter needs a plumb cut at the top (where it meets the ledger) and a bird's mouth cut near the bottom (where it sits on the outer beam). The bird's mouth is a notch cut that creates a flat bearing surface. Cut one test rafter first, check the fit, then use it as a template for the rest.
- Install rafters one at a time: toenail or use a rafter hanger at the ledger end, and use a hurricane tie or rafter tie at the beam end. Every single rafter gets hardware at both ends.
- Add blocking between rafters at the outer beam and at the ledger for lateral rigidity and to close off the rafter bays from birds and pests.
- Install your roofing material. For metal panels, start at one end and work across, overlapping each panel per the manufacturer's spec (usually one rib). Use the correct screw-type fastener with a rubber washer at every rib on every purlin. For polycarbonate panels, use the manufacturer's closure strips at ridge and eave to seal the corrugations.
- Install fascia boards along the outer rafter ends and rake edges to give the roof a finished look and protect the rafter tips.
What often goes wrong at the rafter stage is the bird's mouth cut. If it is too deep, you weaken the rafter. The standard rule is that the seat cut (the flat part) should not be deeper than 1/3 of the rafter depth. So on a 2x8 rafter (7.25 inches actual), your seat cut should not exceed about 2.4 inches deep. Take your time on the first rafter, test the fit before cutting the rest, and you will save yourself a lot of frustration.
Finishing, sealing, drainage, and keeping it in shape
Flashing at the ledger is not optional. Once your roofing panels are on, install counter-flashing over the top edge of the roofing material where it meets the house wall. This is a bent piece of aluminum or galvanized steel that directs water out and over the roofing surface instead of letting it wick behind. Seal the top edge of the flashing to the wall with a good elastomeric caulk (not standard painter's caulk, which fails in outdoor conditions). Check this seal every spring.
Gutters are worth adding at the outer eave. A 16-foot cover sheds a significant amount of water in a heavy rain, and without a gutter that water dumps off the edge and either onto your deck furniture or against your foundation. A simple K-style aluminum gutter with a downspout at one corner is an afternoon install and makes a real difference in how the space stays usable during and after rain.
For wood-framed covers, apply a penetrating wood sealer or exterior paint to all exposed lumber before and after installation. Pay extra attention to the end grain of rafters and posts, which absorbs water fastest. Re-seal or re-paint every two to three years depending on your climate. In humid or coastal areas, inspect the ledger connection every season for signs of rot or rust at the lag screws.
Metal roofing panels need almost no maintenance beyond keeping them clear of debris (leaves piled up hold moisture and cause rust around fasteners). Check the rubber washers on your roofing screws every few years: they degrade in UV and are the most common source of roof leaks on panel roofs. Replacement screws are cheap and the fix takes minutes.
If at any point your plan involves uncertain deck structural capacity, a complex roofline that connects to the house in multiple places, or local code that requires stamped engineering drawings, bring in a structural engineer or a licensed contractor for at least a consultation. A one-hour paid consult with an engineer is worth far more than guessing at beam sizes in a high-snow region. The build itself is very doable as a DIY project for most homeowners, but the foundation of that confidence is knowing the structural math is correct before you pick up a saw.
Once your cover is up, you may find yourself wanting to push further: adding screens, extending the structure to cover more of the deck, or even covering a lower-level patio underneath. If you want to extend a covered patio, plan the new section to match the existing roof pitch and tie it into the same ledger, posts, and beam layout for safe load transfer. Those are all natural next steps that build on exactly what you just learned here. The framing logic is the same, the attachment principles carry over, and each project gets a little faster once you have done the first one.
FAQ
How do I choose the right roof pitch if I’m not using wood shingles?
If you’re using metal or polycarbonate panels, a minimum of 1/4 inch per foot is workable, but you still want enough slope to keep water moving off quickly. Before locking in your ledger height, calculate the finished low-side runoff path and make sure it doesn’t discharge directly onto a walkway, stairs, or the deck rim where splashback can wick under trim and flashing.
What clearance should I plan for if there’s a door or window under the patio cover?
Use the underside clearance to the lowest rafter at the outer edge, but also account for how far the door or window operates (open swing radius or sliding clearance). A cover that clears a closed door can still interfere when the door is fully open, especially if you’re near the house-side edge.
Can I attach the ledger to siding only, or do I need to hit studs or a rim joist?
The ledger must be fastened to the structural framing (rim joist or studs, or a proper header if you’re tying into a different support). Siding or sheathing alone is not structural, so you need to confirm stud locations and use through-bolts or structural lag screws into the framing members.
How do I handle a deck that doesn’t have joists where I want my posts?
If joists don’t line up with your chosen post locations, add blocking or upgrade to a continuous support member (like a doubled beam) beneath the post bases. The goal is to transfer the roof load into the deck framing, not into decking boards, and you should only place post bases where the load has a direct structural path.
What’s the correct way to prevent rot at the ledger over time?
Flashing is the first line of defense, but you also need to choose compatible materials and keep water from becoming trapped. Install step flashing behind siding, use a proper exterior elastomeric sealant at the top edge, and re-check the caulk bond and any signs of staining or rust around fasteners each spring.
Do I need gutters if I’m already pitching the roof correctly?
Pitch helps, but gutters control where the water goes during heavy rain. If you don’t add them, runoff often splashes onto deck surfaces, furniture, or against the foundation line, which can increase algae and siding staining. A simple gutter at the outer eave plus one downspout is the easiest way to make the space usable year-round.
How do I account for roof material thickness and allow for proper flashing overlap?
Don’t just include panel or sheathing thickness in your clearance math, also plan the flashing lap paths. Your counter-flashing and step flashing need to overlap roof layers correctly, and the ledger flashing edge must sit so water can flow outward without gaps. Dry-fit the roofing and flashing once before final fastening if you’re close to a height limit.
Is it safe to set posts on concrete pavers instead of proper footings?
Generally no. Posts need a foundation designed for uplift and compressive loads, and pavers often settle, shift, or fail to resist wind uplift. If you’re not digging footings, confirm you have code-appropriate post bases and a deck-framing load path that can handle added forces without relying on non-structural surface materials.
What connection details matter most for wind uplift?
Use uplift-rated post bases and code-rated hardware at every interface, especially rafter-to-beam and beam-to-post. You also want hardware installed where it can actually resist pulling upward, not just where it looks strong. Missing even one connection point can reduce the whole roof system’s ability to resist storm loads.
How can I tell if my deck was built strong enough for a roof cover?
Look for the original design and any permit records if available, and check whether the deck’s ledger attachments, beam sizing, and post locations can handle added roof dead load plus live load from snow. If you’re in a high-snow or high-wind area, or your deck framing is minimal, it’s worth getting a structural engineer to review your existing member sizes and fastener layout.
Can I use a kit patio cover, and will it simplify permitting?
A kit can reduce some guesswork because components are pre-engineered, but you still may need permits based on your local rules and the final footprint. If your jurisdiction requires stamped drawings or engineering for your snow and wind exposure, confirm whether the kit manufacturer provides the necessary documentation for your permit application before you start.
What maintenance is different between metal panel roofs and wood-framed roofs?
Metal panels mainly need debris removal and periodic checking of screw washers, since UV degradation is a common leak source. For wood-framed covers, plan on re-sealing or repainting on a schedule (often every 2 to 3 years depending on humidity and sun), with extra attention to end grain and any areas where water can pool.
What’s a common mistake at the rafter bird’s mouth that leads to failure?
Over-cutting is the big one, if the seat cut weakens the rafter too much. Use the guideline of keeping the seat depth to about one-third of the rafter depth, and always test-fit the first rafter, then mark and cut the rest to the same template so you don’t end up with inconsistent connections.
When should I hire a pro instead of doing this as a weekend DIY?
Hire help if your deck structure is questionable, the cover footprint is unusually complex, you need to span long distances without clear support under the posts, or your local code requires stamped engineering. Also consider a pro if you’re close to obstructions like second-story windows, because small changes in roof geometry can change ledger height and load transfer.