
You can build a cover over your patio yourself in a single weekend (for a simple attached lean-to) or over two to three weekends (for a gable or freestanding structure), as long as you pull the right permit, plan your footings for local frost depth, and connect your ledger board correctly to the house. The project is well within reach for an intermediate DIYer comfortable with a circular saw, drill, and post-hole digger. The steps that trip most people up are not the carpentry, it is the permit paperwork, the ledger flashing, and undersized footings. Get those three things right and the rest follows.
How to Build a Cover Over My Patio: DIY Guide & Plans

Celia Vaughn
10 Aug 2026
Who this guide is for and what you'll build
This guide is written for homeowners who already have a concrete or paver patio and want to add a permanent or semi-permanent overhead cover. You do not need to be a contractor. You do need to be comfortable measuring twice, drilling into masonry or house framing, mixing concrete, and reading a basic plan drawing. If you have built a deck, a fence, or a garden shed, this project is in the same skill range. If you have never used a post-level or set a footing, budget extra time and read the structural sections carefully before you buy materials.
By the end of this guide you will know which style of cover suits your patio and budget, what permit you likely need, how to assess your site, how to size and set footings, how to attach a ledger to the house safely, and how to frame and roof the structure. You will also know exactly when the project crosses from DIY territory into professional territory, and what that hand-off looks like.
Quick decision checklist: style, budget, and DIY vs. pro
Before you price materials or draw a single line, run through these questions. They will point you to the right section of this guide and flag whether you need an engineer or a permit agent before you start.
- Is your patio attached to or detached from the house? Attached covers use a ledger on the house wall. Freestanding covers use four posts and do not touch the house structure.
- What is your projected roof area? Many jurisdictions (San Diego is a well-known example) exempt attached patio covers at or under 300 sq ft from a full building permit, but the threshold varies. Look up your city or county before assuming you are exempt.
- Is your area in a high-wind or high-snow zone? Check your basic wind speed and ground snow load using ASCE 7 maps or a wind-speed lookup tool for your zip code. High-load areas often require engineered drawings even for small covers.
- Do you want a solid roof (shingles, metal panels, polycarbonate) or an open/lattice cover? Solid roofs require more structural capacity, better drainage planning, and often trigger a permit where lattice may not.
- Does your HOA have design approval requirements? Submit for HOA approval before you pull the building permit so you do not end up changing approved drawings.
- What is your realistic budget? A basic DIY attached lean-to with pressure-treated lumber runs roughly $1,500 to $4,000 in materials for a 12x16 ft cover. Aluminum patio cover kits for the same size run $2,000 to $5,000 installed yourself. A full gable or freestanding structure in wood or steel can run $4,000 to $10,000+ in materials.
- Are you comfortable with a circular saw, a drill/driver, a level, and a post-hole digger? If yes to all four, you can likely DIY the framing. If not, consider hiring a framing carpenter for the structural work and doing the finish work yourself.
- Is the existing patio slab in good condition? Cracks wider than 1/4 inch or signs of heaving may indicate a drainage or soil problem that needs addressing before you build overhead.
Site assessment: measuring, checking the structure, utilities, and drainage
Spend at least one hour on site assessment before you do anything else. Mistakes made here cost real money later.
Measure the patio and map the overhead space
Measure the patio length and width to the nearest inch. Sketch it on paper with the house wall at the top. Mark the location of any exterior doors, windows, hose bibs, dryer vents, or electrical outlets on that wall. These affect where your ledger can go and where posts can land. Note the eave height on the house, your cover's ridge or beam must clear any soffits or gutters, and you want to maintain a comfortable finished ceiling height of at least 8 feet, ideally 9 to 10 feet.
Check the house wall framing and material
Tap along the wall where your ledger will attach. You need to locate the band joist (rim joist) or solid framing members behind the siding. Use a stud finder and a long thin nail or an endoscope camera to confirm what is behind the sheathing. Ledger boards must bolt into solid structural lumber, not just sheathing or stucco scratch coat. If the house is masonry block, concrete, or ICF construction, you will use expansion anchors or epoxy anchors instead of lag screws, and the attachment method changes. Common mistake: people assume they can lag into any spot on the wall. You cannot, you must hit framing.
Locate underground utilities before you dig
Call 811 (the national Dig Safe number in the U.S.) at least three business days before digging any footing holes. This is not optional. Underground gas, electric, water, and irrigation lines can and do run under patios. Mark out your post locations with spray paint before the call so you can tell the utility locators exactly where you plan to dig.
Drainage and slope
A patio slab should slope away from the house at a minimum of 1/8 inch per foot (1% grade). Check this with a 4-foot level and a tape measure. If water pools near the house foundation, adding a roof cover will concentrate that runoff and make the problem worse unless you add gutters and downspouts as part of your design. Plan for where the roof water goes before you frame anything.
Sun and shade mapping
Walk the patio at different times of day over a couple of days. Note the sun angles and the shadow line from the house. This tells you how much of the patio actually needs covering and from what direction. In hot climates, west and southwest exposure is the one that makes a patio miserable in the afternoon. A solid west-facing panel matters more than full overhead coverage in those cases. This also informs whether you want translucent polycarbonate panels (let some light in) or a fully opaque roof.
Permits and local codes: what you actually need to know
Permit requirements vary more than almost any other residential project. Do not rely on what your neighbor did or what someone on a forum said. Call or visit your local building department before you spend a dollar on materials. See the blank" rel="noopener noreferrer">Residential Patio Cover Submittal Checklist (City of Stockton) for a typical list of plan‑check submittal requirements including site plans, scaled construction drawings, framing/footing details, and manufacturer cut‑sheets or engineered calculations. That said, here is a reliable framework for what most jurisdictions require.
Typical permit submittal checklist
- Site plan drawn to scale showing the property, house footprint, patio outline, and the proposed cover location with dimensions and setbacks from all property lines
- Construction drawings including a plan view (top-down), at least one elevation (side view), and section cuts showing footing depth, post size, beam size, rafter size, and roof material
- Framing details: ledger attachment method and fastener schedule, post-base specifications, beam-to-post connection, rafter-to-beam connections
- Footing details: diameter or dimensions, depth below grade, concrete specification (most jurisdictions require minimum 3,000 psi 28-day compressive strength), and reinforcement if required
- Roof material specification: shingle type, metal panel specs, polycarbonate panel product data sheet, or lattice dimensions
- Manufacturer cut sheets for any proprietary hardware (post bases, joist hangers, ridge connectors)
- Engineered calculations or engineer stamp if the project exceeds local prescriptive limits (solid roof, high wind/snow zone, large span, or unusual load path)
Setbacks, HOA rules, and exemptions
Most jurisdictions require a patio cover to maintain the same rear and side setbacks as the primary structure, typically 5 to 10 feet from side property lines and 10 to 20 feet from the rear. Covered structures in many areas cannot exceed a certain percentage of lot coverage. Some cities allow open-lattice patio covers without a permit under a certain square footage; others require a permit for any attached structure. Cities like Irvine, CA allow simple open-lattice covers without engineer-stamped calculations but do require stamped plans or extra review for solid roofs or structures in fire hazard zones. Always verify local amendments to the IRC or IBC rather than assuming national code defaults apply.
Wind, snow load, and code compliance
Under IBC 2024 Appendix I, patio covers must be designed for dead loads plus a minimum vertical live load of 10 psf. If your local ground snow load is higher than 10 psf, use the snow load. Wind loads are determined by your site-specific basic wind speed, derived from ASCE 7 maps. You can look up your zip code on ASCE's online GIS map or use a third-party tool like WindSpeedByZip. If your basic wind speed is above 115 mph (Exposure B) or you are in a coastal area, assume a permit examiner will ask for an engineer review. For most of the continental U.S. interior, prescriptive framing from IRC Section R802.4 rafter span tables will be sufficient, but check this early rather than after you have drawn your plans.
Inspections: what to expect
- Footing inspection: inspector visits before you pour concrete to verify hole diameter, depth, and any required reinforcement
- Framing inspection: inspector checks ledger connection, post bases, beam-to-post connections, rafter spacing, and tie hardware before you close in any ceiling or walls
- Final inspection: inspector verifies roofing, gutters (if required), and overall conformance with approved plans
Design options: which style fits your patio
There are four main styles to choose from. Each has a different structural logic, different cost, and different attachment to your house or site. Pick based on your patio layout, your house roof line, and your budget, not just on what looks good in photos. If you already have a cover and want to enlarge it, see how to extend covered patio for step-by-step options.
Attached lean-to (shed roof)
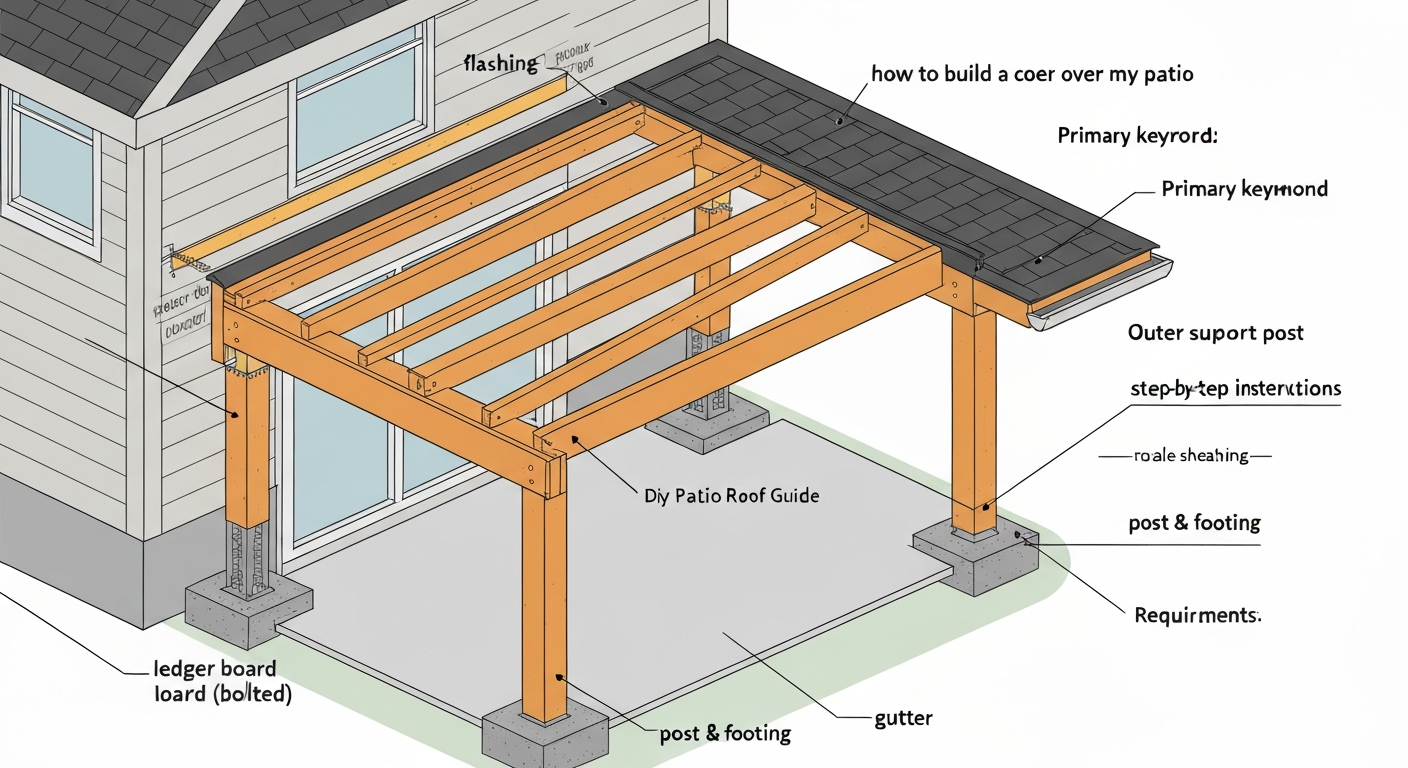
A lean-to has a single sloping roof that attaches to the house on one side and is supported by posts on the outer edge. It is the simplest and least expensive option. The high end attaches to a ledger bolted to the house wall or fascia board, and the low end rests on a beam spanning between two or more posts. Typical pitch is 1:12 to 3:12 (meaning the roof drops 1 to 3 inches for every foot of horizontal run), which is enough to shed water effectively without looking too steep. This is the starting point for most first-time patio cover builders and is the style covered in the step-by-step build section below.
Attached gable roof
A gable cover has a peaked roof with two slopes meeting at a ridge. It looks more like a permanent room addition and is significantly more structurally complex. The ridge typically ties back to the house, and the framing involves collar ties or ridge beams. Material and labor cost is 30 to 60 percent more than a lean-to of the same footprint. Many gable patio covers in the field are permitted as room additions if the walls are eventually closed in. If you want a gable, plan for a permit and budget extra time for framing. If you are also looking at building a patio cover directly over a deck structure, the framing considerations are similar but the post foundation approach changes, a situation covered in more detail in guides specific to deck-mounted covers.
Freestanding cover (pergola or shade structure)
A freestanding cover does not attach to the house at all. It stands on four or more posts set in footings. This gives you design freedom (you can place it away from the house) and avoids any ledger flashing complexity. The trade-off is that all four corners need footings, and freestanding structures have greater uplift demands in wind because there is no house connection providing lateral resistance. Posts, beams, and footings typically need to be sized up compared to an equivalent attached cover. This style also works well if your house wall is not accessible for a ledger (stucco over foam insulation, for example, makes ledger attachment complicated). For tips on expanding an attached outdoor platform, see our guide on how to extend a patio deck.
Under-deck ceiling system
If you have an elevated deck above your patio, a purpose-built under-deck drainage and ceiling system converts the space below into a dry, usable outdoor room. For details specific to converting space beneath an elevated deck, see our guide on how to cover a patio under a deck. Products like Trex RainEscape install above the deck joists, capture water between deck boards, and channel it to an integrated trough that routes to a downspout at the deck's edge. The result is a finished ceiling below the deck without a separate roof structure. This is a specialized approach that requires its own planning and is worth exploring separately if you have an existing second-floor deck over your patio.
Roofing and style choices: solid, open, or translucent
The roof surface you choose affects everything downstream: the pitch you need, the drainage you must plan for, the structural load on your rafters, and how much natural light the covered area receives. Here is how to think through the options.
Solid roofs
Asphalt shingles over plywood sheathing, standing-seam metal panels, and corrugated aluminum panels are all solid-roof options. They provide full rain protection and can be insulated if you want to keep the space cooler. Minimum pitch for asphalt shingles is 2:12 with modified underlayment; standing-seam metal can go as low as 1:12. Solid roofs add more dead load (shingles plus sheathing = roughly 10 to 15 psf; metal panels = 3 to 5 psf) and require gutters to manage concentrated runoff. Insulation between rafters is possible and reduces summer heat gain significantly in hot climates, a 2-inch polyiso board under metal panels is a common and effective detail.
Open and lattice covers
Open lattice or spaced-slat covers provide shade without blocking airflow or all sunlight. They carry significantly less structural load than a solid roof (typically 3 to 5 psf dead load for the lattice material itself). Ventilation is excellent and the space stays cooler in summer. The obvious downside is that they do not keep you dry in rain. Many homeowners add a shade sail or outdoor curtains for additional sun control. Open covers are also more forgiving of minor pitch inaccuracies because water drainage is not a concern.
Translucent and polycarbonate panels
Twin-wall or multiwall polycarbonate panels are a popular middle ground. They shed rain, let diffused light through, and weigh only 1 to 2 lbs per square foot. They require a minimum 1:12 pitch to drain properly and benefit from UV-protective facing on the exterior side (most quality panels have this built in). Thermal expansion is significant: a 12-foot polycarbonate panel will expand and contract up to 1/2 inch seasonally, so the installation requires slotted fastener holes and flexible sealant rather than rigid caulk. Condensation forms on the interior surface in humid climates, which can drip if not managed with a correctly sloped panel and properly sealed ridge and eave caps.
Pitch, ventilation, and insulation quick rules
- Minimum pitch for asphalt shingles: 2:12 (with low-slope underlayment)
- Minimum pitch for standing-seam metal: 1:12
- Minimum pitch for polycarbonate or corrugated panels: 1:12
- Minimum pitch for open lattice: no structural minimum, but 1:12 is good practice to drain any flat surfaces in the framing
- Ventilation: if you insulate between rafters, leave at least a 1-inch air channel above insulation and below sheathing, with intake at the eave and exhaust at the ridge or peak
- Insulation: polyiso rigid board or spray foam between rafters works well for patio covers; fiberglass batts in an unvented assembly perform poorly and trap moisture
Material comparison: wood, aluminum, steel, and polycarbonate
Choosing the right material affects your total project cost, how long the structure lasts, how much ongoing maintenance it needs, and how straightforward the installation is for a DIYer. Use the table below to compare at a glance, then read the notes that follow for more context.
| Material | Approx. Material Cost (12x16 ft cover) | Typical Lifespan | Maintenance Level | DIY-Friendliness | Best For |
|---|---|---|---|---|---|
| Pressure-Treated Wood | $900 – $2,200 | 20 – 30 years with care | Moderate (stain/seal every 2–3 yrs) | High — standard tools, widely available | Budget builds, custom shapes, painted finishes |
| Cedar or Redwood | $1,500 – $3,500 | 25 – 40 years | Low-moderate (oil or seal periodically) | High — same tools as PT wood | Natural aesthetics, rot-resistant, no chemical treatment concerns |
| Aluminum (kit system) | $2,000 – $5,000 | 30 – 50 years | Very low (occasional wash-down) | Moderate — kit assembly, specialized cuts | Low-maintenance, modern look, hot/humid climates |
| Steel / Powder-coated | $2,500 – $6,000+ | 30+ years (coated) | Low (inspect coating annually) | Low — requires welding or bolted fabrication | High-strength spans, contemporary design, commercial-grade durability |
| Polycarbonate Panels (roofing only) | $200 – $600 (panels only) | 10 – 20 years | Low (clean annually, replace seals) | High — cuts with circular saw, standard fasteners | Light transmission, rainproof, greenhouse-style covers |
For most first-time DIY builders, pressure-treated lumber (PT) is the right starting point. It is available at every home center, cuts with standard tools, and is forgiving of minor measurement errors. The cost is lowest and the framing knowledge transfers directly from any deck or fence project. If you want near-zero maintenance and live in a humid climate, aluminum kit systems are worth the higher upfront cost, you will not be resealing or painting every few years. Steel is best left to experienced builders or metal fabrication shops unless you are comfortable with bolted steel connections and have access to the right hardware.
Foundation and footing requirements
Footings are the part of this project most often undersized by DIYers, and they are also the part that fails inspections most often. Get these right the first time, it is far easier to dig a wider hole before you pour than to dig out and redo a footing after the fact.
Frost depth
In climates with freezing winters, footings must extend below the locally adopted frost depth. This prevents frost heave from lifting your posts and racking the whole structure. The frost depth varies enormously by location: 0 inches in southern California and Florida, 12 inches in the upper South, 36 to 48 inches in Minnesota and the northern plains. IBC Appendix I does allow support on a slab-on-grade in frost-free areas (where the adopted frost depth is zero), but anywhere else your footings must go deep. Look up your county or city's adopted frost depth, not a national average, the local adopted figure, and add 2 to 4 inches below that for the footing pad.
Footing sizing and concrete spec
A typical residential patio cover post footing is a round tube form, 10 to 16 inches in diameter, with a flared or flat base below frost depth. For a 6x6 post carrying a 12-foot span in a moderate load area, a 12-inch diameter tube footing to frost depth is commonly sufficient, but always verify with your building department's standard detail or a span table. Use minimum 3,000 psi concrete (most bag mixes labeled for footings meet this; Quikrete 5000 and equivalent products are 5,000 psi and are easier to work with in cold conditions). Many jurisdictions require a #4 rebar cage in footings, check your local amendment before you pour.
Post bases and anchor bolts
Post bases keep the wood post off the concrete surface, preventing moisture wicking and rot. Simpson Strong-Tie ABA, ABU, and similar adjustable post-base products are the industry standard. Set the anchor bolt or strap while the concrete is wet, positioned precisely using a template and a plumb bob. Misalignment of post bases by even 1/4 inch shows up visibly in the finished structure, so take the time to set them accurately. For posts that must resist significant wind uplift (freestanding structures especially), use a base with a tested uplift load rating that matches your engineering or code requirement.
Ledger attachment: the most critical connection in the whole project
If you are building an attached cover, the ledger is the single most important structural connection. Ledger failures are a leading cause of deck and cover collapses, and they are the most common reason attached covers fail a framing inspection. See IRC R507.9.1.1 Deck Ledger Attachment: The 2026 Code Guide (DeckPlan Pro summary referencing IRC) for the IRC ledger attachment rules and acceptable fasteners, 1/2″ through‑bolts, 1/2″ lag screws into solid framing, or approved anchors into concrete, and for guidance on preventing common ledger failures. Take this section seriously.
How to attach a ledger correctly
- Locate the band joist (rim joist) behind the house siding using a stud finder. Mark the centerline with a chalk line. The band joist is typically an inch and a half of solid lumber — this is what you bolt through.
- Remove a strip of siding where the ledger will sit. Use a circular saw set to the depth of your siding material only — you do not want to cut into sheathing. This gives the ledger a flat bearing surface and allows for proper flashing.
- Install a self-adhesive waterproof flashing membrane (like Grace Vycor or equivalent) over the exposed sheathing before the ledger goes up. This is not optional. Water that gets behind a ledger rots the band joist, destroys the fastener embedment, and eventually causes the whole cover to pull off the house.
- Position the ledger board (typically a 2x8 or 2x10 pressure-treated board) against the wall and clamp it temporarily in place.
- Drill pilot holes and install 1/2-inch diameter lag screws or through-bolts per the IRC R507 fastener schedule. The spacing depends on your joist/rafter load — common schedules call for 1/2-inch lags at 16-inch on-center stagger pattern, two rows. Use hot-dip galvanized or stainless hardware with pressure-treated lumber, never plain steel.
- Install step flashing over the top of the ledger and behind the siding above, then re-install or replace the siding to lap over the flashing. The goal is a continuous weatherproof detail.
- Add lateral load connectors (hold-downs or structural screws) at each end of the ledger if your local code or engineer requires them. These resist the ledger sliding sideways.
What often goes wrong here: people use standard wood screws instead of structural lag screws, skip the flashing entirely, or install the ledger through vinyl siding without removing the siding first. All three of these are both code violations and genuine safety hazards. The flashing step adds maybe two hours of work and is the one detail that will prevent a costly rot repair five years from now.
Step-by-step build: attached lean-to patio cover
This walkthrough covers a standard pressure-treated lumber lean-to attached to the house with a ledger, supported on two posts in the outer corners of a 12x16 ft patio. Adjust post count and beam spans for different sizes. This is the style I would recommend for a first build.
Tools you will need
- Circular saw and miter saw
- Drill/driver and impact driver
- 1/2-inch spade bit and long ship-auger bit for ledger pilot holes
- Post-hole digger or rented power auger (strongly recommended for 30+ inch depth)
- 4-foot level and line level or laser level
- Chalk line and speed square
- Tape measure and framing square
- Clamps (at least four)
- Concrete mixing trough or rented mixer for large pours
- Safety glasses, hearing protection, work gloves
Materials list for a 12x16 ft attached lean-to
- 1 ledger board: 2x8 or 2x10 pressure-treated, 16 ft long
- 2 posts: 6x6 pressure-treated, length = desired finished height + frost depth + 6 inches (cut to final height after setting)
- 1 beam: doubled 2x10 or 2x12 PT, 16 ft long (or engineered LVL if span exceeds PT limits)
- 8–10 rafters: 2x8 PT, 12 ft long (spaced 16 or 24 inches on center depending on load and roofing material)
- 2 post bases (Simpson ABA66 or equivalent) and anchor bolts
- Post-to-beam hardware (Simpson BC6 or equivalent post caps)
- Rafter-to-ledger and rafter-to-beam hardware (joist hangers, hurricane ties)
- 1/2-inch lag screws: 3-inch minimum embedment into band joist, per your fastener schedule
- Self-adhesive flashing membrane: 9-inch wide roll, at least 18 linear feet
- Step flashing: aluminum or galvanized, 20 pieces
- Roofing material: your choice (see roofing section above)
- Concrete: 6–8 bags of 5,000 psi mix per footing hole (12-inch diameter, typical frost depth)
- Rebar: two #4 bars per footing if required locally
- 2x6 or 2x8 fascia boards for the outer edge and rafter ends
- Gutters and downspouts if roof is solid
Build sequence
- Mark post locations on the patio using batterboards and string lines. Confirm square by checking diagonal measurements (they should be equal if the layout is square). Mark the exact footing hole centers with a nail and bright spray paint.
- Dig footing holes to the locally required frost depth, adding 4 inches for the concrete base pad. Use a power auger if depth exceeds 24 inches — it is worth the rental cost.
- Set tube forms (Sonotube) in the holes. Mix and pour concrete, inserting a rebar cage if required. While concrete is wet, set post-base anchor bolts precisely on your layout marks, using a plumb bob to confirm position. Recheck alignment before the concrete sets. Let cure minimum 24 hours (48 is better) before loading.
- Cut ledger board to length. Mark the wall, strip siding, apply flashing membrane, and install the ledger per the detailed instructions in the section above. Confirm the ledger is level.
- Set posts in the post bases. Do not cut them to final height yet — leave them long. Brace them plumb in both directions with temporary diagonal bracing screwed to stakes in the ground.
- Calculate the top-of-beam height based on your ledger height and desired roof pitch. Snap a level chalk line on the posts at this height. Cut posts to height with a circular saw. Install post caps.
- Build the beam (if using a doubled 2x member, nail or bolt the two boards together with staggered nails every 16 inches). Set the beam in the post caps and fasten per manufacturer specs.
- Mark rafter layout on the ledger and beam, 16 or 24 inches on center. Install joist hangers on the ledger and beam bearing points. Cut rafters to length with a plumb cut at the ridge end (cut angle = roof pitch) and a bird's-mouth or square cut at the beam end if you are using hangers.
- Set rafters in the hangers and fasten. Add hurricane ties at each rafter-to-beam connection. These are required by code in most wind zones and are cheap insurance everywhere else.
- Install blocking or a rim board at the outer rafter ends to form the fascia backing. Install the fascia board over this.
- Install roof sheathing (if solid roof), roofing felt and drip edge, then your chosen roofing material. Or install polycarbonate or lattice panels directly to the rafter tops using the manufacturer's fastener system.
- Install gutters and run downspouts to discharge at least 5 feet from the house foundation, or tie into an existing drainage system.
- Schedule framing inspection, then final inspection after roofing is complete. Do not close in the ceiling (if you plan one) before framing inspection.
Cost and time estimates
A 12x16 ft (192 sq ft) attached lean-to in pressure-treated lumber with polycarbonate panels, DIY labor, will cost approximately $1,800 to $3,500 in materials depending on your market and lumber prices. Add $300 to $600 for permit fees in most jurisdictions. If you upgrade to metal roofing and cedar lumber, expect $3,500 to $5,500 in materials for the same footprint. An aluminum kit system in the same size runs $2,500 to $5,000 in materials. Hiring a framing contractor for the structural work while doing finish work yourself typically adds $1,500 to $3,500 in labor.
Time-wise: a single experienced DIYer can complete the footings and ledger in one full day, the post/beam/rafter framing in a second full day, and the roofing and finish work in a third day. Add a day for permit prep and a half-day for concrete cure time. Plan on three to four weekends if you are working alone in shorter sessions or encountering typical setbacks like a concrete pour that needs to cure before you can proceed.
Rainwater and drainage details
Every solid or semi-solid cover concentrates rainwater at the drip line. Without gutters, that concentrated water hits the ground at the cover edge and can erode soil, undermine your post footings over time, or run toward the house. Install a 4-inch or 5-inch K-style aluminum gutter along the low side of the roof. Slope it at 1/8 inch per foot toward the downspout. Use at least one downspout per 50 linear feet of gutter, discharging into a splash block or buried drain pipe routed at least 5 to 6 feet away from the house foundation. In regions with heavy rainfall, consider an underground pop-up emitter in a gravel sump to manage the volume.
Safety practices to build in from the start
- Call 811 before every footing dig, without exception
- Use GFCI protection on any power tools outdoors — a cheap outdoor-rated extension cord with built-in GFCI is a reasonable backup if your outlet does not have it
- Never work on a ladder alone when setting posts or beam — have a second person on the ground at minimum
- Wear safety glasses when cutting pressure-treated lumber; the preservative dust is hazardous
- Use a respirator (N95 or better) when cutting or drilling PT lumber, engineered wood products, or fiberglass insulation
- Brace posts and beams before letting go of them — an unbraced 16-foot beam balanced in a post cap will fall
- Do not modify or skip the ledger flashing detail to save time — water intrusion behind a ledger is one of the most common causes of structural failure in attached patio covers
- Follow the approved permit drawings exactly; deviations require amended plans before inspection
Maintenance and long-term care
A pressure-treated wood cover should be cleaned and resealed or restained every two to three years. Pay particular attention to the ledger flashing detail annually, look for any gaps in flashing or sealant at the house wall junction and recaulk as needed. Check post bases for standing water or soil contact at the base of posts each spring. Tighten any loose hardware. Inspect rafter-to-beam hardware for corrosion, especially in coastal climates. Aluminum covers require almost no maintenance beyond a hose-down with soapy water once a year. Polycarbonate panels should be cleaned with a soft cloth (never abrasive pads) and inspected for UV yellowing every few years, most quality panels carry a 10-year warranty against excessive discoloration.
Common problems and how to fix them
- Rafter sag midspan: usually caused by undersized rafter depth or too wide a spacing. Sistering a matching rafter alongside the sagging one and fastening together fixes it without demolition.
- Water pooling on the roof: the roof pitch is insufficient or the ledger was set too low relative to the outer beam. A 1:12 minimum pitch is required for all panel and metal roofing. If pitch is too shallow, raising the ledger end or shimming the beam end is the repair.
- Ledger pulling away from house: fastener failure from using wrong fastener type or not hitting solid framing. This is a serious structural defect. Stop using the cover, sister a new ledger board properly over the existing one with correct lag screws into confirmed framing, and have the repair inspected.
- Post heaving in winter: footings were not deep enough to get below frost line. This requires digging new footings adjacent to the current ones and rebuilding the post bases.
- Condensation dripping from polycarbonate panels: panels are not pitched steeply enough, or end caps are not sealed. Add slope if possible and reseal all cap and ridge profiles with manufacturer-approved butyl tape.
- Gutter overflow: downspout spacing is too wide or debris has blocked the outlet. Clean gutters each fall and spring; add a second downspout if overflow continues.
When to hire a professional instead
Most of this project is well within DIY reach, but there are specific situations where calling a structural engineer or licensed contractor is the right call, not a sign of defeat. If your patio cover will exceed 400 square feet, span more than 14 feet between supports, attach to a house in a high-wind or high-seismic zone, or if the permit examiner flags the design for engineer review, get an engineer. If your house wall framing is unusual, the structure is older than 1980, or you find rot in the band joist when you open the wall for the ledger, stop and get a contractor to assess the condition of the existing structure. The ledger is only as strong as the framing it bolts into. If you are planning a covered patio that flows into or over an existing deck, the structural interaction between the deck framing and the cover requires careful coordination, the kind of situation that benefits from a design review before you start cutting lumber.
FAQ
What primary code documents and standards must I research to ensure patio‑cover guidance is accurate and code‑compliant?
At minimum review the adopted International Residential Code (IRC) (roof and framing prescriptive tables, chapter on roof/ceiling construction), the International Building Code (IBC) Appendix I for patio covers where adopted, and ASCE 7 for site‑specific wind and snow load values. Also check local municipal amendments and any county building‑department guidance that modifies footings, frost depth, or prescriptive allowances.
Which local sources and permit checklists should I consult for jurisdiction‑specific requirements?
Use the local municipality’s building department website for permit checklists, submittal requirements and plan‑check procedures (examples: City of San Diego, Stockton, Vallejo). Look for residential patio‑cover submittal checklists, required drawings, inspection checklists, and local frost‑line/footing depth tables.
What structural design inputs are essential for safe patio‑cover framing and foundations?
Site‑specific basic wind speed and ground snow load (ASCE/municipal maps), design dead/live loads per IBC/IRC, soil bearing capacity and local frost depth for footing sizing, tributary load areas for posts and beams, and uplift/wind‑load demands for connections. If loads exceed prescriptive tables, an engineered, stamped design is required.
When can I use IRC prescriptive rafter and footing tables, and when is an engineered design required?
Use IRC prescriptive tables when the project fits the code’s defined scenarios (common spans, standard lumber sizes, typical loads and spacing). Obtain an engineered design when spans, loads (high wind/snow), unusual geometries, or roof‑to‑house attachment conditions fall outside prescriptive limits or when the local jurisdiction requires stamped calculations.
What ledger and attachment details should the article cover to prevent common failures?
Cover proper attachment into sound structural framing (not into siding), approved fastener types (through‑bolts, specified lag/ledger screws or concrete anchors), spacing per manufacturer/code, ledger flashing and WRB sequencing (self‑adhesive flashing, step/counter‑flashing), and the need for hold‑downs or lateral‑load devices when required. Cite Simpson Strong‑Tie guidance and IRC ledger rules where applicable.
Which manufacturer and technical guides are important to reference for connectors, fasteners and drainage systems?
Reference Simpson Strong‑Tie (fastener/connector selection and corrosion guidance), Trex RainEscape (under‑deck drainage systems and installation guides), and other manufacturer installation/cut‑sheets for metal roofing, polycarbonate panels, and post bases. Include product selection charts and installer manuals for torque/spacing and warranty considerations.