
A lean-to patio roof is one of the most approachable structural projects a homeowner can tackle. You attach one end of a sloped roof to your house wall and support the other end on posts, giving you a covered outdoor space for somewhere between $800 and $4,000 in materials depending on size and what you build it from. Most people with basic carpentry skills and a full weekend can frame one in wood; aluminum kits can go up even faster. This guide walks you through every decision you need to make before you pick up a saw, every structural requirement that keeps it safe, and the actual build sequence from ledger board to final flashing.
How to Build a Lean-to Patio Roof: DIY Guide for Wood, Metal

Celia Vaughn
12 Aug 2026
Project overview and who this guide is for
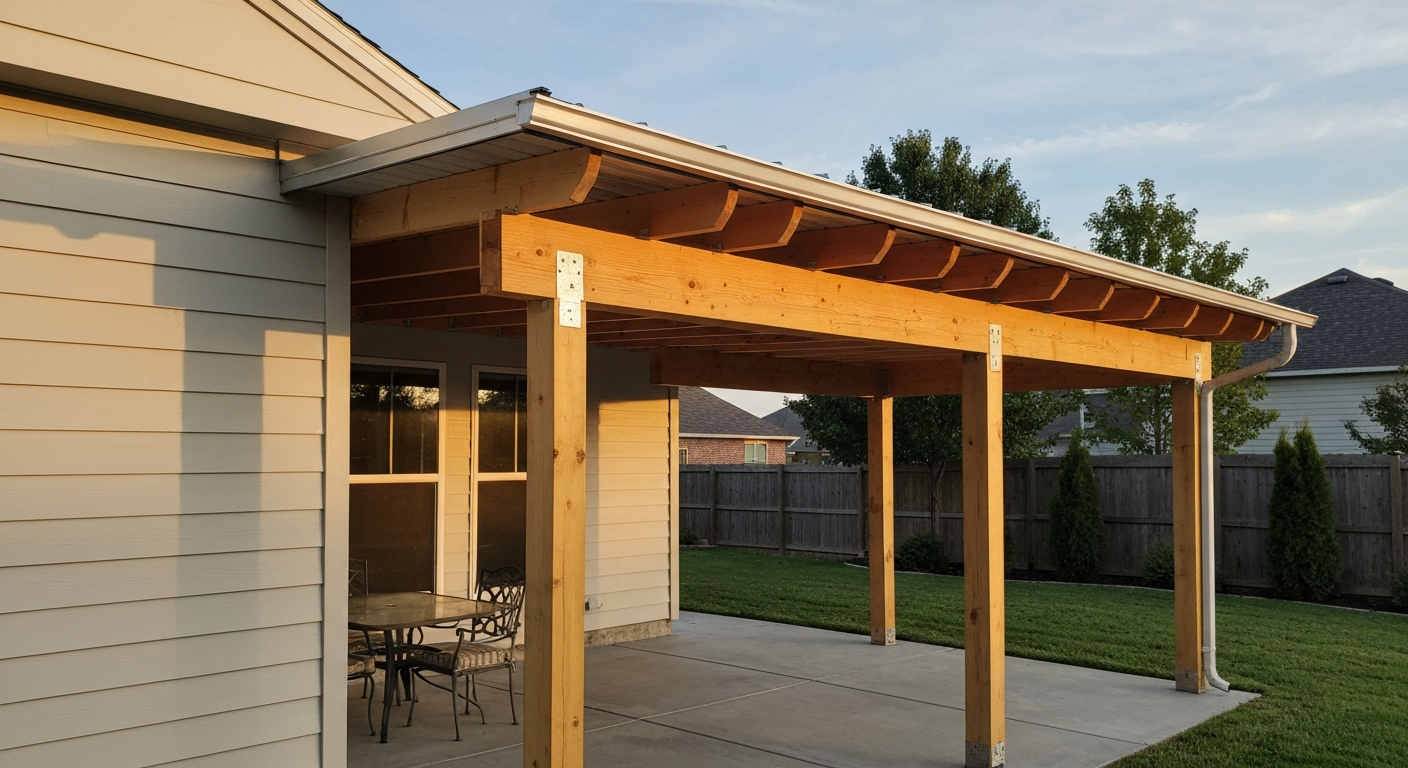
A lean-to (also called a skillion or shed-style) patio roof has a single slope that drains water away from the house. One side attaches to the building via a ledger board; the other side rests on a beam carried by posts set in footings. It is the simplest roofed structure you can add to a home because you are essentially building half a gable roof. That simplicity makes it the right starting point for most DIYers, but it does not mean you skip permits or structural thinking.
This guide is written for homeowners who are comfortable using a circular saw, a drill/driver, and a level, and who are willing to pull a permit and spend a weekend or two on the project. It covers wood framing, aluminum/metal options, and polycarbonate panel roofing. For step-by-step instructions on installing polycarbonate roofing panels, see the guide on how to build a patio cover with polycarbonate. If you are curious about designing a more complex roofline first, a dedicated guide on how to design a patio roof covers pitch geometry and layout in more depth. For step-by-step instructions on installing and detailing translucent panels, see the guide on how to build a polycarbonate patio roof (ID: 2ad2742d-2d04-4c54-98a5-7b9119757f12). If you want a quick visual preview or a step-by-step build example in a game environment, see our guide on how to make a patio roof in The Sims 4. If your main interest is in transparent or translucent panels specifically, guides on building a patio cover with polycarbonate panels and building a polycarbonate patio roof go deeper on that panel type.
Quick decision checklist before you start
- Do you have at least 8 feet of clearance from the patio slab to the soffit of your roofline? You need that for a comfortable minimum interior height.
- Is your house wall wood-framed or masonry? The ledger attachment method changes significantly for each.
- Do local codes require a permit for a patio roof? (Most jurisdictions do for any attached structure over 200 sq ft, many for anything over 120 sq ft, and some for anything permanent. Check before you start.)
- Is there a hose bibb, electrical outlet, or gas line running through the wall where you plan to attach? Locate utilities first.
- Are you in a high-wind or heavy-snow region? If so, structural sizing gets more conservative and this guide flags those decision points.
- Can you rent or borrow a post-hole digger, a power miter saw, and scaffolding or pump jacks? If not, factor rental into your budget.
- Are you comfortable working at height to install ledger flashing against the house? If not, hiring a roofer or handyman for just that step is a smart call.
Choosing the right lean-to style, location, and attachment approach
Location drives almost every other decision. The ideal wall to attach to is a structural wall that runs parallel to the house's floor framing (rim joist side) so you have solid backing for the ledger. Gable-end walls can work but often require blocking between studs to carry ledger loads. Ideally, your lean-to should face south or east to maximize shade in the afternoon while letting in morning light, but drainage away from the house takes priority over solar orientation.
You have three basic style choices within the lean-to category. A fully attached lean-to has its ledger fastened directly to the house and relies on the house wall for one line of support. A semi-freestanding lean-to uses posts on both sides but leans against the house for lateral stability. A fully freestanding lean-to is not truly a lean-to (it becomes a shed-style pergola or shade structure), so this guide focuses on the attached and semi-freestanding versions. For most residential patios, the fully attached lean-to is the most efficient use of material and the cleanest visual result.
For attachment to the house, you have two main options: a ledger board bolted through the sheathing into the rim joist or band joist, or a ledger attached to a masonry wall using expansion anchors or epoxy anchors. On wood-framed homes, the IRC prescribes 1/2-inch diameter lag screws or through-bolts at spacings determined by the load and joist span (IRC Table R507.9.1.3(1)). Those fasteners must be hot-dip galvanized or stainless steel, both for weather resistance and because pressure-treated lumber requires corrosion-resistant fasteners to prevent accelerated deterioration.
Material options: wood, aluminum/metal, and polycarbonate
Each material has a legitimate place depending on your budget, your skill set, and what the finished structure needs to look like. Here is an honest comparison across the factors that matter most for a lean-to patio roof.
| Material | Typical cost (materials only, 12x16 ft) | DIY skill level | Lifespan (maintained) | Key advantages | Key drawbacks |
|---|---|---|---|---|---|
| Pressure-treated wood framing + metal roofing or shingles | $900–$2,200 | Moderate | 25–40 years | Widely available, easy to cut and fasten, familiar to most DIYers, accepts any roofing surface | Requires periodic sealing/painting, susceptible to rot if drainage is poor |
| Aluminum kit system (extruded channels + panels) | $1,500–$3,500 | Low-moderate | 30–50 years | Corrosion-proof, lightweight, no painting, many kit systems designed for DIY assembly | Higher upfront cost, limited custom sizing with some kits, less structural depth for long spans |
| Polycarbonate panels on wood or metal subframe | $700–$1,800 for panels + subframe | Moderate | 15–25 years (UV-coated) | Lets in diffuse light, lightweight, cuts with standard tools, relatively low cost | Expands and contracts significantly with temperature, must follow manufacturer span and fastening specs exactly |
| Standing-seam or corrugated metal roofing on wood framing | $1,100–$2,500 | Moderate | 30–50 years | Durable, fast drainage, excellent in high-wind/snow areas, good fire resistance | Noisy in heavy rain without insulation, requires metal-compatible fasteners and flashings, some profiles need specific purlin spacing |
Wood framing
Pressure-treated lumber (ground-contact rated at .40 PCF for any member within 6 inches of grade, standard .25 PCF above that) is the standard choice for posts, beams, and ledgers in most North American climates. Use #2 or better Douglas Fir, Southern Yellow Pine, or Hem-Fir depending on what is available locally. The American Wood Council's Span Tables for Joists and Rafters give maximum clear spans for common rafter sizes under standard loading (typically 10 psf dead load plus 20 or 30 psf live load). For a basic 12-foot rafter span under moderate loads, 2x8 rafters at 24 inches on center is a common starting point, but verify against the span tables for your specific species, grade, and local loads.
One point many first-timers miss: because pressure-treated lumber contains copper-based preservatives (ACQ and similar modern treatments are particularly aggressive), you must use hot-dip galvanized fasteners meeting ASTM A153/A153M or stainless steel (300 series) fasteners throughout. Standard bright zinc electroplate screws will corrode and fail within a few years in contact with ACQ-treated wood. In coastal or salt-air environments, go straight to stainless.
Aluminum and metal kit systems
Pre-engineered aluminum patio cover kits (available from suppliers like Equinox, Palram, and regional patio cover manufacturers) use extruded aluminum channels with built-in drainage gutters and snap-in panel systems. They are genuinely DIY-friendly because the engineering has already been done, provided you stay within the kit's certified span and load ratings. The trade-off is that you are locked into the manufacturer's sizing increments, and you still need to provide proper footings and a code-compliant ledger attachment to the house. Metal roofing manufacturers like MBCI publish installation guides that specify purlin spacing, screw patterns, and recommended flashings for their panels. Follow those specs closely; they are written to maintain both performance and any warranty coverage.
Polycarbonate panels
Polycarbonate is appealing because it lets in light while still providing weather protection. Twin-wall and multi-wall sheets (6 mm, 10 mm, and 16 mm thicknesses are common) provide better insulation and more rigidity than single-skin corrugated polycarbonate. Corrugated single-skin sheets cost less but are more flexible and need closer purlin spacing, typically 600–900 mm on center. Multi-wall panels can span 1,200–2,200 mm between purlins depending on profile and thickness; always use the specific product's span chart, not a generic value. Polycarbonate has a high coefficient of thermal expansion (roughly 65x10^-6 to 75x10^-6 m/m per degree Celsius), which means a 3-meter panel can expand or contract by about 6 mm over a 30-degree temperature swing. Drill oversized or slotted fastener holes, use neoprene-sealed roofing screws, and leave the manufacturer-specified gap at panel edges and ridges. Manufacturer datasheets note polycarbonate’s high thermal expansion (≈65–75×10⁻⁶ m/m·°C) and explicitly recommend drilling oversized or slotted fastener holes and leaving expansion gaps, see Polycarbonate Fabrication Guide - Interstate Plastics (installation/expansion guidance). Skipping this step is the single most common reason polycarbonate roofs crack and leak within a few years.
Tools and materials checklist
General tools (every lean-to build)
- Circular saw or miter saw for framing cuts
- Drill/driver with impact driver (two is better: one for drilling pilot holes, one for driving screws)
- Hammer and nail puller
- Level (4-foot minimum; a 6-foot or laser level speeds up post and ledger work significantly)
- Speed square and combination square
- Tape measure (25-foot minimum)
- String line and line level for laying out post positions
- Post-hole digger or rented power auger
- Concrete mixing tub and hoe, or a rented mixer
- Caulking gun
- Ladder and/or scaffolding rated for your weight plus materials
- Safety glasses, hearing protection, work gloves, and hard-soled boots
Material-specific items
- Wood builds: pressure-treated 4x4 or 6x6 posts, 2x ledger board (same depth as rafters), 2x rafters, ridge/beam lumber, structural connectors (post bases, post caps, hurricane ties), concrete tube forms (Sonotubes), premix or bagged concrete
- Metal roofing: panels cut to length, metal roofing screws with neoprene washers, ridge cap, eave trim, step flashing or continuous Z-flashing at the wall, foam closure strips (matching the panel profile)
- Polycarbonate panels: panels, aluminum or UV-stabilized polycarbonate extrusion (H-profile connectors between panels), UV-protected end tape, neoprene-washer screws, aluminum ridge cap, silicone sealant rated for polycarbonate
- Aluminum kit: all components per kit BOM, plus the same footing and ledger materials as a wood build
- Fasteners for all builds: 1/2-inch diameter hot-dip galvanized or stainless lag screws and bolts for ledger (per IRC table), structural screws (e.g., Simpson Strong-Drive or equivalent) for connectors, 16d galvanized nails or equivalent for framing
Design basics: size, span, slope, and drainage
Start with the footprint you actually want, then check whether the framing works. A 12x16-foot lean-to is a comfortable first project. The 12-foot dimension typically runs from the house wall to the outer beam (the rafter span), and the 16-foot dimension runs parallel to the house (the beam span). As a rough rule, a 12-foot rafter span is manageable with 2x8 or 2x10 lumber at 16 or 24 inches on center for moderate loads. If you want to push to 16 feet of rafter span, you are likely moving to 2x10 or 2x12 rafters, or you need an intermediate post line. Use the AWC Span Tables to confirm member sizes once you know your local design loads.
Slope (pitch) is the most important drainage decision. The minimum recommended slope for a metal or polycarbonate roof is 1:12 (about 4.8 degrees), which gives water enough momentum to drain before it can pool and find fastener penetrations. A 2:12 or 3:12 pitch is more forgiving and is a better choice if your house wall attachment point is low. For a 12-foot rafter run at 2:12, the outer beam is 24 inches lower than the ledger; at 3:12 it is 36 inches lower. Sketch this out before you finalize ledger height, because that determines the finished interior clearance at the outer edge. Aim for at least 7 feet of finished clearance at the low side.
Drainage direction matters too. Water should drain toward the outer beam and then into a gutter or onto a splash pad away from the foundation, not toward the house. Never slope a lean-to toward the house. If the natural grade behind the project slopes toward the house, plan for a gutter and downspout at the outer beam as a standard feature, not an optional upgrade.
Load considerations: wind, snow, and live loads
Patio roofs are structural. They carry dead load (the weight of the roofing material and framing itself, typically 10–15 psf for light framing plus metal or polycarbonate roofing), live load (maintenance workers, accumulated debris), and environmental loads. The two environmental loads that govern most residential lean-to designs are ground snow load and wind speed, both of which are region-specific values from the ASCE 7 hazard maps (ASCE 7-16 and 7-22 are the editions most commonly adopted by current state and local codes). ASCE 7 provides a free online hazard tool where you can enter your address and get site-specific design values. Use the ASCE 7 Hazard Tool (ASCE/SEI 7 site hazard lookup) to enter your address and retrieve the site‑specific ground snow load and basic wind speed required for design.
Ground snow loads range from zero in the deep South to 100 psf or more in parts of New England, the Rockies, and the upper Midwest. Roof snow load is roughly 70% of ground snow load for most residential applications, but your local building department will tell you the adopted design value for your jurisdiction. Wind design speeds range from about 85 mph in sheltered interior areas to 150+ mph in hurricane zones. These numbers feed directly into rafter sizing, post sizing, footing depth, and connector selection. If you are in a zone with significant snow or wind, do not guess: plug the numbers into the span tables and connector load tables, or ask a structural engineer to review your framing plan. A one-hour engineering review typically costs $100–$250 and is worth every dollar.
Wind uplift is the load that most DIYers underestimate. A lean-to acts like a sail in certain wind directions, and the rafters can be pulled upward off the wall plate. Simpson Strong-Tie hurricane ties (the H10A and similar products) connect each rafter to the top plate or beam below it with a rated uplift capacity. The product installation guide specifies the exact nailing pattern to achieve the published allowable load. Use these on every rafter-to-beam and rafter-to-ledger connection, not just the end rafters.
Structural and attachment methods
Ledger board installation
The ledger is the most critical connection in a lean-to roof. On a wood-framed house, the ledger (typically a 2x8 or 2x10 to match rafter depth) is bolted through the wall sheathing and siding into the rim joist or band joist of the floor or roof structure. IRC Table R507.9.1.3(1) gives the required lag screw spacing based on the tributary load and joist span. For a typical 12-foot rafter span with 16-inch on-center rafters, you are often looking at 1/2-inch diameter lags at around 12–16 inches on center, staggered in two rows. Drill a proper pilot hole (about 5/16 inch for a 1/2-inch lag) through the ledger and sheathing into the rim joist to avoid splitting, and countersink the head so it sits flush.
The biggest practical mistake people make with ledger boards is not addressing water infiltration behind the ledger. Water that gets behind an unflashed ledger will rot the rim joist and house framing within a few years, often invisibly. Before you bolt the ledger, either flash it properly (see the weatherproofing section below) or use standoff spacers to create a drainage gap behind it. The flashing approach is more weathertight; the gap approach is easier but requires consistent maintenance of the gap.
Posts, beams, and footings
Posts carry the outer beam. For a 16-foot beam span with 6x6 posts at 8-foot on center, you need two intermediate posts in addition to the corner posts, giving you three posts total on the outer line. Post size depends on height and load: 4x4 posts are adequate for low, lightly loaded structures in low-wind areas; 6x6 is the better default for any post over 8 feet tall or any structure in a moderate-to-high wind zone. Posts should be connected to the beam above with post caps (Simpson BC6 or equivalent) and to the footing below with post bases (Simpson ABA66 or similar) that keep the post end off the concrete and soil to prevent rot.
Footings must extend below the local frost line, and in any case not less than 12 inches below undisturbed grade per IRC Section R403.1.4. Frost line depth ranges from zero in Florida to 60 inches or more in northern Minnesota and Canada. Your building department will have the local frost depth. A common DIY approach is a 12-inch diameter tube form (Sonotube) poured with 3,000 psi concrete, with the post base anchor cast in while the concrete is wet. Size the tube diameter and depth to carry the tributary load from your post: for typical residential lean-to loads, a 12-inch diameter footing 18–24 inches deep works in most non-frost or shallow-frost areas. In frost regions, use a larger diameter Bigfoot footing form at the base of the tube to resist frost heave.
Bracing and lateral stability
A lean-to attached to a house has built-in lateral bracing from the house wall in one direction. The direction parallel to the house (along the beam) is where racking is a concern. Knee braces (angled from post to beam at 45 degrees, typically 2x6 or 4x4) at each interior post greatly reduce the tendency for the structure to rack under lateral wind load. In high-wind areas, a full diagonal brace or a shear wall panel at one or both ends of the structure is worth considering. Simpson Strong-Tie's Deck Connection and Fastening Guide covers lateral bracing connector options in detail, and the hardware choices there (tension rods, knee brace connectors, hold-downs) are worth reviewing before you finalize your framing plan.
Rafter-to-ledger and rafter-to-beam connections
Rafters connect to the ledger with joist hangers (LUS28 or similar for 2x8 rafters in face-mount configuration) and to the outer beam with either a notched bird's-mouth cut resting on the beam plus a hurricane tie, or with a sloped hanger designed for the roof pitch. The bird's-mouth is the traditional approach and works well, but the notch should not remove more than 1/3 of the rafter depth. Hurricane ties at every rafter-to-beam intersection are non-negotiable in any jurisdiction with a wind design speed above 90 mph, and they are a good idea everywhere. Use the nail count specified on the connector; under-nailed connectors deliver a fraction of the rated load.
Flashing, gutters, and weatherproofing
Flashing where the lean-to roof meets the house wall is the detail that separates a roof that lasts from one that causes expensive water damage. The correct sequence (from bottom to top) is: install self-adhering membrane (like Grace Ice and Water Shield) over the top of the ledger board and up the wall at least 4 inches; install step flashing or a continuous Z-flashing over the membrane and under the house's existing siding or cladding; then bring the roofing material up to the wall and overlap the lower leg of the Z-flashing. The roofing material should never touch the wall directly; there should always be a flashed overlap with a drainage path.
At the eave (outer beam), install a drip edge if you are using shingles or metal roofing. For polycarbonate, the manufacturer's aluminum eave trim serves this purpose. A gutter at the outer eave is strongly recommended. A 4-inch K-style aluminum gutter on a 12-foot-wide lean-to handles typical rainfall without overflowing. Slope the gutter at least 1/4 inch per 10 feet toward the downspout, and locate the downspout to discharge at least 6 feet from the foundation. Common mistake: people install the gutter level because it looks better. A level gutter holds water, breeds mosquitoes, and corrodes faster.
At the rake (side edges of the roof), install rake trim or barge board to close off the rafter ends and shed water laterally. Caulk any penetrations (electrical conduit, light fixture boxes) with a paintable exterior sealant rated for the roofing material. For metal and polycarbonate roofs, use foam closure strips matching the panel profile at both the eave and the ridge/wall intersection to block insects and wind-driven rain from entering the corrugations while still allowing condensation drainage.
Step-by-step build sequence
- Pull your permit. Take your site plan (showing the lean-to dimensions, setbacks from property lines, and the wall it attaches to) and a basic framing plan to the building department. Most residential lean-to permits are over the counter or same-day online submissions.
- Lay out post locations. Use batter boards and string lines to establish the outer post line parallel to the house wall and square to it. Check square by measuring diagonals: they should be equal. Mark post centers with spray paint.
- Dig and pour footings. Dig to local frost depth (minimum 12 inches per IRC R403.1.4). Set tube forms, check for plumb, and pour concrete. Set post base anchors in wet concrete and align them precisely with your string line. Let cure 48–72 hours minimum before loading.
- Install the ledger board. Snap a level chalk line on the house wall at the ledger height. Remove siding in the ledger zone (keep it; you will reinstall it over the flashing). Drill pilot holes and install 1/2-inch lag screws per IRC Table R507.9.1.3(1). Apply self-adhering membrane over the ledger top and up the wall.
- Set posts. Install posts on the cured footings using the post base hardware. Brace posts plumb in both directions with temporary diagonal bracing before releasing.
- Install the outer beam. Lift the beam onto the post caps (use a second person or a beam cradle made from a cleat nailed to a post). Fasten with the specified hardware. Check that beam and ledger are at the correct relative heights to deliver your design pitch.
- Cut and install rafters. Mark rafter layout (16 or 24 inches on center) on both the ledger and the beam. Cut bird's-mouth notches at the beam end and square-cut the ledger end. Install joist hangers at the ledger first, then set rafters and secure at the beam with hurricane ties and toe-nails or sloped hangers.
- Install blocking. Add solid blocking between rafters at the outer beam and at mid-span for any span over 8 feet. Blocking prevents rafter rotation and adds diaphragm stiffness.
- Install roofing. For metal or polycarbonate: install purlins (horizontal members between rafters) at the spacing required by the manufacturer. Lay panels from eave to ridge, lapping or connecting per manufacturer instructions. Install all flashings before the roofing reaches the wall.
- Install wall flashing and reinstall siding. Slide Z-flashing or step flashing under the existing siding above the ledger, overlapping the self-adhering membrane. Reinstall siding over the top leg of the flashing. Caulk the top edge of the flashing where it meets the siding.
- Install gutter and trim. Hang the gutter with the correct slope, attach downspout, and install rake and eave trim. Caulk all penetrations.
- Schedule the inspection. Most jurisdictions require at least a framing inspection before you cover the structure and a final inspection. Call your building department to confirm the inspection sequence.
Safety, permits, and common mistakes
Working at height is the biggest physical risk in this project. Set up your ladder or scaffolding on stable, level ground. Never lean a ladder against an unsupported rafter. If you are working alone, use a beam pocket or a temporary cleat nailed to a post to hold one end of a beam while you fasten the other. Have someone with you when you are lifting anything over 8 feet off the ground.
Permit and code checkpoints to hit: confirm your setback distances from property lines before you pour footings (many jurisdictions require 5 feet from side property lines for accessory structures); verify that your lean-to does not encroach on any utility easement; confirm whether your HOA requires design review; and check whether your homeowner's insurance requires notification of permanent structural additions. Skipping the permit is a gamble that can come back to bite you at resale, when refinancing, or if the structure ever causes property damage.
Common mistakes in order of frequency: (1) Flashing the ledger incorrectly or not at all, leading to hidden rot within 3–5 years. (2) Using electroplated screws with pressure-treated lumber: they corrode, connectors loosen, structure becomes unsafe. (3) Under-nailing structural connectors: a hurricane tie nailed with 4 nails instead of the required 10 delivers roughly 40% of its rated load. (4) Skipping the expansion gap in polycarbonate panels, causing cracking and leaks. (5) Setting footings above frost depth and discovering frost heave every spring.
When to call a professional
Most homeowners can build this project. There are a few situations where professional help is the right call. If your house wall is masonry (brick, concrete block, or ICF), ledger attachment requires correctly sized expansion anchors or epoxy anchors with engineer-specified embedment depth and spacing, and that engineering review is worth the cost. If your site has a ground snow load above 40 psf or a wind design speed above 115 mph, have a structural engineer size your members and review your connector plan. If you find rotted rim joist material when you open the wall for the ledger, stop and hire a contractor to repair the structure before you proceed. And if you have never installed flashing before, hiring a roofer for just that one step is cheaper than repairing water damage three years later. For another relevant comparison, see how to design a patio roof.
Basic maintenance to keep it performing
- Inspect the ledger flashing every spring. Look for lifted edges, cracked caulk, or siding that has settled down over the flashing top leg.
- Clear the gutter at least twice a year (fall and spring). A blocked gutter on a lean-to roof will back water up under the roofing at the eave.
- Check all structural connectors for rust staining, which signals fastener corrosion. Tighten or replace any lag screws that show movement.
- For wood framing: touch up any bare or checked wood with a penetrating oil finish or exterior paint every 3–5 years. Pay attention to rafter tails and post bases.
- For polycarbonate roofing: clean with mild soap and water (no solvent cleaners). Inspect UV-protective end tape annually and replace if it has lifted.
- For metal roofing: check that all neoprene-washer screws are still sealing (look for rust streaks below fastener locations). Replace failed screws before the hole enlarges.
FAQ
What building codes and standards must I reference when writing a DIY lean‑to patio roof guide?
Include the adopted International Residential Code (IRC) chapters relevant to foundations, roofs, and attachments (e.g., ledger-to-band-joist/fastener tables, footing depth/frost protection: IRC Chapter 4 & Chapter 5). Reference ASCE/SEI 7 for site‑specific design loads (wind, snow, seismic). Cite local amendments and municipal code resources since jurisdictions modify the IRC/ASCE requirements.
Which specific IRC provisions are essential for ledger and attachment guidance?
Cite the IRC ledger/connection requirements (prescriptive lag/bolt size, on‑center spacing, and corrosion requirements) such as the ledger-to-band-joist tables (e.g., IRC deck ledger connection provisions). Note fastener material requirements (hot‑dip galvanized or stainless steel) and reference the exact table and figures used by the edition adopted locally.
What foundation and footing requirements must be covered?
Explain IRC R403.1.4 (minimum footing/frost requirements — minimum depth 12 inches below undisturbed ground and extend to local frost line unless protected) and local frost‑depth lookup procedures. Specify footing sizing basics (load transfer, bearing capacity) and when to consult a structural engineer. Include typical prescriptive footing sizes for small roof posts where applicable and local code variances.
How should I handle design loads in the guide?
Require use of ASCE 7 (current edition adopted locally) to obtain site‑specific basic wind speeds and ground snow loads via hazard maps or ASCE hazard tool. Explain load combinations used for sizing rafters/beams and addressing snow/drift and wind uplift. Recommend conservative default design loads for preliminary DIY planning, but advise verifying local requirements for final design.
What manufacturer and product data are necessary for each material option (wood, metal, polycarbonate)?
Include span tables and installation guides from manufacturers: American Wood Council span tables for rafters/joists; Simpson Strong‑Tie connection and fastening guides for connectors, ledger attachments, hold‑downs; metal roofing manufacturers' installation guides (fastener/clip spacing, flashings); and polycarbonate OEM datasheets (span charts, purlin spacing), plus thermal expansion and fastening guidance from polycarbonate suppliers (e.g., Palram, Laserlite, Lexan/Covestro). Link to specific product span charts and installation PDFs used in design.
What fastener, connector, and corrosion information must be included?
Cite Simpson Strong‑Tie recommendations for connector selection and nailing/fastening patterns. Specify ASTM standards for coatings (e.g., ASTM A153 for hot‑dip galvanizing) and note AWPA/manufacturer guidance for treated lumber compatibility. Recommend stainless (300‑series) or hot‑dip galvanized hardware for exterior use; emphasize isolation methods to prevent galvanic corrosion when metal panels contact treated wood or fastener dissimilar metals.