
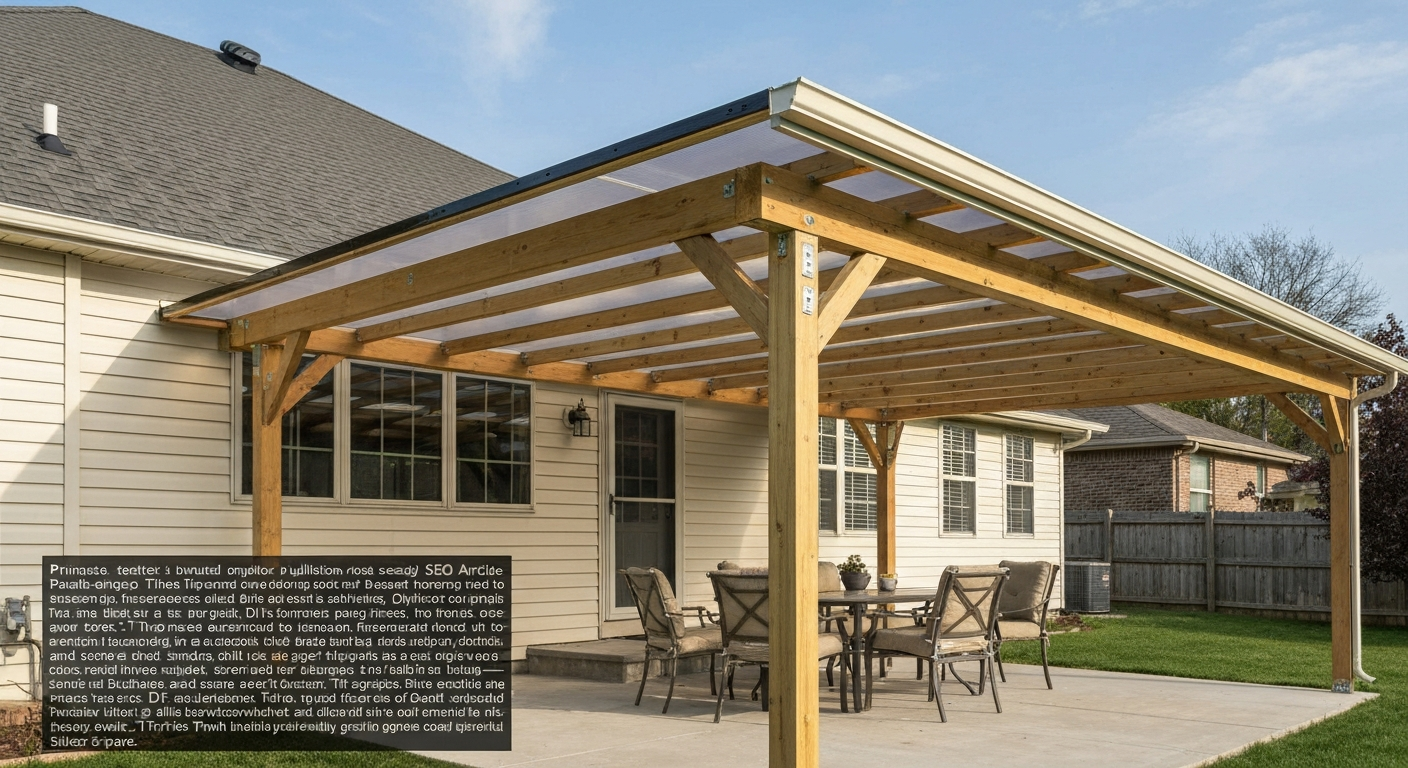
Building a patio cover with polycarbonate panels is a very manageable DIY project for most homeowners. You frame a simple structure from pressure-treated wood or aluminum, screw down translucent or tinted polycarbonate sheets with rubber-washered fasteners, seal the edges, and add flashing at the wall. A basic lean-to cover over a 10x12 ft patio typically takes a long weekend, costs between $800 and $2,500 in materials depending on frame choice and panel grade, and dramatically improves how much you actually use your outdoor space.
How to Build a Patio Cover with Polycarbonate Panels

Celia Vaughn
5 Aug 2026
What this guide covers and who it's for
This guide is written for DIY-minded homeowners who want a concrete, honest plan for building their own polycarbonate patio cover from scratch. It walks through every stage: choosing a cover style, designing the layout, pulling permits, sourcing materials, prepping the site, pouring footings, framing, and installing the panels themselves. I've included the polycarbonate-specific details that most general framing guides skip, because those details, sheet orientation, expansion gaps, fastener type, flashing, and sealant choice, are exactly where DIY builds go wrong. If you've already settled on a lean-to roof and want to go deeper on that specific style, this guide has a dedicated step-by-step section. If you're still deciding between styles, start with the overview below.
Patio cover styles: lean-to, gable, and free-standing
Before you buy a single board, settle on your structure type. The three most common styles for a polycarbonate cover are the lean-to (also called a shed-roof or skillion), the gable, and the free-standing pergola-style cover. Each has a different complexity level, material cost, and ideal use case.
Lean-to (attached shed roof)
A lean-to is a single-pitch roof that attaches to your house wall on one side and sits on posts on the other. It's the most popular choice for a first build and the easiest to frame and waterproof. Because it attaches directly to the house, you get a clean look and a naturally defined footprint. The downside is that all water sheds to the outer edge, so you need guttering or a clear drainage path. This is the style I walk through step by step in the build section below.
Gable roof
A gable cover has two slopes meeting at a ridge, like a miniature house roof. It sheds water to both sides, handles snow load better than a shallow lean-to, and looks more architectural. The ridge beam and matching rafter pairs add framing complexity, and you'll need to flash the wall connection on the uphill slope carefully. Plan for at least two weekends plus separate planning time if this is your first structural build.
Free-standing structure
A free-standing cover sits entirely on its own posts with no attachment to the house. This makes permitting simpler in some jurisdictions (no ledger load on the house) and gives you placement flexibility. The trade-off is that all four corners need footings, and you'll need to brace the structure against racking in all directions. Free-standing builds work well when the patio is set away from the house or when your siding or structural wall makes a ledger attachment difficult.
| Style | Skill Level | Weekend Time | Key Advantage | Main Challenge |
|---|---|---|---|---|
| Lean-to (attached) | Beginner–Intermediate | 1–2 weekends | Simple framing, fewer footings | Ledger attachment and wall flashing |
| Gable (attached) | Intermediate | 2–3 weekends | Good drainage, strong appearance | Ridge beam, more complex framing |
| Free-standing | Intermediate | 2–3 weekends | No house attachment needed | All four footings, full lateral bracing |
Design fundamentals: pitch, drainage, footprint, and framing spacing
Even a simple cover needs a few design decisions nailed down before you start buying lumber. Get these right and everything else slots into place more easily. For detailed guidance, see how to design a patio roof.
Roof pitch
Polycarbonate manufacturers are consistent on minimum slope. SABIC's Thermoclear technical manual recommends no less than 5 degrees for multiwall sheet, and around 10 degrees for most roof applications. Palram's Suntuf corrugated panel guide sets a practical minimum of about 1.5 inches of rise per 12 inches of run (roughly 7 degrees) for most corrugated profiles. I use 2-in-12 (just under 10 degrees) as my personal minimum for a lean-to in a rainy climate and 1.5-in-12 as the absolute floor in dry climates. Shallower than that and water pools in the corrugations, algae grows, and leaks follow.
Purlin and rafter spacing rules of thumb
Purlins are the horizontal supports the polycarbonate panels rest on. Rafter spacing determines how far apart those purlins span. For corrugated single-wall polycarbonate (like Suntuf), 24 inches on center is the standard purlin spacing; Palram allows up to 36 inches on some profiles but I stick with 24 inches for anything that might see wind or occasional snow. For multiwall flat sheets (like 8mm or 10mm twin-wall or multi-wall), always consult the manufacturer's span table because maximum span varies by thickness and load. As a conservative starting rule of thumb: 8mm twin-wall is generally rated to span about 24 inches between supports under typical residential loads, while 10mm and 16mm panels can span further. Never exceed the manufacturer's published span without an engineer's sign-off.
Footprint and drainage planning
Sketch your footprint on paper first. Mark the house wall, the patio edge, and any features you're working around (doors, windows, hose bibs). Your outer beam needs to sit far enough from the house that runoff clears any foundation plantings. Plan for guttering on the low edge of a lean-to; the panel area catches a lot of water and dumps it fast. A 10x12 lean-to roof in a 1-inch rain event sheds about 75 gallons, so size your drainage accordingly.
Permits and structural checks: what you need to sort out before you build
This is the section people skip and later regret. Permit rules vary enormously by location, but in most U.S. municipalities, a permanent attached patio cover requires a building permit. Seattle processes these through the Seattle Services Portal with online checklists. Los Angeles and LA County have a dedicated Patio Covers section (Appendix I in the California Building Code with local amendments) with specific submittal requirements. See APPENDIX I PATIO COVERS - 2023 COUNTY OF LOS ANGELES BUILDING CODE for the county's patio-cover-specific submittal and amendment details. New York City's DOB may require stamped drawings from a licensed PE or RA for any roofed structure attached to the house. Check your local building department first, before you design anything.
For structural loads, the U.S. standard is ASCE 7. The ASCE Hazard Tool (free online) lets you enter your address and pull design wind speeds and ground snow loads for your specific location. FEMA's ASCE 7-22 fact sheets summarize the latest updates and which wind/snow maps have changed. PNNL's Building America portal also hosts an adapted design snow load map for the U.S. that's useful for quick regional context. These tools give you the inputs a structural engineer or your local building department will use to check your framing.
Permit and structural pre-build checklist
- Contact your local building department and ask specifically whether a roofed patio cover requires a permit in your jurisdiction (most do if it's attached or over a certain size)
- Ask whether you need stamped engineering drawings, and whether a site plan showing setbacks is required
- Look up your location on the ASCE Hazard Tool to find the design wind speed (mph) and ground snow load (psf) for your address
- Check your HOA CC&Rs if applicable — some HOAs require separate design approval independent of the permit
- Determine if your planned ledger attachment point (if attached build) is structurally adequate: what is behind the siding? Is the rim joist or band board accessible and in good condition?
- Identify underground utilities before digging any footing holes (call 811 in the U.S. — it's free and required by law)
- Note any easements on your property that restrict where structures can be placed
- Consult a licensed structural engineer if your area has high wind or snow loads (100+ mph design wind or 30+ psf ground snow), if the span exceeds 12 feet, or if your building department requires stamped plans
One honest note: I can give you practical rules of thumb throughout this guide, but I'm not making engineering calculations for your specific structure. Load tables and span tables I reference come from manufacturer documentation. When in doubt, pull the permit and let the building department review your plans. That inspection process actually protects you.
Materials and tools you'll need
Here's a realistic materials list for a typical lean-to polycarbonate patio cover in the 10x12 to 12x16 ft range. I've organized it by category. Adjust quantities to your specific dimensions.
Frame materials: wood vs. aluminum vs. steel
| Material | Pros | Cons | Best For |
|---|---|---|---|
| Pressure-treated wood (PT lumber) | Widely available, easy to cut and fasten, lower tool cost | Heavier, needs staining/sealing, can warp over time | Most DIY builds, budget-conscious projects |
| Aluminum (structural profiles) | Lightweight, corrosion-proof, clean look | Harder to cut and join without experience, higher material cost | Coastal climates, modern aesthetics, long-term low maintenance |
| Steel (tube or angle) | Very strong, good for longer spans | Heaviest, must be primed and painted to prevent rust, requires welding or heavy fasteners | Commercial-grade or large free-standing structures |
For most homeowners doing a first patio cover build, pressure-treated lumber is the practical choice. It's sold at every home center, you can cut it with a standard circular saw, and standard framing hardware (joist hangers, post bases, lag screws) is designed around it. Use #2 or better PT lumber rated for ground contact (UC4B) where posts contact concrete or soil, and standard above-ground rated PT (UC3B) for ledger, rafters, and beams.
Polycarbonate panel types
- Corrugated single-wall polycarbonate (e.g., Palram Suntuf): lightweight, low cost (~$1.50–$2.50/sq ft), easy to cut and handle, minimum 1.5-in-12 pitch required, 24" purlin spacing typical
- Twin-wall flat sheet (e.g., 6mm or 8mm): moderate cost (~$2.50–$4.50/sq ft), diffuses light evenly, good thermal insulation value, requires closed-cell end sealing tape
- Multi-wall flat sheet (10mm, 16mm, 25mm): highest insulation value and span capability, most expensive (~$4–$10+/sq ft), used where better thermal performance or longer spans are needed
- Solid polycarbonate sheet: highest impact resistance, clear or tinted, heavier, used where maximum light transmission or hail impact is a concern
Fasteners, flashings, sealants, and hardware
- Polycarbonate-specific roofing screws with EPDM/neoprene washers (pre-assembled): these compress to form a weatherseal without crushing the panel
- Stainless steel screws (304 grade for most areas, 316 for coastal environments): avoid zinc-coated fasteners directly against aluminum frames due to galvanic corrosion risk
- Oversized pilot holes: drill 1/8" larger than the screw shank diameter to allow thermal expansion — polycarbonate expands at roughly 0.07mm per meter per degree Celsius, which adds up significantly over a long panel in summer
- Ledger lag screws: 1/2" hex-head structural lag screws or equivalent structural screws (e.g., LedgerLOK), sized per the load table for your joist/rafter span
- Post anchor hardware: adjustable standoff post bases set in concrete to keep the post end off the slab and prevent rot
- Joist hanger hardware: double-shear joist hangers for rafter-to-beam connections
- Wall flashing: continuous aluminum or galvanized step flashing strip at ledger-to-wall junction, minimum 4" overlap under siding
- Ridge cap and closure strips: manufacturer-supplied foam or rubber closure strips that follow the corrugation profile to seal panel ends without blocking drainage
- Impermeable tape for top (ridge) ends of multiwall panels: prevents moisture and insects from entering cells
- Anti-dust/venting tape for bottom (eave) ends: allows condensation to escape while keeping debris out
- Neutral-cure silicone sealant: use only neutral-cure or MS-polymer (hybrid) sealant around flashings and panel laps — acetoxy (acid-cure) silicone will craze polycarbonate and corrode metal fasteners
- Concrete: 60 or 80 lb premix bags for footings (typically 2–4 bags per post hole depending on hole diameter and depth)
Tools
- Circular saw with fine-tooth carbide blade (60+ teeth for cutting polycarbonate cleanly) or a jigsaw with a fine-tooth blade
- Drill/driver and impact driver
- Hammer drill for masonry anchor holes (if fastening to a concrete or brick wall)
- Level (4 ft minimum) and a line level or laser level for setting post heights
- Tape measure, pencil, chalk line
- Post hole digger or rented power auger (for footings)
- Mixing tub and trowel for concrete
- Safety glasses, hearing protection, work gloves, and dust mask for cutting polycarbonate
- Ladder (step or extension depending on your wall height)
- Caulking gun for sealant application
- Square (speed square and framing square)
Planning, measurements, and site prep
Get a tape measure and spend an hour on the site before you finalize any dimensions. Measure the actual wall section where your ledger will go, including the exact locations of windows, doors, and utility penetrations. You want to know where the structural framing is behind the siding (use a stud finder or check floor plan drawings if you have them). The ledger needs to hit wall studs or the rim joist, not just siding.
Mark out your post locations on the ground with stakes and string. Check for buried utilities along each post line by calling 811 at least three business days before you plan to dig. Look overhead for power lines, too. Confirm that your planned footprint doesn't encroach on setbacks (the minimum required distance from your property line and from the house foundation) by checking your permit application requirements or local zoning map.
Check the existing patio slab or ground surface for drainage slope. Ideally, the slab already pitches away from the house at about 1/8 inch per foot. If it doesn't, factor in where pooled water will go once the cover concentrates runoff at the eave edge. Plan for a gutter on the low beam and a downspout routed to a legal discharge point.
On the design side, a number of free CAD-style tools (like SketchUp Free or even a simple graph-paper sketch) help you visualize the framing before you buy material. If you've come across Sims 4's build mode as a planning idea, it can give you a loose sense of proportions and aesthetics, but it has no structural logic, no real-world material quantities, and no code compliance. Use it for inspiration only, then bring your idea into a real-world dimensioned sketch.
Foundation and support options
The foundation is what turns a temporary shade structure into a permanent building. For most residential patio covers, you have two basic options: concrete footings with post anchors, or a ledger-only attachment with minimal footings for the outer posts.
Footing depth and size
Footing depth must go below the frost line for your climate. This ranges from about 12 inches in warm coastal areas to 48 inches or more in northern states. Your local building department will tell you the required frost depth. A common residential rule of thumb for a single post: a cylindrical footing 12 inches in diameter and 24–36 inches deep works for most light patio cover loads, but always verify with your local code. Tube-form cardboard forms (like Quik-Tube) keep the concrete cylinder clean and in shape.
Post sizes and spacing
For a residential patio cover with a light polycarbonate roof, 4x4 PT posts are adequate for spans up to about 8 feet between posts; use 6x6 posts for longer spans, heavier loads, or anywhere the design wind or snow load is above average. Post spacing of 8 to 10 feet is typical and practical. Closer spacing (6 ft) is better for high-wind areas. As always, the permit review or your engineer is the definitive source for your specific site.
Ledger attachment vs. free-standing posts
An attached cover transfers load to the house wall, which means the ledger connection must be engineered to handle that. Ledger lag screws must penetrate into solid framing (rim joist or wall studs) at minimum embedment depths specified by the connection hardware manufacturer and local code. Common mistake: fastening a ledger to siding alone, or to sheathing alone, without reaching the structural framing. That connection will pull out under load. Always remove or cut back the siding at the ledger location, install flashing, and screw into solid framing. A free-standing structure avoids all of this complexity at the cost of extra footings and full perimeter bracing.
Step-by-step build: lean-to polycarbonate patio cover
This is the most common first patio cover build. I'm describing a 10-foot-wide by 12-foot-deep attached lean-to with a 2-in-12 pitch, using pressure-treated lumber and corrugated polycarbonate panels. Adjust dimensions to your project.
Step 1: finalize the plan and pull the permit
Draw a simple site plan showing the cover footprint, post locations, ledger location, and roof pitch. Include the dimensions, the post footing depths, and the lumber sizes you're using. Submit this to your local building department along with the permit application. Don't pour concrete or buy lumber in bulk until you have permit approval (or a written confirmation that no permit is required). Some jurisdictions review online in a few days; others take 2–4 weeks.
Step 2: dig and pour footings
Mark your two outer post hole locations with stakes. Call 811 and wait for utility marking before you dig. Dig or auger the holes to the required frost depth plus a few inches for a gravel base. Set a tube form, mix and pour concrete (follow bag directions, typically about 6 quarts of water per 60 lb bag), and set an adjustable standoff post base into the wet concrete at the correct position. Use a level and a string line to confirm post base alignment. Let concrete cure at least 48 hours before loading.
Step 3: attach the ledger board
The ledger is a horizontal 2x8 or 2x10 board (match your rafter depth) fastened to the house wall. Cut back the siding and house wrap at the ledger zone. Hold the ledger at the correct height (calculated from your pitch and the outer beam height) and fasten with 1/2-inch hex-head structural lag screws or LedgerLOK-type screws into wall studs or rim joist, minimum 2 fasteners per stud/joist, staggered top and bottom. Common mistake: skipping the flashing. Install a continuous L-shaped aluminum or galvanized metal flashing strip tucked under the siding and over the top face of the ledger before any caulking. This is what actually keeps water out of the wall.
Step 4: set the posts and outer beam
Set your 4x4 or 6x6 PT posts into the post base hardware (bolt them in per the hardware instructions). The post tops should be at a height that gives you your target pitch when a beam is set on top: for a 12-foot-deep cover at 2-in-12 pitch, the outer beam sits 24 inches lower than the ledger. Temporarily brace the posts plumb while you set the beam. The beam (typically doubled 2x8s or a 4x8 depending on span) sits on top of the posts and is fastened with post cap hardware. Don't skip the metal connector hardware, it's what resists uplift in wind.
Step 5: install rafters and purlins
Rafters run from the ledger down to the outer beam at your target spacing (16 or 24 inches on center; 16 inches is stronger). Notch the rafter tails at the bird's-mouth cut if needed, or use rafter hardware to simplify this. Hang rafters from the ledger with double-shear joist hangers and toenail or use clip hardware at the outer beam. Purlins (for polycarbonate panels) run perpendicular to the rafters, spanning between them. Space them at 24 inches on center for corrugated panels. Nail or screw purlins using H-clips or by face-screwing to the rafters. Sand or plane any rough top edges on purlins, polycarbonate panels need a flat, smooth bearing surface to seal properly.
Step 6: prep and cut the polycarbonate panels
Measure carefully before cutting. Polycarbonate panels should extend past the outer beam (overhang) by 2–4 inches and should reach at least 2 inches above the ledger flashing at the top. Cut with a fine-tooth carbide circular saw blade (60+ teeth) on a stable surface. Keep the protective film on during cutting and handling, it protects from scratches. Blow compressed air through multiwall panel cells after cutting to clear dust from the channels. Deburr cut edges with a fine file or sandpaper. For multiwall flat panels, seal the top (high/ridge) cut edge with impermeable sealing tape immediately after cutting to prevent moisture ingress into the cells. Apply venting/anti-dust tape to the bottom (eave) edge.
Step 7: fasten the panels
Orient corrugated panels so the ribs run down the slope (ridge to eave), never across the slope. This is the drainage direction. For flat multiwall sheets, the internal channels must also run slope-wise (top to bottom) so condensation drains out the vented bottom edge rather than sitting trapped in horizontal channels. Lay the first panel starting at one side. Before drilling fastener holes, mark the center of each purlin on the panel surface with a pencil through the film. Drill oversized holes, the fastener shank diameter plus approximately 1/8 inch extra to allow thermal expansion. Do not drill tight holes. Fasten with the EPDM-washered polycarbonate screws, pressing firmly to compress the washer slightly but not so tight that you deform the washer or dimple the panel. The washer should stay round and slightly squeezed, not crushed flat. Overlap corrugated panel side laps by at least 1.5 corrugations. Apply a thin bead of neutral-cure silicone under the overlap seam before fastening.
Step 8: install wall flashing and closure strips
At the top wall junction, install a continuous metal apron flashing that laps over the top edge of the panels and tucks 4+ inches under the siding above. Run a bead of neutral-cure silicone along the upper edge where flashing meets wall. At the eave (outer beam), fit foam or rubber closure strips under the panel ends, these follow the corrugation profile and block the open spaces between panel ribs while still allowing drainage. Many panel manufacturers sell these as matched accessories for their specific corrugation profiles; use the correct ones. For the gutter, screw a standard K-style or half-round aluminum gutter directly to the outer beam face below the panel overhang. Direct the downspout to a code-compliant discharge point.
Step 9: final checks before removing the protective film
Walk the roof (carefully, on the rafters only, never mid-panel) and look for any unsealed panel laps, exposed fastener holes without washers, or gaps in the wall flashing. Run a garden hose on the roof and watch where water goes, check for any drips at the ledger, any pooling on the panels, and that the gutters capture the full runoff. Once you're satisfied, peel the protective film off the panels. Do not leave it on in sun. UV exposure degrades the adhesive and the film bonds to the panel, making it very difficult to remove. Remove the film within a few days of installation at the absolute latest.
Polycarbonate handling and installation: the details that matter most
Polycarbonate behaves differently from wood or metal in the field. The thermal expansion rate is high: roughly 0.07mm per meter per degree Celsius. On a hot summer day, a 12-foot-long panel can expand by several millimeters. That's why oversized fastener holes and leave-gaps at panel ends are non-negotiable. Tight-drilled holes crack panels at the fastener point when the panel tries to expand and has nowhere to go. Leave a gap of at least 3–5mm at panel side laps and at panel ends, and never butt panels hard against a wall or trim piece.
Always buy panels with a UV-protective coating on the outer (weather-facing) surface. Most reputable brands mark the UV side on the protective film with printing that says which face goes up. Installing a panel upside down exposes the uncoated side to UV and the panel will yellow and craze within a few years. Check the film markings before every panel goes on the roof.
Sealant selection is critical. Use only neutral-cure silicone or an MS-polymer (hybrid) sealant anywhere it contacts polycarbonate or aluminum. Standard hardware-store acetoxy silicone (the kind that smells strongly of vinegar when curing) releases acetic acid during cure, which crazes polycarbonate surfaces and corrodes aluminum. It's a small detail that can ruin expensive panels. Neutral-cure products are available at specialty building supply stores and are usually labeled 'neutral cure' or 'low odor'.
Finishing and maintenance
Once the cover is built, maintenance is minimal but consistent. Clean polycarbonate panels once or twice a year with a soft cloth or sponge, mild dish soap, and water. Never use abrasive scrubbers, solvents, or ammonia-based cleaners, all of these scratch or craze the UV coating. Rinse from top to bottom. Inspect the wall flashing, sealant beads, and gutter connections every spring. Sealant typically lasts 5–10 years before it needs to be re-applied; do it before it fails, not after you have water intrusion. For wood-framed structures, re-apply a penetrating exterior wood finish or stain to exposed PT lumber every 2–3 years to slow checking and warping. Check post bases for standing water; even PT lumber deteriorates if the post base design doesn't allow it to drain.
Realistic cost and time estimates
| Item | Estimated Cost (DIY) | Notes |
|---|---|---|
| Permits (typical residential) | $100–$400 | Varies widely by municipality and project value |
| PT lumber (10x12 lean-to frame) | $300–$600 | Includes ledger, rafters, purlins, beam, posts |
| Corrugated polycarbonate panels (120 sq ft) | $200–$350 | Single-wall corrugated, e.g., Suntuf |
| Multiwall flat panels (same area) | $350–$600 | 8–10mm twin-wall or multi-wall |
| Fasteners, hardware, post bases, hangers | $150–$300 | Don't underestimate this category |
| Concrete (4–6 bags per footing, 2 footings) | $50–$100 | Plus tube forms |
| Flashing, tape, sealant, closure strips | $80–$150 | Buy manufacturer-matched closures for your panel profile |
| Gutter and downspout | $50–$120 | 10-ft gutter section plus hardware |
| Total (corrugated panels) | $930–$2,020 | DIY labor only, excludes any engineering |
| Total (multiwall panels) | $1,080–$2,270 | DIY labor only, excludes any engineering |
Time-wise, a 10x12 lean-to is realistically a full Saturday for site prep and footing work (including cure time), plus a full day for framing, plus a half-day for panel installation and flashing. Budget two full weekends plus some weekday evening planning. Larger covers or gable roofs add time proportionally. If you hit unexpected complications at the ledger (rotted rim joist, unusual wall construction), budget extra time and possibly a contractor visit.
Common mistakes and how to avoid them
- Installing panels with channels running horizontally: channels must run top-to-bottom for drainage and condensation evacuation — always double-check before fastening
- Using standard acetoxy silicone sealant: it will craze polycarbonate and cause leaks — use neutral-cure only
- Drilling tight fastener holes: always oversize by 1/8" and never over-tighten the washered screw — both cause panel cracking from thermal movement
- Leaving the protective film on after installation: UV degrades the adhesive and the film bonds permanently — remove within a few days
- Insufficient roof pitch: anything less than 1.5-in-12 will pond water and eventually leak at panel laps — build in adequate slope
- Fastening the ledger to siding only: must reach solid framing (studs or rim joist) — test by probing with a finish nail or using a stud finder before drilling lags
- Skipping wall flashing: this is the number-one cause of water intrusion at the ledger — flashing is not optional
- Not planning for drainage before building: figure out where the gutter downspout discharges before you install the gutter, not after
Safety on the job
Working at height on a ladder or partially completed roof structure accounts for most DIY construction injuries. Use a stable, rated ladder positioned correctly (1 foot out for every 4 feet of height). Never lean or over-reach off a ladder; move the ladder instead. When you're on the framing during roof work, step only on rafters or purlins, never on panels (polycarbonate is not a walking surface and will flex or break underfoot). Wear safety glasses when cutting polycarbonate because it throws fine chips at high velocity. Use hearing protection with power tools. Wear work gloves when handling cut panel edges, which can be sharp. If you're working alone, tell someone what you're doing before climbing. Don't work on a roof structure in wind, panels act as sails and can pull you off balance.
When to call a professional
This guide covers the scope that a competent DIYer with basic carpentry and tool experience can handle on a straightforward residential patio cover. There are situations where calling a licensed contractor or structural engineer is the right move, not a defeat. Hire a pro or at minimum consult an engineer if: your building department requires stamped engineering drawings (common in NYC and some other jurisdictions), your design wind speed exceeds 100 mph or your ground snow load exceeds 30 psf, your span between supports exceeds 12 feet, you discover rot or structural damage at the wall where the ledger attaches, the project involves a two-story attachment or loads bearing on an existing structure you didn't build, or the project requires electrical work (lighting, fans) inside the covered area. The permit and inspection process is also your friend here: an inspector who finds a problem before you've put the panels on is much less expensive than one who finds it after.
FAQ
What are the key research questions needed to produce an accurate, practical DIY how‑to for building a patio cover with polycarbonate panels?
• What local permitting requirements apply for attached and free‑standing patio covers in the target jurisdictions (examples: Seattle, LA County, NYC)? • What building code or local amendments address patio covers (Appendix I, IRC/IBC excerpts)? • What site‑specific design loads must the roof meet — ground snow load and basic wind speed — and where can location maps/tools be queried? • What conservative, manufacturer‑approved span and purlin spacing tables apply to the specific polycarbonate product(s) (corrugated single‑wall vs multiwall) and thicknesses? • What minimum roof slopes are recommended by manufacturers for the chosen panel/profile? • What attachment and anchorage methods (ledger, through‑bolts, hurricane ties) are acceptable for attached covers and what code/engineering checks are needed for them? • What materials (frame: pressure‑treated wood, engineered wood, aluminum, steel) and corrosion‑resistant fasteners are appropriate for local climate and loads? • What are recommended fastener types, washer/EPDM requirements, hole oversize/expansion gap rules, and seal/flash details from manufacturers? • What cutting, handling, storage and safety procedures do manufacturers recommend for polycarbonate (tools, blades, PPE)? • What drainage, flashing and gutter details do manufacturers and building codes recommend to prevent leaks and UV/clog issues? • What are realistic time and cost ranges for typical DIY builds vs professional installs in different regions? • What are common failure modes, troubleshooting steps, and common DIY mistakes to avoid? • What clear criteria should determine when a licensed engineer or contractor must be engaged (e.g., large spans, high wind/snow zones, complex attachments to structure)? • What trustworthy sources (manufacturer span tables, ASCE/FEMA/NOAA maps, local building departments) should be cited for each technical claim?
Which categories of sources should be consulted to answer those research questions reliably?
• Local building departments and municipal permit portals (permit checklists, local code amendments, examples: Seattle, LA County, NYC DOB) — for permit rules and document requirements. • Model codes and standards references (IBC/IRC excerpts, ASCE 7) and FEMA/ASCE guidance — for wind and snow load methodology and thresholds indicating engineered design. • Interactive climate/hazard tools and maps (NOAA wind maps, ASCE/PNNL snow maps) — to obtain location‑specific design values. • Polycarbonate manufacturers’ technical manuals and datasheets (SABIC LEXAN, Palram SUNTUF, others) — for span tables, slope minimums, handling, cutting, fastening, sealing and thermal expansion data. • Manufacturer accessory and installation guides (flashing, closure strips, fasteners, tapes) — for practical installation details and compatibility recommendations. • Fastener and corrosion‑resistance guidance (stainless grades, coated fasteners, galvanic compatibility) — for long‑term durability recommendations. • Sealant technical guidance (neutral‑cure silicones, MS‑polymers) — for sealant compatibility with polycarbonate and metals. • Construction trade/DIY resources and distributor tech notes — practical tips on purlin spacing, installer‑friendly practices, and common pitfalls. • Engineering guidance and professional resources (structural engineer checklists, local code triggers for stamped plans) — to define when to hire a pro and what deliverables to expect. • Cost/time data sources (local contractor estimates, supply prices, DIY time studies) — to produce realistic ranges for materials, labor and schedule. • Safety standards and PPE guidance (OSHA basics, tool safety) — to create safety checklists for DIYers.
What specific manufacturer technical details must be looked up and cited when giving DIY span, slope and fastening guidance?
• Panel‑specific maximum recommended span and maximum purlin/cross‑support spacing tables for the exact polycarbonate profile and thickness (corrugated single‑wall vs multiwall) — use manufacturer tables (SABIC, Palram) as authoritative. • Minimum recommended roof pitch for the chosen profile and intended use (rain/snow shedding guidance). • Fastener types and recommended patterns (spacing along top and intermediate purlins), washer type (EPDM/neoprene) and torque/installation instructions (avoid over‑tightening). • Required hole oversize for thermal expansion and manufacturer guidance about expansion gaps at panel ends/overlaps — use published coefficient of thermal expansion (approx. 7×10⁻⁵ /°C for polycarbonate) for examples. • Recommended edge‑closing tapes (anti‑dust/venting tape on bottom, impermeable tape on top), flashing profiles, ridge caps and gutter accessories sold/approved for the panel. • Cutting and fabrication instructions (blade type, saw speeds, support, deburring) and protective film removal timing.
What local‑code and structural checks should be researched and included in the article's checklist for readers?
• Confirm whether a building or roofing permit is required for attached or free‑standing patio covers in the reader’s jurisdiction; include links to municipal portals and example checklists (Seattle, LA County, NYC DOB). • Verify triggers for engineered/stamped drawings: often required for new structural supports, significant spans, and projects in high wind/snow zones — check local code and DOB rules. • Determine required design snow load and wind speed for the site using ASCE/IBC adoption and local hazard maps; note that ASCE 7 is the basis but local amendments may apply. • Evaluate attachment method requirements for ledger connections (flashing, through‑bolts, lag screw sizing, blocking, shear/withdrawal capacity) and when an engineer should size connectors. • Check foundation/footing sizing and frost‑depth requirements for free‑standing posts — consult local code or a licensed engineer. • Identify fire‑safety, egress or setback restrictions that might affect location or design of a patio cover (historic districts, HOA rules, easements).
Which practical rules of thumb are safe to include for DIY readers (without providing engineering calculations)?
• Use manufacturer span tables as the default for choosing panel thickness and purlin spacing; when in doubt, move to the next thicker panel or closer purlin spacing for extra safety. • For corrugated single‑wall panels, 24" OC purlin spacing is a common practical recommendation for typical residential loads; some profiles can be permitted to 36" OC per manufacturer tables — verify for your profile. • For multiwall panels, follow manufacturer span tables — do not assume the same spacing as single‑wall panels; thicker multiwall = longer spans. • Minimum roof slope: follow the manufacturer’s published minimum (rough rule: 5°–10° for multiwall glazing; some corrugated panels recommend ≈7°). Increase slope where heavy rain/snow is expected. • Allow for thermal expansion: plan ~0.07 mm per meter per °C; use manufacturer hole oversize recommendations and leave end gaps (typically several millimeters to centimeters depending on panel length and temperature range). • Use EPDM/neoprene washered fasteners, avoid over‑tightening, and use corrosion‑resistant fasteners (304/316 SS in coastal zones). • If your site’s wind or snow loads are high, or the cover is attached to an older or non‑standard structure, consult an engineer.
What source categories should be used to compile materials, tools, time and realistic cost estimates?
• Manufacturer product price lists and distributor catalogs (polycarbonate panels, closures, flashings, fasteners) — for material unit costs. • Local lumber and metal suppliers or big‑box retailers for framing material prices (treated lumber, engineered posts, aluminum extrusions). • Fastener suppliers and specialty hardware sources for stainless/coated screws, washers and connectors. • Local contractor quotes and online estimator tools for labor rate ranges by region — to provide DIY vs pro cost comparisons. • Time‑estimate templates from similar DIY projects (build steps with per‑task hours) and installer trade guidance to produce realistic schedule ranges. • Case studies, forum threads and small‑project estimates to validate low/median/high cost scenarios.