Designing a patio roof comes down to four decisions made in the right order: what type of structure fits your space and goals, how big and how steep it needs to be, what materials you'll build it from, and how it attaches safely to your house or sits on its own posts. Get those four things right before you buy a single board or panel, and the actual build becomes a logical sequence of steps rather than a series of expensive surprises.
How to Design a Patio Roof: DIY Planning, Loads, and Build Steps

Celia Vaughn
6 May 2026

Start by clarifying your patio roof type and goals
Before you sketch anything, be honest about what you need the roof to do. Shade only? A simple open-lattice or louvered structure is enough. Rain protection? You need solid roofing panels and proper drainage slope. Year-round use in a cold or high-wind region? Now you're into structural territory with real load requirements. Your goal shapes every decision that follows, so write it down.
The three main roof types each have a different design profile. A lean-to (also called a shed-style) roof is the most common DIY choice: it slopes in one direction, attaches to the house on one end, and sits on posts on the outer edge. It's the simplest to frame and the easiest to waterproof. A gable roof has two slopes meeting at a ridge, looks more like an extension of the house, and gives you more headroom but requires more framing work. A free-standing structure has no attachment to the house at all and relies entirely on its own posts and footings, which makes it more flexible in placement but more demanding on the foundation side.
Be realistic about the overlap between these types and your actual skills. A lean-to is a strong first patio roof project. Gable roofs and free-standing structures with long spans start to involve engineering considerations that go beyond beginner territory, especially in areas with significant snow or wind loads.
Measure, plan slope and drainage, and map the structure layout
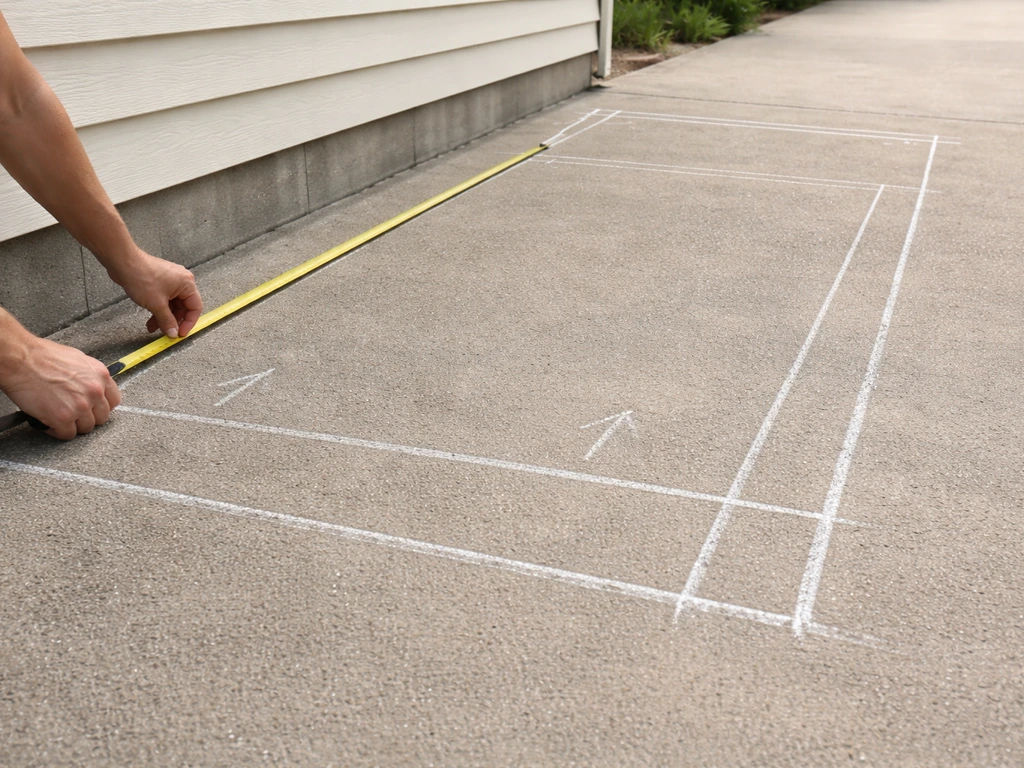
Measure your patio area accurately before doing anything else. Get the full width (parallel to the house) and the projection (how far out from the house wall you want the roof to extend). These two numbers determine your rafter length, beam span, post spacing, and material quantities. Measure twice, write it down, and add a few inches to your projection to account for overhang at the outer edge.
Slope is non-negotiable if you want water to drain off. The minimum practical slope for solid patio roofing panels is about 1:12 (roughly 5 degrees), meaning the roof drops 1 inch for every 12 inches of horizontal run. For polycarbonate or corrugated metal panels, most manufacturers recommend a minimum of 1:6 to 1:4. On a lean-to roof, you control slope by setting the ledger board height on the house wall higher than the outer beam height. Common mistake: people set the slope too flat to preserve headroom clearance and end up with standing water and leaks. If you're in a snowy climate, note that roofs with slopes under 5 degrees need a rain-on-snow surcharge of 5 psf factored into the design load per IRC guidance.
For the structural layout, decide on rafter spacing (typically 16 or 24 inches on center for wood, or per manufacturer specs for aluminum kits) and beam/post spacing (typically 6 to 8 feet apart for standard lumber spans). Sketch a top-down plan showing where every post, beam, and rafter lands. This drawing becomes your permit submittal, your materials list, and your field reference all at once.
Choose your materials and style
Material choice affects how the roof looks, how long it lasts, how much it costs, and how hard it is to build. There's no single right answer, but here's what each option actually involves in practice.
| Material | Typical Cost (DIY) | Durability | Appearance | DIY Difficulty |
|---|---|---|---|---|
| Pressure-treated wood | Lowest upfront | 15–25 years with maintenance | Natural, classic | Moderate — familiar tools, but needs sealing/staining |
| Aluminum (kit or custom) | Mid to high | 30–50+ years, no rot or rust | Clean, modern | Easy to moderate — pre-engineered kits simplify design |
| Steel/galvanized metal framing | Mid range | 20–40 years with coating | Industrial or hidden | Moderate — requires metal-cutting tools |
| Metal roofing panels (corrugated/standing seam) | Low to mid | 30–50 years | Rustic to modern depending on profile | Easy — lightweight, screws down fast |
| Polycarbonate panels | Low to mid | 10–20 years (UV-rated) | Translucent, light-diffusing | Easy — but expansion gaps are critical |
Wood is the most forgiving material to work with if you're new to framing because it's easy to cut, drill, and fasten with standard tools. Pressure-treated lumber is the right choice for any members close to the ground or in contact with concrete. Use #2 or better Douglas fir or Southern yellow pine for rafters and beams. The downside is ongoing maintenance: plan to seal or stain every two to three years in wet climates.
Aluminum patio cover kits are worth considering seriously if you want a low-maintenance result and don't want to engineer spans from scratch. Most kits come with pre-punched components, span tables, and assembly instructions. They're also lighter than wood, which reduces load on the attachment point. The trade-off is that kits lock you into standard widths and projections, and they cost more upfront than raw lumber.
For the roofing surface itself, corrugated metal panels and standing seam metal are durable, drain well, and install quickly. Polycarbonate lets light through, which is great for plants or brightening a dark patio space. Polycarbonate roofing is typically installed with compatible glazing sheets, proper support spacing, and sealant tape to prevent leaks at overlaps. Both work well as long as you follow the slope minimums and use the correct fasteners and sealant tape at overlaps and ridge caps.
Building codes, permits, and load requirements you can't skip
This is the section most DIYers want to skip, and it's the one that comes back to bite them hardest. A patio roof attached to your house is a structural addition. If you want a Sims 4 version of these choices, see our guide on how to make patio roof in The Sims 4 how to make patio roof sims 4. Most jurisdictions require a building permit, and many require a site plan or framing drawing as part of the submittal. Skipping a permit can create problems when you sell the house or make an insurance claim.
The IRC (International Residential Code) Appendix H addresses patio covers specifically and gives prescriptive design requirements separate from the main roof framing chapter. It sets a minimum design pressure of 10 psf for lateral (wind) loads on patio cover structures. Your actual design loads depend on your local climate: your jurisdiction publishes a version of IRC Table R301.2(1) that lists the ground snow load and wind design speed for your area. Look that up before you finalize any beam or rafter sizes.
For snow: if your area has a ground snow load at or below 70 psf, you can generally follow IRC prescriptive methods. If your ground snow load exceeds 70 psf, you need an engineer to design the structure. For wind: find your local design wind speed and use it when sizing connections and anchor bolts. This isn't theoretical. A poorly anchored patio roof in a 90+ mph wind event becomes a projectile.
The practical takeaway: pull the permit, call your local building department to confirm what drawings they need, and ask specifically whether your project requires an engineer's stamp. Many straightforward lean-to projects in moderate climates don't require engineering, but you need to ask rather than assume.
Attachment methods and anchoring to house or columns
How the roof connects to your house (or stands on its own) is the most structurally critical part of the whole project. Getting this wrong is also the most common source of failures, leaks, and permit rejections.
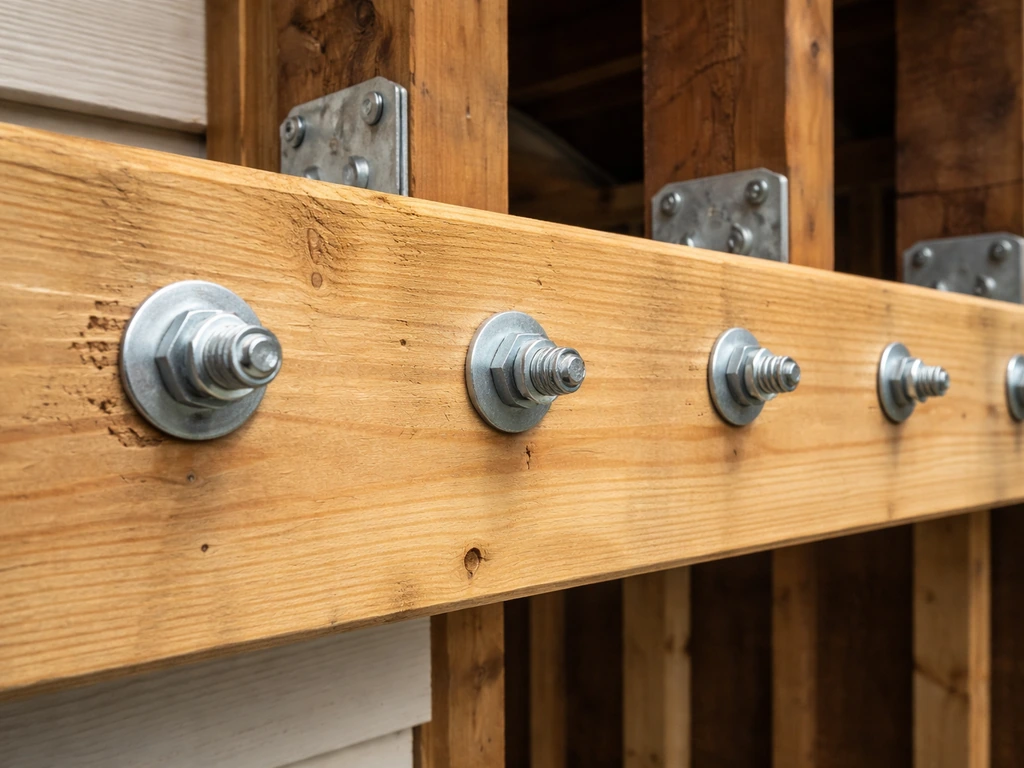
Attaching to the house with a ledger board
A ledger board is a horizontal member bolted directly to the house's rim joist or wall framing. It carries the inner end of all your rafters. The ledger must be attached to structural framing in the house wall, not just siding or sheathing. For a typical lean-to, use 1/2-inch lag screws or structural bolts in a staggered pattern every 16 inches, driven into the rim joist or wall studs. Remove the siding at the ledger location, install the ledger against the sheathing or house wrap, flash it properly (more on that below), and then re-trim the siding up to the ledger face. What often goes wrong here: people bolt the ledger through the siding without removing it, leaving a gap behind the ledger that traps water and rots the house framing over time.
Posts and footings for the outer edge or free-standing structures

Posts carry the outer beam and transfer the roof load to the ground. Each post needs a concrete footing sized to the load and your local soil bearing capacity. A common residential footing for a patio post is a 12-inch diameter tube footing poured 12 to 18 inches deep (below the frost line in cold climates, which varies widely by region). Use post base hardware anchored in the footing rather than setting posts directly in concrete, which traps moisture and causes rot at the base. Space posts no more than 8 feet apart for standard 4x6 or 6x6 lumber beams under typical residential loads.
For free-standing structures, every post needs a footing, and the structure needs diagonal bracing or knee bracing to resist lateral (wind) loads since there's no house wall providing stability. This is where free-standing builds get more complex and where it's worth double-checking your design against the load tables.
Build steps: framing, rafters, roofing panels, and flashing
Once your footings have cured (minimum 24 to 48 hours for tube footings, 7 days before loading), you're ready to build. Work in this order to keep the structure plumb, square, and safe.
- Set posts and check plumb in both directions. Brace them temporarily before installing beams.
- Install the ledger board on the house wall at the correct height to achieve your target slope. Use a level and a tape measure to confirm height at both ends before fastening.
- Install the outer beam across the post tops, fastened with post cap hardware. Check that the beam is level and that the height difference between ledger and beam gives you the slope you planned.
- Cut and install rafters. Rafters run from the ledger to the outer beam, notched (birdsmouth cut) where they sit over the beam if using wood. Space them at your planned on-center dimension. Use rafter hanger hardware at the ledger end for every rafter.
- Install any intermediate beams or purlins if your roofing panels require mid-span support (check panel manufacturer specs for maximum unsupported span).
- Install the roofing panels starting at the low end (eave) and working up toward the house. Overlap panels per manufacturer specs (typically one or two corrugations for corrugated metal, or per the channel system for polycarbonate). Use the correct panel screws with neoprene washers — overtightening cracks panels and creates leak points.
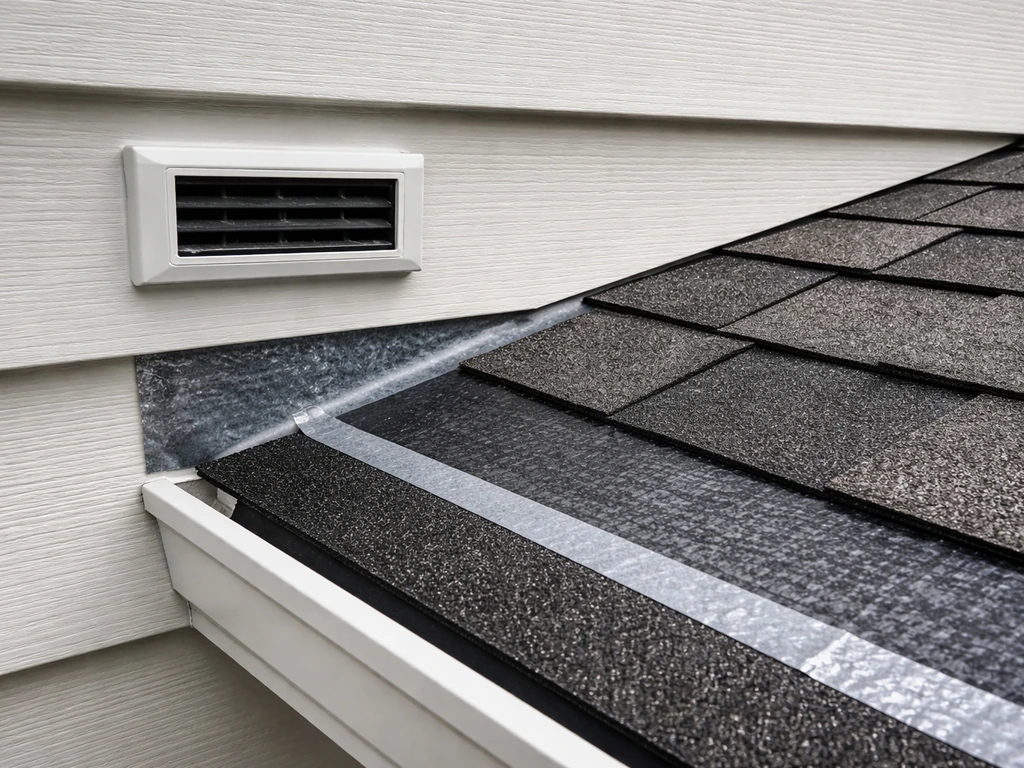
- Install the ridge/wall flashing where the roof panels meet the house wall. This is the number one leak location on any patio roof. Use Z-flashing tucked under the house siding above the ledger and lapping over the top of the first panel course. Seal the top edge with flashing tape or compatible sealant.
- Install fascia board at the outer edge to cover the rafter tails and give the roof a finished appearance. Add a drip edge over the fascia to direct water away from the framing.
A note on working safely at height: use proper scaffolding or a stable ladder with a spotter for any work above 6 feet. Roof panel installation on a sloped surface while managing long, lightweight panels in any wind is genuinely awkward. Work with a partner. Panels that catch wind while you're on a ladder are a serious fall risk.
Weatherproofing, ventilation, and keeping it performing long-term
A patio roof that leaks or rots within five years isn't a budget success, no matter how cheap the materials were. Weatherproofing starts at the design stage (correct slope, proper overhang past the outer edge, correct flashing details) but continues through every material and fastener choice you make.
Flashing and sealing the wall connection
The wall-to-roof joint is where almost every patio roof leak starts. Z-flashing is your primary defense: the top leg tucks under the siding course above the ledger, and the bottom leg laps over the top edge of the first panel. Seal the top leg to the house wrap or sheathing with flashing tape. Do not rely on caulk alone here. Caulk cracks with seasonal movement. Physical flashing that sheds water mechanically is what works long-term.
Ventilation under solid roofing
Solid roofing panels over an enclosed patio can trap heat and moisture under the roof surface. For open-sided patio roofs, this is usually not a problem since air moves freely. But if you're enclosing the sides or building toward a screened porch situation, leave a gap at the ridge or at the eave to allow air to circulate under the panels. This is especially important with metal roofing in hot climates, where a trapped air gap can significantly raise the temperature under the roof.
Ongoing maintenance schedule
- Once a year: inspect all flashing and sealant at the wall connection. Reapply sealant anywhere it's cracked or pulling away.
- Once a year: check all post bases and hardware for corrosion, especially in coastal or wet climates. Tighten any loose fasteners.
- Every 2 to 3 years (wood structures): re-seal or re-stain all exposed wood members. Pay special attention to end grain on rafter tails and beam ends.
- After any major storm: walk the perimeter and check for lifted panels, damaged flashing, or shifted posts. Address anything immediately rather than waiting for the next maintenance cycle.
- Periodically: clear debris from the roof surface and gutters if installed. Leaves and debris hold moisture against panel surfaces and accelerate degradation.
One last honest note: if your project involves a complex gable roof, a long free-standing span, an unusual site with high wind exposure, or any attachment to an older house where you can't confidently identify the structural framing, bring in a structural engineer or a licensed contractor for at least a design review. The cost is small relative to the cost of a failed structure or a permit rejection after the build is complete. Most of what's described here is well within DIY range for a standard lean-to or simple covered patio, but knowing where the line is matters as much as knowing how to frame a rafter.
FAQ
How should I handle rain runoff so my patio roof does not create foundation or wall-wash problems?
If you have existing gutters, choose a roof layout that lets runoff land away from the house foundation and does not dump water directly into a window well. Plan a clean discharge path, either into a downspout extension or onto a drainage area with gravel and slope away from the footing line.
What should I check on my house framing before installing a ledger board?
For an attached lean-to, avoid “sistering” ledger connections into rim joist areas that are rotted, insect damaged, or missing structural framing. If the rim joist looks compromised, you typically need localized repair before the ledger is installed, not after, because the ledger depends on solid wood to transfer load.
Are anchor bolt and ledger connection spacing more important than the fastener size?
When the roof must resist both uplift and lateral forces, the anchor pattern matters as much as the bolt size. Use the attachment spacing and edge distances required by your fastening schedule, and do not substitute different fasteners without checking the load rating and the jurisdiction’s acceptance.
What mistake most often causes leaks at panel seams even when the flashing looks correct?
The most common roof-panel alignment issue is installing fasteners or flashing outside the manufacturer’s approved location, which can create leak channels or strip fastener threads. Before starting, mark the rafter/beam supports on the ground, verify panel overhang direction, and do a dry fit so overlaps land over solid backing members.
How much roof overhang should I design for to protect posts and beam ends?
Plan overhang so it extends beyond the outermost posts enough to protect the post tops and beam connections from direct splash. If water repeatedly hits the ends of lumber, you will often see early finish failure and accelerated rot even with pressure-treated components.
Does the minimum slope requirement change if I switch from solid panels to polycarbonate or corrugated panels?
Do not assume the same slope works for all roof surfaces. Solid panels usually tolerate the minimum slope you choose, but translucent products often require additional slope or specific support spacing to prevent sagging and uneven water flow.
When is an air gap under the patio roof actually required, and where should it be?
If your patio is enclosed or partially enclosed, ventilation becomes critical. Leave an air path at the ridge or eave (or follow kit/roofing manufacturer instructions), and avoid fully boxing in the top without a defined under-roof airflow route.
Can I add ceiling fans, lights, or speakers to a patio roof safely?
Yes, but only if you treat it like an electrical installation, not a casual add-on. Use weather-rated cable runs, install through-roof penetrations with proper flashing boots, and support fixtures so their weight and wind forces do not load the roofing deck or trim.
What drawings do building departments commonly ask for beyond just a rafter size list?
When planning a permit, bring a simple site plan that shows the roof footprint, setbacks to property lines, and the attachment location on the house, plus a framing layout showing post spacing and beam spans. Many building departments also want details for the wall-to-roof connection and the plan view of post locations.
How does snow design differ from simply using a higher load rating?
In snowy climates, the risk is not just snow weight, it is snow sliding and accumulation on lower sections. If the design uses a lean-to, check how snow will collect along the roof edge and whether you need increased live load factors, roof slope adjustments, or additional shedding control.
Can I use a standard footing size, or do I need to size footings to my soil and frost depth?
Tube footings and footings depth are climate-specific, frost line varies by region, and soil bearing capacity changes the required size. Before you pour, verify your local frost depth and soil conditions, then confirm the footing size with the load plan rather than using a generic diameter.
How do I know whether my free-standing patio roof needs diagonal bracing?
Free-standing roofs usually need bracing because they lack a house wall to resist wind. If your post spacing or beam span is wide, diagonal bracing, knee bracing, or engineered moment connections can be required to meet lateral stability, even when the roof looks “square.”
What changes when attaching a patio roof to an older house with unknown or nonstandard framing?
If the house framing is older, you may not have a modern rim joist layout or consistent stud spacing, and you might also have mismatched lumber grades. Ask the building department or a contractor what they allow for ledger attachment in your specific conditions, because fastener placement may need to change.
Do I need fall protection or temporary guardrails when building at height on a patio roof?
A guardrail is usually required when there is an open side with a sufficient height drop and the patio roof work creates a fall hazard. Even if the final roof is low, you still need fall protection for panel installation and ladder work, because panel edges can catch wind and pull you off balance.