
You can build a covered patio off your house yourself, but it takes real planning before you swing a single hammer. The project is genuinely DIY-able for most handy homeowners, an attached lean-to or simple gable cover over a 12x16 or 20x20 slab is something a motivated person with basic carpentry skills, a few weekends, and a helper can pull off. What trips people up is skipping the permit, guessing at post footings, or botching the ledger attachment to the house. Do those three things right and the rest of the project follows a logical sequence.
How to Build a Covered Patio Off Your House: Complete DIY Guide

Celia Vaughn
18 Jul 2026
What this guide covers and who it's for
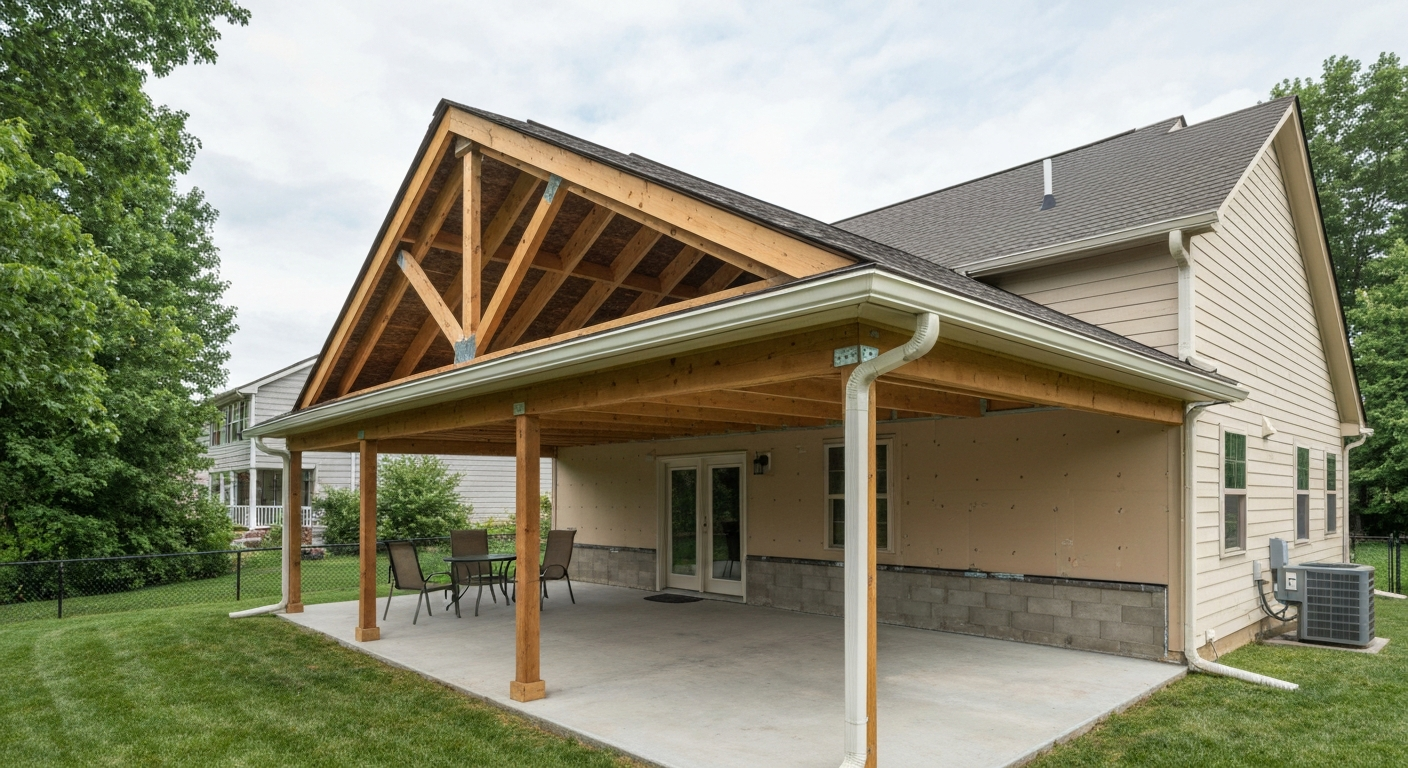
This is a full soup-to-nuts guide for DIY homeowners planning an attached covered patio. Whether you're building a simple lean-to roof off the back of your house, a gable-style structure over a 20x20 patio, or a free-standing shade cover in your backyard, the planning, structural, and finishing decisions are largely the same. I'll walk you through site assessment, permits, material choices, attachment methods, structural framing, a 20x20 build example, tool lists, cost ranges, and an honest look at when you should hire a pro instead of going it alone. For a practical, step-by-step walkthrough with photos and plans, see a guide on how to build a covered patio yourself. If you're working through a specific size or style, the planning process for a 20x20 cover or detailed DIY building plans are worth pulling alongside this guide.
Start here: your planning checklist
Before you buy a single board, spend a Saturday afternoon working through this checklist. Skipping any item here is how projects stall mid-build, or worse, get torn down by the building department.
Site assessment
Walk your patio area and ask yourself: Where does water flow during a heavy rain? Is the ground level or does it slope toward the house? Is there a drip edge or downspout that your roof will interfere with? Note where the sun hits hardest and what direction you want the roof to shed rain. Check for overhead utility lines, both above and, critically, underground. Call 811 (the national dig-safe line) before any footing excavation. Most footing holes for patio posts only go 12 to 36 inches deep depending on your frost line, but that's deep enough to hit a gas or electrical line.
Setbacks and property lines
Your local zoning code sets minimum distances (setbacks) from property lines, easements, and sometimes from the main structure itself. A covered patio attached to the house is usually treated as an extension of the building footprint, not an accessory structure, so it may need to meet the same rear or side yard setbacks as the house. Pull your property survey or ask your building department what setback applies. Getting this wrong means relocating posts after the footings are poured.
Drainage planning
A covered roof concentrates rainwater along its edges, so you need to think about where that water goes before you design the roof pitch and overhang. Plan for gutters and downspouts routed to daylight or a dry well, and make sure the slope of the patio slab itself runs away from the house foundation, a minimum of 1/8 inch per foot is typical. This is far easier to address in planning than after the roof is built.
Permits and inspections
Almost every U.S. jurisdiction requires a building permit for a new covered patio attached to a house. The Los Angeles Department of Building and Safety, for example, requires plan review and a permit submittal for structural attachments. Many counties publish a standard 'Patio Cover / Deck / Pergola' submittal packet that lists exactly what you need to provide: a site plan showing property lines and setbacks, a framing plan showing post locations and beam sizes, footing details, and in some cases structural calculations when your spans exceed prescriptive limits. Pasco, WA is one example of a jurisdiction with a publicly available checklist that lays this out clearly. The inspection process typically includes a footing inspection before you pour concrete, a framing inspection before sheathing goes on, and a final inspection. Budget two to four weeks for permit approval in most jurisdictions, longer in high-volume metro areas.
Local load limits
Your building department fills in local values for ground snow load, design wind speed, and frost depth on a climatic criteria form (IRC Table R301. IRC 2021, R301.2 Climatic and geographic design criteria (ICC) specifies that residential structures be designed for dead, live, roof (snow/live), wind, and seismic loads and that jurisdictions provide the local ground‑snow, design wind speed, and frost depth values used in design blank" rel="noopener noreferrer">IRC 2021 — R301.2 Climatic and geographic design criteria (ICC). 2 defines what those values govern). These numbers drive your footing size, post sizing, and rafter spacing. If you're in a coastal area, hurricane zone, or high-snow region, your structure needs to be engineered accordingly, prescriptive tables from guides like the American Wood Council's DCA-6 have limits, and exceeding them requires a structural engineer's sign-off. Look up your site's wind speed using the ASCE 7 Hazard Tool before assuming standard framing will work. Authoritative ASCE wind maps are also published as GIS data sets, ASCE/NIST Wind Maps (ArcGIS dataset), ASCE 7 wind zones can be used to look up basic wind speed for a specific site ASCE/NIST Wind Maps (ArcGIS dataset) — ASCE 7 wind zones.
Design decisions: style, size, pitch, and attached vs. free-standing
Roof styles
The three most common styles for a house-attached patio cover are the lean-to (shed roof), the gable, and the hip. The lean-to is the simplest: rafters slope in one direction from a ledger on the house down to a beam on the outer posts. It's the easiest to frame, the easiest to flash, and the most forgiving for a first build. A gable roof has a ridge in the middle and two slopes, which looks more like a natural extension of the house roofline, but it requires a ridge beam, collar ties or ceiling joists, and more complex flashing at the house wall. A hip roof is the most complex and typically warrants professional framing unless you have solid carpentry experience. For most DIY builders, the lean-to is the right starting point.
Roof pitch
Pitch is how steeply the roof slopes, expressed as rise over run, a 2:12 pitch rises 2 inches for every 12 inches of horizontal run. For a lean-to using solid roofing (shingles, metal panels), a minimum of 2:12 pitch is needed to shed water reliably; 3:12 or 4:12 gives more headroom at the outer edge and better drainage. If you're using polycarbonate panels, the manufacturer typically requires a minimum 5-degree slope (about 1:12). A steeper pitch also raises the height of the ledger attachment at the house, which matters if you're attaching below a window or near the eave.
Attached vs. free-standing
An attached patio cover connects directly to the house via a ledger board, it's structurally simpler in some ways (the house provides one support line) but more demanding in terms of attachment integrity and flashing. A free-standing structure has posts and beams on all four sides, sits independently of the house, and is easier to move or modify later. Free-standing covers are also useful when the house wall makes attachment difficult (brick veneer, EIFS/stucco systems, or a wall with no accessible rim joist). The trade-off is cost: free-standing structures require more posts, more footings, and more beam material. For most homeowners building directly off a wood-framed house, an attached design makes more sense structurally and economically.
Material options: honest pros, cons, and durability
Choosing your material is the single biggest decision after the structural design because it affects cost, maintenance, longevity, and what you can DIY versus what you need to hire out. Here's a straight comparison.
| Material | Typical Cost Range | Durability | DIY-Friendliness | Maintenance | Best For |
|---|---|---|---|---|---|
| Pressure-treated wood | $8–$18/LF framing | 15–30 years with maintenance | Excellent — standard tools | Stain/seal every 2–3 years | Budget builds, traditional look |
| Cedar / Redwood | $18–$35/LF | 20–40 years | Excellent | Oil or seal every 2–3 years | Natural aesthetics, dry climates |
| Aluminum (patio cover kits) | $20–$45/sq ft installed | 30–50 years | Good with kit systems | Nearly none | Low-maintenance, coastal areas |
| Galvanized / painted steel | $25–$55/sq ft installed | 25–40 years | Moderate — welding or bolting | Paint touch-ups, rust checks | Heavy snow loads, commercial look |
| Polycarbonate panels | $3–$10/sq ft panels | 10–20 years (UV-rated) | Excellent | Annual cleaning | Light diffusion, pergola roofing |
| Asphalt shingles (on framed roof) | $1.50–$4/sq ft materials | 20–30 years | Good if comfortable on roof | Inspect annually | Matching house roof, attached covers |
| Metal roofing panels | $3–$8/sq ft materials | 30–50 years | Good — snap-lock or exposed fastener | Minimal | Long spans, modern aesthetics |
| Luxury/composite options | $50–$150+/sq ft installed | 40–60 years | Usually contractor-installed | Minimal | High-end outdoor living spaces |
Pressure-treated lumber is the default for most DIY attached covers because it's available at every home center, works with standard carpentry tools, and is forgiving of minor framing imperfections. The downside is ongoing maintenance, you need to stain or seal it on a regular schedule or it grays, checks, and eventually rots at the connections. Aluminum kit systems (sold by companies like Stratco, Palram, and various regional suppliers) are the best option if you want a low-maintenance structure with a finished look out of the box. They're not as cheap as raw lumber, but the total installed cost difference narrows when you factor in the finish work and long-term maintenance wood requires. Steel framing is worth considering for large spans or high-wind zones, but it typically requires bolted connections and sometimes welding, which pushes it beyond most DIY skill sets.
Polycarbonate and translucent panels
Polycarbonate roofing is underrated for patio covers. Twin-wall or triple-wall polycarbonate panels (8mm or 16mm) let in diffused light, handle moderate snow and wind loads, and install with simple aluminum extrusion systems. The main caveats: cheap panels yellow and cloud within five years, so buy UV-stabilized panels with a legitimate warranty (10-year minimum for quality brands), and the slope requirement is non-negotiable, standing water between the channels grows algae and destroys the material.
Luxury and high-end finishes
If budget isn't the primary constraint, composite lumber (like TimberTech or Trex structural framing), powder-coated aluminum beam systems, louvered roof systems (motorized slat roofs like those from Equinox or Brustor), and standing-seam metal roofs elevate a patio cover significantly. These products are durable, look sharp, and add real resale value, but most require either professional installation or a high level of DIY confidence. If that direction interests you, there's more depth in a guide focused specifically on luxury patio cover builds.
Realistic costs and how finishes affect long-term value
Budget ranges for a covered patio swing widely depending on size, material, and whether you're doing the labor yourself. Here's a realistic breakdown for a 16x20 attached cover (320 sq ft) as a reference point, with DIY labor assumed.
| Build Type | Estimated Material Cost (DIY Labor) | Estimated Contractor Cost | Lifespan Before Major Work |
|---|---|---|---|
| PT lumber framing + asphalt shingles | $2,500–$4,500 | $8,000–$14,000 | 15–20 years |
| PT framing + metal roof panels | $3,000–$5,500 | $9,000–$16,000 | 25–35 years |
| Cedar framing + metal roof | $5,000–$9,000 | $14,000–$22,000 | 30–40 years |
| Aluminum kit system (DIY-install) | $4,500–$9,000 | $10,000–$18,000 | 30–50 years |
| Steel framing + standing seam metal | $7,000–$14,000 | $18,000–$30,000 | 35–50 years |
| Luxury louvered / composite system | $15,000–$40,000+ | $25,000–$60,000+ | 40+ years |
The biggest cost lever you control as a DIY builder is labor, which typically makes up 40 to 60 percent of contractor pricing. Material costs are largely fixed once you've chosen your system. Where finishes matter for long-term cost: a cheap paint or stain on a wood structure will peel and require recoating every two to three years, while a factory-applied oil finish on cedar or a powder-coat on aluminum holds up ten to fifteen years with minimal intervention. Spending an extra $500 to $800 on a quality finish at build time routinely saves more than that over a decade.
Don't forget permit fees (typically $150 to $500 for a standard residential patio cover permit, though larger metro areas can run higher), concrete for footings (a 60-lb bag of fast-set concrete runs about $7 to $10, and you'll need several bags per footing), and hardware costs which add up faster than most people expect, joist hangers, post bases, lag screws, hurricane ties, and flashing can easily total $400 to $800 on a mid-size project.
Attachment methods: ledger board, beam-and-post, and free-standing
Ledger board attachment
The ledger is a horizontal board (typically a 2x8, 2x10, or 2x12 depending on loads) bolted directly to the house's rim joist or band joist. Rafters or joists hang from it on one end, transferring the roof load into the house structure. This method is structurally efficient and saves material, but it has to be done correctly, ledger failures are one of the most common causes of deck and patio cover collapses. The key rules: remove all siding and housewrap behind the ledger location before installation, install continuous corrosion-resistant flashing (typically a Z-flashing or through-wall flashing) so water cannot get behind the ledger, use specified fasteners (structural lag screws or through-bolts) at code-required spacing, and never attach a ledger to brick veneer, hollow CMU without solid grouting, or EIFS stucco, those surfaces can't handle the pullout loads. Simpson Strong-Tie's structural screw systems (SDWS and SDWH series) are widely accepted as code-compliant alternatives to traditional lag screws and are easier to install accurately.
Beam-and-post attached system
In this approach, instead of hanging rafters from the house directly, you run a beam parallel to the house wall on posts, then span rafters from that beam to a separate outer beam on the far posts. The house wall may still have a ledger for rafter tails, or the structure may simply lean against the house fascia for weather protection without structural attachment. This method is useful when the house wall doesn't offer a clean ledger attachment point, or when you want the structure to be removable without patching the house. The trade-off is that you need posts on the house side in addition to the outer posts, which means more footings and a slightly more complex framing layout.
Free-standing connections
A free-standing patio cover has four corners (or more, for larger structures) with posts set in individual footings or surface-mounted post bases. Beams run along all four sides, rafters span between the two long beams, and the structure stands independently. Connections at each post use post caps (like Simpson Strong-Tie PC or BC series bases and caps) which resist both downward load and uplift from wind. The advantage is zero attachment to the house and simpler permitting in some jurisdictions. The downside is cost, typically 20 to 30 percent more material, and the gap between the roof and the house wall, which needs a separate weather flashing or trim treatment to prevent water intrusion.
| Attachment Method | Best For | Pros | Cons |
|---|---|---|---|
| Ledger board | Wood-framed houses with accessible rim joist | Fewest posts, lower cost, strong connection | Critical flashing required; can't use on masonry veneer or EIFS |
| Beam-and-post (attached) | Houses with problematic walls or brick veneer | Flexible, adaptable, no wall penetrations | More posts and footings, more framing complexity |
| Free-standing | Any situation; rental properties; future flexibility | No house attachment needed, movable concept | Higher material cost, gap flashing needed at house wall |
Structural considerations: footings, posts, beams, rafters, and flashing
Footings and foundations
Every post carrying roof load needs a footing, a concrete pad or cylinder dug below the frost line and sized for the load it carries. The IRC requires deck footings to be placed no less than 12 inches below undisturbed ground, and below the local frost depth where applicable (this is why someone in Minnesota needs footings at 42 inches while someone in Phoenix can go 12 inches). The American Wood Council's DCA-6 guide gives prescriptive footing sizes for common situations: as an example, for a 6x6 post with a joist span of roughly 10 feet and a beam span of 10 feet or less, the table calls for a round footing approximately 23 inches in diameter (or a 20x20-inch square footing) with a 9-inch thickness, assuming 1,500 psf soil bearing capacity and 2,500 psi concrete. If your soil is soft clay or fill, those numbers go up, have a soil assessment done or use larger footings conservatively.
Posts
For residential patio covers, 4x4 posts are adequate for heights up to about 8 feet with modest loads, but 6x6 posts are the better choice for anything over 8 feet or for structures in moderate wind zones. Posts should be set on post bases (Simpson ABA or equivalent) that keep the wood off the concrete and allow for air circulation, a post set directly in concrete will rot at the concrete line within ten to fifteen years even with pressure-treated material. In high-wind zones, your post base selection matters: hurricane-rated uplift connections (like the Strong-Wall or HPAHD series) are often required. Space posts no more than 8 to 10 feet apart for typical 4x6 or 4x8 beam spans; wider spacing requires larger beams.
Beams and joists
Beams carry the load from rafters or joists and transfer it to posts. A common DIY approach is to build up beams from doubled or tripled 2x lumber (e.g., three 2x10s nailed together for spans up to about 14 feet depending on species and spacing). Engineered lumber, LVL (laminated veneer lumber) or PSL (parallel strand lumber), can span further with less depth and is worth considering for spans over 12 feet or where headroom is tight. Always use the manufacturer's span table for engineered products (Weyerhaeuser, LP, Boise Cascade each publish their own values, and they're not interchangeable). For wood decking or rafter spans, the APA and AWC both publish span tables as well.
Rafters and roof framing
Rafters for a patio cover roof are typically spaced 16 or 24 inches on center depending on roofing material and load. For shingle-covered roofs with plywood or OSB sheathing, 16-inch spacing with 2x6 rafters typically handles spans up to 12 to 14 feet. For metal panel roofs that span independently, you may be able to go wider, 24 inches or more, but check the metal manufacturer's span data. For open patio covers (like a pergola with polycarbonate panels), rafters are often more decorative and can be spaced 24 to 48 inches with appropriately sized members. Always use rafter hangers (like Simpson LUS series) at the ledger and beam connections rather than toenailing alone, toenails have very low resistance to lateral and uplift forces.
Flashing and water management
This is where most DIY patio covers fail over time. Where your new roof meets the house wall, water will find any gap and get behind the siding. The correct approach: install continuous step flashing behind the siding at the roof-to-wall intersection, a counterflashing or apron flashing over the ledger, and seal every penetration with roofing caulk rated for exterior use. For a lean-to roof, the highest point of the rafter is at or near the house wall, this is your most vulnerable spot. If you're matching existing asphalt shingles, the new flashing should tuck under the existing siding course above and over the new roofing below. Don't rely on caulk alone without mechanical flashing, it will fail within three to five years.
Span and load spacing guide
The tables below are illustrative examples to show you how span and spacing decisions work together. They are not substitutes for your local code, the AWC DCA-6 prescriptive guide, or an engineer's calculations. Use these to get your design in the right ballpark, then verify against your local requirements and the specific lumber species and grade you're using. When your spans exceed what prescriptive tables cover, roughly 18 feet for beams in the DCA-6 guide, consult a licensed structural engineer.
Typical rafter spans for common lumber sizes (illustrative)
| Rafter Size | Spacing | Typical Max Span (light roof load) | Notes |
|---|---|---|---|
| 2x6 | 16" o.c. | 10–12 ft | Standard for shingle or metal roofs |
| 2x6 | 24" o.c. | 8–10 ft | Reduce span for heavier loads |
| 2x8 | 16" o.c. | 13–16 ft | Better for longer lean-to designs |
| 2x8 | 24" o.c. | 11–13 ft | Verify with species-specific tables |
| 2x10 | 16" o.c. | 16–18 ft | Approaching prescriptive limit; check code |
| 2x10 | 24" o.c. | 14–16 ft | Consider engineer review at upper end |
Typical beam spans for built-up lumber beams (illustrative)
| Beam Size | Post Spacing | Typical Supported Rafter Span | Notes |
|---|---|---|---|
| (2) 2x8 | 8 ft | Up to 10 ft | Works for modest 16-ft wide covers |
| (3) 2x10 | 8–10 ft | Up to 12 ft | Common for 20-ft wide attached covers |
| (2) 2x12 | 10 ft | Up to 12 ft | Good for 20x20 outer beam |
| (3) 2x12 | 10–12 ft | Up to 14 ft | Upper end of prescriptive range |
| 4x8 or 4x10 solid sawn | 8 ft | Up to 12 ft | Species and grade dependent |
| LVL 3.5"x11.25" | 10–14 ft | Up to 16–18 ft | Use manufacturer span tables |
A practical way to read these tables: for a 20-foot-wide lean-to, your outer beam needs to span between posts on the far side. If you space posts 10 feet apart, a tripled 2x10 or 2x12 beam is in the right territory. Your rafters then span from the ledger at the house to that outer beam, roughly 12 to 16 feet depending on how far out the cover extends. A 2x8 at 16 inches on center handles a 14-foot rafter span comfortably under most light-to-moderate load conditions. When in doubt, go up one size, the material cost difference between a 2x8 and 2x10 is small, and the safety margin it buys is real. For anything in a high-wind, high-snow, or seismic zone, treat these numbers as starting points only and get an engineer's input.
Step-by-step build sequence
Lean-to (attached shed-roof) patio cover
- Pull your permit and have approved plans on site before breaking ground.
- Mark footing locations using batter boards and string lines; call 811 and confirm no utilities are in the way.
- Dig footing holes to required depth (frost line plus 6 inches minimum); set tube forms.
- Install post bases (Simpson ABA or equivalent) centered in the form before pouring; use a level and let concrete cure 24–48 hours before loading.
- Set posts: plumb each one in two directions, brace temporarily with diagonal braces staked to the ground.
- Install the ledger board on the house: strip siding, install Z-flashing and through-wall flashing, then bolt the ledger to the rim joist using structural lag screws or through-bolts at code-specified spacing.
- Set the outer beam on top of the posts using post caps; check level across the full beam span.
- Cut and install rafters: set the bird's mouth cut at the outer beam, hang the top end in rafter hangers at the ledger; nail hurricane ties at each rafter-to-beam connection.
- Install blocking between rafters at the beam and ledger ends for lateral stability.
- Install roof sheathing (OSB or plywood), roofing underlayment, and finish roofing (shingles, metal panels, or polycarbonate).
- Flash the roof-to-wall intersection: step flash behind siding, apron flash at the ledger, caulk all penetrations.
- Install fascia, gutters, and downspouts; check water flows away from the house.
- Schedule framing and final inspections as required by your permit.
Gable roof patio cover (attached)
A gable roof follows the same footing, post, and ledger steps as the lean-to, with these additions: you'll set a ridge beam at the center of the roof span, supported either by a structural post at the outer end or by engineered hangers at the house wall. Rafters run from the ledger up to the ridge on one side, and from the outer beam up to the ridge on the other side. The outer gable end needs a structural header or end rafter to close out the triangle. Gable end framing (the triangular wall section) can be left open for an airy look or sheathed and sided to match the house. The flashing at the gable-to-house-wall intersection is more involved than a simple shed roof, plan for step flashing and potentially a cricket (a small diverter) if the gable intersects a chimney or wide wall section.
Free-standing patio cover
Free-standing builds follow the same footing and post sequence, but you install post bases and posts on all four corners (and intermediate points for larger spans). All beams are structural, there's no ledger. The roof framing options are the same as above. The critical difference is that all lateral stability has to come from the structure itself: posts must be rigidly connected to beams with moment-resisting connections (like knee braces or structural post caps rated for moment), or the roof sheathing and rigid diaphragm action provides it. For open pergola-style free-standing covers, knee braces at each post-to-beam connection are the standard approach.
20x20 covered patio: a worked example
A 20x20 foot attached lean-to cover is one of the most common DIY builds and a good size to plan around. For step-by-step plans and a detailed material list, see how to build a 20x20 patio cover. Here's what a typical material list and timeline looks like. This assumes pressure-treated lumber framing, a metal panel roof, and a concrete footing system with surface-mounted post bases.
Approximate material list for a 20x20 PT lumber lean-to
| Item | Size / Spec | Approximate Quantity |
|---|---|---|
| Ledger board | 2x10 PT, 20 ft | 1 piece |
| Outer beam (built-up) | 3x 2x12 PT, 20 ft | 3 pieces |
| Rafters | 2x8 PT, 14 ft (approx) | 16 pieces at 16" o.c. |
| Posts | 6x6 PT, 10 ft | 4 pieces (2 per side if beam-and-post) |
| Ridge blocking / blocking | 2x8 PT, cut pieces | ~20 linear ft |
| Post bases | Simpson ABA66 or equivalent | 4 |
| Rafter hangers | Simpson LUS28 or equivalent | 16–18 |
| Hurricane ties | Simpson H2.5A or equivalent | 16–18 |
| Structural lag screws | 1/2"x4" HDG | ~30 (ledger) |
| Z-flashing / step flashing | Galvanized, 20 ft continuous + step | 1 coil + step units |
| Roofing (metal panels) | 26-gauge corrugated or R-panel | ~450 sq ft (with overlap) |
| Roofing underlayment | Synthetic, 30 lb equivalent | 1 square |
| Concrete (fast-set) | 60-lb bags | 8–12 bags (2–3 per footing) |
| Tube forms | 10–12" diameter, 36" length | 4 |
| Fascia board | 2x6 or 1x8 cedar/PT, 20 ft | 2 pieces |
| Misc hardware and fasteners | Joist hanger nails, structural screws | Assorted ~$150–$250 |
Total estimated materials for this configuration run roughly $2,800 to $4,500 depending on lumber prices in your region, metal panel brand, and hardware choices. Add $300 to $500 for permit fees and inspection costs. Labor time for an experienced DIYer with one helper: three to four full weekends, with the footing cure time adding a mandatory wait between weekend one and weekend two.
Tools you'll need
- Circular saw (and ideally a miter saw for rafter cuts)
- Drill/driver and impact driver
- Post hole digger or rented power auger
- Level (4-foot minimum) and plumb bob or laser level
- Chalk line and tape measure
- Framing square (for laying out rafter cuts and bird's mouths)
- Ladder (8-foot and extension)
- Roof jacks or roof brackets if working on a pitched surface
- Safety glasses, work gloves, hard hat for overhead work
- Tin snips for metal roofing
- Caulking gun and exterior-rated caulk
How to sketch your own plans
Your building department will need a site plan and framing plan at minimum. You don't need CAD software for a standard residential patio cover, graph paper or a free tool like SketchUp Free, Floorplanner, or even Google Slides works fine. For a step-by-step walkthrough and detailed tips on how to build a backyard patio cover, see our complete guide on how to build a backyard patio cover. Here's what to include on each drawing.
Site plan (view from above)
- Property lines with dimensions and north arrow
- House footprint with dimensions
- Proposed patio cover outline with overall dimensions (e.g., 20 ft x 20 ft)
- Distance from patio cover to all property lines (setbacks)
- Location of any utility easements, downspouts, or existing structures
- Scale notation (e.g., 1 inch = 10 feet)
Framing plan (structural overhead view)
- Post locations with footing sizes noted
- Beam sizes and span dimensions
- Rafter sizes, spacing, and span dimensions
- Ledger board size and attachment note
- Ridge beam if applicable
- All member sizes called out (e.g., '(3) 2x12 PT beam', '2x8 PT rafters at 16" o.c.')
Section/elevation detail
- Side-view cross-section showing post height, beam height, rafter slope, and roof pitch (e.g., '3:12 pitch')
- Footing depth below grade
- Ledger attachment detail (flashing, fastener type, size, and spacing)
- Post base detail (post base model number and concrete footing dimensions)
Keep your drawings clear and dimensioned. Inspectors aren't looking for architectural drawings, they're looking for enough information to verify that what you're building meets code for your site. Label every member size and every connection. If your plan calls for spans at or near the limits of prescriptive tables, note the reference you used (e.g., 'per AWC DCA-6 Table 4'). More depth on drawing and planning is covered in a dedicated guide on how to draw patio cover plans.
Safety practices worth taking seriously
Working at height is the biggest risk in this project. Most serious injuries happen on ladders or when carrying materials onto a roof. Use a ladder standoff bracket so the ladder doesn't rest against the gutter; always have a second person footing the ladder; never overreach, move the ladder instead. When installing rafters, use roof jacks and planks to create a safe working platform rather than standing on the rafters themselves. For anything steeper than a 4:12 pitch, fall protection (a roof anchor and harness) is worth the rental cost.
Working around the ledger attachment also puts you in close proximity to the house's electrical service entry, hose bibs, and dryer vents, locate all of these before you start cutting siding. Pressure-treated lumber produces toxic sawdust; wear an N95 mask when cutting it and keep scrap and sawdust out of burn piles. For any concrete work, use gloves, wet concrete is highly alkaline and causes skin burns with prolonged contact.
Maintenance after the build
The most important annual maintenance task is checking the ledger flashing and any roof-to-wall intersection for signs of water infiltration, discoloration, soft wood, or mold at the house wall inside or out. Check that gutters aren't backing up and causing water to pond at the roof edge. For wood structures, inspect stain or sealant condition every two years and recoat before the finish fails entirely rather than after, it's dramatically easier to recoat a sound surface than to strip and refinish weathered wood. Tighten any visible hardware annually: post base bolts and rafter hangers can loosen from thermal cycling. For metal panel roofs, check exposed fasteners (if used) for backing out and recheck sealant at panel laps.
When to hire a pro instead of DIYing
Be honest with yourself about where the project is. The structural framing, ledger attachment, and footing work are learnable skills, but they have real consequences if done wrong. Consider hiring a structural engineer (not the full contractor, just the engineering review) when your spans exceed prescriptive limits, you're in a high-wind or high-snow zone, or the building department asks for stamped calculations. Consider hiring a licensed contractor for the entire project if: your house wall is masonry or EIFS and the attachment method is unclear; you're in a jurisdiction with complex plan-check requirements (some large metro areas with strict seismic or WUI fire codes, like Austin's land development code amendments, add layers that benefit from professional navigation); or if the roof height puts you consistently above 10 feet working at the wall. You can also split the work: hire a framer for one to two days to set posts and beams correctly, then complete the roofing and trim work yourself. That approach gets the structural-critical portion done right while keeping the overall cost manageable.
Permits exist for a reason, and inspectors aren't adversaries, they're a free structural review of your work. Pull the permit, do the inspections, and you'll have a record that the structure was built to code. That matters for homeowner's insurance and for resale. A covered patio added without permits is a liability that follows the property, not just the current owner.
FAQ
What are the first planning steps before building a covered patio attached to my house?
Start with site assessment (clearances to property lines, utilities, drainage, high/low spots, tree canopy). Determine local design constraints (HOA rules, easements, setbacks). Find your home’s wall construction (stud spacing, sheathing, brick, stucco) to plan ledger or attachment. Lookup local climatic criteria (design wind speed, snow loads, and frost depth) from your jurisdiction or ASCE/IRC references. Prepare a preliminary sketch showing patio footprint, roof type, roof slope, and any roof drains/gutters. Finally, estimate budget, desired materials, and whether you’ll use prescriptive code options or need engineered designs.
When do I need a building permit and what will the permit reviewer want?
Most U.S. jurisdictions require permits for new or attached patio covers; many also require permits for substantial attached covers even if open on the sides. Permit packets commonly require a site plan, framing/roof plan, footing details, ledger/attachment details, and structural calculations when spans or loads exceed prescriptive limits. Local code amendments (fire/WUI rules, flood zones) can add restrictions. Check your municipal building department submittal checklist early—many cities post a 'patio cover/deck/pergola' packet with required drawings and special conditions.
How do I decide whether to use prescriptive plans or an engineered design?
Use prescriptive (code/industry guide) plans if your project falls within published limits (span/footing/post sizes in guides like AWC DCA‑6 or IRC R507) and local jurisdiction accepts prescriptive packets. You need engineered design when spans/loads exceed prescriptive tables, when unusual site conditions exist (weak soils, high wind/seismic zones), for complex roof framing, or when the inspector requires calculations. If in doubt, get a structural engineer or a permit-ready stamped plan.
Which materials should I consider for framing and roofing, and what are the pros/cons?
Framing: - Pressure‑treated timber (common, cost‑effective, easy to work) — pros: workability, cost; cons: maintenance, durability near ground, corrosion with fasteners (use hot‑dip galvanized/stainless). - Engineered lumber (LVL/glulam/PSL) — pros: high strength, longer spans, smaller members; cons: higher cost, limited home‑workability. - Aluminum/steel posts and rafters — pros: low maintenance, durable, slim profiles; cons: thermal expansion, potentially higher cost, different fasteners/attachment details. Roofing: - Asphalt shingles — matches house roof, durable, heavier (requires framing for loads), needs proper flashing with ledger. - Metal panels (standing seam/galvalume) — lightweight, durable, good for modern look; requires condensation control and proper purlin spacing. - Polycarbonate or corrugated plastic — lightweight, transmits light, less insulating, may age/ scratch. - Composite panels or insulated panels — higher-end, better insulation and durability but higher cost. Consider roof load, desired light/opacity, compatibility with house roofline, and local fire/WUI rules.
What are typical attachment methods for an attached patio cover, and what are the key risks?
Common attachment methods: 1) Ledger board attached to house framing (lean‑to/attached): requires removal of siding/veneer, through‑bolts or structural ledger screws, continuous corrosion‑resistant flashing, and confirmation you’re fastening into structural members (not solely veneer). Ledger failures are a common collapse cause, so follow IRC/AWC fastening schedules and manufacturer guidance. 2) Beam‑and‑post connected to house (bearing beam bearing on posts that sit on footings, but tied to house for stability): reduces ledger loads but requires careful connection for lateral loads and potential roof tie‑ins. 3) Free‑standing patio cover (detached): no ledger, posts/footings carry all loads — often easier for permiting if attachment to house is not allowed. Always use approved fasteners and flashing and follow local code.
What structural considerations and basic span/footing guidance do I need to plan?
Design for code loads: dead load, live/load from occupancy or snow, wind and seismic per IRC/ASCE. Use local values for snow/wind/frost depth. Follow prescriptive tables where allowed (e.g., AWC DCA‑6, IRC R507) for post sizes, beam spans, joist/rafter spans, and footing diameters. Typical guidance: 4×4 posts are limited in load capacity and often replaced by 6×6 or metal columns for 12'+ spans; footings are sized per soil bearing (many tables assume 1,500 psf) — e.g., for common 6×6 posts a square 20