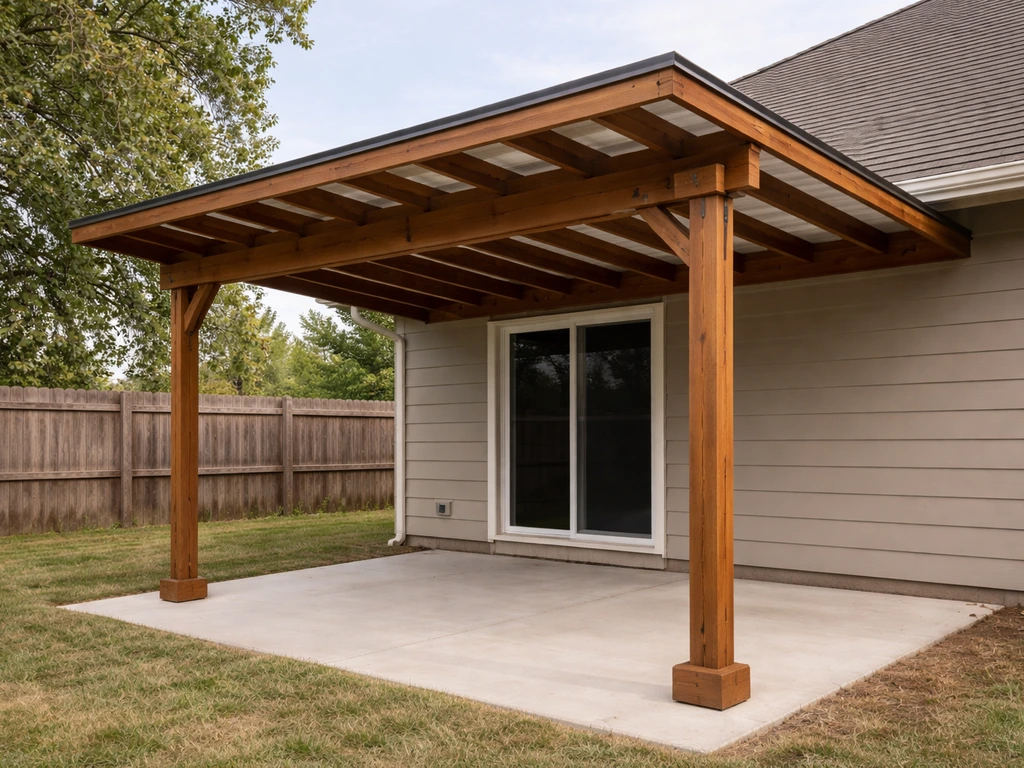
You can build a backyard patio cover yourself in a weekend or two, depending on size and style. If you want full DIY covered patio building plans, use the same lean-to approach and measurements outlined above to guide your layout, materials, and framing steps. The most practical approach for most homeowners is a lean-to (also called an attached patio cover), where one side ties into the house via a ledger board and the other side rests on posts set in the ground. It's the simplest structure to build, the easiest to permit, and still gives you a solid, attractive covered patio that lasts decades when done right.
How to Build a Backyard Patio Cover Step by Step

Celia Vaughn
30 Jun 2026
Pick the right style before you do anything else
The style you choose determines everything else: how many posts you need, whether you attach to the house, how complicated the roof framing gets, and how long the build takes. There are three main types worth knowing.
- Lean-to (attached): One side bolts to the house with a ledger board, the other side sits on posts. This is the most popular DIY backyard patio cover because it's structurally efficient, shares one wall with the house, and is straightforward to permit. Ideal for most rectangular back patios.
- Gable (attached or freestanding): Has a peaked roof with two slopes meeting at a ridge. Looks more architectural, handles rain and snow shedding better, but requires ridge beam framing and more cutting. A good step up in difficulty from a lean-to.
- Freestanding: Stands completely on its own four or more posts with no attachment to the house. Required when you can't or don't want to attach to the house wall, or when your patio is set away from the structure. More posts, more footings, slightly more work but also more flexible in placement.
For most people reading this, the lean-to is the right call. If you're dreaming of something bigger or more elaborate, like a full 20x20 covered patio or a luxury build with tongue-and-groove ceilings and ceiling fans, those are worth exploring as separate projects once you understand the fundamentals here. If you're aiming for a luxury patio cover, the same fundamentals apply, but you’ll want to plan for premium finishes and enhanced ceiling or shading details. But if your goal is to get shade and weather protection over your back patio without overcomplicating it, start with the lean-to.
Plan it out and take good measurements
Measure the patio area you want to cover, then add about 12 inches on each open side if you want the roof to overhang the edge. A typical DIY backyard patio cover runs somewhere between 10x12 feet and 16x20 feet. For a 20x20 patio cover specifically, you will want to plan for larger span lengths and verify beam and post spacing in your building plans 16x20 feet. Anything larger starts to push into territory where you really should draw formal plans, and you'll want to look at dedicated patio cover building plans to make sure your post spacing and beam sizing are right.
Sketch your layout on paper with these measurements noted: the total width and depth of the cover, the height at the house wall (called the ledger height), the height at the outer posts, and the resulting roof pitch. A minimum pitch of 1/4 inch per foot is needed to drain water. Most lean-tos look best and drain best with a pitch between 2/12 and 3/12 (meaning the roof drops 2 to 3 inches for every 12 inches of horizontal run). For a 12-foot deep cover with a 3/12 pitch, your outer posts will be about 3 inches shorter than your ledger height.
Mark post locations on the ground using stakes and string. For a standard lean-to, posts typically go at the outer corners, plus one intermediate post every 8 to 10 feet along the front beam if your span is wider than 10 feet. Dig footing holes at those marks before you do anything structural. Most codes require footings to extend below the frost line, which varies by region, so check with your local building department.
Key measurements to write down before you buy anything
- Total width of the cover (parallel to the house wall)
- Total depth of the cover (how far it extends from the house)
- Ledger height: the height at which the ledger board attaches to the house, measured from the finished patio surface
- Outer post height: ledger height minus the pitch drop
- Post spacing along the beam (aim for 8 feet maximum between posts for most lumber sizes)
- Rafter spacing (16 inches on center is standard for most roofing materials; 24 inches works for heavier panels)
Choose your materials: wood, aluminum, or metal
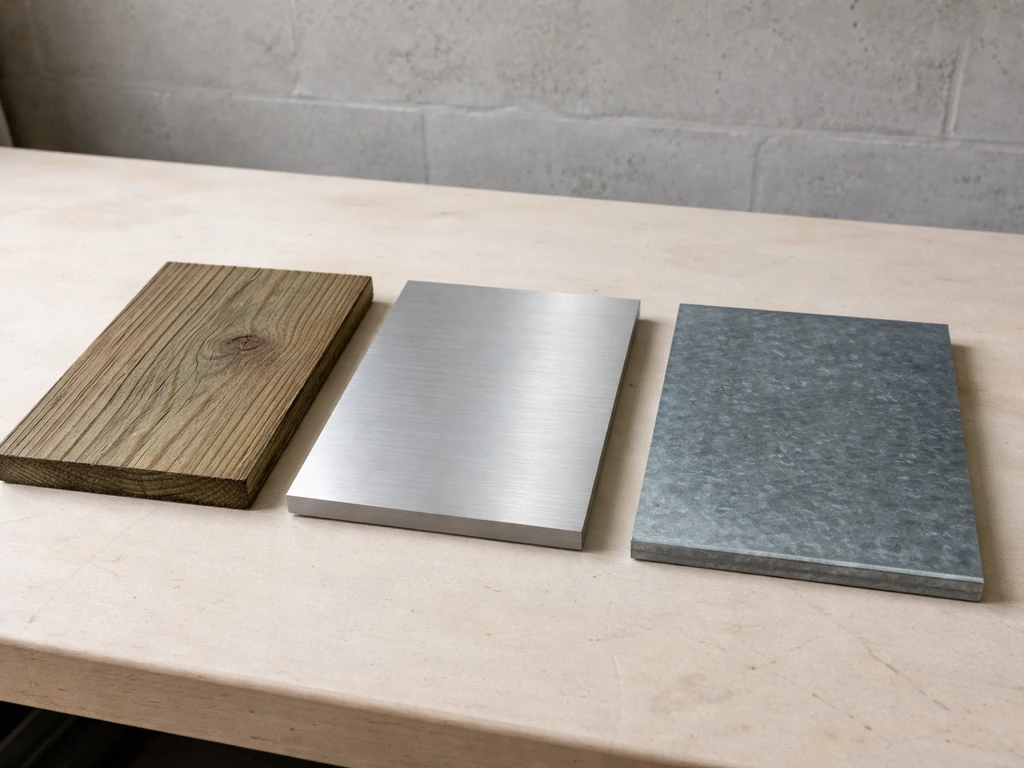
This is where a lot of homeowners stall. Here's a plain comparison so you can move forward.
| Material | Cost (rough range) | Durability | DIY Difficulty | Best For |
|---|---|---|---|---|
| Pressure-treated wood | $15–$25 per linear foot installed | 15–30 years with maintenance | Beginner-friendly | Budget builds, traditional looks, easy cutting and fastening |
| Cedar or redwood | $20–$35 per linear foot installed | 20–40 years, naturally rot-resistant | Beginner-friendly | Better aesthetics, natural resistance without treatment |
| Aluminum (kit or custom) | $30–$60 per linear foot installed | 40+ years, no rot or rust | Moderate (kit) / Harder (custom) | Low maintenance, clean modern look, coastal or wet climates |
| Steel / metal framing | $25–$50 per linear foot installed | 30–50+ years with proper coating | Moderate to difficult | Long spans, heavy roof loads, commercial-style builds |
For a first DIY backyard patio cover, pressure-treated lumber is the most forgiving. It's available at any home center, easy to cut and fasten, and mistakes are cheap to correct. If you live somewhere humid, near saltwater, or you simply don't want to paint or seal anything every few years, aluminum kits are worth the higher upfront cost. You bolt them together with included hardware, and they come with pre-engineered sizing charts so you skip a lot of the structural guesswork.
For the roof covering itself, your main options are polycarbonate panels (translucent, lets in light, affordable), corrugated metal panels (durable, classic, fast to install), asphalt shingles (matches the house, heavier, requires solid sheathing), or a louvered aluminum system if you want adjustable shade. Polycarbonate and corrugated metal are the easiest for a DIYer to install quickly and correctly.
Structural basics and how to attach it properly
This is the part most online guides gloss over, and it's where problems happen. An attached patio cover has to be designed to handle dead load (the weight of the structure itself) plus a live load. The International Residential Code's Appendix H, which governs patio covers specifically, requires a minimum vertical live load of 10 pounds per square foot (psf). In snow country, that number goes up, sometimes significantly. Bozeman, Montana, for example, uses a roof snow load of 41 psf as a design input. Point being: your cover has to be engineered for where you live, not just built to look sturdy.
Wind loads are the other big factor. The IRC specifies wind load requirements based on your local basic wind speed and your site's exposure category (is it open, suburban, or sheltered?). Coastal areas or open plains with high wind speeds need heavier framing and more robust fasteners than a sheltered backyard in a low-wind zone. If you're unsure what your local design loads are, your building department can tell you in about five minutes, or you can look them up in the IRC wind tables using your county.
Ledger attachment (for attached covers)
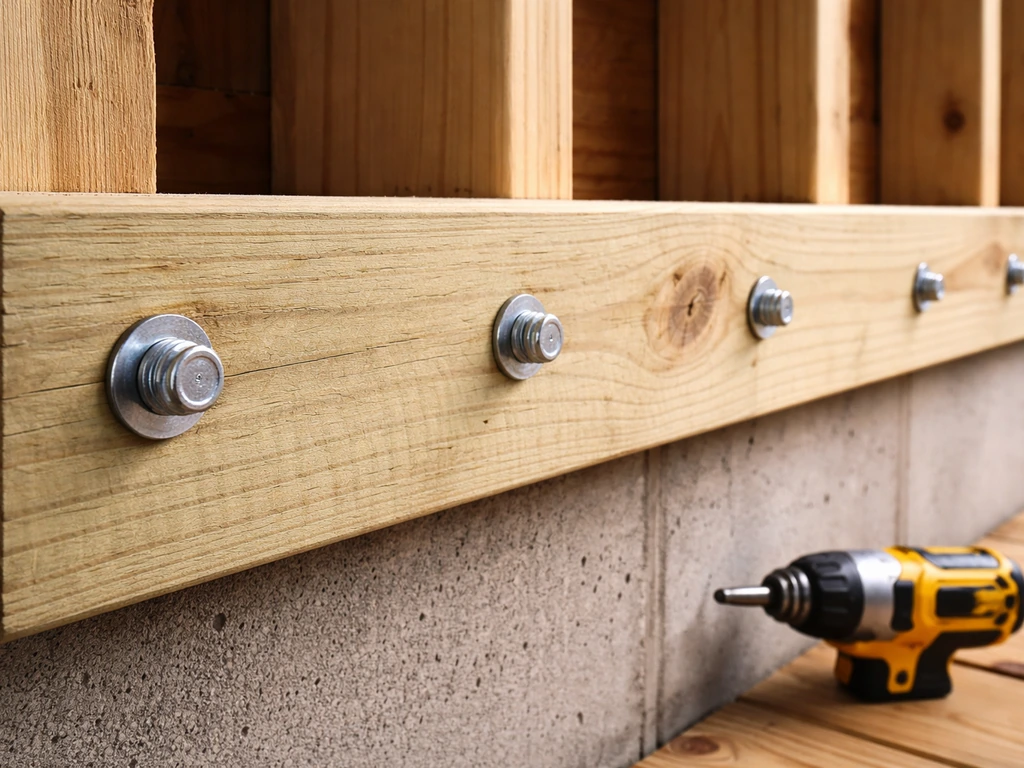
The ledger board is a horizontal 2x8 or 2x10 that bolts directly to the house's rim joist or wall framing. This is the most structurally critical connection in the whole build. Common mistake: people lag-screw a ledger into siding or sheathing without hitting the actual framing behind it, and the whole thing pulls away from the house under load.
Always locate the rim joist or wall studs with a stud finder, remove or cut back the siding so the ledger sits against the house sheathing or directly on the framing, install flashing above the ledger to direct water away from the wall, and use 1/2-inch lag screws or structural bolts into framing at 16-inch intervals. This isn't optional. A poorly attached ledger is a collapse waiting to happen.
Posts and footings
Posts for a residential patio cover are typically 4x4 for smaller structures (up to about 8 feet tall and 10 feet of tributary width) or 6x6 for larger ones. Each post sits on a concrete footing poured in a tube form below the frost line. Standard footing diameter is 10 to 12 inches. Pour the footing, set a post base anchor in the wet concrete so the post never sits directly in the dirt (rot prevention), and let it cure 24 to 48 hours before setting posts. Posts connect to beams at the top using post caps or notched connections.
Beam and rafter sizing
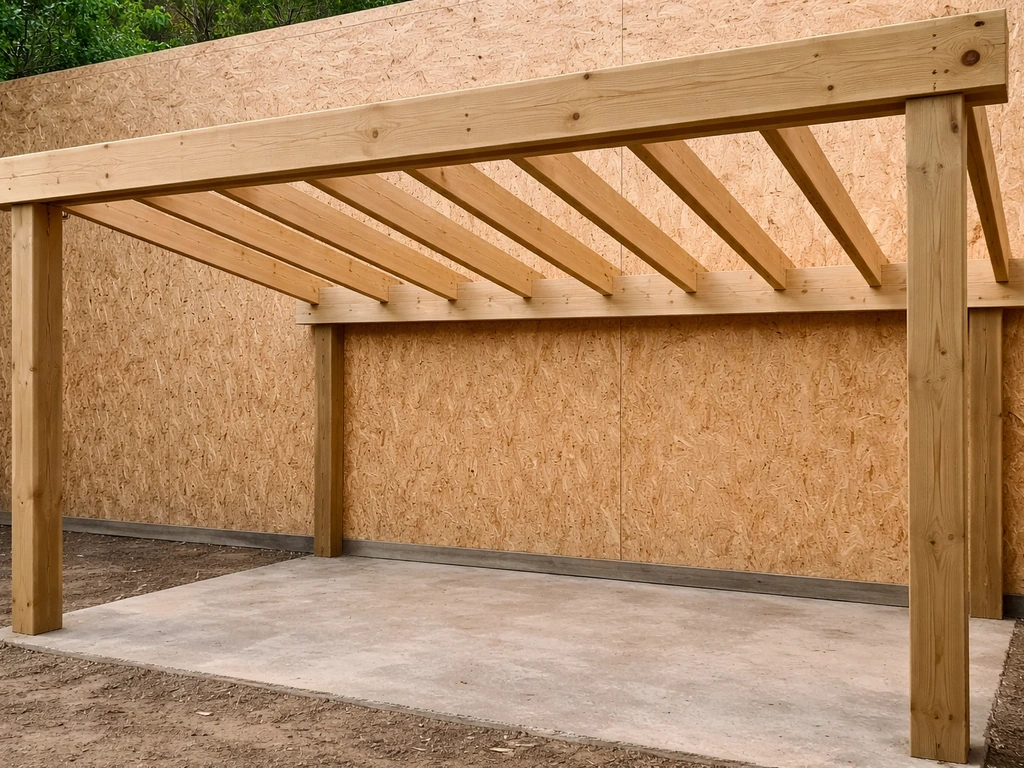
For a lean-to, the front beam runs horizontally across the tops of your outer posts, parallel to the house. Rafters then span from the ledger to the beam. A general rule for wood rafters spaced 16 inches on center: a 2x6 can span up to about 10 feet, a 2x8 up to about 14 feet, and a 2x10 up to about 18 feet, depending on load. If you're using aluminum or following a kit's specs, use the manufacturer's span tables. Don't guess on beam sizing; undersized beams sag and can fail.
The build sequence, step by step
Here's the order of operations for a standard attached lean-to patio cover. Don't skip steps or reorder them; each one sets up the next.
- Pull your permit. Submit your plan (even a hand-drawn sketch with dimensions works in many jurisdictions) to the building department and get approval before you dig. This usually takes 1 to 3 days online or up to 2 weeks in person at busy offices.
- Mark and dig footing holes. Use your layout strings to find post locations, dig below the frost line (call 811 first to have utilities marked), and pour concrete in tube forms. Set post base anchors while the concrete is wet. Let cure 24–48 hours.
- Attach the ledger board. Locate the rim joist, cut back siding if needed, install flashing, and bolt the ledger with 1/2-inch lag screws into framing every 16 inches. Double-check level before finalizing.
- Set and plumb the posts. Drop posts into the post base hardware, plumb them with a level on two adjacent faces, and brace them temporarily with 2x4 braces staked into the ground. Don't attach permanently until the beam is on.
- Install the beam. Lift the beam (you need at least one helper here) onto the post caps or notches at the top of each post. Fasten with structural screws or through-bolts. Check that the beam is level before fastening permanently.
- Install the rafters. Mark rafter layout (16 or 24 inches on center) on both the ledger and the beam. Cut rafters to length with the correct bevel at the top end to match your roof pitch. Use rafter hangers on the ledger end and toe-nail or use hardware at the beam end. Install a bird's mouth cut or notch where rafters sit on the beam if your design calls for it.
- Add blocking and bracing. Install blocking between the first and last rafters at the beam end to keep rafters plumb and prevent rotation. Add knee bracing from posts to the beam at 45 degrees if required by your plan or if the structure feels racked.
- Install roof sheathing or purlins. For solid sheathing (asphalt shingles), run 1/2-inch plywood or OSB across the rafters. For corrugated metal or polycarbonate panels, install 2x4 purlins perpendicular to the rafters at the spacing required by your panel product.
- Install roofing material. Start at the lower edge and work up. For metal panels, overlap corrugations and use the correct self-sealing screws. For polycarbonate, seal the open end channels with tape and use pre-drilled holes to avoid cracking. For shingles, follow standard starter course and exposure rules.
- Flash where the roof meets the house. This step gets skipped more than almost any other, and it's the number one cause of water damage. Install step flashing along the house wall where it meets the roof surface, then cover with counter flashing tucked into the siding or into a reglet cut in the wall. Caulk with a paintable polyurethane sealant rated for exterior use.
- Schedule your inspection. Call the building department for a framing inspection before you close anything in, and a final inspection once the roofing is complete.
Permits, inspections, and when to stop DIYing
Most jurisdictions require a permit for any permanent patio cover that attaches to the house. Even freestanding covers over a certain square footage (often 200 square feet) typically need permits. The permit process isn't just bureaucratic overhead. The inspector is checking that your ledger connection is solid, your footings are deep enough, and your framing can actually handle the loads for your area. If you skip the permit and something fails, your homeowner's insurance may deny the claim. It's also a problem when you go to sell the house.
What to bring to the permit office: a site plan showing the patio cover location relative to property lines and the house, a framing plan with dimensions and member sizes, and the proposed roof material. In many areas you can submit digitally. The review takes anywhere from 2 business days to 4 weeks depending on the jurisdiction's workload. Budget for it in your timeline.
Here's when to seriously consider hiring a structural engineer or a contractor instead of going fully DIY: if your span exceeds 20 feet, if you're in a high-snow or high-wind zone and you're not confident calculating loads, if you're attaching to a house that has had previous water damage or structural issues, if your soil is expansive clay or has poor bearing capacity, or if your HOA or local code requires stamped engineered drawings. Getting a one-hour consult with a structural engineer (typically $150 to $300) can save you from a very expensive mistake or a failed inspection.
What it costs and how long it takes
A DIY lean-to patio cover in pressure-treated wood with corrugated metal roofing typically runs $1,500 to $4,000 in materials for a 12x16-foot structure, depending on local lumber prices, hardware, and roof material. Aluminum kit systems for the same size usually cost $3,000 to $7,000 in materials, but they go up faster and require less skill. If you hire a contractor to do the same wood build, expect $6,000 to $12,000 or more, depending on your region. The DIY savings are real and significant.
Timeline for a solo or two-person DIY build: allow one day for layout and footing work, one to two days for framing (ledger, posts, beam, rafters), and one day for roofing and flashing. Add time for concrete curing (2 days minimum before loading the footings) and permit wait time at the start. A realistic total is two weekends of active work, spread over two to three weeks once you account for curing and inspection scheduling. Don't try to rush the concrete cure or skip the framing inspection. Those are the two shortcuts that create real problems.
Common mistakes and how to avoid them

- Attaching the ledger to siding or sheathing only: Always bolt into the house framing. Remove siding behind the ledger and install proper flashing.
- Skipping the bird's mouth or rafter seat cut: Without a proper bearing point at the beam, rafters can split or slide. Take time to cut this correctly.
- Setting posts directly in concrete without a post base: Direct ground contact causes rot within 5 to 10 years even with treated lumber. Always use a post base anchor.
- Undersizing the beam: When in doubt, go up a size. A 4x8 beam that sags under snow load is a failure. Use span tables, not guesses.
- Not flashing the roof-to-wall joint: This single omission causes more water damage than any other patio cover mistake. Don't skip it.
- Building without a permit and then having to tear it down: It happens more than you'd think. Pull the permit first.
- Over-spacing rafters for the roof material: Polycarbonate panels especially will sag or crack if rafter spacing exceeds the panel manufacturer's recommendation. Read the spec sheet.
Your next steps starting today
If you want to start today, do these three things: measure your patio and sketch your layout with dimensions, call or visit your local building department online to find out what permit paperwork they require for a patio cover, and choose your material (wood for budget and ease, aluminum for longevity and low maintenance). Once you have those three things locked in, you have everything you need to buy materials, pull the permit, and start digging footings.
The actual build is straightforward once the planning is done. Once you have your measurements and style picked, you can use them to guide your own patio cover drawings and how to draw patio cover plans for your specific size and materials. Most of the projects that stall out do so before the first hole is dug, not during the framing.
If you're thinking bigger, like a full covered patio built off the side of the house, or you want to explore detailed pre-drawn plans before committing to a design, those are great next steps to research once you've got your basic measurements and material choice settled. Getting the fundamentals right on this build makes every variation easier to tackle.
FAQ
Do I need a permit even for a small attached patio cover, and what usually triggers the requirement?
Often yes, because attached covers affect the house connection and structural loads. Permits commonly apply when the cover is permanently attached to the house, exceeds a certain square footage threshold, or changes roof/wall drainage and ledger attachments. If your project is under the square footage limit but still bolts to the rim joist, call your building department to confirm how they treat “attached” covers.
What’s the most common failure point, and how do I prevent it?
The ledger board connection to the house is the most common high-risk detail. Prevent problems by fastening into actual framing (rim joist or studs), not siding or sheathing, and by installing proper flashing above the ledger so water cannot wick into the wall. If you cannot reliably hit framing, it’s a sign to redesign the attachment method or stop and get guidance.
How do I choose the roof pitch if I’m trying to balance drainage and headroom?
Start with drainage first, then adjust aesthetics and clearance. A minimum of 1/4 inch per foot is required to drain, and lean-to roofs usually look and shed water best around 2/12 to 3/12. If you end up with limited headroom at the outer edge, consider a narrower cover width, using a different roof material thickness, or planning a slightly taller ledger height within code limits.
Can I build a patio cover using free-standing posts without attaching the roof to the house?
Yes, but the structure becomes more complex and often still needs permits, especially as size increases. Freestanding designs rely on post spacing, beam sizing, and footing loads without the ledger attachment, so your layout and engineering inputs still matter. If your goal is to reduce risk around the ledger, ask about a freestanding or independent attachment option with your local inspector.
How do I handle snow load and wind load if I’m not sure what region I’m in?
Use local design inputs, not general assumptions. Your building department can tell you the required snow and wind parameters, but if you look them up yourself, make sure you use the right exposure category (open, suburban, sheltered) and consider nearby obstacles. A mismatch of exposure category is a common mistake that can under-size framing.
What should I do about roof runoff, especially if water will hit a walkway or garden area?
Plan where the water will go before you lock in flashing and gutters. Without guidance, runoff can splash onto the foundation, create mud at the post line, or erode landscaping. If you install flashing, consider adding a simple gutter or directing discharge with downspouts to a safe drainage path, and ensure the runoff slope continues away from the house.
Is it okay to use cedar or other non-pressure-treated lumber for the posts and beams?
For exposed structural elements outdoors, pressure-treated lumber is the safest default because it resists rot and ground moisture. If you want a different wood species for appearance, it’s usually better as trim or non-structural cladding, while keeping posts or critical load paths pressure-treated or rated for exterior structural use.
How far below the frost line do my footings need to go, and what if I hit hard rock or utilities?
Footings generally must extend below the frost depth, which varies by region, so you need local guidance. If you encounter rock or utilities, you typically cannot just “shallow it and hope,” you may need an engineer to redesign footing size, type, or placement. For utilities, get marked and coordinate early, because relocating posts after framing can be expensive and can compromise load paths.
What roof materials are easiest to install on a DIY lean-to, and what’s the tradeoff?
Polycarbonate panels and corrugated metal panels are commonly the quickest for DIY because they install with straightforward layouts and are forgiving. The tradeoff is performance and appearance, for example polycarbonate can require careful fastening and compatibility checks, while corrugated metal may need specific underlayment and end-wall details to prevent leaks at seams and overlaps.
How do I prevent leaks at the ledger area and roof edges?
Two details matter most: proper flashing at the wall connection and correct edge sealing at roof ends and transitions. Install flashing so water is directed away from the house wall, not into the siding seam, and use the correct overlap order for your roofing type. Before closing everything in, do a dry-fit check and ensure no fasteners bypass flashing where they should be protected.
If my span is longer, do I just use bigger lumber, or do I need a different design?
You should not rely on “bigger is better” guessing. Longer spans usually require specific beam and post spacing changes, plus confirmation of rafters, deflection limits, and load capacity for your live load and snow and wind conditions. For spans beyond common DIY ranges (for example over 20 feet), plan on formal plans or a structural engineer review.
How should I space posts and rafters if my cover is wider than the typical 10-foot span?
Use your layout and span calculations, then verify spacing against your roof framing span tables or kit specs. As width increases, intermediate posts and correctly sized beams become necessary to prevent sag and excessive deflection. A practical approach is to decide rafters and spacing first based on your roof material, then place posts to support the beam where the loads demand it.
What’s the safest order of work if I want to avoid rework or failed inspections?
Plan for inspections, not just construction speed. Common safe sequencing is layout and footing excavation, pour and cure footings, install posts and beams, then rafters, then decking or sheathing as required, then roofing and flashing. Do not load or conceal work before required checks, especially the ledger attachment and footing depth and embedment.