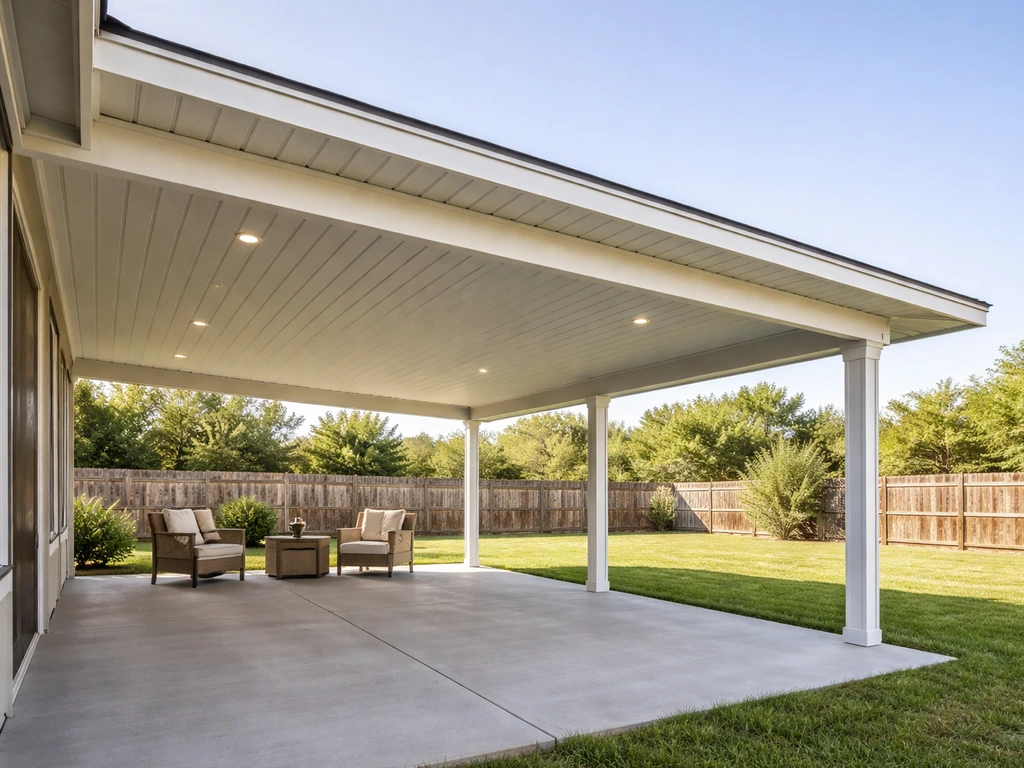
Building a 20x20 patio cover is a realistic DIY project for a motivated homeowner. You're covering 400 square feet of patio with a roof structure that needs proper footings, a sound frame, correct pitch for drainage, and attachment details that won't leak or pull away from the house. The full process runs about two to three weekends for an experienced DIYer, or three to five weekends if this is your first structural build.
How to Build a 20x20 Patio Cover: Step-by-Step DIY Guide

Celia Vaughn
11 Jun 2026
Here's how to do it right, from design through the final roofing panel. With the right do it yourself covered patio building plans, you can map out your measurements, materials, and construction steps before you start building. If you want to build with confidence, follow clear how to draw patio cover plans steps so your post spacing, slopes, and materials all match your design Here's how to do it right, from design through the final roofing panel..
Confirm your design before you touch a single board
The first real decision is whether your cover will be attached to the house or freestanding. An attached lean-to (also called a shed-roof or single-slope cover) is the most popular DIY choice for a 20x20 build because it shares a ledger with your house wall, which reduces the number of posts and simplifies the framing.
If you're deciding between attached and freestanding construction, learning how to build backyard patio cover layouts like a lean-to ledger connection can prevent most early DIY mistakes. When you decide on the attached option, you also need to plan the ledger height and flashing so the roof stays watertight where it meets your house attach a covered patio to your house.
A freestanding structure needs four corner posts at minimum and often interior posts depending on beam span, but it gives you more placement flexibility and avoids the ledger attachment headache entirely.
After that, settle on your roof style. A simple shed roof with a single slope is the easiest to frame and waterproof. A gable roof looks more finished and handles rain and snow better on both sides, but it requires a ridge beam, opposing rafter pairs, and more complex flashing if attached to the house. For a first-time 20x20 build, I'd lean toward the shed roof unless you have framing experience.
For a 20x20 footprint, clarify what that number actually covers. If you want 20 feet of usable patio protected by the roof, your structural posts may sit inside that envelope or right at the edges. Plan for a 12-to-18-inch overhang on the exposed sides (eave and rake ends) if aesthetics matter. That means your beam span and rafter length will be slightly longer than 20 feet once overhangs are included. Write this down before you order anything. Once you have the footprint and overhangs figured out, you can start turning those measurements into a clear patio cover plan.
Clearance matters too. Most building codes require a minimum 7-foot ceiling height under a patio cover. A lean-to attached to a single-story house wall typically pitches from around 9 to 10 feet at the house down to 8 feet at the outer beam, giving you that comfortable clearance. Confirm your existing wall height and plan the pitch from there. A minimum slope of 1/4 inch per foot is the code floor for positive drainage on low-slope systems, but a 1:12 to 2:12 pitch is much better for shedding water off panels or shingles without pooling.
Permits and safety basics before you buy a single board
Almost every municipality requires a building permit for a permanent patio cover, especially one attached to the house. A 400-square-foot structure is not a grey area. Pull the permit. The cost is typically $75 to $300 depending on your jurisdiction, and skipping it creates real problems when you sell the house or file an insurance claim.
Your permit submittal will generally need to include a site plan showing the structure's location relative to your property lines, a framing plan with post/beam/rafter sizes and spacing, and connection details, especially the ledger attachment if you're going attached. Some counties require an engineer's stamp on the structural drawings for spans over a certain length; check with your local building department before you draw anything up.
The 2018 IRC Appendix H for patio covers sets a minimum live load of 10 pounds per square foot for the roof framing (higher in snow country). Your inspector will check that your beam and rafter sizing meets this. If you're in a high-wind or heavy-snow region, the loads go up and your lumber sizes go up with them. This is one situation where hiring a structural engineer for a few hundred dollars to review your plans is genuinely worth it, because undersized framing in those conditions is a real safety risk.
- Contact your local building department first and ask specifically what's required for a 20x20 attached or freestanding patio cover
- Ask whether a licensed contractor must pull the permit or if homeowners can do it themselves (most places allow owner-builder permits)
- Find out if a structural engineer's stamp is required for your span or attachment type
- Check HOA rules if you have one, since some require design approval before permitting
- Don't order materials until permit approval, because inspectors sometimes require design changes
On the safety side: work with a partner whenever you're setting posts, lifting beams, or installing roof panels. Use proper scaffolding or a rented pump jack, not a ladder balanced on the patio. Wear eye protection when cutting and always use structural hardware (joist hangers, post bases, hurricane ties) rather than toenailing alone for connections that carry load.
Framing layout: posts, beams, and rafters for a 20x20 span
For a 20-foot span, you cannot run a single beam without serious sizing or a mid-span post. The most practical layout for a 20x20 attached shed roof uses a ledger on the house wall running the full 20-foot width, a doubled or tripled outer beam also running the full 20 feet supported by three posts (at each end and one in the middle at roughly 10-foot spacing), and rafters spanning from ledger to outer beam at 24 inches on center. That middle post is the structural key for this span. Without it, you'd need a very large engineered beam, which adds cost and requires more careful sizing.
For rafter sizing on a 20-foot attached cover with 10-foot rafter spans (ledger to outer beam), 2x8 lumber at 24 inches on center is a common and code-acceptable choice under standard 10-psf live load. In snow country or with heavier roofing material, bump to 2x10s. The outer beam carrying three posts and a 20-foot span should be sized as a doubled 2x10 or 2x12, or a tripled 2x10 for heavier loads. When in doubt, the span tables in the IRC or a quick consult with your lumber yard's estimator will confirm the right sizing for your region.
For a freestanding 20x20 structure, the typical layout uses four corner posts plus one or two interior posts along each 20-foot beam line. Posts are typically 4x4 for heights up to 8 feet or 6x6 for taller structures and heavier loads. All posts need to sit in code-approved post bases anchored to concrete footings, not buried directly in soil (for most code jurisdictions today).
| Member | Typical Size (standard load) | Spacing | Notes |
|---|---|---|---|
| Ledger (attached) | 2x8 or 2x10 pressure-treated | Full 20-ft run | Bolted to house rim joist or wall framing, not just siding |
| Outer beam | Doubled 2x10 or tripled 2x10 | Full 20-ft span with mid post | Size up for snow/heavy roofing |
| Rafters | 2x8 at 24" OC | 10-ft span, ledger to beam | 2x10 for heavier loads or snow |
| Posts | 4x4 (up to 8 ft) or 6x6 | ~10 ft spacing along beam | Set in post bases on concrete footings |
| Blocking/hurricane ties | Metal hardware at every connection | At each rafter-to-beam and post-to-beam joint | Non-negotiable for wind resistance |
Choosing your materials: wood, aluminum, or metal
This is the decision that most affects your cost, maintenance load, and long-term durability. Wood framing with polycarbonate or corrugated metal roofing panels is the most DIY-friendly and the easiest to source at any lumber yard. Aluminum patio cover kits (pre-engineered systems with aluminum beams, posts, and interlocking roof panels) take longer to source but install faster once they arrive and require almost zero maintenance. Steel or heavier metal framing lands somewhere in between, usually reserved for commercial-style builds or regions with extreme loads.
| Material System | Estimated DIY Cost (20x20) | Maintenance | DIY Difficulty | Best For |
|---|---|---|---|---|
| Wood frame + corrugated metal roofing | $1,800 to $3,500 | Moderate (paint/seal every 5-7 yrs) | Beginner-friendly | Budget builds, standard climates |
| Wood frame + polycarbonate panels | $2,000 to $4,000 | Low to moderate | Beginner-friendly | Light/brightness desired under cover |
| Aluminum patio cover kit | $3,500 to $6,500 (kit only) | Very low | Moderate (kit assembly) | Low-maintenance, clean appearance |
| Wood frame + asphalt shingles | $2,500 to $5,000 | Moderate | Moderate | Matching existing house roof look |
| Steel/metal frame + metal panels | $4,000 to $8,000+ | Low | Advanced | High-load regions, commercial look |
My honest recommendation for most homeowners building their first 20x20 cover: use pressure-treated lumber for the frame (it handles outdoor exposure and moisture contact at posts and ledger) and corrugated metal roofing panels or polycarbonate panels for the roof. This combo is forgiving to work with, widely available at any big-box store or lumber yard, and gives you a solid, long-lasting result without specialty tools. If low maintenance is your top priority, an aluminum kit is worth the higher upfront cost, but plan for a 3 to 6 week lead time from most suppliers.
For blank" rel="noopener noreferrer">roofing slope minimums: if you go with corrugated metal panels, a 1:12 to 2:12 pitch works well. Asphalt shingles require at least 2:12 per most codes and work better at 3:12 or steeper. Polycarbonate panels can work at 1/4:12 minimum but drain better at 1:12 or steeper. Plan your pitch before you choose your roofing material, not after.
Site prep, layout, and footings
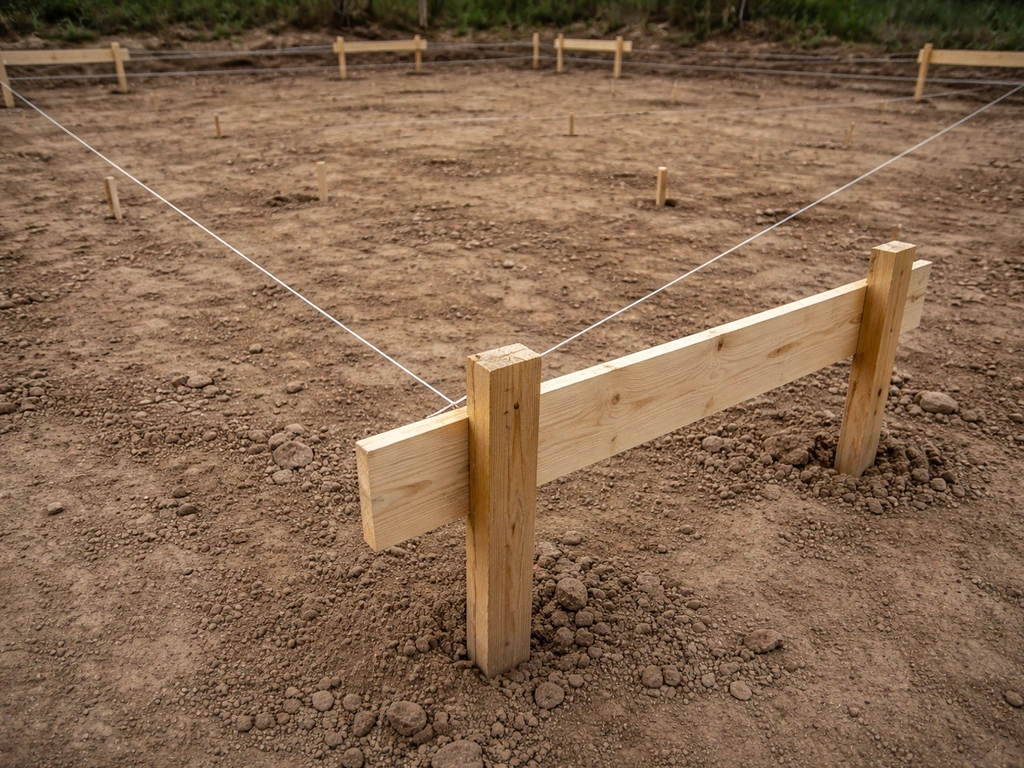
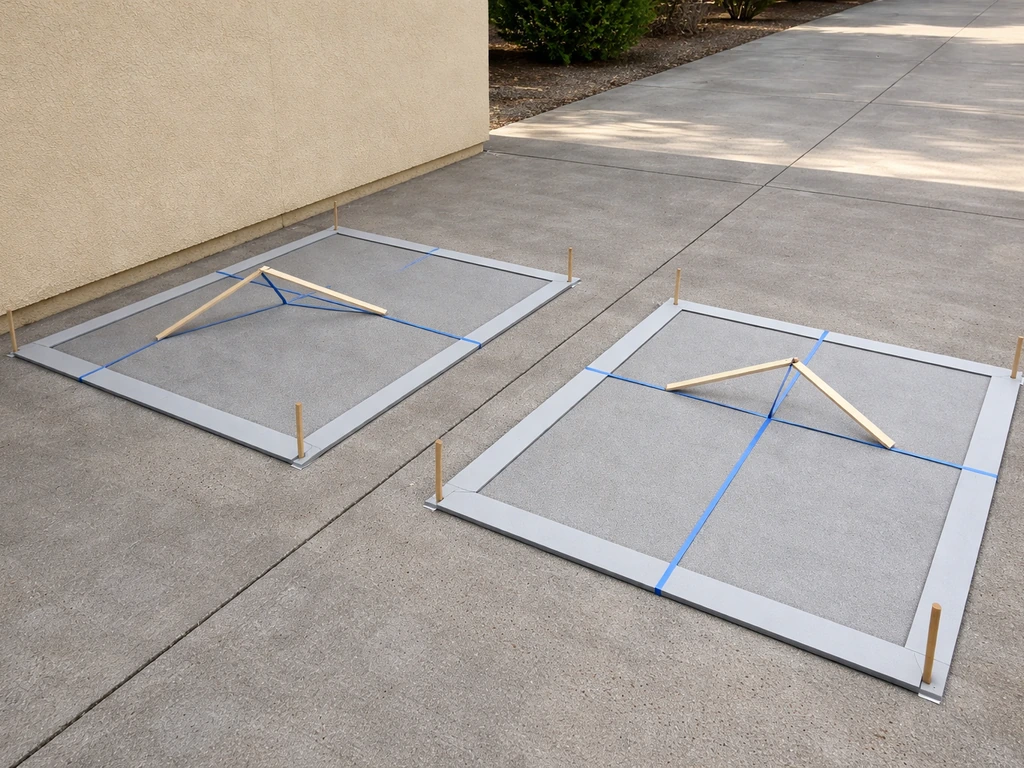
Start by marking out your exact post locations using batter boards and string lines. This is the step most DIYers rush and later regret. Take an hour to set your batter boards 18 to 24 inches outside the corner post locations, run string lines to establish your building lines, and use the 3-4-5 triangle method to confirm square corners. A 20x20 that's even 2 inches out of square will cause headaches when you try to fit roof panels later.
Footing depth depends on your local frost line. In warm climates (zones 7 to 10), 12 to 18 inches of depth is often acceptable. In colder climates, footings need to go below the frost line, which can be 36 to 48 inches deep in northern states. Your building permit application will tell you the required depth for your area. For post footings on a 20x20 cover, a typical footing is a 12-inch diameter tube form (like a Sonotube) filled with concrete, with an adjustable post base anchor set in the wet concrete before it cures. For an attached cover, your ledger transfers load to the house foundation, so ledger-side posts may be positioned differently or omitted on that side.
- Mark post locations with stakes, then set batter boards and string lines to establish building lines
- Check for square using the 3-4-5 triangle or by measuring diagonals (they should match)
- Dig footing holes to your permitted depth using a rented power auger (strongly recommended for 3+ holes)
- Set tube forms, pour concrete, and embed post base anchors while concrete is wet, double-checking alignment with string lines
- Let concrete cure a minimum of 48 hours (72 hours in cool weather) before loading posts
- Set posts in anchors, plumb them with a level, and brace them temporarily with diagonal 2x4 braces before installing beams
For the ledger on an attached cover, this connection is critical and is one of the spots inspectors pay the most attention to. The ledger must bolt through the house wall into the rim joist or wall framing, not just into the sheathing or siding. Remove the siding in the ledger area, cut your ledger to length, and install it with 1/2-inch lag screws or structural bolts at 16-inch spacing (staggered to avoid splitting). Use flashing over the ledger to direct water away from the house wall. This is not optional.
Step-by-step construction sequence
Step 1: Set the ledger (attached builds) or layout posts (freestanding)
For attached covers, the ledger goes up first and sets the high-side reference height for everything else. Mark the ledger height on the house wall based on your desired pitch. Install the ledger level, lag it into the framing, and flash immediately. For freestanding builds, set all posts first, cut them to height after they're plumb and braced.
Step 2: Install posts and beams
With footings cured and post bases set, drop posts into the bases and fasten them per the hardware manufacturer's specs. Cut posts to the correct height (accounting for beam height on top) and crown them with your outer beam. For a doubled beam, assemble the two members with construction adhesive and 16d nails or structural screws, then lift the assembly onto the posts and fasten with post caps. This is the hardest physical lift of the project. Have at least two helpers and use a temporary ledger strip nailed to the post to hold the beam while you fasten the cap hardware.
Step 3: Install rafters
Snap a chalk line on the ledger and beam to mark 24-inch on-center rafter locations. Cut rafter tails to your desired overhang length. At the ledger end, use metal joist hangers; at the beam end, use hurricane ties or rafter ties. Do not skip the metal connectors here. Toenailing alone is not enough to resist wind uplift on a roof this size. Install all rafters, then add blocking between rafters at the beam line to prevent rotation.
Step 4: Install roof decking or purlins
If you're using roofing panels (corrugated metal or polycarbonate), you don't need full plywood decking. Install 2x4 purlins perpendicular to the rafters at 24-inch spacing to give the panels a nailing surface. If you're using asphalt shingles, install 7/16-inch OSB or 1/2-inch plywood sheathing across all rafters, stagger the joints, and nail off at 6 inches on edge and 12 inches in the field.
Step 5: Roofing, flashing, and weatherproofing
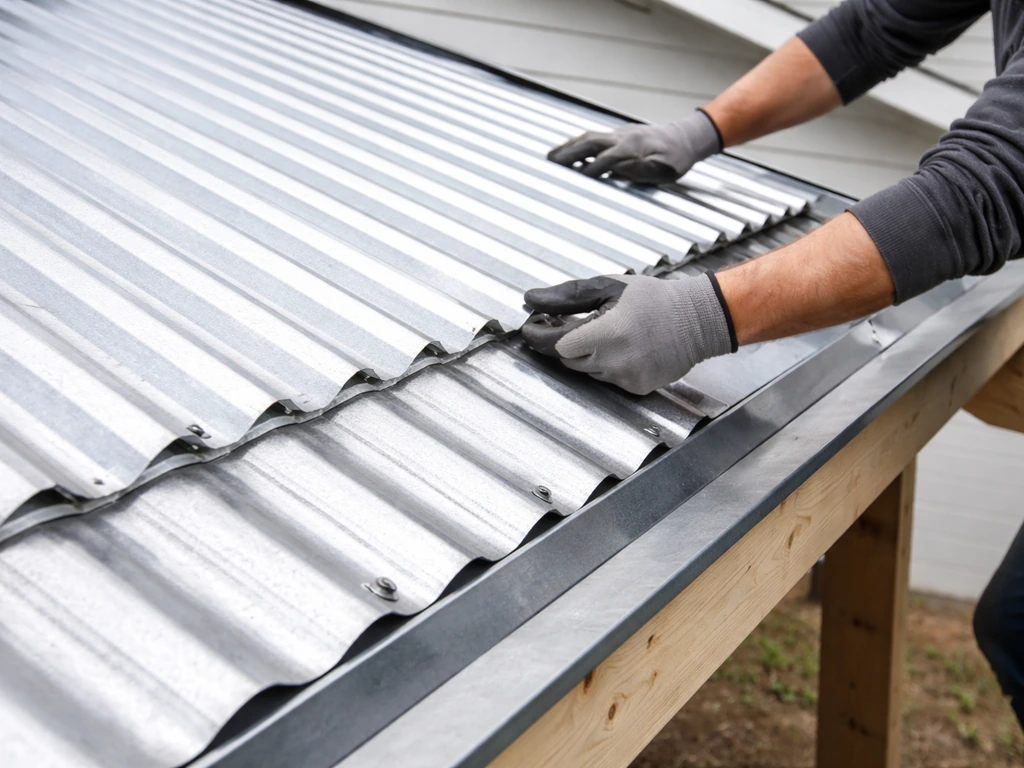
For corrugated metal panels: start at the low end (eave) and work up toward the house, lapping each panel over the one below by at least 6 inches (more in heavy rain areas). Use the rubber-gasketed screws designed for metal roofing, and drive them into the crown of the corrugation, not the valley. At the ridge (where the roof meets the house wall), install a piece of step flashing or a continuous Z-flashing tucked under the house siding and over the top of the last panel. Seal the gap with a compatible roofing caulk or foam closure strips cut to match the panel profile.
For shingle builds, install synthetic underlayment (30-pound felt or similar) over the sheathing before shingles. Flash all wall-to-roof intersections with step flashing woven into each shingle course. Install drip edge at the eave before underlayment and at the rake edges after. A gutter along the outer eave is a smart finishing touch on any patio cover to direct water away from the patio slab and the post footings.
Budget, tools, and lead times
For a wood-framed 20x20 cover with corrugated metal roofing, budget $2,000 to $4,500 in materials depending on lumber prices in your area, post count, and roofing quality. Aluminum kit systems run $3,500 to $7,000 or more for a quality 20x20. Add $200 to $500 for fasteners, hardware, and flashing. Permit fees vary but are usually under $300. If you rent a power auger and scaffolding, add roughly $150 to $250 for tool rentals.
- Circular saw with a framing blade (you'll need this for every cut)
- Speed square and rafter square for rafter layout
- Post level or digital level (standard bubble levels work but a post level frees your hands)
- Power drill/driver with long bit for lag screws
- String lines and batter boards for layout
- Chalk line for marking rafter locations
- Rented power auger for footings (saves hours of hand digging)
- Hammer drill for lag bolts into the house rim joist
- Safety glasses, work gloves, and non-slip footwear
On lead times: pressure-treated lumber and standard hardware are same-day pickup at most big-box stores. Specialty items like aluminum cover kits, polycarbonate panels in custom widths, or engineered beams can take 2 to 6 weeks to arrive. Order these before you pull your permit so you're not waiting on materials once inspections are scheduled. If you want to match your existing house roof for shingles or tile, bring a sample to the roofing supply house early since color-matching discontinued profiles can take time.
Common mistakes and when to call a pro
The biggest mistake I see on DIY patio covers is not flashing the ledger properly. Water gets behind the ledger board, rots the rim joist, and causes mold inside the wall cavity over a few seasons. It's invisible damage until it's a major repair. Do the flashing correctly the first time: step flashing or a continuous Z-bar over the top of the ledger, tucked under the siding above.
- Skipping the mid-span post on a 20-foot beam run, leading to beam sag under load
- Setting posts in concrete without post bases (direct burial creates rot in even pressure-treated wood over time in most climates)
- Insufficient pitch, causing water to pool and leak at panel laps or shingle valleys
- Using toenails instead of metal hardware at rafter-to-beam and post-to-beam connections
- Attaching the ledger to siding only instead of into the structural rim joist or wall framing
- Not squaring the layout before digging, resulting in a racked frame that never goes together cleanly
- Ordering materials before permit approval and then having to redesign
Know when to bring in a pro. If your house has a stucco or stone exterior, ledger attachment becomes significantly more complicated and often needs a mason or structural engineer involved. If you're in a high-snow-load region (50+ psf ground snow load), the framing math changes enough that an engineer's review of your plans is genuinely necessary, not just nice to have. If the patio cover needs to span more than 20 feet without an intermediate post, that's an engineered beam situation. And if you've never done any structural framing before, having an experienced contractor do the post-and-beam work while you handle the finish details is a reasonable split that keeps the project safe and still saves you real money.
A 20x20 patio cover is one of the most satisfying DIY projects you can tackle because the result is immediately visible and functional. If you've built decks or done any framing, this is a natural next step. If you're newer to structural work, go slower on the planning phase and use the permit process as your quality check. The inspector's job is to catch problems before they become expensive, so let them do it. Once the frame is up and the roof is on, you'll have 400 square feet of outdoor living space that adds real value to your home and lasts for decades if the framing and flashing are done right.
FAQ
Do I need a structural engineer for a DIY 20x20 patio cover even if I’m using common lumber sizes?
Not always, but get an engineer or building department review if you’re in a high-snow or high-wind area, plan a larger beam span than the typical mid-post layout, or want a gable roof attached to masonry or unusual wall finishes (stucco, stone). Also consider it if your permit requires engineered drawings for your jurisdiction or if you cannot confirm ledger connection details to actual framing members.
What’s the best way to confirm my roof pitch before I build posts and rafters?
Establish the ledger height using a level, then verify the low-side beam height by measuring the rise over the exact run, including your planned overhang. Re-check after posts are set and before cutting rafters, because slight footing or post-base offsets can change the effective slope and drainage.
Can I bury wood post bases in soil or skip concrete footings to save time?
In most code areas, no. Posts generally need code-approved concrete footings with adjustable post bases (or brackets) anchored in concrete, not direct burial. Skipping that step increases rot and settlement risk, and it can also fail inspections.
How do I prevent ledger leaks if my siding is already installed?
Remove the siding in the ledger zone so the ledger bolts go into the rim joist or wall framing, then install flashing in a way that sheds water away from the house. After flashing, replace or integrate siding details so water cannot travel behind the ledger board or into the wall cavity.
Do I need full decking under corrugated metal or polycarbonate panels?
Usually not. The common DIY approach is purlins (for example 2x4) installed perpendicular to rafters to create a solid nailing surface for the panels. Full decking is typically reserved for shingle roofing, and skipping incorrectly under shingles can lead to failed nailing and water intrusion.
What’s the correct order to install roofing so water flows the right direction?
For corrugated metal, start at the eave (low side) and lap panels upward so each upper sheet overlaps the one below. For shingle systems, install synthetic underlayment first, then run step flashing at every wall intersection with each shingle course.
How far apart should rafter locations be on a 20x20 patio cover?
A practical DIY standard is 24 inches on center when using typical materials and common shed-roof layouts. Confirm spacing against your local requirements and roof covering choice, because changing the spacing can affect panel fastening patterns, deflection, and wind uplift performance.
Can I toenail rafters or beam connections instead of using joist hangers, hurricane ties, and post caps?
Avoid toenailing for structural connections on a roof this size. Use the specified hardware at the ledger and beam ends, and follow manufacturer fastening requirements. Hardware prevents rotation and uplift, which toenailing alone may not resist in strong wind events.
My panels still seem misaligned at the edges, what’s the best way to fix it?
Before fastening the roof permanently, re-check squareness by measuring diagonals between corner post or beam points. If you’re even slightly out of square, fix it by adjusting rafter or purlin placement where permissible, or by reworking the framing before panels are fully committed.
Should I add gutters for a patio cover, and where should water go?
If the outer edge discharges toward a slab or footings, adding a gutter at the exposed eave can reduce splashback and erosion. Route the discharge away from post bases and property grading so water doesn’t pool against the structure or wash debris into drains.
How do I plan the project schedule around inspections and material lead times?
Order any long-lead items (aluminum kits, engineered beams, custom-width polycarbonate) before inspections are scheduled, because waiting can stall the build. Schedule the permit submission early, since the review and required corrections can affect when you’re allowed to close framing.
What’s the most common DIY issue that causes long-term damage, and how can I catch it early?
Improper ledger flashing is a top cause of hidden rot and mold. During construction, inspect that the ledger bolts go into framing, that flashing is installed so it sheds water over the top of the ledger, and that there are no gaps where water could bypass the flashing system.