Installing a patio cover yourself is absolutely doable for a homeowner with basic carpentry or assembly skills, but the projects that go sideways almost always skip the planning phase. Here is the full process: assess your site and pull permits first, choose a style and material that matches your climate and budget, build your structure from the ledger or posts outward, install roofing panels with proper slope and flashing, and seal everything before you call it done. If you want to avoid costly mistakes, follow a clear patio cover how to checklist from layout and permits through flashing and sealing call it done. This guide walks you through each stage in order, with real measurements, honest material trade-offs, and the specific steps that prevent leaks and rework.
Patio Cover Installation Instructions: DIY Step-by-Step

Choose the right patio cover style and materials
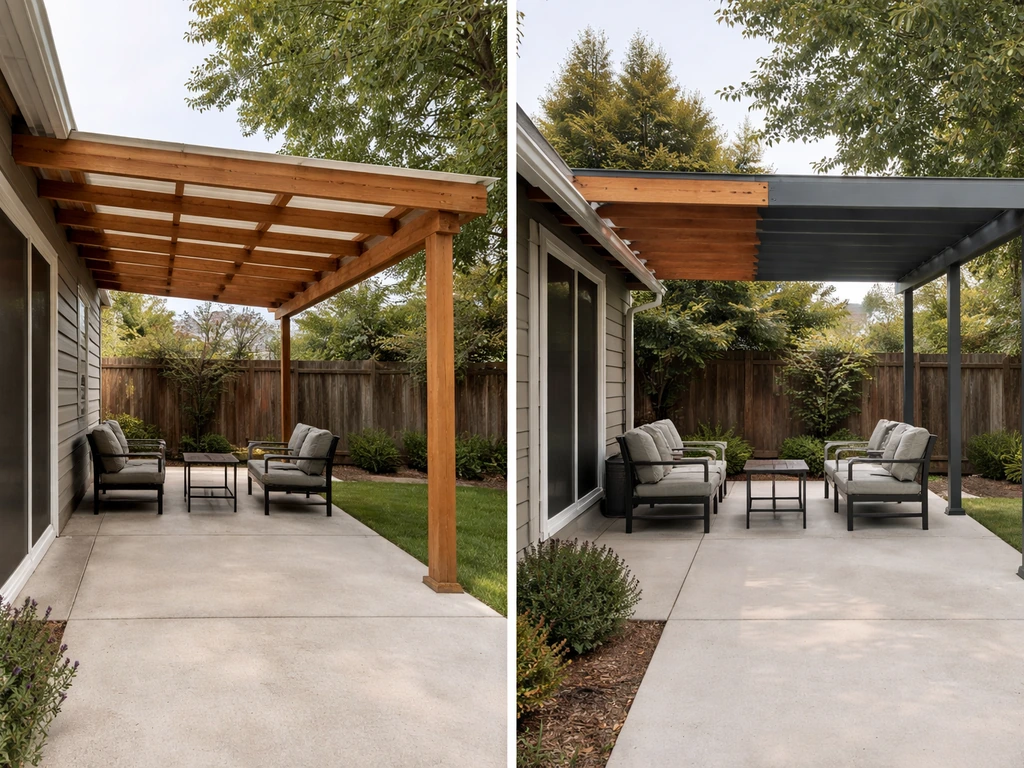
The two most common configurations are the lean-to (also called an attached shed-style cover) and the freestanding structure. A lean-to attaches at one end to a ledger board or beam bolted to your house, then pitches down toward the yard, supported by posts at the outer edge. It is the most popular choice because it borrows structural support from the house, uses less material, and feels like a natural extension of the roofline. A freestanding structure has posts at all four corners, which gives you more placement flexibility but requires more footings and a complete independent frame.
Beyond configuration, you are choosing between three primary materials: wood, aluminum, and steel. Each has real trade-offs worth understanding before you buy anything.
| Material | Pros | Cons | Best For |
|---|---|---|---|
| Wood (Douglas Fir, cedar, PT lumber) | Easy to cut and fasten on-site, low upfront cost, accepts paint or stain | Requires ongoing maintenance, susceptible to rot in wet climates | DIYers who want flexibility and a traditional look |
| Aluminum (extruded kit systems) | Lightweight, rust-proof, low maintenance, consistent profiles | Higher upfront kit cost, harder to modify cuts without a miter saw and blade suited to aluminum | Homeowners who want a near-permanent, low-maintenance cover |
| Steel (tube frame) | Very strong, good for large spans | Heavy, requires welding or bolted connection know-how, prone to rust without proper coating | Large or custom freestanding structures |
For most DIY homeowners installing a 12x16 or 14x20 attached cover, an aluminum kit system or pressure-treated wood frame with polycarbonate or aluminum roofing panels is the sweet spot. Aluminum kit systems like Ultralox and similar extruded-profile products come with pre-cut or field-cut components and detailed manufacturer instructions. Wood framing gives you more flexibility if your attachment wall is irregular or your span is non-standard. Polycarbonate panels deserve a special mention because they let in diffused natural light while shedding water, which makes a covered patio feel far less cave-like than solid panels. For roofing material choices, your main options are solid aluminum panels, twin-wall or multi-wall polycarbonate sheets, wood decking with a finish roofing layer, or lattice for shade-only structures.
Planning: permits, measurements, and site assessment
Do not skip this stage. Permit requirements are real, inspections matter, and building without a permit can create serious headaches when you sell the house. Many cities, including Garland, TX, require a building permit for any attached or freestanding patio cover. The City of Irvine, for example, distinguishes between solid-roof, open-lattice, louvered, and fabric covers and applies different requirements to each. Check your local building department website before buying materials.
If you are in an HOA, check the architectural review guidelines before you design anything. Some HOAs prohibit encroachment on utility or drainage easements and specify a minimum roof pitch. One example, Brittany Lakes HOA, requires a minimum 4/12 pitch for patio enclosure roofs sloping away from the house. That kind of requirement directly affects your rafter sizing and your post heights, so you need to know it upfront.
For structural loading, both the 2024 International Building Code (IBC Appendix I) and the 2018 International Residential Code (IRC Appendix H) require patio covers to handle dead load plus a minimum vertical live load of 10 lb/ft² (0.48 kN/m²), and snow loads must be used when they exceed that minimum. In a snowy climate, 10 lb/ft² is nowhere near enough design load. Your local permit office or a structural engineer can give you the correct design load for your area.
Measurements and site assessment checklist
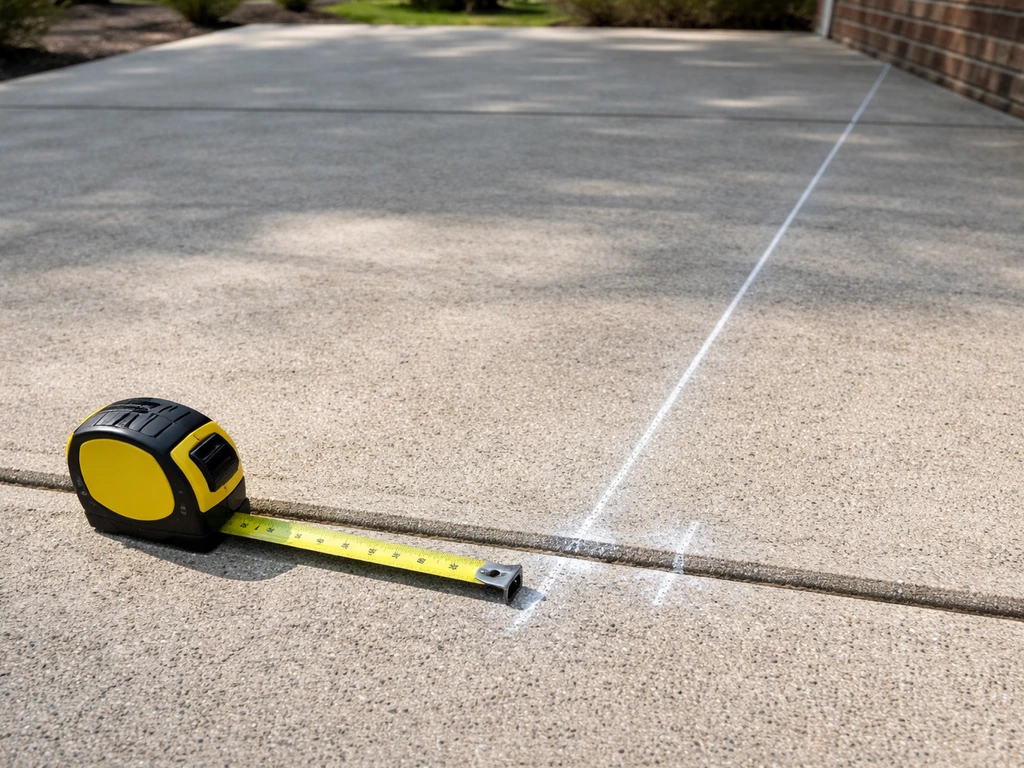
- Measure the width and depth of the area you want covered, and confirm there are no utility lines (underground or overhead) in the footprint
- Check the attachment wall height: measure from the finished floor or patio surface up to where the ledger will attach, and calculate the headroom you will have at the outer edge after applying your roof pitch
- Determine your roof pitch: a minimum of 1 inch per foot slope is recommended for polycarbonate panels, with 2 to 3 inches per foot being the practical sweet spot for clean drainage; some HOAs require 4/12 (4 inches per foot)
- Identify where water will drain at the outer edge and make sure it does not direct runoff toward a neighbor's property, a foundation, or an easement
- Locate any existing downspouts or gutters on the attachment wall that may need to be redirected
- Check for obstructions on the attachment wall: windows, electrical boxes, gas meters, or existing flashing that complicate ledger placement
- Photograph the wall condition and note any existing water damage or rot that needs repair before you attach a ledger
- Confirm setback requirements from property lines and note any easements on your plat
Tools, materials, and preparation checklist
Getting everything staged before you start saves enormous time on the day of installation. A common mistake is starting the project before all fasteners, flashing, and sealants are on-hand. Running to the hardware store mid-install for a missing tube of caulk or the wrong lag bolt length is how simple one-day projects turn into three-day frustrations.
Tools you will need
- Tape measure (25 ft minimum) and chalk line
- 4-foot and 2-foot levels, plus a long string line for checking level across longer spans
- Post hole digger or rented power auger for freestanding structures with concrete footings
- Cordless drill/driver and a hammer drill with masonry bits if attaching to a concrete or masonry wall
- Circular saw (a miter saw is strongly preferred for cleaner cuts on rafter tails and beam ends)
- Blade suited to your material: carbide-tipped for wood, non-ferrous metal-cutting blade for aluminum
- Socket wrench set and an impact driver for lag bolts
- Caulking gun
- Safety glasses, work gloves, and hearing protection
- Ladder rated for your working height, ideally two ladders so you can span across without constant repositioning
Materials and supplies
- Ledger board or ledger channel (sized per your span and local load requirements)
- Structural posts (4x4 PT wood minimum for most spans, or aluminum post kit components)
- Rafters or patio cover beams at your planned spacing (typically 24 inches on center for most covers)
- Roofing panels: polycarbonate sheets, solid aluminum panels, or material matching your kit
- Post base anchors or post-to-beam hardware (Simpson Strong-Tie or equivalent rated connectors)
- Lag screws: 1/2-inch diameter hex-head lags in 3-inch to 5-inch lengths for ledger attachment into framing
- Galvanized or stainless joist hangers and rafter ties for all connections
- Z-flashing (galvanized metal, minimum 3 inches wide) or a rubber ledger flashing membrane per kit specs
- Self-adhesive flashing tape for sealing around fastener penetrations
- Exterior-grade silicone caulk and a compatible primer for your substrate
- Concrete mix (for post footings, if freestanding or if local code requires footing depth)
- Gravel for footing drainage layer
- Drip edge and gutter or gutter-end cap if directing runoff at the outer edge
Step-by-step installation sequence: layout to final assembly
This sequence follows a lean-to attached patio cover, which is the most common DIY configuration. Freestanding structures follow the same logic but start with all four post locations instead of a ledger, and require concrete footings at every corner.
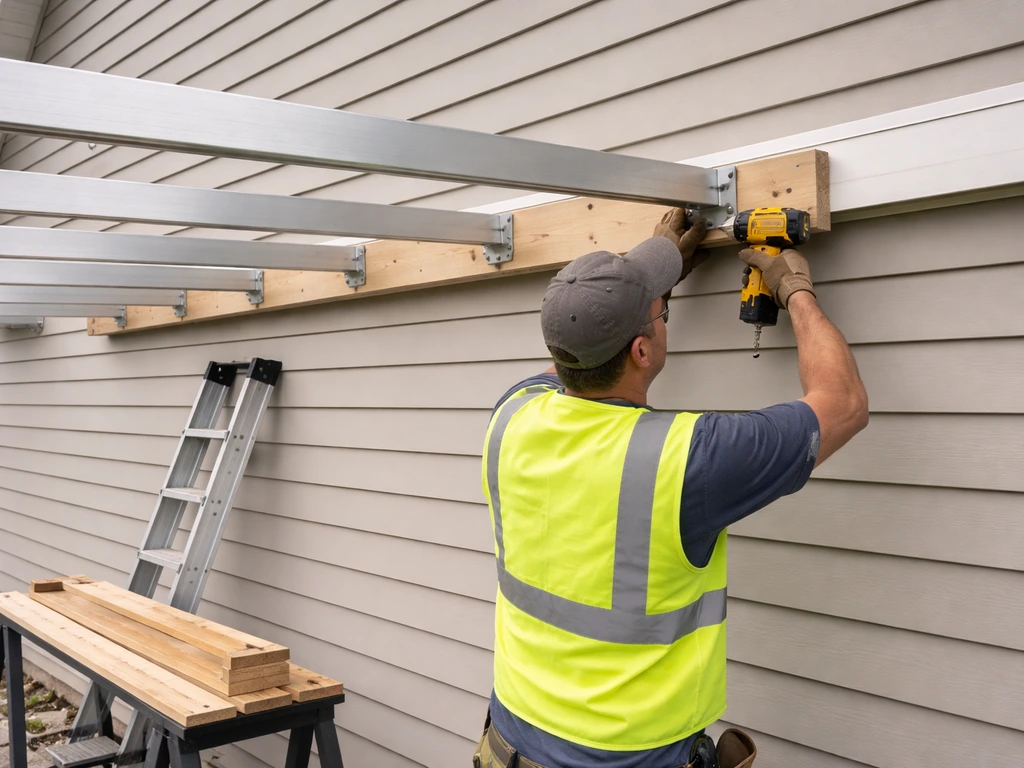
- Mark and snap a chalk line on the attachment wall at the ledger height. Double-check this height using your level. Remember that the finished top of the ledger, not the bottom, is your reference for rafter bearing.
- Locate wall studs or rim joist behind the siding using a stud finder. Mark each stud location along the ledger line. Ledger bolts must hit framing, not just siding or sheathing.
- Cut the ledger board or aluminum ledger channel to length. Pre-drill bolt holes at each stud location, spacing lags no more than 16 inches apart, staggered vertically to avoid splitting.
- Install ledger flashing before bolting the ledger permanently. Slip Z-flashing or a rubber flashing membrane behind the siding above the ledger line, then set the ledger in place. (More on this in the flashing section below.)
- Bolt the ledger using 1/2-inch by 3.5-inch minimum hot-dipped galvanized or stainless lag screws, torqued snug but not overtightened. Check level again after each end is bolted.
- Lay out post locations at the outer edge. Use batter boards and string lines to mark the footprint square: measure diagonals and adjust until both diagonals are equal. This is the step most beginners rush, and it causes every other alignment problem that follows.
- Dig or drill post footings to a depth that meets your local frost line or a minimum of 18 to 24 inches in frost-free climates. Pour concrete and set post base anchors while the concrete is wet. Allow the concrete to cure at least 24 to 48 hours before loading it.
- Cut and set posts to the correct height. Use a level on two adjacent faces to plumb each post. Brace posts temporarily with 2x4 braces staked to the ground until the beam is installed.
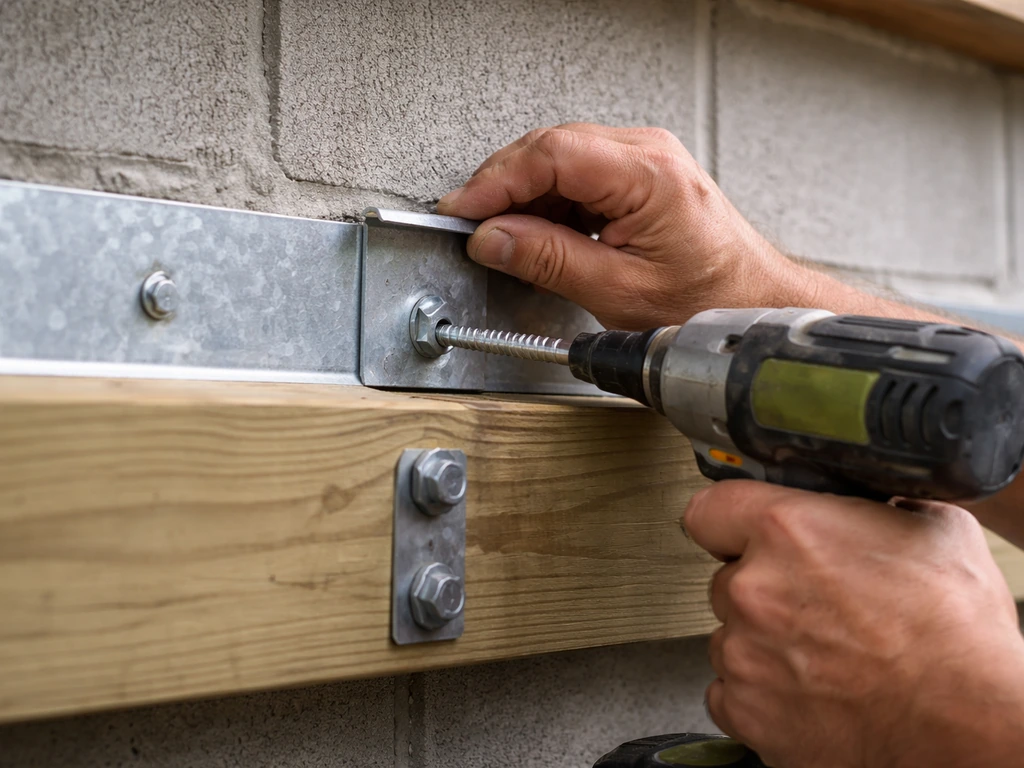
- Install the outer beam or header across the post tops. Use post caps rated for the beam size. Check that the beam is level and that the distance from the ledger to the outer beam is consistent at both ends.
- Install rafters from the ledger to the outer beam using joist hangers at both ends. Space rafters per your plan (typically 24 inches on center). Check each rafter for crown and install crown-side up.
- Install any blocking, trim fascia at the rafter tails, and add a top plate or nailer if your roofing panels require it.
- Install roofing panels starting from one side, overlapping per the manufacturer's direction, and working across. Secure panels at ridgelines and at each rafter, using the fastener type and spacing specified for the panel product.
- Install trim pieces, end caps, and edge closures to seal panel edges against insects and water infiltration.
- Install gutters or drip edge at the outer fascia to direct runoff away from the patio. Slope gutters 1/16 inch per foot toward downspout outlets.
- Final caulk pass: run a bead of exterior silicone at the top edge of the ledger flashing, around any penetrations through the wall, and at all panel-to-trim interfaces.
Attachment and structural safety: ledger, posts, and fasteners
The ledger connection is the most structurally critical part of an attached patio cover, and it is also where leaks start if the flashing is done wrong. Both problems are preventable if you give this step serious attention.
Lag bolt spacing and penetration depth matter. The lag needs to penetrate at least 1.5 inches into the rim joist or stud framing after passing through the ledger and any siding or sheathing. A 1/2-inch hot-dipped galvanized lag at 16-inch spacing is a reliable baseline, but verify with your local building department because span and load affect this. Use two lags per stud location, staggered so they are not on the same grain line, to reduce splitting risk.
For posts, use rated post base connectors anchored into concrete footings rather than burying the wood post directly in the ground. Direct burial accelerates rot even with pressure-treated lumber. Simpson Strong-Tie ABU, ABA, or equivalent post bases provide a standoff that keeps the post end dry. For aluminum posts, use the post base hardware specified in your kit's installation instructions. Post heights need to be identical at both outer corners and match the beam bearing height from your design.
At beam-to-post and rafter-to-beam connections, use hardware rated for the load. Skipping metal connectors and just toe-nailing is a common shortcut that building inspectors will flag, and rightly so. Simpson LPC post caps for beams, and LUS or HU joist hangers for rafters, are the standard choices and are stocked at most home improvement stores. Galvanized or stainless hardware is mandatory for outdoor use; standard zinc-plated hardware corrodes quickly in exterior exposure.
Plumb and level checks at each stage prevent compounding errors. A post that is 1/4 inch out of plumb does not seem like much, but it throws off beam seating and rafter alignment across the full span. Check plumb on two adjacent faces of every post. Check level on the ledger and outer beam before installing rafters.
Roofing panels and finishing: drainage, flashing, and sealing
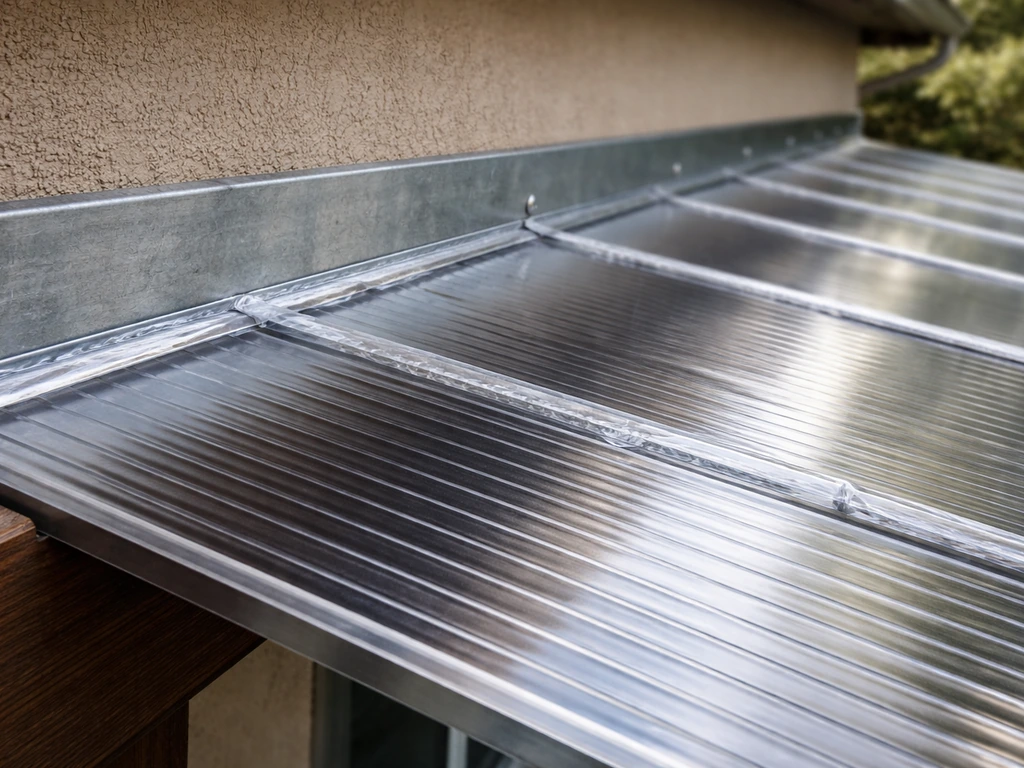
Getting the slope right is the first rule of a leak-free patio roof. For polycarbonate panels, the manufacturer-recommended minimum slope is 1 inch per foot, but 2 to 3 inches per foot drains much more reliably and keeps panels cleaner over time. A 3.5 inch per foot slope (roughly 16 degrees) is a practical target that works well aesthetically and functionally. Whatever slope you choose, it needs to be consistent from ledger to outer beam, not just at the ends of the span.
Ledger flashing is non-negotiable on any attached patio cover. blank" rel="noopener noreferrer">The standard approach for a wood-sided house is galvanized Z-flashing: the top leg of the Z tucks under the siding above the ledger, and the bottom leg laps over the face of the ledger, directing water outward. In high-rainfall climates, layer this with a self-adhesive rubber flashing membrane applied to the wall sheathing before the ledger goes up. blank" rel="noopener noreferrer">Ultralox aluminum kit instructions specifically call for a rubber flashing membrane step and remind installers to remove the wax paper backing to expose the adhesive, which sounds obvious but gets missed under field conditions. Whatever system you use, the flashing must shed water away from the wall, never create a pocket where water can stand.
In drier climates, a simple cap flashing over the ledger can be sufficient, but if your area gets regular rain or your wall has any history of water intrusion, go with the multi-layer approach: self-adhesive membrane first, Z-flashing on top, and a final bead of silicone at the top edge where the flashing meets the siding. The bead of silicone is a secondary defense, not the primary barrier; do not rely on caulk alone.
At the outer edge, plan where water goes before you install the first panel. A standard aluminum drip edge or continuous gutter along the outer fascia keeps runoff from pouring onto people walking in and out. Slope any gutter toward a downspout location and direct the downspout away from the patio slab and your foundation. If your patio cover slopes toward the house roof (uncommon but sometimes necessary based on wall height), make sure the house roof's existing gutters can handle the added runoff from the cover area.
Panel-to-panel seams and panel end caps need to be sealed with the closures that come with your panel system. Open ends allow insects, moisture, and debris into the flutes of polycarbonate panels, which creates internal staining and reduces the panel's longevity. Foam closure strips that conform to the panel profile, combined with aluminum end caps, are the right approach. Run a bead of compatible sealant behind the trim before pressing it into place.
DIY limits, inspections, and troubleshooting common problems
This is a realistic project for a homeowner with basic skills, a helper, and a weekend or two. That said, there are situations where calling a professional or at minimum having a licensed contractor review your plan is the right call.
When to call a pro or get an engineer involved
- Your span exceeds 20 feet, which typically requires an engineered beam design to avoid excessive deflection
- You are in a high snow load area (over 25 lb/ft² ground snow load) or a high wind zone, where loading calculations become complex
- The attachment wall shows signs of rot, structural damage, or water intrusion before you start
- Your local permit requires engineer-stamped drawings, which some jurisdictions require for any solid-roof patio cover
- You need to run electrical (outlets, fans, lighting) inside the covered area, which requires a licensed electrician in most jurisdictions
- The project involves modifying or tying into the existing house roof structure
Inspections: what to expect
If you pulled a permit, your local building department will typically schedule a framing inspection before you install roofing panels, and a final inspection after everything is complete. The framing inspection is actually helpful: an inspector catching a missing joist hanger or an under-bolted ledger at the rough framing stage is far better than discovering a problem after the roof is on. Have your approved plans on-site. Clear access to all connections. Do not cover the ledger flashing until after the inspector has seen it.
Common problems and how to fix them
- Water pooling on the roof surface: almost always a slope problem. If panels are nearly flat, you will need to recut rafter ends or shim the ledger height to increase pitch before reinstalling panels.
- Leak at the ledger/wall junction: the flashing is either installed backwards, the siding was never cut back to allow the top leg to tuck under, or the sealant bead was applied over a dirty or wet surface. Strip and redo the flashing properly; do not try to caulk over the problem.
- Posts not plumb after concrete cures: minor adjustments can be made with shims at the post base if the deviation is less than 1/4 inch. More than that, you may need to reset the footing.
- Roofing panels rattling or lifting: fasteners were either spaced too far apart or the wrong type was used. Add fasteners at midspan and confirm you are using the panel manufacturer's specified screw with a neoprene washer.
- Rafters crown-down (bowing downward at the center): caused by installing rafters with crown facing down. Remove and flip them. This is a quick fix before roofing panels go on, but painful after.
- Ledger pulls away from wall after a season: lag bolts did not hit framing, or the framing behind the wall was damaged. Remove the ledger, repair the wall framing, and re-lag into solid lumber.
- Panel edges open and showing insect or debris intrusion: install foam closures and aluminum end caps with sealant. This is a straightforward fix at any point after installation.
If you are working with a specific aluminum kit product, the manufacturer's installation instructions are your most reliable reference for fastener specs, panel overlap distances, and component sequencing. If you are using an aluminum kit, follow the aluminum patio cover installation instructions that came with your specific system for the correct fastener specs, overlaps, and sequencing aluminum kit product. Aluminum kit systems marketed specifically as DIY patio cover packages, including extruded-profile systems and the Palram Olympia series, each have their own geometry and fastener patterns. Work through the manufacturer's sequence alongside this general guide, not instead of it. The principles here apply universally; the component-specific details live in the product documentation.
Take your time with layout, do not rush the flashing, and get the permit and inspection done. Those three things separate a patio cover that lasts 20 years from one that causes problems in year two.
FAQ
What should I do if my patio cover roof pitch ends up slightly off from my plan after I set the posts?
Stop and re-check post heights and ledger level before installing rafters or panels. Even small height differences can make the roof slope inconsistent across the run, which affects drainage and panel overlap fit. If the structure is out, adjust before you lock in beam bearings or you may end up forcing panel geometry, creating gaps at seams that are harder to seal later.
Do I need to treat the ledger differently if my house has siding over sheathing (or if I’m attaching to masonry)?
Yes. For wood-framed walls under siding, the flashing layers and lag penetration into structural framing are the key. If you are attaching to masonry or a different substrate, use the correct approved anchors and follow manufacturer or engineer guidance for embed depth and edge distances, then revise flashing details so water is directed away from the wall system. Don’t assume the same lag bolt specs apply.
Can I install polycarbonate panels right away after flashing the ledger, or do I need to wait for sealants to cure?
Plan for cure time on sealants and any self-adhesive membrane components before expecting full weather sealing performance. Many products require a specific temperature and time window to reach bond strength. If rain is imminent, verify the product instructions for whether the assembly is considered temporarily watertight immediately or only after cure, then stage panel installation accordingly.
What’s the best way to prevent leaks at screw or fastener penetrations in the panels?
Use only fasteners, gaskets, and sealants that are compatible with your panel system and follow the recommended hole size and fastening torque. Over-driving can distort polycarbonate and compromise the seal, under-driving can leave gaps. Keep fasteners spaced and located per the panel profile, and ensure closures are installed so water cannot wick into flutes.
How do I handle panel expansion and contraction with polycarbonate roofs?
Leave the intended clearance and install fasteners in a way that allows movement, typically using the panel system’s slotted hole guidance or specified gasket thickness. Don’t fully rigidly clamp panels. If you tighten fasteners as if it were metal roofing, temperature swings can cause stress cracking or warping, especially along long runs.
Is a gutter really necessary on the outer edge, or can I let water drip off the fascia?
A drip edge alone may be acceptable in some low-rain situations, but a gutter or trough is often the practical choice to protect patio users and prevent erosion at the slab edge. If you use a gutter, slope it toward a downspout and verify downspout placement avoids dumping water toward the foundation or directly onto drainage pathways.
What if my patio slab is too close to the posts for ideal drainage and downspout discharge?
Re-route drainage before you finish roofing. Consider extending downspouts with splash blocks, adding a diverter, or directing runoff to an existing drainage system where permitted. If water will land right on the patio edge or pooling areas, it can undermine slab conditions and increase deterioration, even if the roof itself is leak-free.
Can I use lattice or open shading for a “roof” while still expecting it to handle wind and storms?
If the structure is intended as a roof or enclosure, treat wind and design load requirements seriously. Lattice and open covers often reduce water exposure but can increase wind pressure on remaining surfaces. Confirm that your chosen material and opening percentage meet local code expectations for wind load and snow load (if applicable), and verify that fastening methods are rated for exterior exposure.
What’s the most common inspection issue that causes rework before the roof goes on?
Missing or incorrect structural connectors, insufficient ledger anchorage, and fasteners that do not meet rated hardware requirements are frequent problems. Another common one is failing to show flashing details before covering them up. Keep the approved plans onsite, stage hardware so the inspector can see the connection, and don’t conceal the ledger flashing until it has been reviewed.
If I’m using an aluminum kit system, can I substitute “equivalent” parts to save money?
Usually you should not substitute parts unless the manufacturer explicitly allows it. Aluminum kits are designed around specific connector geometry, fastener types, and panel overlap sequencing. Using off-brand brackets or different fastener lengths can change load paths and lead to fit problems. If you must change something, ask the manufacturer for written approval or confirmation for your exact model and span.
Do I need to use galvanized or stainless hardware everywhere, even inside the structure?
For outdoor exposure, yes, you should use exterior-rated corrosion-resistant hardware throughout the load-bearing connections. Even if components are sheltered under the roof, water vapor, splashback at the outer edge, and condensation can still corrode standard zinc-plated hardware over time. If any portion is likely to be exposed, default to hot-dipped galvanized or stainless as recommended by the kit or structural guidance.
When should I hire a pro instead of DIY, even if I can build things?
Consider hiring or at least getting a licensed review if you have unusual attachment conditions (non-standard house framing, masonry attachment, or irregular wall geometry), complex spans, heavy snow or wind areas requiring detailed engineering, or if your site grading and drainage are challenging. Also get professional help if permit requirements are unclear, because design/load documentation issues can trigger costly redesign.