If you searched 'how to install DG patio,' there's a good chance you're actually looking at a decomposed granite patio surface, not a patio cover kit with that brand name. DG, in almost every real-world patio context, stands for decomposed granite, a crushed rock material that compacts into a firm, natural-looking surface you can use instead of concrete or pavers. This guide walks you through exactly how to install one, from site prep all the way to sealing and long-term upkeep.
How to Install a DG Patio Cover Step by Step DIY Guide

Celia Vaughn
8 Jun 2026
What 'DG Patio' Actually Means
Decomposed granite is weathered granite that's broken down into small particles, typically ranging from fine sand to about 3/8-inch gravel. It's sold by the ton at landscape suppliers and big-box stores, and it comes in a few forms: natural/loose DG, DG with stabilizer mixed in, and DG with resin binder. For a patio, you almost always want stabilized or resin-bound DG so the surface holds up underfoot and doesn't track into the house.
Loose DG is great for pathways and less-trafficked areas, but it shifts under chairs and tables and can become a muddy mess after rain. Stabilized DG has a polymer or organic binder added during mixing, which gives it a packed, almost hardscape feel when properly compacted. Resin-bound DG is the most durable and most expensive option, typically used for driveways and high-traffic commercial spaces. For most homeowner patios, stabilized DG hits the sweet spot of cost, appearance, and performance.
You might also see 'DG patio cover' referenced in design guidelines or community HOA documents, where a patio cover (like a pergola or lean-to roof) sits over a DG surface. SUN City Texas design guidelines describe an optional patio including a pergola-type patio cover, distinguishing such covers from DG patio ground surfacing terminology DG patio cover. In that case, you're dealing with two separate projects: the ground surface and the overhead structure. This guide focuses on the DG surface itself. If you're also planning to build a cover or shade structure over it, that's a separate installation sequence, and the overhead structure should generally go in after the surface prep is done.
Plan Before You Dig: Site Checks and Permits

DG patios often fly under the permit radar because they're not a permanent structure, but don't assume. Check with your local building department before you start. Most jurisdictions don't require a permit for a simple ground-level DG surface, but some HOAs have strict rules about material types, colors, and the percentage of your yard that can be hardscaped. Get that answered first.
Beyond permits, do a real site evaluation before ordering anything. Walk the area after a rain and watch where water pools. DG drains well but it can't fix a low spot in your yard, and if you install it in a natural basin, you'll have a soggy, unstable surface every time it rains. Your finished DG surface should slope away from the house at roughly 1/8 to 1/4 inch per foot. Mark the high and low points of your planned area with stakes and a string line so you can calculate how much excavation or fill you need.
Also check for underground utilities before you excavate. Call 811 (in the US) at least a few days before digging, and they'll mark any buried lines at no cost. Even shallow excavation of 4 to 6 inches can nick irrigation lines or low-voltage landscape wiring.
- Confirm permit requirements with your local building or planning department
- Review HOA guidelines for hardscape material types and coverage limits
- Assess natural drainage patterns and identify any low spots
- Verify the slope requirement: 1/8 to 1/4 inch drop per foot away from structures
- Call 811 to locate and mark underground utilities before excavating
- Measure your patio area precisely and add 10% to your material calculations for waste
Everything You Need Before You Start
DG projects are straightforward materially, but showing up without the right compaction equipment will cost you dearly in the finished result. A plate compactor is non-negotiable for anything larger than about 50 square feet. Rent one from a local equipment rental shop for a day; it's typically $75 to $150 and worth every cent.
Materials
- Stabilized decomposed granite: budget approximately 1 ton per 100 square feet at a 3-inch compacted depth (loose DG compacts roughly 20–25%, so order more than you think you need)
- Landscape fabric (weed barrier): enough to cover the full area, overlapping edges by 6 inches
- Bender board, steel edging, or stone edging: to define the perimeter and keep DG contained
- Concrete or landscape spikes for edging: 12-inch spikes work for most bender board products
- Gravel base material (crushed road base): optional but recommended for areas with poor drainage
- Polymeric sand or additional stabilizer: for touching up edges and transitions
Tools
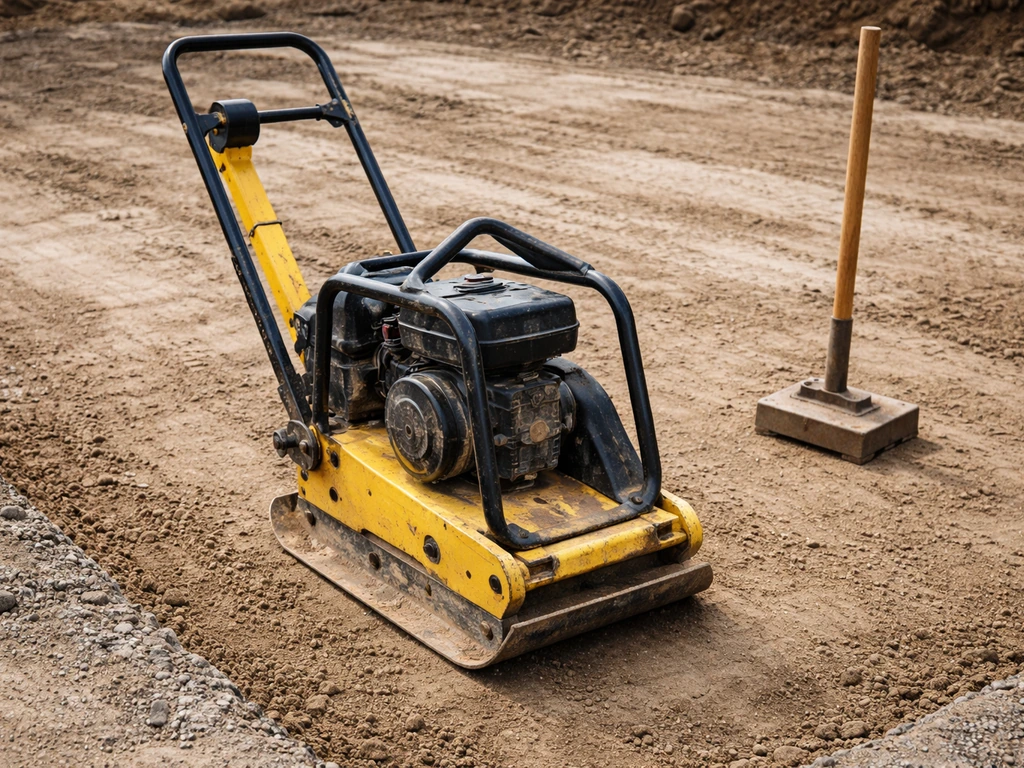
- Plate compactor (rent for the day)
- Flat spade and standard shovel for excavation
- Wheelbarrow for moving material
- Hand tamper for corners and edges the plate compactor can't reach
- Landscape rake for spreading DG evenly
- String line, stakes, and line level for establishing grade
- Measuring tape and marking paint or chalk line
- Garden hose with spray nozzle for wetting DG before compaction
- Work gloves and eye protection
How much DG to order
Stabilized DG runs around $185 per ton at most suppliers, and coverage varies slightly by particle size. As a practical rule, one ton covers roughly 100 square feet at a 3-inch finished depth. Measure your square footage, divide by 100, and that gives you your minimum tonnage. Add 10 to 15% extra for waste, spillage, and the extra material you'll need to get the slope right. If your site has soft or sandy native soil, plan to add a 2-inch compacted road base layer underneath, which increases your total depth and material needs.
Step-by-Step Installation
- Mark and excavate the area. Spray your perimeter with marking paint and excavate to 4 to 6 inches below your desired finished grade. This accommodates 2 inches of base (if using it) plus 3 to 4 inches of compacted DG. Slope the excavated base away from the house as you dig, not just the finished surface.
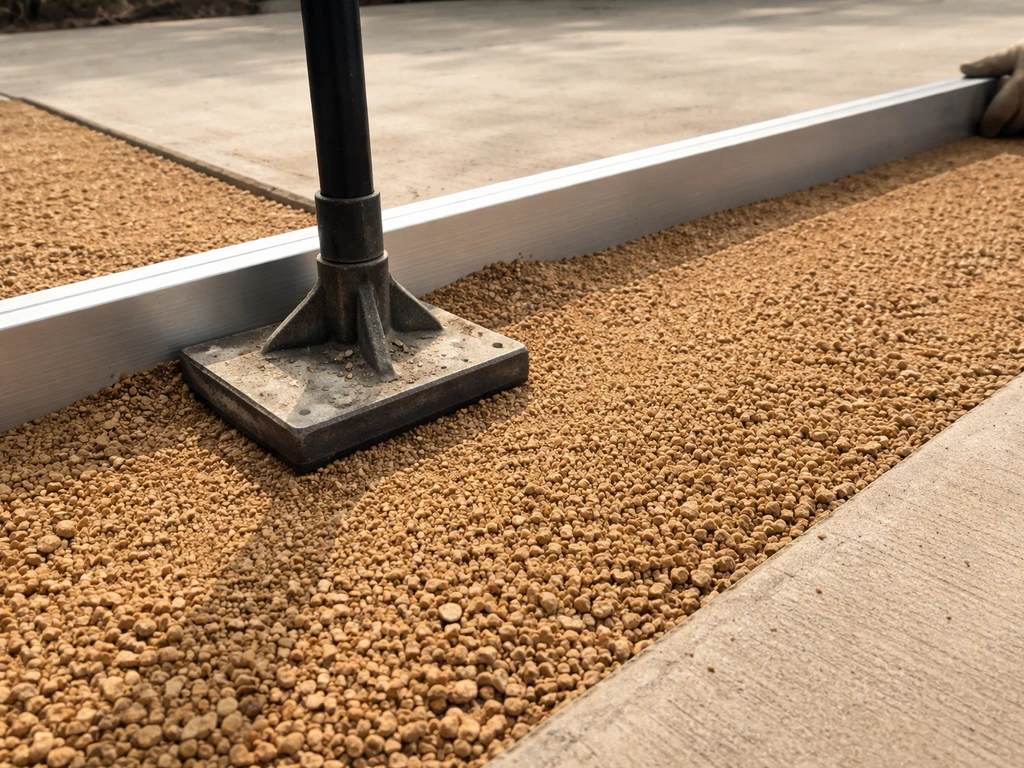
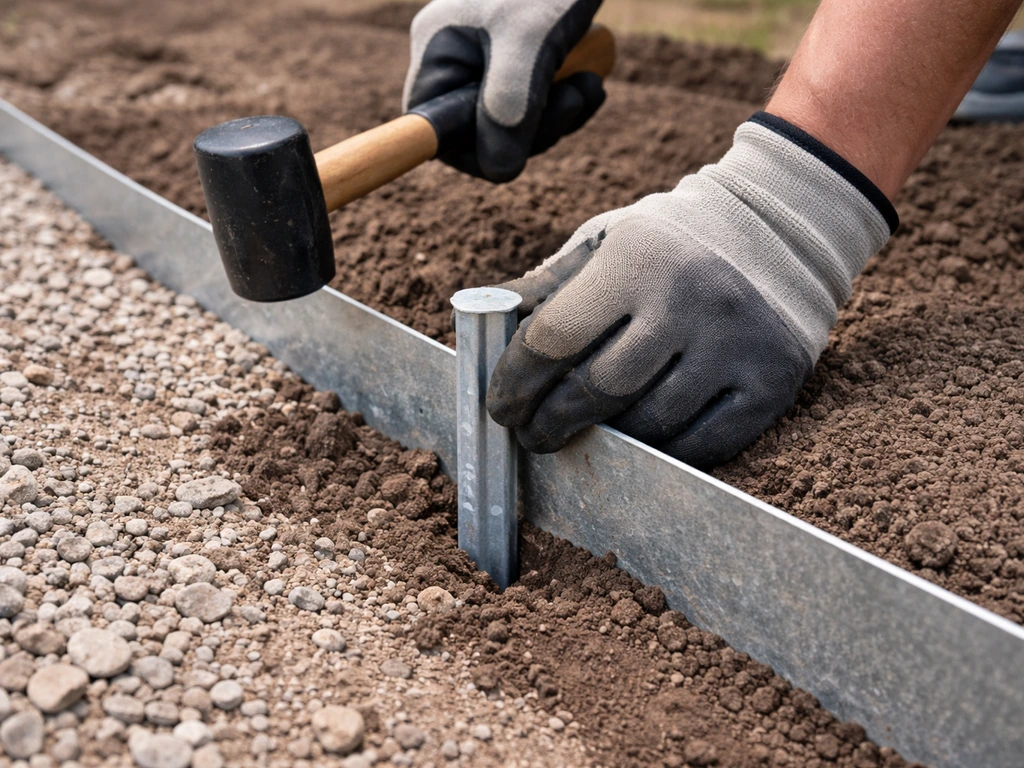
- Install the edging first. Set your bender board, steel edging, or stone border around the entire perimeter. Secure it with spikes every 18 to 24 inches. This step needs to be done before the DG goes in, not after. The edging holds the material in place permanently and keeps it from migrating into lawn or garden beds.
- Lay landscape fabric (optional but recommended). Roll out the weed barrier across the excavated area, overlapping seams by at least 6 inches. Trim it to fit inside the edging. Some contractors skip this with resin-bound DG, but for stabilized DG it helps suppress weeds long-term.
- Add and compact base material if needed. If you have soft, expansive, or clay-heavy soil, spread 2 inches of crushed road base (also called Class II base or road crush) and compact it with the plate compactor. Dampen it lightly first. This is your drainage and stability layer.
- Spread the first lift of DG. Add about 2 inches of loose DG across the area and rake it to a consistent depth. Don't dump the whole load at once. Multiple thin lifts compact far better than one thick one. Check your slope with the string line as you spread.
- Wet the DG. Before compacting, dampen the surface thoroughly with a garden hose until the DG holds together when you grab a handful but isn't dripping wet. This activates the stabilizer in pre-mixed products and is critical for proper compaction.
- Compact the first lift. Run the plate compactor across the entire surface in overlapping passes, working from the edges toward the center. Then do a second set of passes at 90 degrees to the first. Use the hand tamper in corners, along the edging, and any area the machine can't reach.
- Add the second lift and repeat. Spread another 1 to 2 inches of DG, wet it, and compact again the same way. For a 3-inch finished depth, two or three lifts is typical. Check your finished surface elevation against your target grade stakes. Common mistake: adding a single thick layer and assuming it will compact down to the right depth. It won't, and it won't be stable either.
- Final grade check and touch-up. After the final compaction pass, check that the surface is smooth and draining the right direction. Add small amounts of DG to fill any low spots, wet, and tamp by hand. The surface should feel firm underfoot with minimal give.
- Let it cure. Stabilized DG needs 24 to 48 hours to fully set. Keep foot traffic off it and protect it from rain for the first day if possible. After that, it's ready to use.
Anchoring, Fasteners, and Structural Safety
DG is a surface material, not a structural system, so 'anchoring and fasteners' here really means making sure the edging system that holds your DG in place is properly secured and that any adjacent structures, like posts for a patio cover, are anchored in a way that doesn't undermine the DG surface. If your goal is to figure out how to install patio swing posts over a DG surface, the key is planning the post anchoring and footing order correctly post for a patio cover. For a patio cover over DG, choose tube brackets that match your post size and fasten them securely to the structural members before you add the surface and edging patio tube brackets.
For edging: use galvanized or stainless steel spikes if you're in a region with frequent rain or freeze-thaw cycles. Standard black landscape spikes rust and fail within a few seasons. Space them no more than 24 inches apart, and at corners, add an extra spike within 2 to 3 inches of the bend to prevent the edging from pulling away.
If you're setting posts for a pergola, patio cover, or shade structure over the DG area, those footings need to be poured concrete and should go in before the DG surface, not after. For a patio mate screen room, the key is planning the frame and anchoring points so the structure stays secure and sealed to your patio base. If you’re also installing a patio railing, plan the post locations carefully and use the right anchors so the rail is secure on your patio base patio railing installation. Digging footing holes after the DG is installed will disrupt the base and edging. The concrete footing should extend below the frost line for your area (check your local building code, but 12 to 24 inches is common in most US climates), and the post hardware (typically a post base bracket set in the wet concrete) needs to keep the wood or aluminum post clear of the DG surface to prevent rot or corrosion at the base. If you're adding a cover structure over your DG patio, plan the post locations before you start laying surface material.
Wind and drainage matter for DG surfaces too. In high-wind areas, DG can scatter from exposed edges, so a solid edging system that's flush with or slightly above the DG surface makes a big difference. For areas that get significant snow loads, DG handles it well, but be aware that snowplow or shovel use can disturb the surface. Plan for a seasonal top-dressing and light re-compaction in the spring.
Sealing, Finishing, and Keeping It Looking Good

Stabilized DG doesn't require sealing the way concrete does, but you do have some options that extend the life of the surface. Acrylic DG stabilizer can be applied as a spray-on topcoat after the surface has cured, which adds durability and reduces surface erosion from rain. This is especially useful if your patio is in a spot that gets heavy rain impact or sees a lot of concentrated water runoff from a roof edge or downspout.
Edges are where most DG patios fail first. The junction between the DG surface and any adjacent structure (a house foundation, a concrete step, a raised planter) tends to crack, shift, or allow weeds to push through. Run a thin bead of flexible landscape adhesive or polymeric jointing sand at any seam between the DG and a hard border. Don't use rigid caulk, it will crack with seasonal movement. If water runs off your roof or gutter directly onto the DG surface, consider redirecting that with a splash block or French drain. If your patio sits under roof edges, installing gutters and directing downspouts away from the DG surface can prevent erosion and puddling. Concentrated water flow will erode even well-compacted DG over time.
Ongoing maintenance
- Blow or rake leaves off the surface regularly. Organic debris breaks down into the DG and feeds weeds over time.
- Top-dress with a thin layer of fresh DG every 1 to 3 years, depending on traffic and weathering. A half-inch top-dressing re-establishes the surface and fills in any worn spots.
- Re-compact after top-dressing using a hand tamper or a pass with the plate compactor.
- Inspect edging every spring for any sections that have shifted, heaved, or pulled away. Re-spike as needed.
- Pull weeds promptly. Even with fabric underneath, wind-blown seeds will germinate on the surface. The sooner you pull them, the less root damage to the DG base.
When to Call a Pro (and the Mistakes That Bite DIYers)
Most homeowners can handle a DG patio installation themselves. It's one of the more forgiving hardscape projects because mistakes are fixable: if your grade is off or a section didn't compact properly, you can add material and re-compact. That said, there are a few scenarios where professional help is genuinely worth the cost.
If you have serious drainage issues in the yard, a landscape contractor or grading specialist can solve the underlying problem before you install any surface. DG is permeable, but it won't fix a yard that floods. If you're on a slope greater than about 8 to 10 percent, DG will erode without proper retaining features. A pro can help with drainage engineering, French drains, or terracing to make the project work long-term.
If your project involves removing or modifying existing concrete, building footings for a cover structure, or working in a jurisdiction that requires a permit and inspection, bring in a licensed contractor or at minimum have your plans reviewed by your building department before you start.
The mistakes that show up most often
- Skipping edging or installing it after the DG: without solid borders, DG spreads into the lawn within one season.
- Dumping one thick layer instead of compacting in 2-inch lifts: the bottom of a thick, single-layer pour never fully compacts, leaving a soft, unstable surface.
- Not wetting the material before compacting: dry DG won't bind properly. This is the most common reason for a surface that feels crunchy and loose after installation.
- Ignoring drainage slope: a flat or inward-sloping DG surface will hold water against your house foundation. Slope it away, every time.
- Underordering material: DG compacts 20 to 25% from its loose volume. Order more than you think you need, or you'll be making a second supplier trip mid-project.
- Using the wrong DG type: loose or natural DG looks fine in the bag but becomes an unstable, dusty surface underfoot. Always use stabilized or polymer-bound DG for a patio.
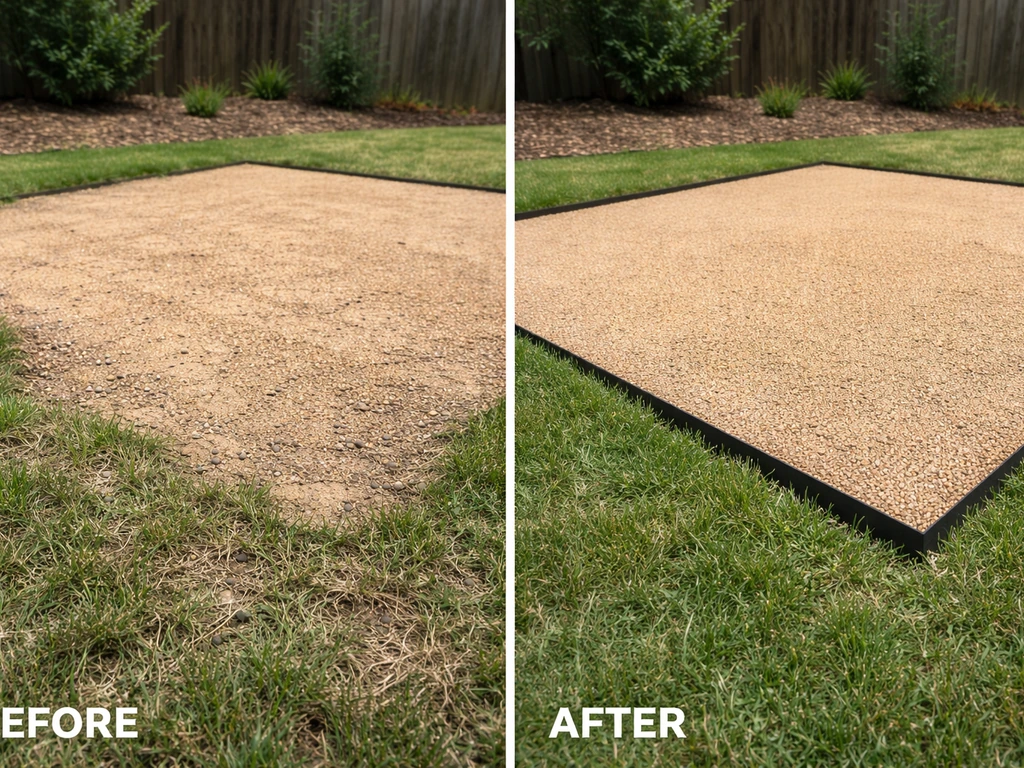
Done right, a stabilized DG patio is a genuinely satisfying weekend project. It's faster than pouring concrete, cheaper than pavers, and has a natural look that works in almost any yard style. Once you've got the surface dialed in, you're also in a great position to add a shade structure or patio cover overhead, which opens up a whole separate set of decisions around posts, roofing panels, and attachment hardware. If you're also installing patio sails for shade, you can plan the sail locations once the DG surface is in place so the posts and brackets have solid footing. If you’re also adding a patio misting system, plan the supply line routing and nozzle placement so they won’t interfere with edging, compaction, or drainage.
FAQ
When I search “how to install DG patio,” how do I confirm I’m buying the right type of “DG” for the project?
In most patio projects, DG means decomposed granite, but you need to check the product label for “stabilized” (mixed with polymer or organic binder) or “resin-bound.” If the bag says “loose” with no binder, expect tracking, shifting under furniture, and more frequent top-dressing.
How can I tell whether my yard slope is enough without guessing?
After rain, mark the exact high and low spots with stakes, then measure the change in height across the patio width. Your goal is roughly 1/8 to 1/4 inch per foot away from the house, but if you see persistent pooling or water flowing from neighboring areas, you may need grading or drainage work first.
Do I need to excavate the full depth everywhere, or can I “spot” add DG?
For a stable, even surface, remove soil uniformly to your planned finished depth (plus any base layer) rather than spot-filling low areas. Spot additions compact less effectively and can create soft spots that feel fine at first but break down after freeze-thaw or heavy use.
What compaction mistake most often ruins DG patios?
Overlooking base preparation and compacting in layers. If you add too much depth at once, the lower portion stays loose even if the top looks packed. Compact in manageable lifts, keep the area slightly damp if your supplier recommends it, and verify firmness before adding the next layer.
How do I prevent DG from washing away at the edges during heavy rain?
Rely on a solid edging system that is secured and low enough to resist being undercut. Galvanized or stainless steel spikes help in wet or freeze-thaw climates, and you should add extra spikes near corners and bends (within a couple inches of the change in direction).
Should I install DG before or after posts for a pergola or patio cover?
Install post footings first, then the DG surface and edging. The concrete footing needs to be placed in undisturbed ground (and below the frost line per local code), and leaving holes after DG is installed will disrupt the compacted base and can undermine the edging.
Can I use treated lumber or should I keep the post base away from DG?
Even with treated posts, keep the post hardware designed to keep the wood or aluminum post clear of the DG surface. Wet, trapped moisture at the base can shorten lifespan, especially where DG edges hold water or where splashing occurs from downspouts.
Do stabilized DG and resin-bound DG need sealing?
Stabilized DG usually does not require the same kind of sealing as concrete, but you can optionally apply an acrylic DG stabilizer topcoat after curing to improve erosion resistance. Avoid sealing too early, and follow the product directions since cure times vary by brand and weather.
What should I do about weed growth between DG and borders?
Weed problems are usually edge and seam problems, not the DG itself. Use a proper edging transition, and treat junctions with a flexible sealant or polymeric jointing sand rather than rigid caulk, which tends to crack with seasonal movement.
Will DG handle freeze-thaw and snowplows?
DG can handle winter conditions well when properly compacted and edged, but shovels and snowplows can disturb the surface and pull material toward the edges. Plan for spring re-leveling, light top-dressing, and re-compaction where equipment contact occurs.
How do I estimate material more accurately than “tons per 100 square feet”?
Use the rough tonnage rule as a starting point, then adjust for actual finished depth and your slope. Add 10 to 15% for waste, spillage, and extra thickness needed to achieve the grade, and account for any added road base thickness if your native soil is sandy or soft.
When do I need professional help instead of DIY?
Consider a pro if you have persistent flooding, a slope steeper than about 8 to 10 percent without retaining features, or if you must modify existing concrete or add drainage engineering. If permits and inspections apply (or if you’re building structural footings), get plans reviewed before starting.