You can absolutely build a DIY patio roof yourself, most attached lean-to and freestanding shade structures are well within reach for an intermediate DIYer over a weekend or two. If you want shade that you can expand later, a do it yourself patio awnings approach can be a good alternative to building a full roof DIY patio roof. The key is picking the right style for your situation, pulling a permit before you swing a hammer, getting your ledger flashing right the first time, and sizing your framing to meet local code. Do those four things and you'll end up with a solid, weatherproof structure you can be proud of. Skip any of them and you'll be patching leaks or tearing it down for a re-inspection inside a year.
Do It Yourself Patio Roof: Plan, Build, and Safety Guide

Celia Vaughn
17 May 2026
Pick the right DIY patio roof type
The style you choose drives almost every other decision, materials, framing complexity, drainage plan, and how difficult the build actually is. There are four common options for a DIY patio roof, and they're not equally hard.
| Style | Best For | DIY Difficulty | Key Consideration |
|---|---|---|---|
| Lean-to / Attached Shed Roof | Most attached patios, narrow spaces, lower budgets | Beginner–Intermediate | Ledger flashing is critical; single slope concentrates runoff on one side |
| Freestanding Flat or Shed Roof | Patios away from the house, HOA flexibility, renters | Intermediate | Posts and footings carry all loads; no ledger tie-in but footing design matters more |
| Attached Gable Roof | Wider patios, higher rain/snow areas, aesthetic match to house | Intermediate–Advanced | Ridge beam sizing and rafter layout add complexity; sheds water well |
| Simple Shade Structure / Pergola Roof | Filtered light, mild climates, lower structural demand | Beginner | Not weatherproof; polycarbonate or fabric panels can upgrade it |
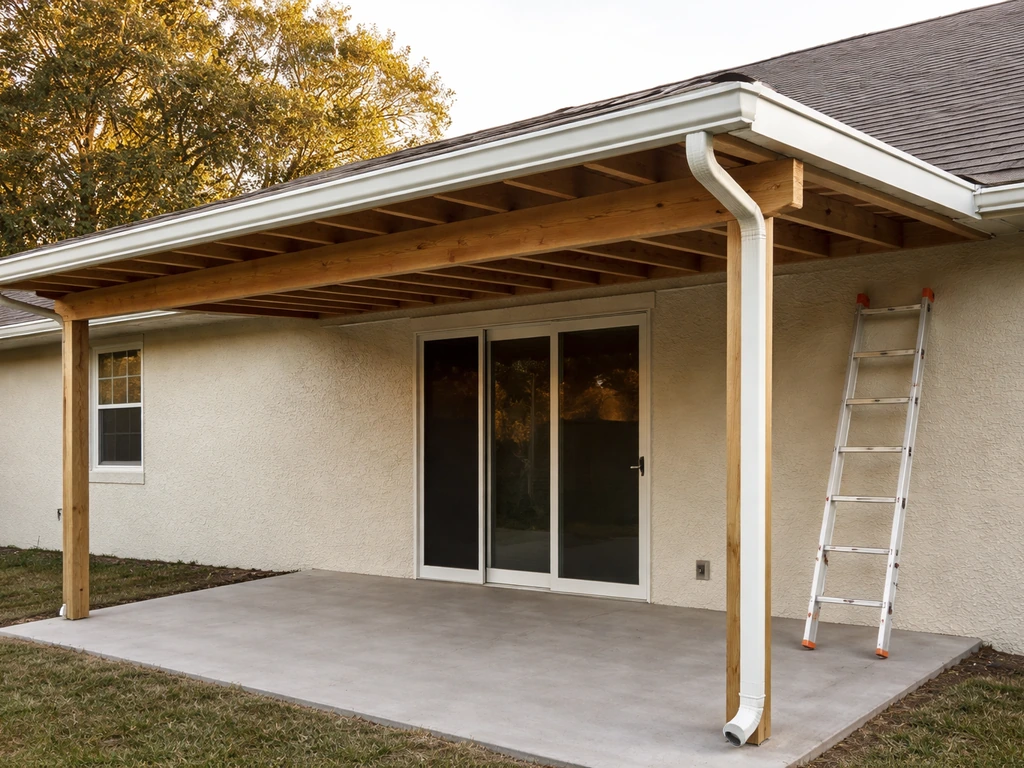
For most first-time builders, the attached lean-to (also called a shed-style or single-slope patio cover) is the sweet spot. It ties into your house with a ledger board, slopes away from the wall, and uses the simplest possible framing: ledger, posts, a beam, and rafters. A gable roof looks great and sheds water better in heavy-rain climates, but you're dealing with a ridge beam, two sets of angled rafters, and more complex flashing at the peak. Build a lean-to clean the first time, and you'll understand everything you need to tackle a gable later. Freestanding covers are great when you want to avoid touching your house structure at all, but you need to engineer the footings properly because all wind uplift and lateral load resistance is on those posts and their anchors, there's no house wall to lean on.
Materials and design choices: aluminum vs. wood vs. metal roofing
This is where a lot of DIYers get stuck browsing online and go in circles. Here's the honest breakdown of the three real options.
Aluminum framing and panels
Aluminum patio cover systems (think Alumawood, AlumaShade, Solara, and similar kit-based products) are the easiest to build with because the manufacturer has already done the engineering for you. If you want the simplest path, start with do it yourself patio cover kits because the manufacturer designs the system and instructions for a range of spans. You get extrusion profiles sized for specific spans, step-by-step instructions, and hardware that fits together as designed. Alumawood systems, for example, specify a minimum slope of 1/4 inch per foot and a maximum of 1 inch per foot, that range is already engineered into the panels. The catch: aluminum kits cost more upfront than raw lumber, and you have to follow the manufacturer's specs exactly. Don't substitute random hardware or deviate from the prescribed overhang and connection details. When you follow the system, DIY feasibility is genuinely high. When you improvise with aluminum extrusions, you create problems the system wasn't designed to handle.
Wood framing
Pressure-treated lumber for posts and beam, and dimensional lumber (typically 2x6 or 2x8 rafters depending on span and spacing) for the framing is the traditional approach and still the most flexible. Wood lets you match your house framing, is easy to source locally, and is forgiving to cut and adjust in the field. Most municipal patio cover handouts, the ones from cities like San Jose, Palmdale, and Cypress, are written around conventional wood framing with allowable span tables built right in. Those tables tell you exactly what size rafter you need for a given span and spacing, so you don't need an engineer for most standard residential spans. The downside is maintenance: wood needs sealing or painting, it can rot at post bases if drainage is poor, and it's heavier to work with overhead.
Metal roofing panels
For the roofing material itself (what actually sits on top of your framing), corrugated or standing-seam metal panels are a great DIY-friendly choice. They're lightweight, durable, available at most home improvement and roofing supply stores, and install fast with wood screws and neoprene washers. Metal does conduct noise in rain, something some people love and others hate. Polycarbonate panels are another popular option for a patio that needs filtered light rather than solid shade; they're easy to cut and install but require pre-drilling holes about 1/8 inch larger than the screw shank to allow for thermal expansion, otherwise you'll crack the panels over time. In cold climates, polycarbonate also traps condensation on the underside, which can drip, worth planning for with adequate slope and ventilation gaps at the ridge or eave.
| Material | Cost Range (materials only) | Maintenance | DIY Ease | Best Climate Fit |
|---|---|---|---|---|
| Aluminum kit system | $15–$35/sq ft | Very low | High (follow the system) | Hot/dry; mild rain |
| Wood framing + metal panels | $8–$18/sq ft | Moderate (seal every 3–5 yrs) | High (familiar tools) | Most climates |
| Wood framing + polycarbonate | $6–$14/sq ft | Low–Moderate | High (careful drilling) | Mild; avoid heavy snow |
| Wood framing + asphalt shingles | $10–$20/sq ft | Moderate | Intermediate | High rain; matches house roof |
My honest recommendation for most DIYers: use wood framing and corrugated metal or Alumawood-style panels. You get local code support (most jurisdictions have prescriptive tables for wood framing), easy sourcing, and a clean finish. If your HOA or neighborhood design standards require your patio cover to match the house materials and style, check that first, some planned communities explicitly require columns and roof materials to match the main structure.
Planning and code checks before you start
This step bores people and gets skipped. Don't skip it. A patio roof that isn't permitted can trigger forced removal, problems when you sell, and liability if something goes wrong structurally. The good news is that many jurisdictions have simplified the process with standard patio cover handouts, the city does the engineering, you fill in the dimensions, and you get a permit over the counter or in a few days online.
What to check at your building department
- Whether a permit is required (most jurisdictions require one for any roofed structure over 120–200 sq ft, and many require one for anything attached to the house)
- Whether your city has a prescriptive patio cover handout (these include span tables, ledger bolt patterns, footing sizes, and flashing details — they're free and do a lot of the engineering work for you)
- Minimum roof pitch requirements (typically 1: 12 for solid roofs, though some jurisdictions allow lower slopes for specific materials)
- Setback requirements from property lines
- Whether your area is in a high wind, high snow load, or fire hazard severity zone — these change framing member sizes and footing depths
- HOA approval if applicable (get it in writing before you buy materials)
On structural planning: the IRC sets a minimum residential roof live load of 20 pounds per square foot (psf) for most configurations, but in snow country your ground snow load can push that significantly higher. If your area has a ground snow load above 70 psf, you're outside standard prescriptive span tables and likely need engineered drawings. Most of the Sun Belt and mild coastal areas are well under that threshold, so a standard permitted DIY build works fine. In the Mountain West or Northern states, check your local ground snow load before assuming the standard table applies.
Site measurements you need before designing
- Overall patio dimensions (width and depth)
- Height of the eave or wall where the ledger will attach
- Distance from the ledger attachment point to the outer beam (this is your rafter span)
- Existing roof framing type and spacing at the tie-in point — some building departments ask for this on permit applications
- Grade slope of the patio slab (the slab itself should slope away from the house at least 1/4 inch per foot for the first 10 feet)
- Location of utilities, underground lines, and existing footings if freestanding posts are needed
Tools, estimating, and a realistic cost and timeline
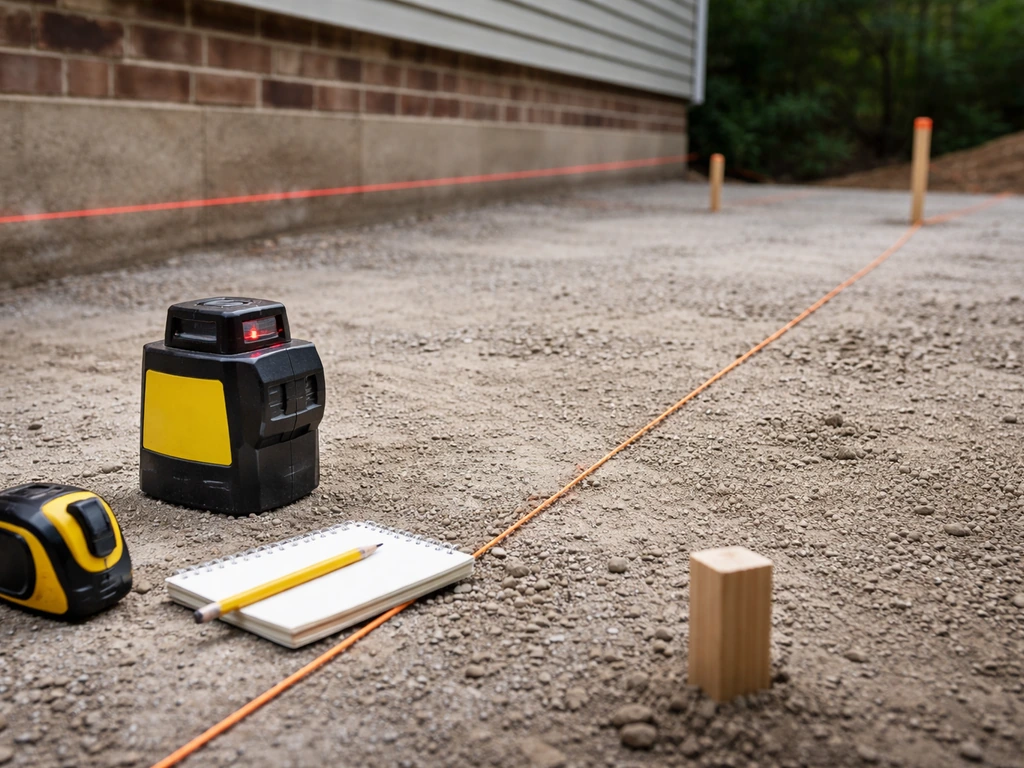
Tools you'll need
- Circular saw and miter saw (or a miter box for angle cuts on rafters)
- Drill and impact driver with appropriate bits
- Level (a 4-foot level and a long string line or laser level for setting post heights)
- Post hole digger or rented auger for freestanding footings
- Speed square and framing square
- Chalk line and tape measure
- Tin snips if cutting metal panels
- Safety: safety glasses, hearing protection, and a properly rated ladder (don't use a step ladder on a slope — get a ladder that stabilizes on uneven ground)
Estimating materials
For a wood-framed lean-to patio roof, start with your rafter count. Rafters typically run 16 or 24 inches on center, check your local prescriptive table for what spacing and size covers your span. For a 12-foot rafter span with standard residential loading, 2x6 rafters at 24 inches on center are common, but verify with your jurisdiction's span table before buying. Count the rafters across your patio width at your chosen spacing, add 10% for waste, and you have your lumber list. You'll also need: the ledger board (same depth as rafters), a beam for the outer edge (typically doubled 2x8 or 2x10 depending on beam span and post spacing), posts (4x4 for spans up to about 8 feet, 4x6 or 6x6 for longer spans or exposed conditions), post bases rated for your loads, structural screws or lag bolts for the ledger, joist hangers for rafter-to-ledger connections, flashing (minimum 26-gauge galvanized), and your roofing panels or shingles.
Realistic cost ranges
A typical 12x16 foot (192 sq ft) attached lean-to patio roof built with wood framing and metal panels will run roughly $1,500 to $3,500 in materials depending on your region, lumber prices at the time you build, and roofing panel choice. Add $150 to $500 for permit fees. An equivalent aluminum kit system will push $3,000 to $6,000+ for the same footprint. If you're hiring out framing labor only and doing the finish yourself, budget an additional $800 to $2,000 for a framing carpenter's time. A fully contractor-built version of the same structure would typically run $6,000 to $12,000 or more, so the DIY savings are real and significant.
Timeline
For a solo builder with a helper, a 12x16 attached lean-to is a two to three weekend project: one weekend for footings (if freestanding posts are involved), ledger, and posts; one weekend for beam, rafters, and roofing panels; a third weekend for flashing, fascia, gutters, and cleanup. If you're waiting on permit approval, factor that in, some jurisdictions are same-day or same-week for standard patio covers, others take two to four weeks. Don't frame before the permit is in hand.
Step-by-step build process: from layout to finished roof
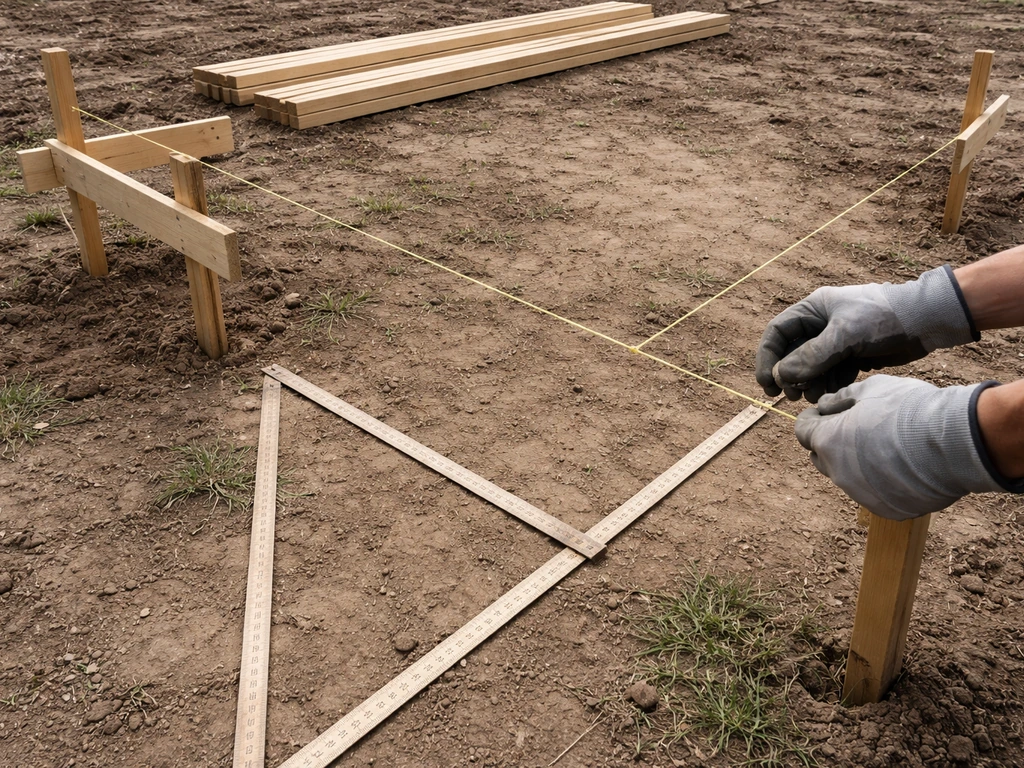
- Lay out the footprint. Use batter boards and string lines to establish the outer perimeter of your structure. Check for square using the 3-4-5 triangle method (measure 3 feet on one string, 4 feet on the perpendicular, and the diagonal between those two points should be exactly 5 feet). Mark post locations.
- Dig and pour footings. For freestanding posts, dig below your local frost depth (check your building department handout — depths vary from 12 inches in the South to 48 inches or more in cold climates). Set post bases in concrete, let cure for at least 48 hours before loading them.
- Install the ledger. This is the most important step of an attached build. Position the ledger so the finished roof surface will slope away from the house at your target pitch (minimum 1 inch of rise per foot of run for most solid roofs). Use the lag bolt spacing specified in your permit handout — typically 5/8-inch diameter lags at 16 to 24 inches on center in a staggered pattern through the ledger and into the rim joist or wall framing. Install flashing immediately (see the flashing section below — don't wait).
- Set posts. Drop posts into post bases, plumb them in two directions with a level, and brace temporarily. Cut posts to the correct height accounting for the beam depth and your target roof pitch.
- Install the outer beam. Lift the beam (get a second person for this — a doubled 2x10 is heavy overhead) and set it on top of the posts. Secure with post caps rated for your load. The beam top should be level across the width of the patio.
- Install rafters. Cut rafter birds-mouth notches where rafters bear on the beam if your design calls for it (a birds-mouth is a small notch cut into the bottom of the rafter that lets it sit flat on top of the beam). At the ledger end, hang rafters with joist hangers — don't just toe-nail. Space rafters at your permitted on-center spacing.
- Add blocking and fascia. Install blocking between rafter tails at the outer beam for rigidity, and nail fascia boards to the rafter ends. Fascia gives your roof a finished edge and is the attachment point for gutters.
- Install roofing panels or sheathing. For metal panels, lap panels according to manufacturer direction (typically one to two corrugations of overlap at side laps, 6 inches of overlap at end laps). Drive screws into the high ribs of corrugated panels, not the low valleys — water runs in the valleys. For polycarbonate panels, pre-drill oversized holes and use manufacturer-supplied closure strips at eave and ridge to block insects and debris. For asphalt shingles, install OSB sheathing first, then underlayment, then shingles starting at the eave.
- Complete flashing at the wall. Install Z-flashing or step flashing at the ledger/wall intersection, and integrate it properly with the existing siding (see the next section). This step is what separates a leak-free patio roof from a problem structure.
- Install gutters and downspouts at the eave. A 12-foot-wide patio roof can dump a lot of water in a storm — gutters protect your patio slab, your foundation, and your footings. Slope gutters toward downspouts at 1/4 inch per 10 feet of run.
Water management: slope, drainage, flashing, and leak prevention
More DIY patio roofs fail from water intrusion than from structural problems. Get this part right and your structure will last decades. Rush through it and you'll be dealing with rot, mold, and stained walls within a few years.
Slope
For a solid roof (metal panels, shingles, or solid panels), build in a minimum slope of 1 inch per foot (1:12 pitch). Shallower than that and water sits, finds every imperfection in your flashing, and eventually gets through. For aluminum kit systems with purpose-built panels, manufacturers like Alumawood specify their own slope range (1/4 to 1 inch per foot), follow that guidance because their panel profile and lap details are engineered for that range. A shallow pitch on a standard corrugated metal panel (meant for steeper slopes) is a common mistake that causes water to back up under laps and drip through.
Ledger flashing, the most critical detail

The ledger is where your roof meets your house, and it's where most attached patio roof leaks originate. For house-attached covers, a horizontal ledger mounted to the house supports the framing, and the ledger connection is also the critical area for flashing and waterproof drainage to prevent leaks. Here's the correct sequence: after lag-bolting the ledger, install a continuous piece of galvanized Z-flashing (minimum 26-gauge) across the top of the ledger. The top leg of the Z-flashing slides up behind the siding course above the ledger, you may need to carefully pry that siding course out to slip the flashing behind it. The bottom leg laps over the face of the ledger and directs water out and away. In wetter climates, add a self-adhering waterproof membrane (WRB tape) behind the ledger before you bolt it, integrating it with the house's existing water-resistive barrier. Cap flashings work fine in dry climates; in the Pacific Northwest or anywhere with sustained rain, go multilayer. Some jurisdictions explicitly require the flashing detail to be shown on your permit drawings, the city building departments in Cypress and Casa Grande, for example, call out 26-gauge galvanized flashing as a labeled requirement on their patio cover plan sheets.
Drainage at the base
Your patio slab should already slope away from the house at 1/4 inch per foot or more for the first 10 feet. If it doesn't, you have a drainage problem that your patio roof will make worse by concentrating runoff exactly at the foundation. Freestanding patio covers resist wind using independent posts and footings, so their structural and drainage design implications differ from attached covers, especially near the house wall and footing design. Address the grading before you build, not after. For freestanding post footings, make sure the concrete extends slightly above grade so water doesn't pool around the post base hardware, standing water at post bases is how you get rot and corrosion even with pressure-treated lumber.
Common leak points and how to prevent them
- Ledger-to-wall gap: Water gets behind siding if Z-flashing isn't tucked under the siding course. Fix: always tuck the top leg of the flashing behind siding — never just caulk over the gap.
- Panel end laps: Insufficient overlap on metal or polycarbonate panels lets wind-driven rain in. Fix: maintain at least 6 inches of end lap and seal the overlap with appropriate panel sealant tape.
- Fastener holes: Screws through panel faces are potential leak points. Fix: use neoprene-backed screws and drive them straight — not at an angle — so the washer seals flat.
- Valley and penetration points: Any pipe, post, or structural penetration through the roof is a leak risk. Fix: flash every penetration with a purpose-made boot flashing and seal the perimeter.
- Shallow slope backup: Too-shallow a pitch causes water to sit at panel laps. Fix: build in the minimum 1:12 slope before you install panels, not after.
When to stop and hire a pro
Most standard patio roofs in mild-to-moderate climates are legitimate DIY projects. But there are specific situations where you should stop, put down the saw, and call a structural engineer or licensed contractor, not because the work is too hard, but because the consequences of getting it wrong are serious.
Red flags that require a structural engineer or licensed contractor
- Your ground snow load exceeds 70 psf — standard prescriptive span tables don't apply and you need engineered drawings
- You're in a high-wind zone (hurricane, tornado-prone areas, or coastal zones with design wind speeds above 115 mph) — uplift calculations require engineering
- You're attaching a ledger to a house with a masonry, stucco-over-foam, or EIFS wall system — these wall assemblies have moisture management layers that require specialized flashing integration; getting it wrong causes significant hidden damage
- Your existing house framing at the ledger attachment point is deteriorated, non-standard, or you can't locate it confidently — a ledger bolted to siding alone (not into framing) will fail
- The permit process requires engineering stamps that your jurisdiction won't waive for a prescriptive design — usually triggered by span, load, or height thresholds
- Your structure is significantly elevated (second-story patio, steep hillside) — working at height and the fall consequences both make this a professional job
- You discover rot, termite damage, or structural compromise in the house wall or existing roof framing during prep work — stop and assess before proceeding
It's also worth knowing when to hire just for a specific trade rather than the whole project. If you're confident framing the structure but nervous about the ledger flashing on a complex wall system, hire a roofer or waterproofing contractor for that one step and do the rest yourself. The ledger-to-house connection is the highest-stakes single detail on an attached patio roof, getting that one right is worth paying for if you're uncertain.
Troubleshooting issues that come up during and after the build
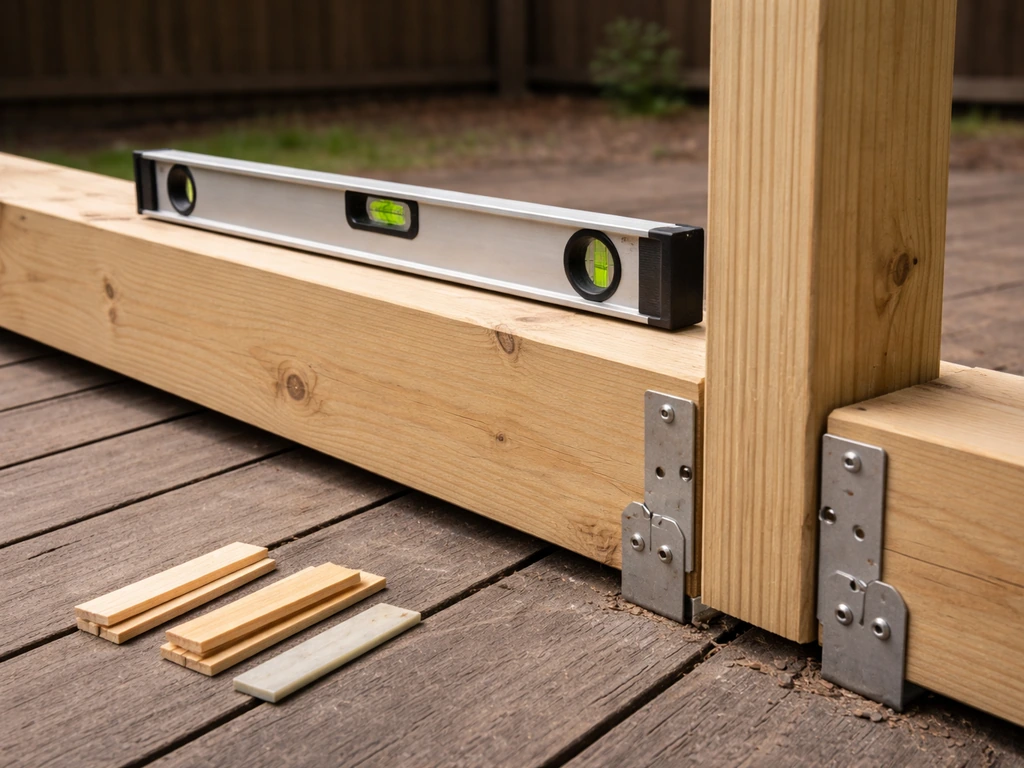
Misalignment is the most common framing problem: posts that end up slightly out of plumb, or a ledger that's not level across its length. Catch these with a level at every step and fix them before moving forward, a 1/2-inch error at the ledger becomes a 1-inch error at the rafter tail and a visible sag in your roofline. Racking (the structure leaning sideways under wind load) means your post-to-beam or post-to-footing connections aren't rigid enough, add knee braces or diagonal bracing between posts and beam if your structure wobbles. A sagging beam usually means the span is too long for the member size; check the span tables and add a mid-span post if needed. Condensation dripping from polycarbonate panels in cold mornings is normal, slope the panels adequately and leave a small gap at the eave for airflow to reduce buildup. And if you have a leak you can't find after the build, go back to the ledger flashing first, that's where 80% of attached patio roof leaks originate.
One last thing: a DIY patio roof is a great project precisely because most of the hard thinking has already been done for you, your local building department's prescriptive handout, manufacturer installation instructions for kit systems, and the straightforward physics of a simple shed roof all work in your favor. If you want to do it yourself patio covers, make sure you also follow the same checklist for style, permits, and water management so the finished cover holds up DIY patio roof. Treat the permit process as free engineering review, follow the flashing details like they matter (because they do), and build to the span tables rather than guessing. You'll end up with a structure you'll use every day.
FAQ
Can I build a do it yourself patio roof over an existing deck or slab that is already cracked or not level?
Yes in some cases, but do not assume the slab is fine. If the slab is heaving, sloped the wrong direction, or has soft spots, fix grading and any structural movement first, since you will concentrate roof runoff and loads at the same points. For freestanding posts, also verify you have stable soil or proper footing depth, not just concrete on top of weak base material.
What’s the biggest mistake to avoid when choosing slope for a do it yourself patio roof?
Using a pitch that is too shallow for the roofing system. Even if the roof looks covered, shallow slope can cause water to back up under panel laps or flashing seams. For corrugated metal, follow the minimum slope requirement for that specific panel profile, not a generic rule, and for polycarbonate allow for thermal expansion by sizing pre-drilled holes correctly.
How do I decide between an attached lean-to and a freestanding patio roof if I want to avoid drilling into my house?
If you want zero connection to the house, you are usually choosing freestanding, but that shifts the hard parts to the footings and lateral stability. You need engineered or prescriptive-compliant post anchors designed for wind uplift and racking, and that requirement can outweigh the convenience of skipping ledger flashing. If you are comfortable with careful waterproofing, an attached lean-to often ends up simpler overall.
Can I install an aluminum kit patio cover without a permit if other homeowners did?
Usually you still need a permit, even for kit systems. Manufacturer engineering does not replace local code and site-specific requirements, like snow load conditions, spacing, and attachment details to your house. The permit acts as your jurisdiction’s check on those variables, and skipping it can create removal or insurance issues later.
What should I use to attach the ledger board, and how do I know I have the right fasteners?
Use the connector type and fastener size required by your permit drawings or your attachment detail. For most wood-framed patios, lag screws or structural screws are used with the correct spacing and embedment, and you must install the ledger over the required weatherproofing layer, then bridge it with properly lapped flashing. Avoid substituting different screws or adding fasteners only where they feel convenient.
Do I need gutters or can I just let runoff fall off the edge of a do it yourself patio roof?
You can often omit gutters if the roof edge drains into a code-compliant area and your patio slab grading directs water away, but gutters help prevent staining, overspray, and foundation erosion. If you have a narrow yard, downhill direction toward the house, or a patio slab that only barely meets slope, consider adding a gutter and downspout, or you may end up with concentrated runoff at the closest point to the foundation.
How do I prevent rot at the post bases for a freestanding do it yourself patio roof?
Start with post bases that are rated for exterior use and designed for the load, then keep concrete and hardware from trapping water around the wood. Ensure the footing concrete extends slightly above finished grade as the article notes, and keep mulch and soil pushed back from the post hardware. Also treat cut ends of pressure-treated lumber and seal as recommended by your lumber supplier.
Is polycarbonate roofing a good choice for a do it yourself patio roof in cold climates?
It can be, but plan for condensation and airflow. If condensation drips are a concern, maintain adequate slope, leave small ventilation gaps at the eave and ridge where applicable, and pre-drill larger holes to handle thermal expansion. Also avoid installing panels too tightly, since trapped moisture and blocked airflow can lead to underside buildup.
What should I do if my ledger height is slightly off or my house wall is not straight?
Fix it during layout, not after framing. Minor wall irregularities can cause rafter ends to bear inconsistently, leading to visible sag or uneven water flow. Use a laser or long level to mark the ledger, verify the ledger is level, and shim or adjust mounting points according to your local approved detail, rather than forcing rafters to twist into place.
If I find leaks after construction, where should I troubleshoot first on an attached do it yourself patio roof?
Start with the ledger flashing and its transitions, since most attached leaks begin there. Check the flashing laps, the interface with siding above it, and any areas where flashing was interrupted or replaced for outlets or penetrations. If you need to open up siding, do it in a way that lets you reinstall the water-resistive layer continuity, otherwise you can create a new path for water.