You can absolutely build and install a DIY patio awning yourself, and most attached fabric or fixed-frame awnings are weekend-level projects if you pick the right type, size your attachment points correctly, and don't skip the slope. For many homeowners, this same DIY planning approach is a helpful starting point when you are deciding on do it yourself patio covers.
Do It Yourself Patio Awnings: Step-by-Step Installation Guide

Celia Vaughn
15 May 2026
The safest path is: choose your awning style, confirm your wall or rafter can handle the load, cut and set your frame with a proper pitch, anchor every connection with structural fasteners (not deck screws), tension the fabric evenly, and check your local permit requirements before you start.
A Western Timber Frame pergola safety guide similarly emphasizes that pergolas should be engineered to resist wind uplift and lateral racking, and that anchoring needs to be designed for specific loads rather than done with generic bolting anchor every connection with structural fasteners (not deck screws). That's the whole job.
The sections below walk you through each step in detail.
Picking the right DIY patio awning type and where it mounts
The first decision shapes everything else: what kind of awning are you actually building? There are four main DIY-friendly styles, and they're not all the same project.
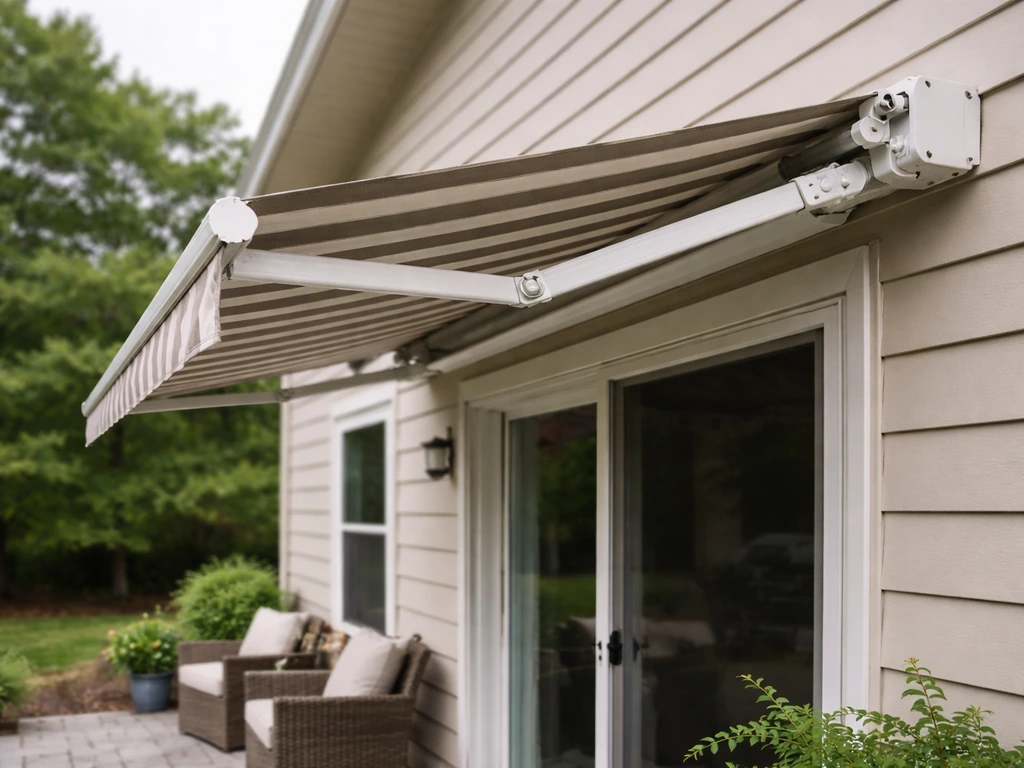
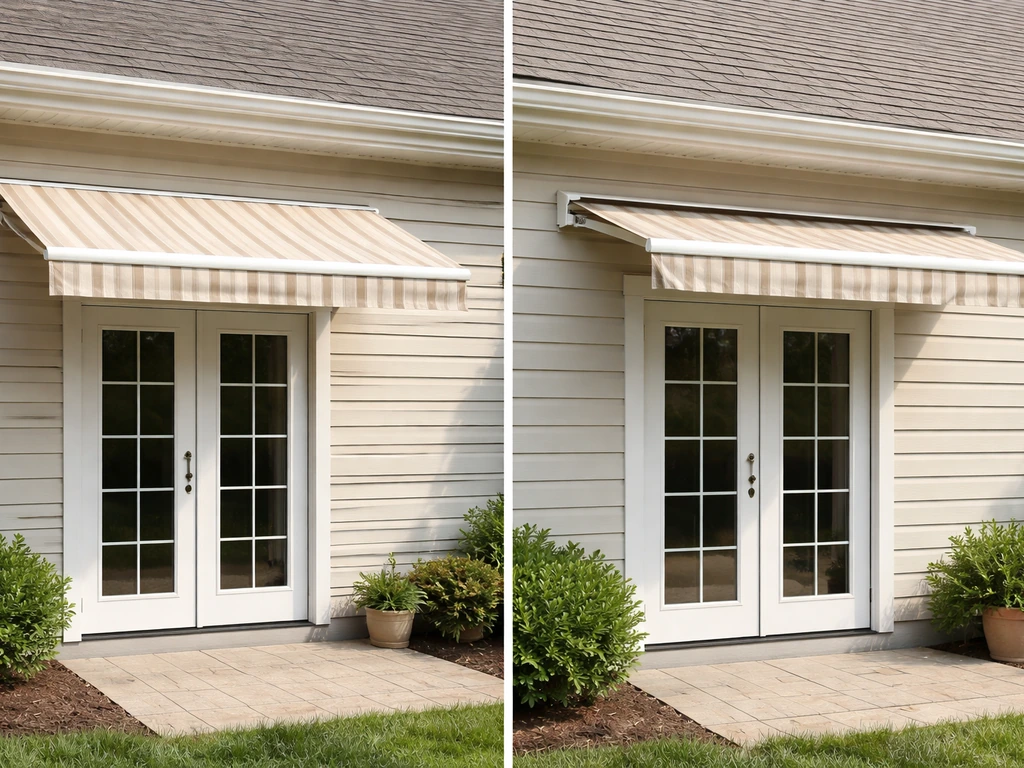
- Fixed fabric awning: A stationary fabric panel stretched over a metal or aluminum frame, attached to the house. Simple, affordable, and the most beginner-friendly option. Think of the classic striped awning over a storefront window, scaled up.
- Retractable manual awning: A spring-loaded or crank-operated arm system that lets you extend and retract the fabric. More moving parts, more installation precision needed, but still very DIY-able from a kit.
- Fixed frame/structural awning: A solid aluminum or wood frame with a roof panel (polycarbonate, corrugated metal, or solid fabric). More like a small lean-to patio cover. This overlaps significantly with DIY patio covers and DIY patio roofs, which have their own full structural requirements.
- Freestanding shade structure: A canopy or shade sail on posts set in concrete, with no wall attachment. Great when you can't or don't want to attach to the house.
Where the awning mounts matters just as much as the style. The four common attachment points are: a wall ledger board (most common for attached awnings), directly into rafter tails or eave blocking under the roofline, into masonry or brick using anchor bolts, or onto freestanding posts set in concrete footings. Each has different fastener requirements and different load-carrying capacity. A stucco or vinyl-sided wall needs extra care because you're going through a non-structural finish layer to reach the actual framing behind it.
Sizing, shade coverage, and layout planning
Measure your patio first, then work backward from the shade you actually want. A common mistake is ordering or building an awning that matches the wall width but doesn't project far enough to cover the seating area. As a rule of thumb, a projection (how far the awning extends out from the wall) of 8 to 12 feet covers a typical patio table-and-chairs setup. For a 10-foot projection with a 25-degree slope, the front valance drops roughly 4.5 feet below the attachment point at the wall, so check your clearance: you want at least 7 feet of headroom at the lowest front edge.
Sketch your layout on paper or use a free tool like SketchUp. Mark the location of doors, windows, and any exterior outlets or light fixtures you'll need to work around. Note the direction the patio faces: a west-facing patio gets brutal late-afternoon sun, so you'll want maximum projection. A south-facing patio benefits more from a steeper pitch that blocks high overhead sun. Factor in any HOA setback rules or fence-line restrictions before you finalize dimensions.
Also think about water. The awning needs to slope enough to shed rain without pooling. A minimum 1-inch drop per foot of projection (roughly a 5-degree pitch) is the bare minimum; 2 inches per foot (about 10 degrees) is more practical and keeps fabric from sagging under rain weight. For a 10-foot projection, that means the back (wall) edge sits at least 10 to 20 inches higher than the front edge.
Materials and tool list for common DIY awning builds
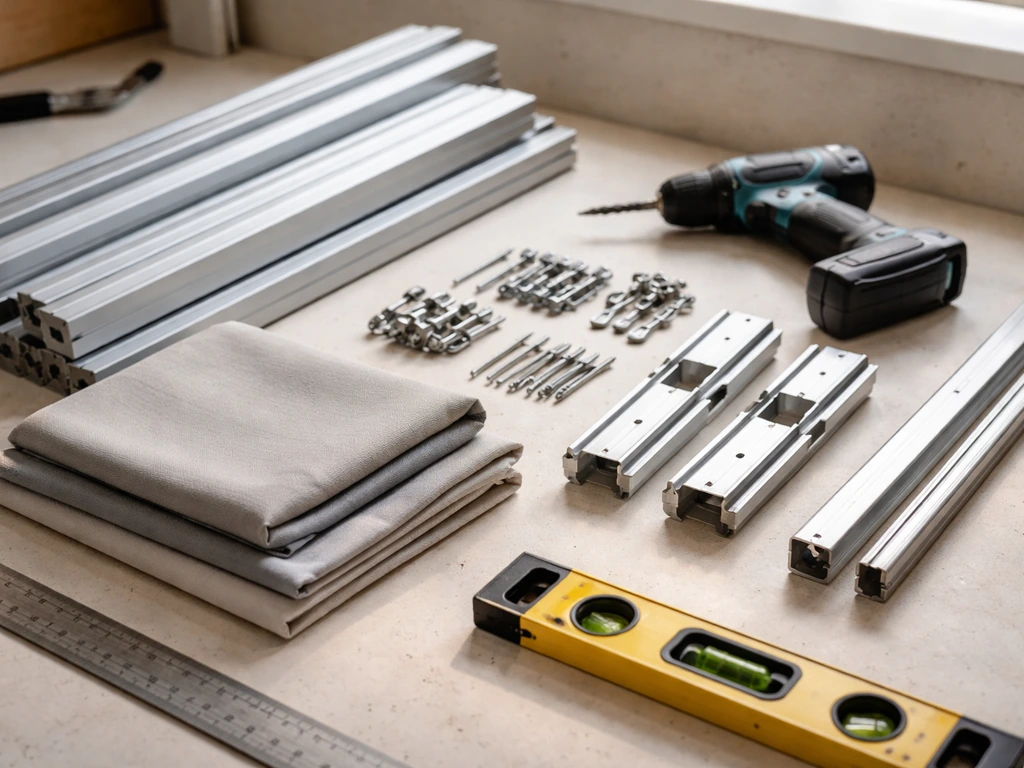
What you need depends heavily on the awning type, but here's a practical breakdown for the two most common DIY builds: a fixed fabric awning on a welded or bolt-together aluminum frame, and a simple fixed frame awning using aluminum or pressure-treated wood.
| Material | Fixed Fabric Awning | Fixed Frame Awning |
|---|---|---|
| Frame material | 1.5" x 1.5" square aluminum tube or kit arms | 2x6 PT wood or 2" aluminum tube |
| Covering | Solution-dyed acrylic fabric (Sunbrella-type) | Polycarbonate panels, corrugated metal, or solid fabric |
| Wall attachment | Lag-screwed header/rail into studs | Ledger board lag-bolted into studs or rim joist |
| Fasteners | Stainless or galvanized lag screws, carriage bolts | 1/2" lag screws minimum, structural bolts at posts |
| Front support | Lateral arm braces or rafter arms | 4x4 or 3" aluminum posts set in concrete |
| Sealing | Self-adhesive flashing tape, silicone caulk | Step flashing at wall, caulk at all penetrations |
| Estimated material cost | $300–$900 DIY | $600–$2,500 depending on size and material |
For tools, you'll need a drill/driver with a long bit for finding studs and driving lags, a level (a 4-foot level makes a big difference here), a tape measure, a chalk line, a miter saw or circular saw for cutting frame members, a socket set, a caulk gun, and safety glasses and gloves. For masonry attachment, add a hammer drill with masonry bits. A second person is not optional on installation day; you need hands-free help to hold frame members at height while you fasten.
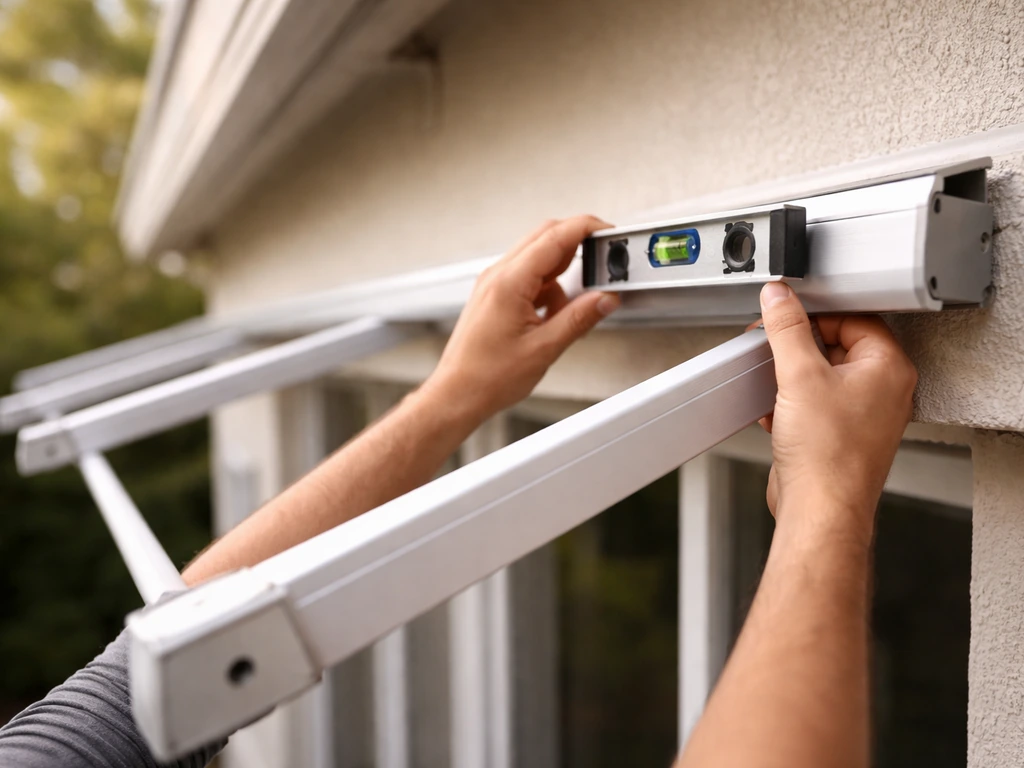
How to attach safely: siding, brick, eave, rafter, and freestanding options
This is the most important part of the whole project, and where most DIY failures happen. An awning that pulls away from the wall doesn't just damage the wall: it falls on people. Every attachment point needs to transfer load into structural framing, not just surface material.
Wood-framed walls with siding
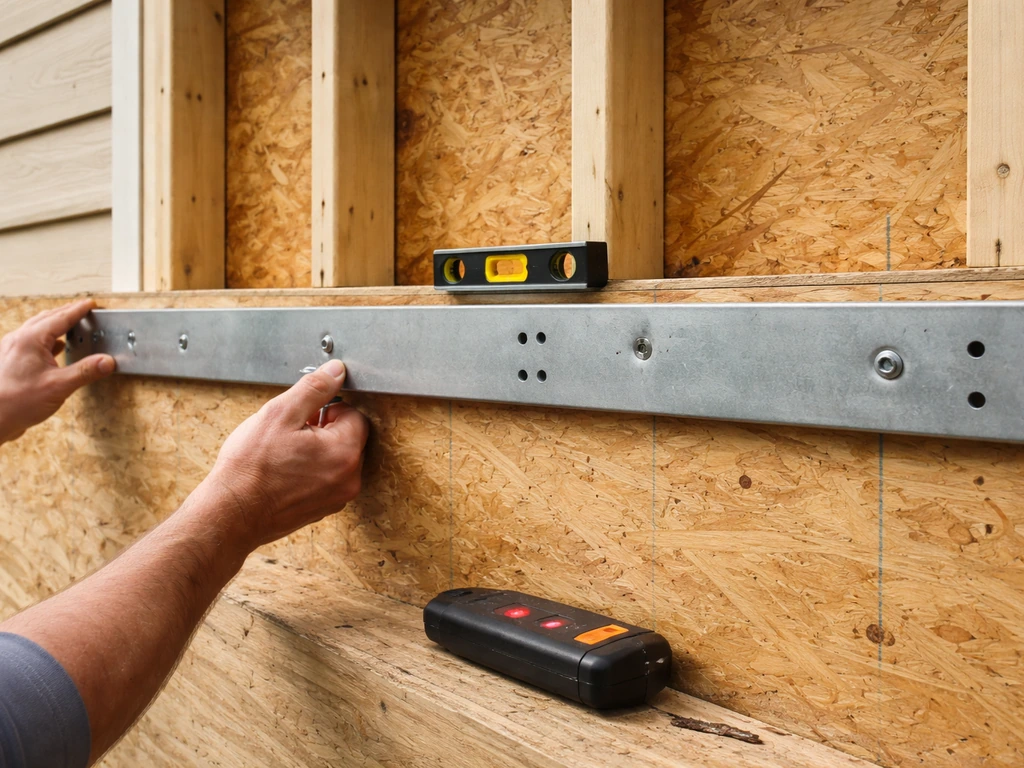
Use a stud finder to locate the wall studs (typically 16 inches on center). Your header rail or ledger board must hit at least two studs, preferably more. Use 3/8-inch or 1/2-inch lag screws long enough to penetrate at least 2.5 inches into solid framing past the sheathing and siding. Drill a pilot hole slightly smaller than the lag shank first to avoid splitting. Apply a bead of silicone around each fastener hole before driving, and seal the top edge of the ledger with self-adhesive flashing tape lapped under any siding above it. Water getting behind the ledger is the number-one cause of rotted walls under awnings.
Brick or masonry walls
Use a hammer drill and carbide masonry bits to drill into the brick or block (not the mortar joint, which is weaker). Set 3/8-inch or 1/2-inch sleeve anchors or wedge anchors into the brick at least 2.5 inches deep. These are rated for far higher pull-out loads than standard lag screws in wood when installed correctly. Seal around each anchor with polyurethane or silicone caulk rated for masonry. Never assume the mortar is strong enough on older homes, especially brick from before the 1970s.
Eave or rafter attachment
Attaching to rafter tails at the eave can give you a cleaner look and can be structurally sound, but you need to confirm the rafter tails are solid (no rot) and that you're hitting the rafter itself, not just fascia board. Use joist hanger-style hardware or direct lag screws into the rafter face. The challenge here is that eave attachments put lateral and uplift load directly on the roof structure, so this option works best for lighter fabric awnings, not heavy frame builds.
Freestanding post option
If you're not attaching to the house at all, posts need to go into concrete footings. A typical rule is to dig the footing to a depth of 1/3 to 1/2 of the post height above grade, and at least 12 inches below the local frost line. For a 10-foot post, that often means a 4-foot deep footing hole. Use post base hardware anchored in the wet concrete rather than setting the post directly in concrete (which traps moisture and causes rot for wood posts). Freestanding structures need diagonal bracing or cross-bracing between posts to resist lateral racking from wind.
Frame construction, slope, drainage, and wind-load basics
Once the attachment points are set, you're building out the frame. For a basic fabric awning, this is a header rail at the wall and rafter arms projecting out to a front rail. For a fixed frame awning, it's a ledger at the wall, rafters sloping down and out, and a beam or header at the front supported by posts or lateral arms.
Slope matters for two reasons: water and wind. Pitch toward the front (or side) so rain runs off and doesn't pond. A shallow pitch (under 5 degrees) on fabric awnings lets water collect in sags, which adds hundreds of pounds of unexpected load during a storm. A steeper pitch also helps with wind: a sloped awning deflects wind upward rather than catching it flat, which dramatically reduces uplift force.
Wind load is something most DIYers underestimate. Wind doesn't just push on awnings from the side: it creates uplift force on the underside (like a wing), especially at projections over 6 feet. Incorrect or absent wind-load calculations can cause uplift or downforce that literally rips attachment points out of walls or buckles frame members. The US standard for design loads is ASCE 7, and building codes (IBC Chapter 16 and IRC Chapter 3) incorporate location-specific wind speeds.
IBHS notes that roof design wind loads rely on code requirements such as the IBC (Chapter 16) and IRC (Chapter 3) along with location-specific design wind speeds building codes (IBC Chapter 16 and IRC Chapter 3) incorporate location-specific wind speeds. . In practice, this means if you're in a high-wind zone (the Gulf Coast, tornado alley, mountain regions), you need to either stick with a kit rated for your wind zone or have an engineer review your frame design.
Cross-bracing between rafter arms significantly reduces racking under wind pressure. Don't skip it.
Common mistake: people build the frame plumb and level, then wonder why water pools in the middle of the fabric. Always set the wall attachment point higher than the front rail by your target slope measurement before you start fastening anything else. It's much harder to adjust after the frame is up.
Installing the awning fabric, track, and tensioning it correctly
For fixed fabric awnings, the fabric is typically attached to the frame using either a bolt rope/keder rail system (the fabric has a sewn rope edge that slides into a channel extrusion on the frame) or staple-and-batten attachment (fabric is folded over a batten strip and screwed into the frame). The keder/rail system is cleaner and more replaceable. The batten system is simpler to DIY but harder to retension later.
Start fabric installation at the back (wall) rail. Slide or clamp the leading edge into the rear channel first, then work forward, pulling the fabric taut as you go. You want the fabric drum-tight with no visible wrinkles or sags. A common beginner mistake is installing the fabric loose because it "feels fine" in calm conditions, then watching it flap violently and wear prematurely in any wind. Fabric that flaps will fail at the seams within a season or two.
For retractable awning kits, the cassette or arm system usually arrives partially pre-assembled. Mount the wall bracket first, level it carefully (a crooked bracket means the arms won't extend parallel to the ground), then hang the cassette and test extension/retraction before final bolt tightening. Most manual crank systems have a spring tension adjustment; follow the manufacturer's specific calibration steps. For motorized/electric retractable awnings, you need a weatherproof exterior outlet nearby, and routing power to that outlet typically requires a licensed electrician unless you already have one in the right spot.
Permits, safety, and when to hire a pro
Many jurisdictions require a building permit for a permanent attached awning or patio cover, especially if it exceeds a certain square footage (commonly 200 square feet) or attaches to the house structure. Many homeowners choose do it yourself alumawood patio covers as an alternative to permanent attached structures, but the safest approach is still to confirm permit and installation requirements before you start. Even if your municipality doesn't require a permit for smaller awnings, your HOA might have rules about materials, colors, or setbacks. Check both before you buy materials. Getting caught with an unpermitted structure can mean fines, forced removal, and complications when you sell the house.
Be honest about what's a DIY job and what isn't. Here's a practical breakdown:
| Situation | DIY or Pro? |
|---|---|
| Fixed fabric awning on a wood-framed wall, under 150 sq ft | DIY with basic skills |
| Retractable awning from a rated kit, standard attachment | DIY with kit instructions |
| Fixed frame awning or lean-to patio cover on posts | DIY with moderate skill; permit likely required |
| Attachment to masonry or brick walls | DIY if comfortable with hammer drill; otherwise hire |
| High-wind zone or roof tie-in required | Get engineering review; hire a pro for framing |
| Electrical for motorized awning | Licensed electrician required |
| HOA or permit requires stamped drawings | Hire a structural engineer or design-build contractor |
| Rafter or roof structure modification needed | Hire a licensed contractor |
Safety basics that aren't negotiable: always work from a stable ladder or scaffold, never lean out from a ladder while fastening overhead (use a second person or a ladder standoff), and use appropriate PPE when drilling into masonry (dust mask, safety glasses). If at any point you open up a wall and find rot, termite damage, or wiring in an unexpected location, stop and get a professional assessment before continuing.
Maintenance, durability, and troubleshooting the common problems
A well-built awning should last 10 to 20 years with regular attention. The fabric is almost always the first thing to go, typically at 8 to 12 years for quality solution-dyed acrylic fabric (like Sunbrella) exposed to full sun. Cheaper polyester fabrics can fade and degrade in 3 to 5 years. The frame, if it's powder-coated aluminum, will outlast the fabric by decades if you keep it clean and touch up any chips before rust sets in.
Cleaning and seasonal care
Clean fabric twice a year with a mild soap solution and a soft brush. Rinse thoroughly because soap residue degrades the water-repellent finish over time. For aluminum frames, a simple wash with soapy water removes salt and grime. Inspect all fasteners annually: look for any that have backed out slightly, any signs of rust streaking below fastener heads (especially on steel hardware in coastal environments), and any movement in the frame when you push on it. If a fastener is backing out, don't just retighten it: pull it, check the hole for damage, and re-anchor with the next size up or in a different location.
Fabric re-tensioning and replacement
Fabric naturally relaxes after the first season. If you notice sagging or flapping, re-tension by slightly adjusting the front rail position (on fixed awnings) or adjusting the spring tension (on retractable systems). If the fabric is visibly faded, cracking, or has developed small holes at the seams, it's time to replace it. Fabric replacement is a legitimate DIY task: most awning fabrics are available cut-to-size from online suppliers, and the installation process is the same as original installation. Measure carefully including the hem and rope/batten allowance before you order.
Troubleshooting what often goes wrong
- Water pooling in the fabric: Your slope isn't enough. Re-pitch the frame by lowering the front rail or raising the wall attachment point. Adding an intermediate support arm can also prevent mid-span sag.
- Frame creaking or moving in wind: Check all fasteners and tighten any that have loosened. If the frame itself is racking, add diagonal cross-bracing between rafter arms.
- Fabric flapping loudly: The fabric isn't tensioned tightly enough. Re-tension before the movement causes seam failure.
- Rust streaks on wall below awning: Steel hardware in an aluminum frame causes galvanic corrosion. Replace with stainless steel or aluminum hardware throughout.
- Water leaking at the wall attachment: The flashing or caulk at the ledger has failed. Remove the ledger if necessary, dry out any wet framing, re-flash properly, and re-seal before re-mounting.
- Retractable awning won't fully extend or retract: Usually a spring tension issue or a bent arm. Consult the manufacturer's adjustment guide; replacement arms are often available separately.
Pre-install and final inspection checklist
- Confirmed wall stud or masonry anchor locations with a stud finder or hammer drill test
- Checked permit and HOA requirements for your jurisdiction
- Calculated slope and confirmed minimum 7-foot clearance at the lowest front edge
- Selected fasteners appropriate for the wall material (lag screws for wood, sleeve/wedge anchors for masonry)
- Applied flashing tape and silicone at all wall penetrations before attaching ledger/header
- Confirmed frame is square and slope is correct before tensioning fabric
- Tensioned fabric tightly with no visible sags or wrinkles
- Tested all retractable mechanisms or fixed hardware for play or movement
- Sealed all remaining penetrations with exterior-rated caulk
- Walked away and came back after the first rain to check for pooling or leaks
If you're looking at a more substantial build, like a full lean-to patio cover with a solid roof panel, the project starts to cross over into do it yourself patio cover territory, which brings in additional structural and roofing considerations beyond what a fabric awning requires. Similarly, if you want a complete solid-roof structure, a do it yourself patio roof build is a different scope with its own framing, roofing material, and drainage requirements. But for most homeowners starting with a shade awning, the steps above are genuinely enough to get the job done safely and well. If you are looking specifically for do it yourself alumawood patio covers, focus on a similar approach to planning the span, slope, drainage, and structural anchoring before you cut or assemble any parts.
FAQ
What should I do if my awning bracket locations do not line up with studs or roof structure?
If you cannot hit solid framing with a ledger (for example studs are in the wrong place or the sheathing is old), avoid fastening through only siding or sheathing. Either reposition the awning so the header rail lands on studs or add an engineered backer/trimmed framing member inside the wall opening before installing the ledger. This is also the point where you should confirm whether you need flashing integration with the house wrap and siding so water does not track behind the awning.
Can I attach my do it yourself patio awning to rafter tails, and how do I know it is safe?
Do not rely on “looks solid” when attaching to rafter tails. Check from inside the attic or soffit area for rot, soft wood, water staining, and cracked fasteners, then verify you can drive attachment hardware directly into the rafter member (not fascia board). If the rafter tails are compromised or the span is mostly decorative, switch to a wall ledger design or have a contractor assess the roof framing.
How do I confirm headroom and clearance once the fabric relaxes after installation?
Set the awning so the lowest front edge stays high enough for your normal use, but also account for rain and the fabric’s natural sag after the first season. A practical check is to simulate a worst-case droop by remeasuring after installation once the fabric relaxes, then confirm door clearance and that foot traffic will not hit the front bar or hem.
My installed awning still shows water pooling, what are the most common causes and fixes?
If water pools, the issue is almost always a pitch or installation reference error, not “the fabric.” Recheck that the wall attachment is higher than the front rail by your planned rise, verify all frame members match the slope (no low spots), and confirm that the awning is not twisted side-to-side. Small frame alignment errors can create localized valleys even if the overall pitch looks correct.
Can I use the same fasteners throughout, or is it okay to mix types where it feels secure?
It is not a good idea to mix wall fastening types, like using deck screws in some holes and structural lags in others. Either use code-appropriate structural fasteners in every attachment point or follow one consistent attachment method rated for the load path. If you already drilled and have damaged holes, you may need to move locations or use larger fasteners or different anchors rather than simply adding more screws.
Where do leaks commonly start on attached awnings, and what is the best way to prevent them?
For do it yourself patio awnings, leaks usually come from the top edge, where water can get behind a ledger or around penetrations. Make sure the ledger area is properly flashed, use a sealant method compatible with the siding type, and seal around every penetration. After a rain test, inspect the underside of the ledger and adjacent wall for dampness or water trails before continuing maintenance.
How do I estimate wind risk for a projected do it yourself patio awning without overbuilding?
Wind concerns depend on projection and location, so use your local wind exposure rather than guessing. If your awning extends far out (especially beyond about 6 feet), plan for uplift, add the needed bracing to resist racking, and avoid undersized frames. If you are not using a kit engineered for your wind zone, have the frame design reviewed, because small changes in bracing and fastener sizing can make a big difference in uplift resistance.
My retractable awning extends unevenly, what should I adjust first?
For retractable kits, alignment matters as much as slope. First level the wall bracket so the arms extend parallel to the ground, then test extension and retraction under normal conditions before fully tightening everything. If the arms bind or do not extend evenly, correct bracket alignment before adjusting spring tension, because incorrect alignment can cause uneven fabric wear.
Can I drill anchors into mortar when installing a do it yourself patio awning on brick?
If you are installing over masonry, do not drill into the mortar as a shortcut. Mortar is weaker and anchor pull-out risk increases. Use the correct masonry bits, drill to the specified depth, place anchors into brick or block, and verify the anchor spacing and embedment match the hardware rating for your substrate.
Can I build on top of a fabric awning frame to support a larger patio cover later?
Yes, but only if your system is designed for it. Heavy loads like solid patio roof elements change the structure and drainage requirements and can exceed what a fabric awning frame is built to carry. If you want a larger shade solution, confirm compatibility or choose a purpose-built patio cover or roof kit where the load paths, engineering, and weatherproofing match the added weight.
When replacing the fabric on a DIY patio awning, how do I avoid getting the size wrong?
For DIY fabric replacement, the easiest failure to avoid is ordering with the wrong allowances. Measure the finished fabric width and length plus any needed hem and rope or batten allowance, then confirm orientation so the fabric seams and tension points sit correctly. After replacement, perform a tension and sag check, then re-tension or adjust spring settings once the fabric has relaxed.