You can absolutely build a DIY patio cover yourself, most homeowners with basic carpentry skills, the right plan, and a free weekend or two can pull it off. A do it yourself patio roof can be a great weekend project if you plan the design, pick the right materials, and follow local permit and code requirements DIY patio cover. If you're looking for an easier route, do it yourself patio cover kits can provide pre-cut components and specs to match your chosen cover style. The key is picking a style that matches your skill level, choosing the right material for your climate, pulling any required permits before you dig a single hole, and making sure every post, beam, and ledger connection is solid. Do those things and you'll end up with a structure that lasts decades. Skip any of them and you'll be tearing it down inside five years.
Do It Yourself Patio Covers: Plans, Materials, and Build Steps

DIY patio cover styles and ideas
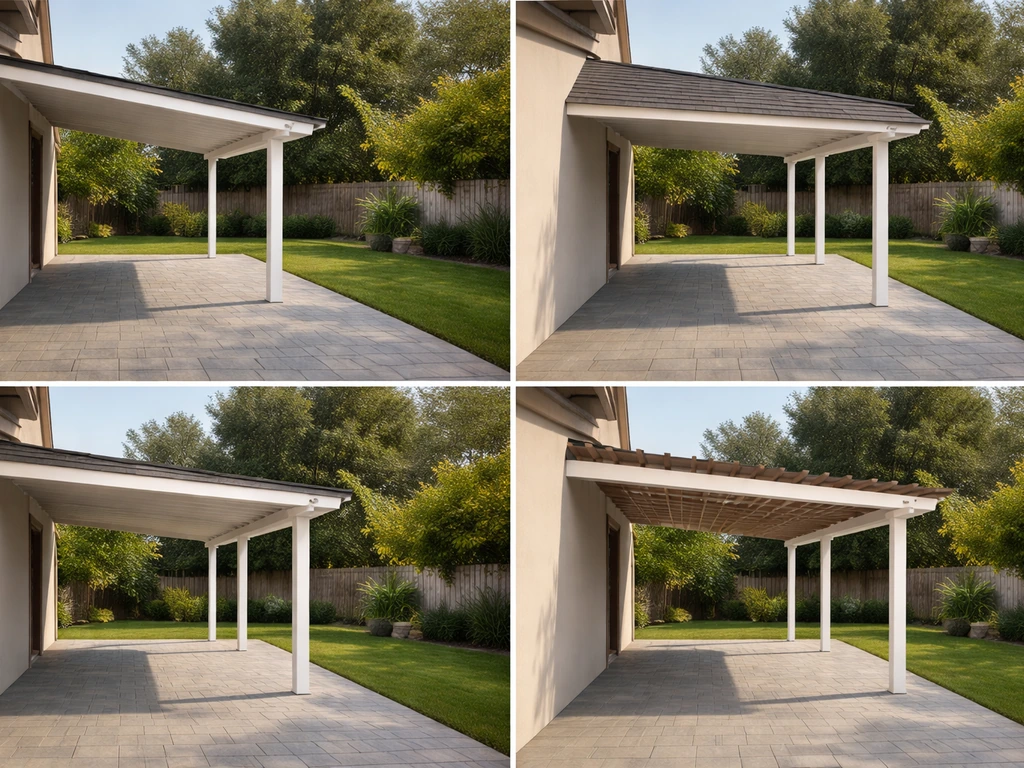
Before you buy a single board or screw, you need to know what you're building. The style you pick determines your material list, your permit complexity, and how many weekends this is going to take. Here are the most practical options for a DIY builder.
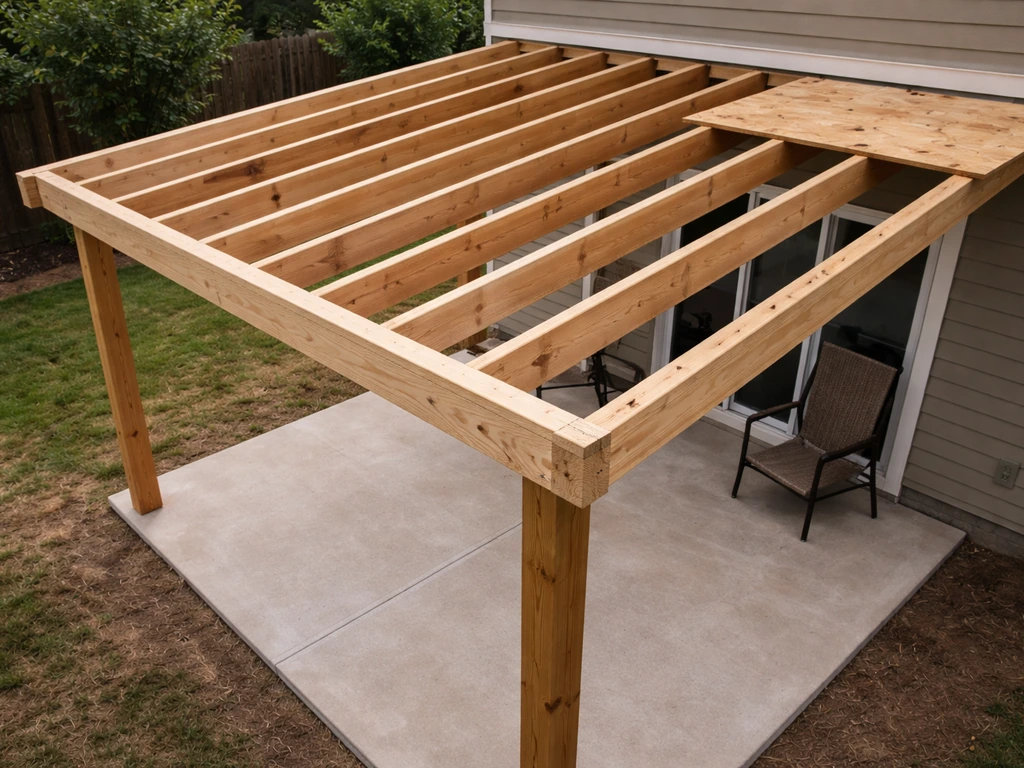
Lean-to (attached shed-roof)
This is the most beginner-friendly option and the most common. One end attaches to your house via a ledger board, the other end rests on posts set into the ground. The roof slopes in one direction away from the house, typically at a minimum pitch of 1/4 inch per foot so water drains off. It's structurally simple, uses the fewest materials, and still looks clean and intentional when done right. If this is your first patio cover, start here.
Gable roof cover
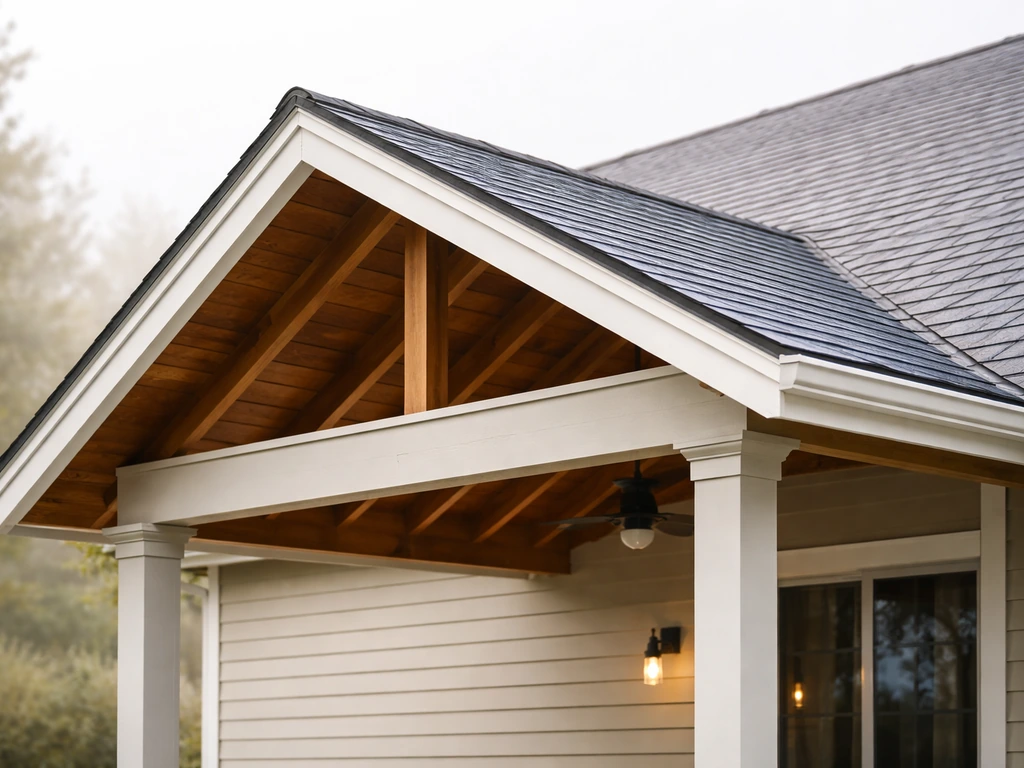
A gable cover has two sloping sides meeting at a ridge, like a little house roof over your patio. It looks more finished and architecturally interesting, handles rain and snow better in heavy-weather climates, and adds real value to your home. The trade-off is complexity, you're cutting and setting rafters at angles, building a ridge board, and the framing work takes more experience. This is a solid intermediate project, not a first-timer build.
Simple flat or low-slope cover
If you're in a dry, warm climate like Arizona or Southern California, a near-flat cover with a very gentle slope (the minimum 1/4 inch per foot is common in these regions) works well and gives a modern, clean look. These are popular with aluminum patio cover systems and alumawood kits. If you are using an alumawood patio cover kit, follow the manufacturer’s installation instructions and spacing requirements for best results alumawood patio cover kits. In snow country or heavy rain regions, a flat cover needs careful drainage planning or it becomes a liability fast.
Freestanding pergola-style cover
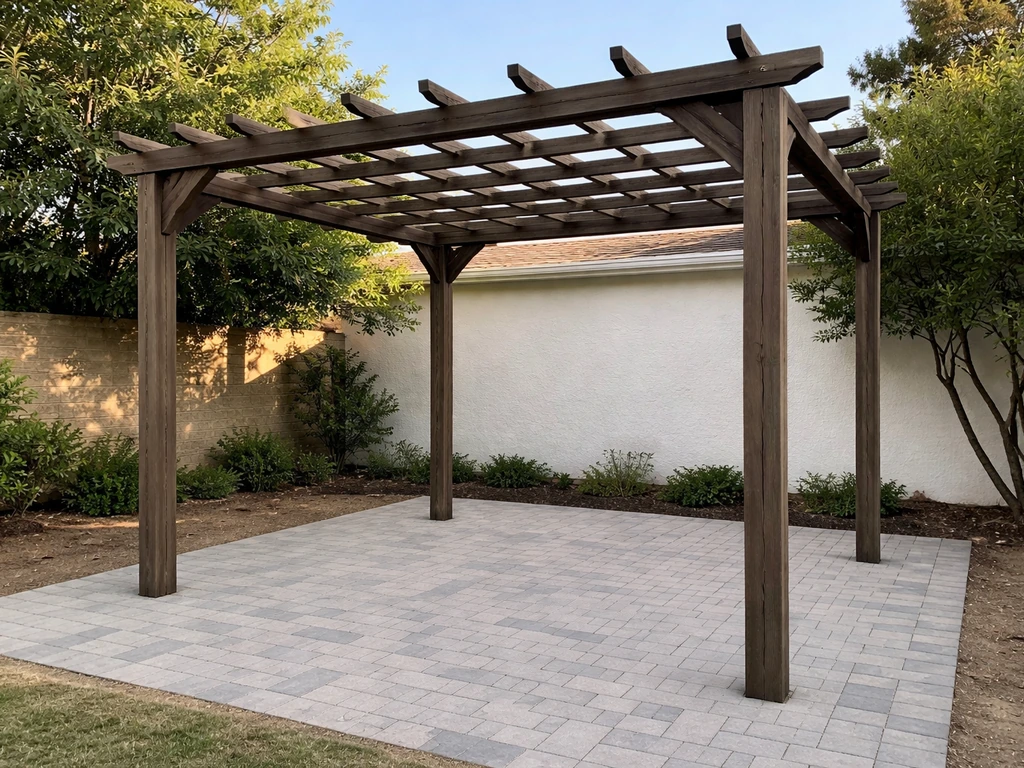
A freestanding cover doesn't attach to your house at all, it has four posts and stands independently. This eliminates the ledger-connection headache entirely and means no penetrations into your home's exterior. The catch is that it requires more material (four posts instead of two) and you need to think about how it's anchored against lateral movement and wind uplift. It's a great option if your house's exterior wall makes ledger attachment tricky or if you want the cover set away from the structure.
Open lattice or louvered cover
If full shade isn't the goal and you just want filtered light and some visual definition to the space, an open lattice top or louvered panel system gives you both. These are lighter structurally, easier to permit in many jurisdictions (some treat open lattice covers differently than solid-roof covers), and can be built in a weekend. Just know that they don't provide rain protection.
Picking materials: aluminum, wood, or metal
Material choice is where most people get stuck because they're comparing apples and oranges. Each material has a real job it's good at. Here's a straight comparison.
| Material | Best For | Lifespan | Maintenance | DIY Friendliness | Approximate Cost (materials only) |
|---|---|---|---|---|---|
| Wood (Douglas Fir, Cedar, Redwood) | Traditional look, full custom design, any climate | 20-40+ years with upkeep | Stain or paint every 3-5 years; check for rot | High — cuts with standard tools | $8–$20 per linear foot of framing |
| Aluminum (extruded/Alumawood kits) | Low-maintenance, dry/sunny climates, modern look | 30-50+ years | Virtually none — occasional rinse | Medium — kit systems are very DIY-friendly | $15–$30 per sq ft installed DIY |
| Steel/Metal (tube steel, corrugated panels) | Industrial look, long spans, high wind/snow loads | 25-50+ years with coating | Repaint every 10-15 years; check fasteners | Low-medium — requires welding or bolted connections | $10–$25 per sq ft depending on spec |
For most first-time DIY builders, pressure-treated lumber framing with a wood or metal roof panel is the sweet spot, it's workable with basic tools, widely available at any home center, and easy to modify if something doesn't fit perfectly. Aluminum systems (including alumawood-style kits) are excellent if you want minimal maintenance and a polished look, and the kit format means less cutting and custom fabrication. Steel makes sense for large spans or high-wind regions but adds welding complexity most homeowners don't have.
Key components you'll need regardless of material
- Ledger board or top plate (for attachment to the house wall)
- Posts (4x4 or 6x6 for wood; aluminum or steel tube equivalents)
- Beams (carrying the load from posts to ledger or ridge)
- Rafters or purlins (spanning between beams, supporting the roof surface)
- Roof covering (solid panels, polycarbonate sheeting, aluminum pan panels, shingles, or metal roofing)
- Post bases or footings (concrete piers with hardware to anchor posts)
- Flashing and sealant (critical at all wall penetrations and transitions)
- Fasteners: structural screws, joist hangers, post caps, hurricane ties
Getting real plans: measurements, layout, and elevations
You don't need an architect to build a patio cover, but you do need a build-ready plan on paper before you touch a tool. Most permit offices want to see a site plan, a framing plan, and at least one elevation drawing. Here's how to create one that actually works.
Measure the space first
Start by measuring the width of your patio along the house wall, that's your cover's width. Then measure out from the house to where you want the outer edge of the cover to land, that's your depth. Write both numbers down in feet and inches. Typical residential patio covers run 10 to 16 feet deep and 12 to 24 feet wide, but yours just needs to fit your actual space. Note any doors, windows, or electrical outlets on that wall; they affect ledger placement and header sizing.
Determine your roof slope and post height
For a lean-to cover, you need to decide where the ledger attaches to the house (the high point) and how tall your outer posts will be (the low point). The difference in height divided by the cover's depth gives you your slope. Stick to a minimum of 1/4 inch per foot of run, so a 12-foot-deep cover needs to drop at least 3 inches from ledger to post top. A maximum of 1 inch per foot keeps things looking proportional and prevents the outer edge from getting awkwardly low. For metal panel systems or alumawood kits, manufacturers typically specify this same 1/4-inch to 1-inch-per-foot range.
Plan your post and beam spacing
For wood framing, posts at 8-foot centers are a common and code-friendly starting point. Prescriptive span tables from your local building department (cities like Rancho Cucamonga and Phoenix publish these as free PDFs) will tell you exactly what beam and rafter sizes are required for your specific spans and roof loads. Don't guess at this, download your city's patio cover standard packet or equivalent and use their tables. It takes 20 minutes and removes all the guesswork.
Draw your plan
You need three simple sketches: a top-down site plan (showing your house footprint, the cover outline, and post locations with dimensions), a framing plan (showing beam/rafter layout, spacing, and sizes), and one elevation view showing the side profile with slope, heights, and ledger attachment point. These don't need to be beautiful, they need to be legible and dimensioned. Graph paper works fine. If your jurisdiction requires stamped engineering drawings, that's a flag to bring in a pro or use a kit system that comes with pre-engineered specs.
The DIY build process, start to finish
Here's the sequence that actually works. Don't rearrange these steps, order matters, especially around inspections.
- Pull your permit (if required) and have your plan approved before any work starts. Some jurisdictions require an inspection at the footing stage before you pour concrete — find out if yours does.
- Mark your layout: Use batter boards and string lines to establish the exact post locations and verify they're square to the house. Measure diagonally corner-to-corner; if both diagonals match, you're square.
- Call 811 (Dig Safe): Before digging any footing holes, contact your utility locating service. Many jurisdictions, including Douglas County, CO, specifically require you to verify utility and easement locations before excavation. It's free and takes one call.
- Dig and pour footings: Standard residential patio covers typically use footings roughly 12 inches in diameter and 14 inches deep at minimum in moderate climates, though your local frost depth may require deeper holes. Pour concrete, set your post-base hardware, and let it cure at least 24-48 hours.
- Footing inspection (if required): Some permits require the inspector to see the holes before you pour. Confirm this with your permit office.
- Set and plumb posts: Drop posts into post bases and brace them perfectly plumb in both directions before any beams go up. Double-check heights against your slope calculations.
- Install the ledger (for attached covers): This is the most critical connection on the whole project. Ledger boards must be bolted through the house sheathing into the rim board or band joist with the correct hardware — not just nailed or screwed into siding. Install proper flashing above the ledger to direct water away from the wall. More on this in the structural section below.
- Hang beams: Set your carrying beams on post caps, making sure beam-to-post connections use rated hardware. Hand-tight isn't good enough — use a wrench.
- Install rafters: Space rafters per your plan and use metal joist hangers at each end. This isn't optional — hangers prevent rafter rotation and uplift.
- Add blocking and bracing: Blocking between rafters at the beam line and diagonal bracing on freestanding covers resist lateral racking. Don't skip these.
- Install roof panels or covering: For solid covers, follow manufacturer instructions for overlap and fastener spacing. Install ridge caps, end caps, and any gutter or drip edge before calling it done.
- Flash and seal: Every penetration into the house wall — every single one — gets flashed and sealed. Use compatible sealant for your roofing material.
- Final inspection: If your permit requires a final inspection, schedule it before you put up lights or ceiling fans. Inspectors need to see connections.
- Touch-up and finish: Caulk any gaps, paint or stain wood components, and install any lighting or ceiling fans you planned for.
Structural and code safety: permits, loads, and attachment
This section is where a lot of DIY builds go wrong, so read it carefully. Getting this right is the difference between a structure that's still standing in 20 years and one that fails in a windstorm or gets red-tagged by an inspector.
Permits: when you need them and what happens if you skip them
Most jurisdictions require a building permit for any solid-roof patio cover. The City of Sacramento’s fee and permit information page distinguishes site-built patio covers from pre-manufactured assemblies and points to the applicable building fees and permit schedule Most jurisdictions require a building permit for any solid-roof patio cover.. Open lattice structures sometimes fall under a threshold, but don't assume yours does, check with your local building department first. Even in cases where a permit isn't technically required, you're still legally required to build to applicable codes. If you sell your home and the cover was built without a permit, you may have to tear it down or pay for a retroactive inspection. Permits typically cost $100 to $400 for a standard residential patio cover, and the plan review process often catches design problems before they become expensive build problems.
Loads: wind, snow, and live load basics
You don't need to be a structural engineer to understand loads at a practical level. Your roof structure needs to handle the weight sitting on it (dead load from roofing materials), people or debris that could land on it (live load), snow if you're in a snow region, and wind trying to lift or push it. ASCE 7 is the national standard that defines how these loads are calculated, but your local building department translates those into practical requirements for your area. In coastal or high-wind regions, attachment requirements are enhanced significantly compared to inland areas. Manufactured aluminum covers often come with declared load ratings, for example, some systems are rated for 10 lbs per square foot snow load. That's fine for Southern California but completely inadequate in Colorado or New England. Know your local ground snow load before specifying any system.
The ledger connection: the most important detail on an attached cover
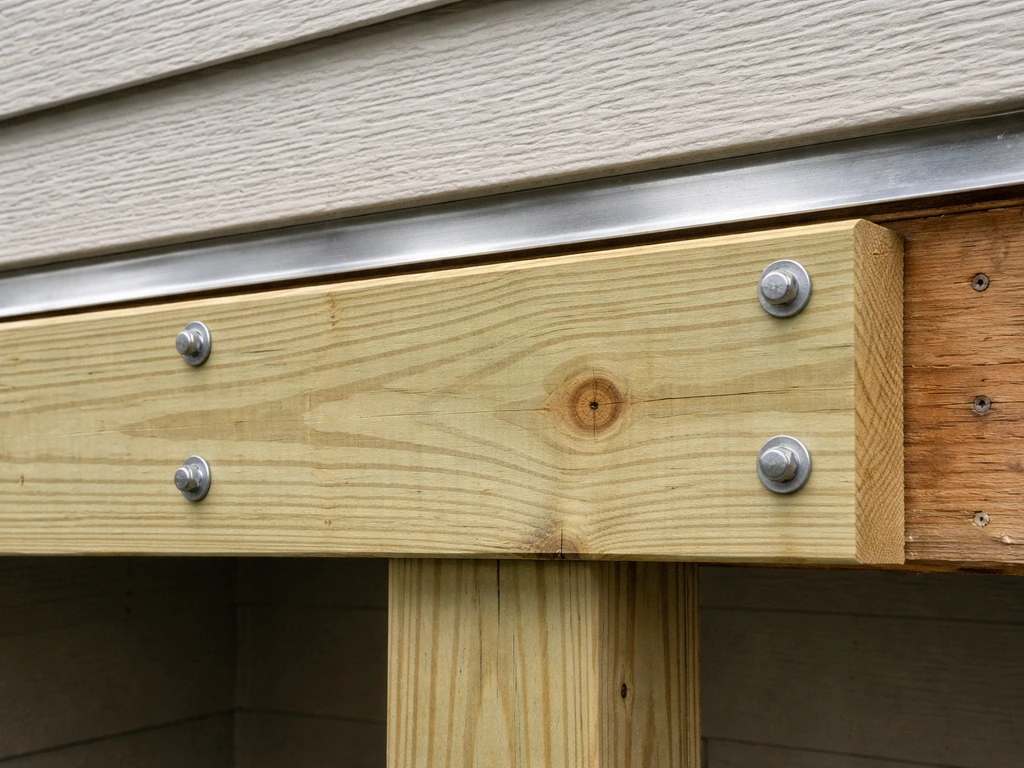
Research from the Building America Solution Center consistently identifies deficient ledger connections as the primary cause of attached porch and patio cover failures. The ledger needs to connect to the structural rim board of your house, not just the siding, not the sheathing, and definitely not the stucco. Use code-approved lag screws or through-bolts at the spacing your plan specifies. Install flashing that directs water over the ledger and away from the wall. The goal is a continuous load path from your roof surface all the way down to the foundation. Every connection in that path needs to be rated hardware, properly installed.
Footing depth and frost
Footing depth isn't just about structural load, it's about frost heave. In cold climates, footings must extend below the local frost depth or the ground will push your posts up and crack your whole structure. In frost-free or mild climates, a 14-inch-deep footing is often sufficient for a standard-size cover. In Chicago or Denver, you might need 36 to 42 inches. Your local building department will tell you the required frost depth for your area.
Minimum roof slope by covering type
Different roofing materials require different minimum slopes to drain properly and prevent leaks. Phoenix’s Residential Patio Covers document provides tables of minimum header or beam sizes, minimum footing sizes, and blank" rel="noopener noreferrer">roof slopes by roof covering type. As a practical reference: asphalt shingles generally need at least a 2:12 pitch, clay or concrete tile typically requires 2.5:12 or steeper, and metal panels can often go as low as 1/4:12 with proper laps and sealant. Aluminum pan covers and polycarbonate panels are similar, 1/4 inch per foot minimum. If you're using asphalt shingles on a lean-to, you may need to raise your ledger attachment height or lower your posts more than you think to achieve sufficient slope.
Tools, budget, and how long this actually takes
Tools you'll need
- Circular saw or miter saw (for cutting lumber)
- Drill/driver and impact driver
- Post hole digger or rented power auger (saves hours over hand digging)
- Level (4-foot level and a torpedo level)
- Speed square and framing square
- Chalk line and measuring tape (at least 25 feet)
- String line and batter boards
- Concrete mixing tub or rented mixer
- Ladder (6-foot minimum, 8-foot preferred for most covers)
- Safety glasses, work gloves, hearing protection
- Caulk gun and utility knife
Realistic budget breakdown
For a typical 12x16-foot attached lean-to cover with pressure-treated lumber framing and corrugated metal or polycarbonate panels, expect to spend $1,500 to $3,500 in materials. An equivalent aluminum or alumawood kit system runs $2,500 to $5,000 in materials. Add $100 to $400 for permits. Renting a power auger for footings runs about $75 to $100 for a half day. If you hire someone to do concrete work only, budget another $300 to $600. Total DIY cost for a well-built 12x16 cover typically lands in the $2,000 to $4,500 range depending on material and finish choices. A contractor doing the same job would charge $6,000 to $15,000 or more.
How long will it take?
Permit review alone can take 1 to 3 weeks in many jurisdictions, so factor that in up front. The physical build of a straightforward lean-to for a single person or two-person team is typically 2 to 4 full days of work: half a day for layout and footing holes, a day for concrete cure (you're waiting, not working), a day for framing, and a day for roofing, flashing, and finishing. A gable roof or larger structure adds another day or two. Don't try to compress the concrete cure time, let it set.
When to call a pro, and mistakes that derail DIY builds
When you really should hire someone
Most patio covers are DIY-able, but a few situations genuinely call for professional help. If your local jurisdiction requires stamped engineered drawings (common in high-wind or seismic zones), you'll need a licensed engineer regardless of who does the build. If your house has unusual wall construction, stucco over foam, EIFS cladding, or masonry, ledger attachment becomes complex and getting it wrong is dangerous. If you're in a coastal high-wind area, connection requirements are significantly enhanced and there's less margin for error. And if your cover is larger than about 400 square feet, spans are longer, loads are higher, and the structural math gets complicated fast. In any of these cases, paying for a structural engineer's review or a licensed contractor is money well spent.
Common DIY mistakes to avoid
- Attaching the ledger to siding, stucco, or sheathing instead of the structural rim board — this is the single most dangerous mistake on attached covers and a leading cause of collapse
- Skipping flashing at the ledger and wall connection, leading to rot inside the wall over 3 to 5 years
- Not calling 811 before digging, which risks hitting buried utilities
- Pouring footings that are too shallow for your local frost depth, causing heaving and cracking within the first winter
- Under-sizing beams or rafters by eyeballing instead of using span tables — what looks beefy enough often isn't
- Using deck screws instead of structural hardware (post caps, joist hangers, hurricane ties) at critical load-path connections
- Starting construction before permit approval and then having to tear out work for an inspection
- Buying an aluminum cover system rated for a 10-lb snow load in a region that gets 40+ lbs per square foot on the ground — always match the system rating to your local design loads
- Not bracing posts while framing, leading to a structure that's out of plumb and won't square up later
- Skipping end caps, ridge caps, and proper sealant on panel systems, assuming the overlaps alone are watertight — they're not
Your next steps right now
Here's the practical sequence to get moving today: Pick your style based on your skill level and climate (lean-to if you're new to this, gable or freestanding if you've done framing before). If you want to do it yourself patio awnings, start by choosing the right style, climate-appropriate materials, and a permit-ready plan. Measure your patio and sketch a basic plan with post locations, dimensions, and slope. Call your local building department and ask if a permit is required and whether they have a standard patio cover packet, most do, and it's free. Download their span tables. Look up your local frost depth and ground snow load (your building department or a quick search for your county's frost depth will give it to you). Then decide on material, get your plan on paper, and submit for permit. While you're waiting for approval, source your materials and line up your tools. The sequence matters, but none of the individual steps are complicated, just follow them in order.
FAQ
How many inspections should I expect when building do it yourself patio covers?
Plan for at least one inspection at each major step, typically after footings or post locations are verified (before concrete is fully finished), and again after framing and ledger flashing are installed but before roof panels go on. Ask your permit office what their inspection checkpoints are, because some jurisdictions treat ledger flashing and roof waterproofing as separate sign-offs.
What if I live in a mild climate, do I still need to go deep for do it yourself patio covers?
Yes, frost depth can affect you even if you are not in a “snow state.” If your ground freezes and thaws, shallow footings can heave and rack the posts, which shows up as misaligned panels and loose connections. Your local building department should state the required footing depth and whether you need extra steps like expanded bases or specific backfill compaction.
How do I prevent leaks around the ledger when building a lean-to do it yourself patio cover?
Treat it as a flashing and drainage detail problem, not just a height problem. If the roof surface does not drain cleanly away from the wall, water can run back to the ledger, especially with gentle slopes. Use the manufacturer’s recommended panel laps and sealant (for metal or polycarbonate) and confirm your slope meets the drainage requirement for your chosen roofing material.
What’s the best way to handle an uneven patio footprint or odd dimensions for do it yourself patio covers?
If your patio has an irregular shape, adjust your width and post layout so the framing lines up with code-friendly spacing and your beam spans. Avoid “floating” posts that do not line up with your planned beam locations, because that forces custom joists/rafters that may not match the span tables. A simple option is to keep the cover rectangular and cantilever or frame an opening within that footprint.
If I want a lattice or louvered top, do I still need a permit for do it yourself patio covers?
Open lattice or louvered covers can still require permits, especially if any portion functions like a solid roof, or if it materially changes the structure’s weather protection. Don’t rely on what you’ve heard online, ask your building department whether your specific design is classified as solid, partially enclosed, or over-the-open-patio, and bring product cut sheets if you are using a kit.
Can I attach a DIY patio cover ledger to siding or stucco instead of structural framing?
Don’t use siding as the structural attachment point. The ledger needs to connect to the house’s structural rim board or approved structural member, and the fasteners must match the plan spacing and length. Also confirm you are installing the right flashing strategy for your wall type (brick veneer, foam sheathing, stucco over foam, etc.), because incorrect flashing can trap water behind the ledger.
What should I do if my measurements end up giving me less slope than expected for do it yourself patio covers?
It depends on your roof covering and exposure. For example, asphalt shingles and tile require different minimum roof pitches, and shallow-slope systems need correct lap orientation and sealant to avoid blow-by leaks. If you are close to the minimum pitch, increase slope by raising the ledger height or lowering outer posts, and verify the pitch your plan uses matches the actual installed slope.
How do I choose between solid roof panels, lattice, and louvers when planning do it yourself patio covers?
If you want filtered light or a covered area that still feels open, use the correct “partial cover” approach. Lattice and louvers reduce rain protection, so you may still want side screens or consider a solid-roof plan if you need reliable coverage during storms. Decide upfront whether the cover’s purpose is shade only, light shelter, or full weather protection, because that changes both material selection and your waterproofing details.
What are common failure points when do it yourself patio covers are built on houses with stucco or EIFS?
If your cover is attached to a home with unusual wall assemblies (stucco over foam, EIFS, masonry veneer, or foam-backed cladding), plan for a more complex ledger detail and possibly different fastener strategies. In these cases, having a kit system with clearly engineered instructions can reduce ambiguity, but you should still confirm the structural attachment path is valid for your specific wall buildup.
When should I switch from DIY framing to an engineer’s review for do it yourself patio covers?
For large spans, the risk is not just “extra lumber,” it is whether your beams and rafters meet span table limits for local roof loads. If you are near or above the area thresholds where the article suggests professional math, consider hiring an engineer for a quick design review or using a kit that provides engineered framing drawings for your exact dimensions and wind and snow conditions. This is usually cheaper than rebuilding after inspectors reject framing.
Is renting a power auger enough, or do I need extra steps for footings on do it yourself patio covers?
A power auger speeds up footing hole digging, but you still need accurate layout and hole depth verification. After drilling, verify post vertical alignment before concrete sets, and protect the top of the footing and any forms from getting disturbed. Don’t skip checking depth relative to frost requirements, since an auger that “looks deep enough” can still be short in a high-ground-freeze spot.
What’s the most common mistake that causes wind-driven rain problems on do it yourself patio covers?
Match the roof underlayment and panel system to your climate. In heavy rain or windy rain exposure, pay extra attention to panel edge flashing, drip edges, and sealant compatibility, especially where polycarbonate or alumawood systems meet transitions. If you routinely get wind-driven storms, discuss wind uplift ratings with the kit manufacturer and ensure the connections and hardware are installed exactly as specified.