For most DIY homeowners, aluminum metal is the better choice for a patio cover. It costs less upfront (roughly $10–$15 per square foot for materials versus $60–$120 per square foot installed for quality wood), it handles moisture without rotting, and a good factory finish can last decades without repainting. Wood makes sense when you want a traditional look, you have easy access to quality lumber, and you're genuinely willing to do the maintenance. But if you're debating this today, there's a real chance aluminum wins for your situation.
Metal vs Wood Patio Cover: DIY Guide, Costs, and Weather Risks

Celia Vaughn
12 Jun 2026
Quick decision: when metal beats wood (and vice versa)
Before you go deep on specs, here's the fast version. Pick metal (aluminum specifically) if you live somewhere with regular rain, high humidity, or temperature swings; if you want a low-maintenance structure; if you're doing this yourself and want a forgiving system with pre-engineered panels and clear instructions; or if your HOA or local codes allow it and you're budget-conscious. Pick wood if you want a genuinely traditional or craftsman look that blends with an older home, if you're comfortable with annual maintenance like sealing and staining, or if you specifically want a heavier, more custom-built structure with exposed rafters that looks hand-built rather than kit-assembled.
The honest truth is that most patio cover failures I've seen come from wood that wasn't properly sealed, wasn't the right treatment grade for the exposure, or wasn't detailed well at the roof-to-house connection. Metal can rust at the fasteners and expand noisily in heat, but those problems are far easier to prevent and fix than a rafter that's rotted through at the ledger.
Materials overview: common types of wood and metal patio covers
Wood patio cover options
Pressure-treated pine is the most common structural choice. It resists fungal decay and insect damage because the preservative is forced deep into the wood fibers. The key detail most people miss is that not all pressure-treated lumber is the same. The tag on the end of each board lists an AWPA Use Category: UC3B means above-ground exposed, while UC4A means ground contact. For patio cover rafters and beams that never touch soil, UC3B is appropriate. For any post sitting in or near the ground, you need UC4A minimum. Using the wrong grade is a very common mistake.
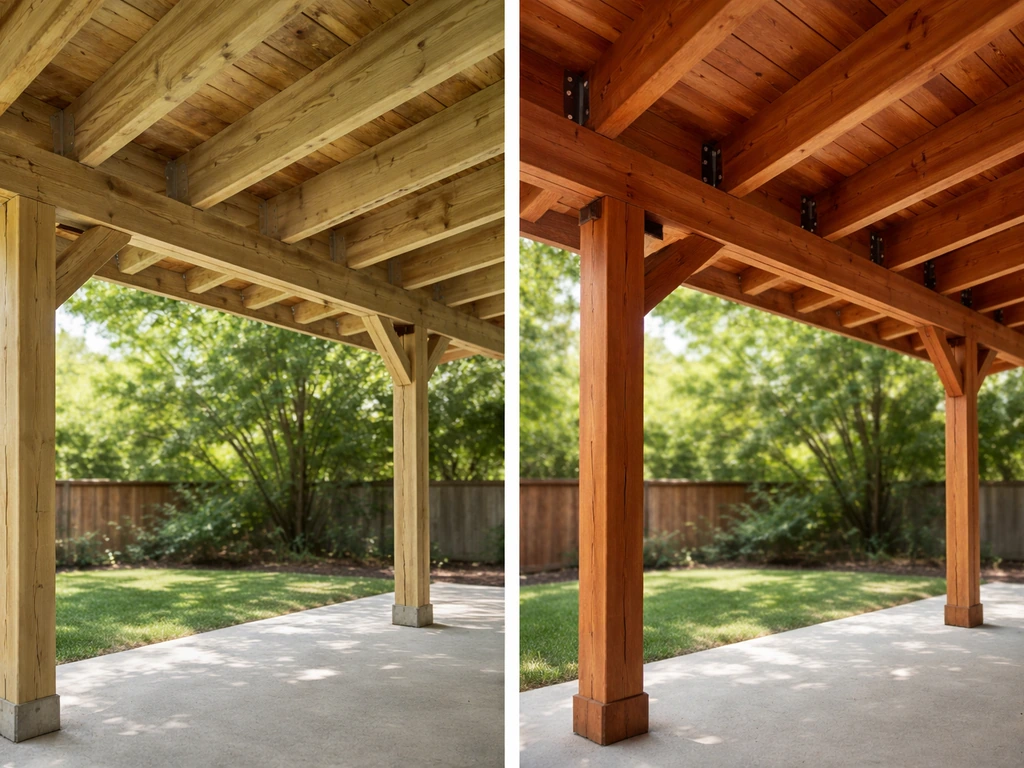
Cedar and redwood are naturally rot-resistant options that look beautiful and take stain well. They cost more than pressure-treated pine and are harder to find in larger structural dimensions at most home centers, but they're a legitimate upgrade for an exposed pergola-style structure where looks matter. For a solid-roof covered patio, though, most of the structural framing is hidden anyway, so spending extra on cedar rafters is hard to justify.
Metal patio cover options
Aluminum is the dominant metal choice for residential patio covers, and it comes in three main forms: solid pan systems (interlocking flat panels that create a watertight roof), lattice panel systems (decorative, partial shade), and louvered systems (adjustable slats). Solid aluminum pan covers are what most DIYers are working with. Systems like Alumawood use extruded aluminum panels with a baked-on or factory finish, and they assemble with a track-and-panel approach that's genuinely manageable for a careful first-timer.
Steel and galvanized steel roofing panels are another option, often used as the roof skin over a wood or steel structural frame rather than as a complete system. Corrugated galvanized steel or metal roofing panels are inexpensive and very durable but add more DIY complexity because you're building the structure and the roof separately. Aluminum kit systems bundle those together, which is why they're usually easier for DIYers.
Cost comparison: upfront, long-term maintenance, and repair costs
| Cost Factor | Wood (Pressure-Treated / Cedar) | Aluminum (Kit System) |
|---|---|---|
| Materials only (per sq ft) | $8–$25+ depending on species and grade | $10–$15 for panels and framing components |
| Installed cost (per sq ft) | $60–$120 for quality materials and labor | $20–$50 installed; DIY drops this significantly |
| Initial finish / coating | Stain or paint: $30–$60 per gallon, plus labor | Factory finish included; no extra coating needed at install |
| Year 1–5 maintenance | Annual cleaning, re-stain or re-seal every 2–3 years | Annual cleaning; inspect fasteners and caulk joints |
| Year 5–15 maintenance | Possible board replacement if rot appears; re-stain cycle continues | Touch up finish if scratched; replace corroded fasteners if needed |
| Repair cost drivers | Rot at ledger or post bases, insect damage, warped boards | Corrosion at steel fasteners, dented panels, faded finish |
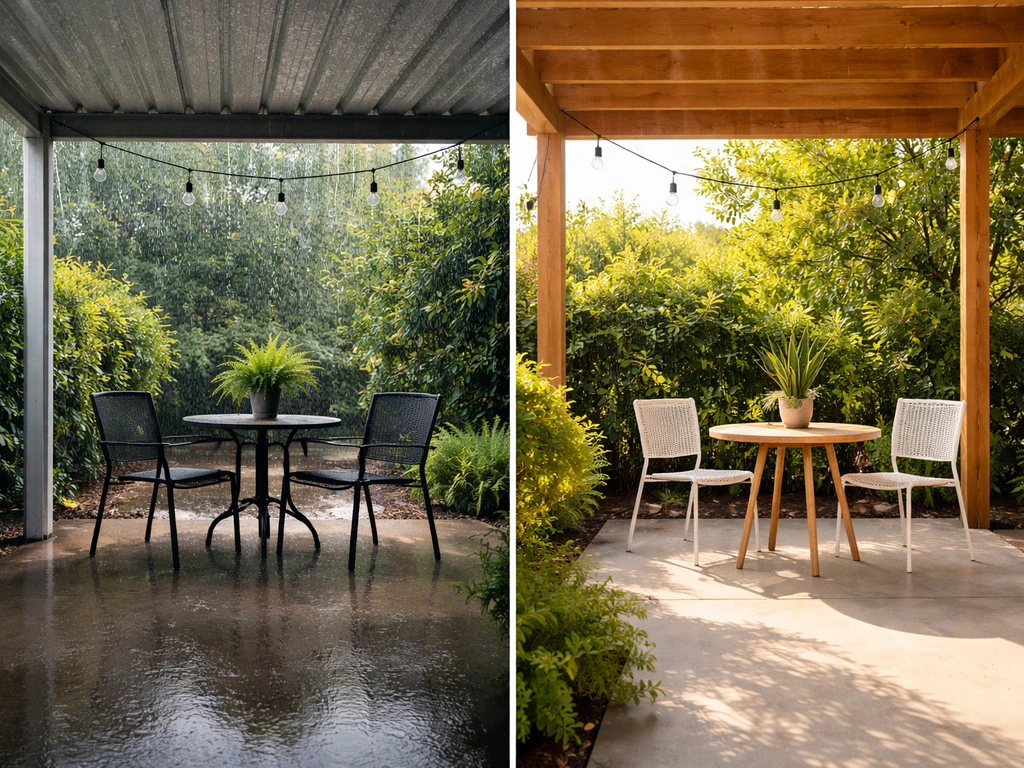
The numbers above show why aluminum often wins on total cost of ownership even when the upfront price feels similar. A wood cover that isn't maintained regularly can develop rot at the ledger or beam ends within 7–10 years in wet climates, and replacing structural members mid-project is expensive and disruptive. Aluminum doesn't rot. The finish will eventually fade or chalk in intense UV climates, but re-coating powder-coated or Kynar 500-finished aluminum is a far cheaper fix than replacing rotted framing.
Performance differences: weather resistance, rot, insects, corrosion, and impact
How wood behaves outdoors
Wood rots when its moisture content climbs above roughly 19% consistently and stays there long enough for fungal colonization to take hold. That doesn't mean a single rainstorm destroys your cover, but it does mean that any design detail that traps water against wood is a slow-motion failure. The most vulnerable spots are the ledger board where the cover attaches to the house, beam-to-post connections, and anywhere a fastener creates a small depression that holds standing water. Insects, especially termites and carpenter ants, make the same calculation: they target wet or partially decayed wood first.
Pressure treatment significantly slows both decay and insect damage, but it's not a permanent force field. In high-humidity or consistently wet climates (Pacific Northwest, Southeast, Gulf Coast), you'll be fighting this battle continuously without good detailing and maintenance. In dry climates like the Southwest or inland West, wood performs much better and the risk profile drops considerably.
How metal behaves outdoors
Aluminum doesn't rust, and it doesn't rot. It does oxidize, but that oxidation forms a protective layer rather than spreading damage the way rust does on steel. The real corrosion risk with aluminum patio covers comes from the fasteners. Standard steel screws through aluminum panels will corrode at the contact point over time, especially in coastal or high-moisture environments. The fix is simple: use corrosion-resistant fasteners (stainless steel or aluminum-compatible coated screws) from day one, and don't overtighten them. A fastener that depresses the panel surface creates a small water trap right at the screw hole, which accelerates both corrosion and leak risk.
Aluminum also expands and contracts with temperature. In climates with large day-to-night or seasonal temperature swings, panels that are installed too tight will creak, buckle, or pull at fasteners. Good kit systems account for this with expansion gaps built into the track design, but you have to follow the installation instructions. Skipping the expansion allowance is one of the most common mistakes in aluminum patio cover installs.
For impact resistance, thick aluminum panels handle hail better than you might expect and far better than thin fiberglass or polycarbonate alternatives. They won't shatter. Wood framing under any roof material is generally solid, though exposed wood decking or lattice can split from heavy hail or falling branches.
Installation and DIY complexity: framing, panels, fasteners, and tools
Attaching to the house
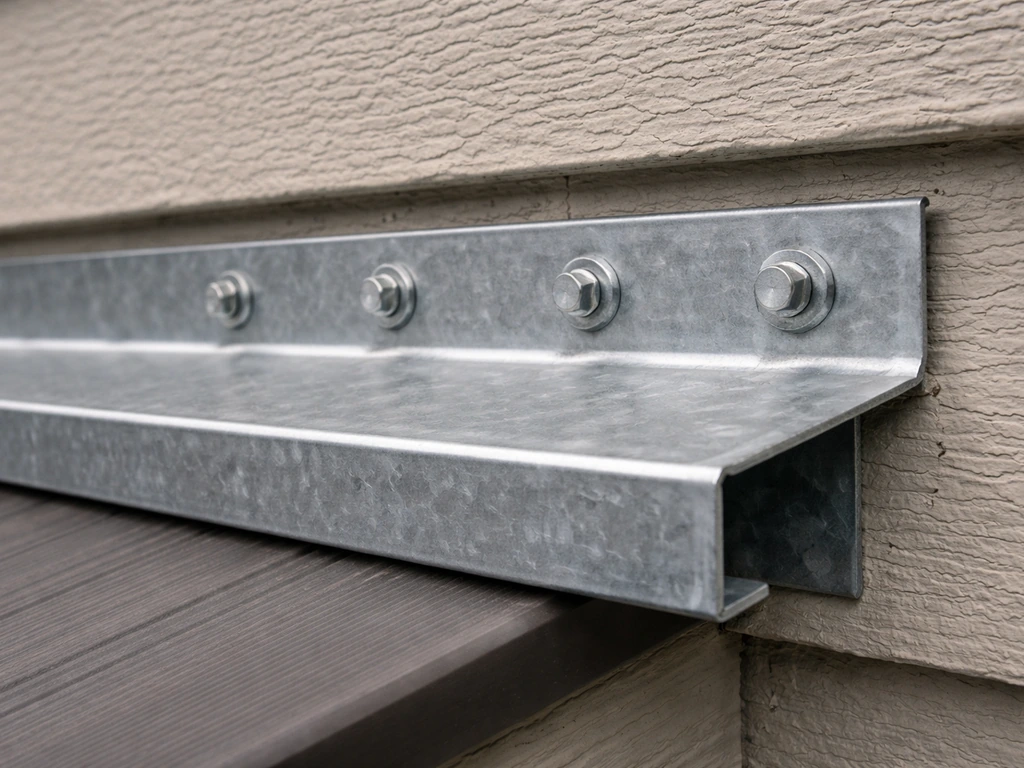
Whether you're building in wood or aluminum, the most critical connection is the ledger: the horizontal board or channel that bolts to your house wall and carries one end of the roof structure. Get this wrong and nothing else matters. The ledger must be through-bolted into structural framing (rim joist, double top plate, or rafters), never just into sheathing or siding. It also needs a flashing detail above it that directs water away from the wall.
This is the number one place leaks start, and it doesn't matter whether your roof panels are wood or aluminum. In Home improvement/Roofing discussions on Reddit, DIYers commonly emphasize careful water management and correct flashing at the roof-to-house connection because leaks often show up behind the fascia this is the number one place leaks start.
For an aluminum kit system, this ledger is usually an extruded aluminum channel. For a wood build, it's typically a 2x8 or larger pressure-treated board.
At minimum, build a slope of about 3/8 to 1/2 inch per foot of run away from the house. A flat roof sounds tempting for aesthetics but it's a maintenance headache in any climate with real rain. Both aluminum pan systems and wood-framed covers with metal roofing depend on that slope to shed water before it can find a fastener hole or joint to seep through.
Freestanding posts and footings
For freestanding covers or the outer post line of an attached cover, posts either set into concrete footings or bolt to concrete anchors on the slab. Many aluminum kit systems are designed to bolt directly to a poured slab in most situations, with the post base engineered to transfer loads. Wood posts going into the ground need UC4A pressure treatment. If you're bolting wood posts to a slab with standoff bases, UC3B can work, but make sure water can drain away from the base rather than pooling around it.
Roof panels and assembly
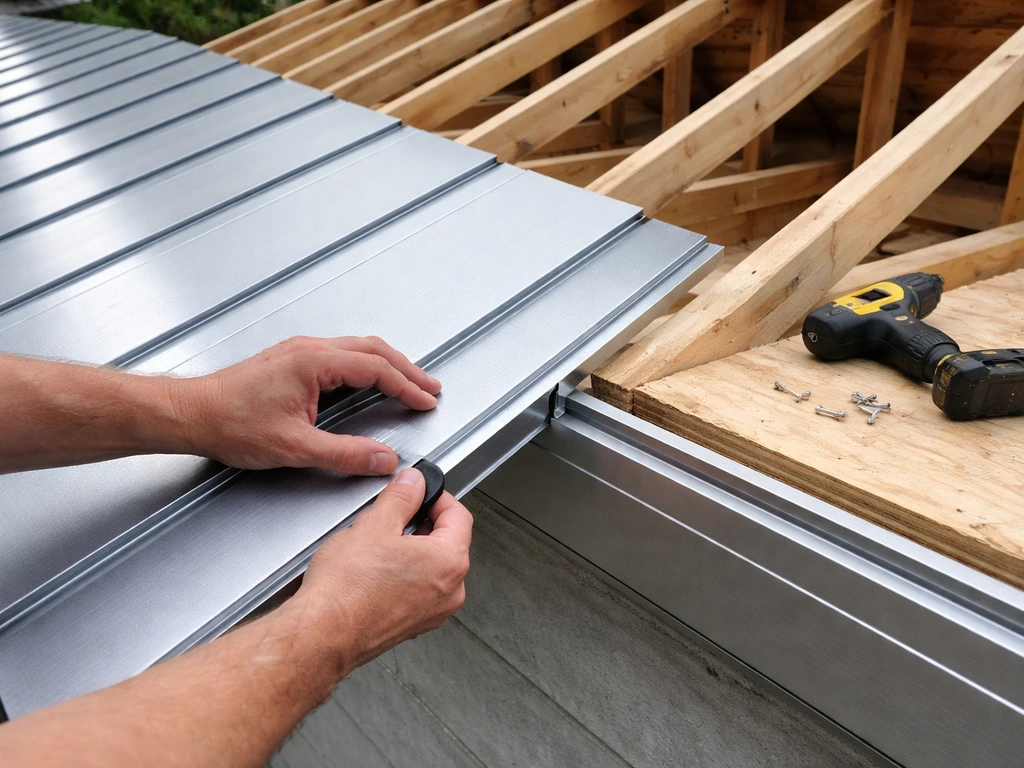
This is where aluminum kit systems have a real DIY advantage. Interlocking aluminum pan panels drop into a channel, align themselves, and fasten with a minimal number of screws per panel. You don't need roofing experience. The panels run perpendicular to the framing members (beams/rafters), and the system is essentially designed so the pieces guide you into correct assembly. ICC-ES evaluation reports for aluminum patio-cover panel systems include installation guidance such as requiring panel orientation (panel length perpendicular to framing) and listing corrosion-resistant steel fasteners in the approved details. For someone doing a patio cover for the first time, this is a huge comfort level difference versus framing out a wood roof and then applying metal roofing panels separately.
A wood build with metal roofing panels (corrugated steel or standing seam) requires more steps: frame the structure with dimensional lumber, install sheathing or purlins depending on the panel type, then fasten the metal panels with specialty roofing screws that include rubber washers to seal the hole. It's not hard, but it's more decisions, more materials to source, and more ways to get a leak. Beginners consistently underestimate how important the valleys and eave details are on a wood-framed metal roof.
Tools you'll actually need
- Circular saw or miter saw (for cutting both aluminum panels and wood framing; a fine-tooth blade works on aluminum)
- Drill/driver with corrosion-resistant bit set
- Level (a 4-foot level minimum; 6-foot if you have one)
- Chalk line for laying out panel runs
- Tape measure and speed square
- Ladder or scaffolding (don't underestimate how much time you'll spend at height)
- Caulk gun and appropriate sealant for your material (silicone for aluminum flashing joints, paintable exterior caulk for wood)
Aesthetic and design options: styles, finishes, colors, and roof shapes
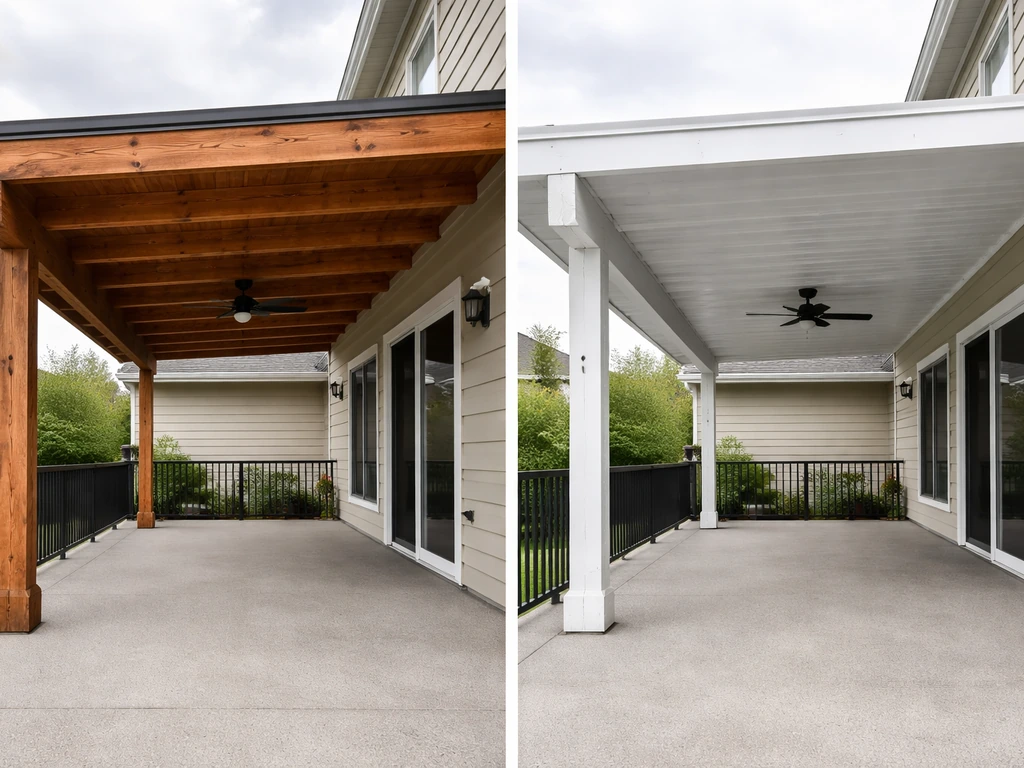
Wood wins the aesthetic argument for traditional and craftsman-style homes. Exposed Douglas fir or cedar rafters with a stained finish have a warmth that aluminum simply doesn't replicate. If your home has detailed trim, exposed rafter tails, or a classic look, a wood pergola or wood-framed solid-roof cover will blend better than a kit aluminum system. You can paint or stain wood any color, and it changes character over time in a way some homeowners genuinely love.
Aluminum kit systems have improved dramatically on aesthetics. Factory finishes now come in a wide range of colors, including earth tones and neutrals that work with contemporary and transitional homes. Many systems offer wood-grain embossed panels that read as wood from a distance, though they won't fool anyone up close. Powder-coated finishes are smooth and uniform. Kynar 500 and similar PVDF coatings can carry 40-year finish warranties under defined conditions, which is a remarkable number compared to a wood stain that needs refreshing every two to three years.
For roof shape, most DIYers are building one of three things: a simple lean-to (shed-style, single slope), a gable (peaked roof with two slopes), or a flat/low-slope cover. Lean-tos are the most beginner-friendly in both wood and aluminum. Gable roofs add structural complexity regardless of material because you need a ridge beam and matching rafter pairs. Aluminum kit systems are generally engineered for lean-to or very low-slope configurations, so if you want a steep gable, a wood build gives you more flexibility. Lattice and louvered aluminum systems are the go-to for a pergola-like open aesthetic if you want some shade without a full solid roof.
Longevity, safety, and warranties: lifespan, fire, wind, snow, and load
How long each material lasts
A well-maintained pressure-treated wood patio cover in a moderate climate can last 20–30 years. Cedar or redwood in a dry climate can outlast that. In high-moisture climates without consistent maintenance, 10–15 years before needing significant repairs is a realistic expectation. Aluminum structural members essentially don't have a decay lifespan, and the finish is typically the limiting factor. Factory powder-coat or baked enamel finishes commonly carry 15–20 year warranties. Premium PVDF coatings like Kynar 500 can run 40 years. Products like Alumawood offer limited lifetime material warranties on the aluminum itself. The fasteners and caulk joints are the maintenance items that need periodic attention, not the panels or framing.
Structural loads: wind, snow, and what the code actually requires
This is where a lot of DIYers get into trouble, not because they pick the wrong material, but because they don't account for the loads their structure has to carry. Snow load (measured in pounds per square foot) varies enormously by location. A patio cover in Phoenix doesn't need to think about this; a patio cover in Denver or the Cascades absolutely does. Wind loads matter everywhere, but especially in hurricane zones, high-desert areas with frequent gusts, or coastal locations.
Most cities require a permit for an attached patio cover, and during the permit process (or the framing inspection that follows), an inspector will verify that your ledger connection, rafter sizing, post sizing, and uplift hardware meet the local code. Berthoud's 2024 IRC Building Guide for patio covers notes that patio-cover permits and projects commonly involve inspections such as framing inspections for roof members and ledger or attachment details permit and inspection process. Uplift clips (the H1 and H2.
5 rafter-to-plate connectors you see referenced in IRC-based design guides) keep roofs from lifting in wind events. They're cheap, they're easy to install, and skipping them is exactly the kind of mistake that fails an inspection or, worse, fails in a storm. Wood and aluminum structures both need these connections; the hardware is just slightly different.
Fire resistance is another real consideration in wildfire-prone areas. Aluminum is non-combustible; wood is not. If you're in a WUI (Wildland-Urban Interface) zone or your local code requires ignition-resistant construction, aluminum is the clear choice and may actually be required.
When to call a pro instead of DIYing
If your project involves modifying existing structural members of the house (cutting into a load-bearing wall, relocating an existing ledger to a different elevation, or spanning more than about 20 feet with a single beam), get a structural engineer or experienced contractor involved. The DIY path is genuinely solid for straightforward attached or freestanding patio covers, but unusual spans, complex multi-slope roofs, or any situation where the existing structure is questionable are worth the money for professional guidance. Permits and inspections are also your friend here, not your enemy: a framing inspection catches problems before they're buried under panels.
Choosing the right option for your home: questions to ask and next steps
Here's a simple framework to make this decision for your specific situation. Walk through these questions honestly before you buy anything.
- What's your climate like? High moisture, humidity, or rainfall pushes you toward aluminum. Dry climates are more forgiving of wood. Wildfire zones often require non-combustible materials.
- How much maintenance are you actually willing to do? Be honest. If the answer is 'as little as possible,' aluminum wins. Wood requires re-sealing or staining every two to three years to stay healthy.
- What does your house look like? Traditional or craftsman homes pair naturally with wood. Modern, contemporary, or ranch-style homes often look just as good (or better) with a clean aluminum system.
- What roof shape do you want? Lean-to or low-slope flat: both materials work, but aluminum kits are faster. Steep gable or complex hip roof: wood framing gives you more flexibility.
- What's your realistic budget? Get actual quotes or price out materials at your local supplier before committing. The installed cost difference between quality wood and aluminum is substantial; materials-only DIY narrows that gap but doesn't eliminate it.
- Does your HOA or local jurisdiction have material or color restrictions? Check before you buy. Some HOAs prohibit visible metal roofing or require specific colors.
- What are your local code requirements? Call or visit your building department. Find out if a permit is required (it usually is for an attached cover), what the local wind and snow design loads are, and whether there are specific requirements for your zone.
- How will you handle the ledger and flashing detail? This is not optional. Sketch it out before you start. Whether you're using wood or aluminum, water management at the house connection determines whether your cover lasts 10 years or 30.
Once you've answered those questions, your path forward is: measure your patio (width, depth, height at the house wall, and the height you want at the outer edge to achieve your slope), sketch a simple plan showing post locations and ledger height, check with your building department for permit requirements, then price out materials from at least two suppliers. If you're going aluminum, request the installation guide from the kit manufacturer before you commit to a brand. If you are planning aluminum patio covers do it yourself, pay special attention to the ledger connection, flashing, slope, and the corrosion-resistant fasteners DIY aluminum system. The quality of those instructions varies, and a kit with clear, detailed documentation is worth paying a small premium for.
If you're leaning toward a DIY aluminum system, it's worth knowing that solid, lattice, and louvered aluminum covers each have distinct installation workflows and structural requirements. Lattice and louvered systems that allow walking access (for maintenance or cleaning) have entirely different load considerations than a standard solid shade roof. Before you commit, it also helps to know whether you can walk on aluminum patio covers and what that depends on. Louvered and lattice systems are also designed around how you can safely walk and maintain them over time walking access. The details on load ratings, fastener patterns, and slope requirements are all worth reviewing carefully for whatever product line you choose.
The bottom line: aluminum is the practical choice for most DIYers in most climates, wood is the right choice when aesthetics and custom design outweigh maintenance concerns, and the details (slope, flashing, fasteners, and proper treatment grade) matter far more than the material headline. Get those details right and either option will serve you well for decades.
FAQ
Do I need to hire a structural engineer if I’m doing a DIY metal vs wood patio cover?
Not usually. Most wood and aluminum patio covers can be installed without relocating any existing house structure, but you still have to nail the ledger and flashing details. If your plan requires cutting into a load-bearing wall, raising the ledger to change the roof slope, or spanning unusually long distances, that is when you should get an engineer or an experienced contractor, even if the material choice is “simple.”
Where do patio cover leaks and failures start, and does it differ for metal vs wood?
Choose based on where the cover is likely to stay wet, not just on the overall material. Wood fails fastest at the ledger interface, beam-to-post joints, and around fasteners that create small water traps. Aluminum fails fastest when the wrong fasteners are used (steel-on-aluminum, or overtightening that depresses the panel) and when expansion gaps are skipped. Treat those areas differently depending on whether you choose metal vs wood.
What if I want a steep gable roof, not a lean-to, will aluminum still work?
Yes, and it changes the decision. If your roofline requires a steeper pitch or a more complex multi-slope shape, a wood-framed system generally gives more design freedom. Many aluminum kit systems are engineered for lean-to or very low-slope configurations. If your target look is a steep gable, wood is often the practical match even if aluminum would otherwise be the lower-maintenance choice.
Can you walk on an aluminum patio cover, and is it different for solid vs louvered systems?
It depends on the type of aluminum system and how it was rated for foot traffic. Solid-panel aluminum covers are typically not designed to be walked on routinely, and stepping patterns can still concentrate loads. Louvered or lattice systems that are marketed for access often have different framing and load paths. Before buying, confirm whether the product is rated for walking access and what the safe load assumptions are.
How often do I need to maintain a metal vs wood patio cover after it’s installed?
In most climates, you should assume yes if you care about performance. For wood, you need an annual or periodic sealing/staining plan (frequency depends on sun and rain exposure). For aluminum, you usually do not recoat immediately, but you should inspect and refresh sealants and check fastener condition, especially at the ledger and at any joints where leaks could develop. Many DIYers forget caulk maintenance because aluminum “doesn’t rot.”
If I’m putting wood posts on a slab, do I still need UC4A?
For wood posts, the key is ground contact grade, UC4A at minimum, because the post is exposed to soil moisture where fungal decay can begin. For freestanding posts with concrete footings, you may still need UC4A depending on how close the wood stays to wet ground. For bolted standoff bases and slab-adjacent situations, UC3B can sometimes be acceptable only if water drains away and the wood is not staying wet near the base.
What fasteners should I use for aluminum panels, and what goes wrong with the wrong ones?
Use stainless or aluminum-compatible coated fasteners, and avoid overtightening. A depressed screw head can create a tiny water pocket that accelerates corrosion at the contact point. In coastal or high-humidity regions, this matters even more. If you retrofit later, mismatched fasteners can be a hidden source of leaks even when the panel itself is fine.
What is the most common installation mistake with aluminum patio covers?
Small gaps are not optional. Aluminum panels expand and contract, so installing too tight (skipping expansion allowances built into the track design) can cause creaking, buckling, or stressed connections that work loose over time. The “fix” is often not brute-force tightening, it is following the manufacturer’s spacing and fastening schedule exactly.
Does the snow and wind load risk change depending on metal vs wood?
It’s mostly a worksheet problem, not a material problem. You still need correct snow load and wind load design based on your location, roof pitch, and attachment method. A patio cover that is fine in Phoenix could be undersized in Denver or a mountain region. Before choosing wood vs metal, confirm your local load requirements and that the design includes the right uplift connections.
Which material is better for wildfire-prone areas, metal or wood?
Yes, and it is not just about fire rating, it is about code-driven requirements. In wildfire-prone WUI areas, aluminum is non-combustible while wood is not. If your jurisdiction requires ignition-resistant construction, metal patio covers may be the only practical path without additional fire-rated construction steps for wood framing.
Will an inspector treat metal and wood patio covers differently during permitting?
Many jurisdictions require a permit for attached patio covers, and the inspector will typically check ledger connection, post sizing, member sizing, and uplift hardware, regardless of whether the cover is wood or aluminum. If you are building without a permit, you may be forced to remove work to make corrections. If inspection is delayed, make sure the ledger and connections are visible until approval.
Is DIY actually easier with aluminum kits than with a wood frame plus metal roof panels?
Not automatically, but you should plan for it. Aluminum systems that are engineered as kits often come with included tracks, channels, and a defined assembly workflow that reduces framing mistakes. Wood builds require correct flashing, sheathing or purlin choices for the roof skin, and accurate valley/eave detailing if you use metal roofing panels over wood framing. The DIY “complexity” is usually higher for a wood frame plus separate metal roofing.
How important is roof slope for both metal and wood patio covers?
For most DIYers, start with slope and water management before you compare costs line-by-line. Flat or near-flat roofs increase the chance that water finds a fastener hole or joint and starts a slow leak that becomes costly. A target slope around 3/8 to 1/2 inch per foot away from the house is a common baseline, and it applies to both aluminum pan systems and wood-framed metal roofing. If your design cannot maintain slope, the decision should shift toward a solution that naturally sheds water.