
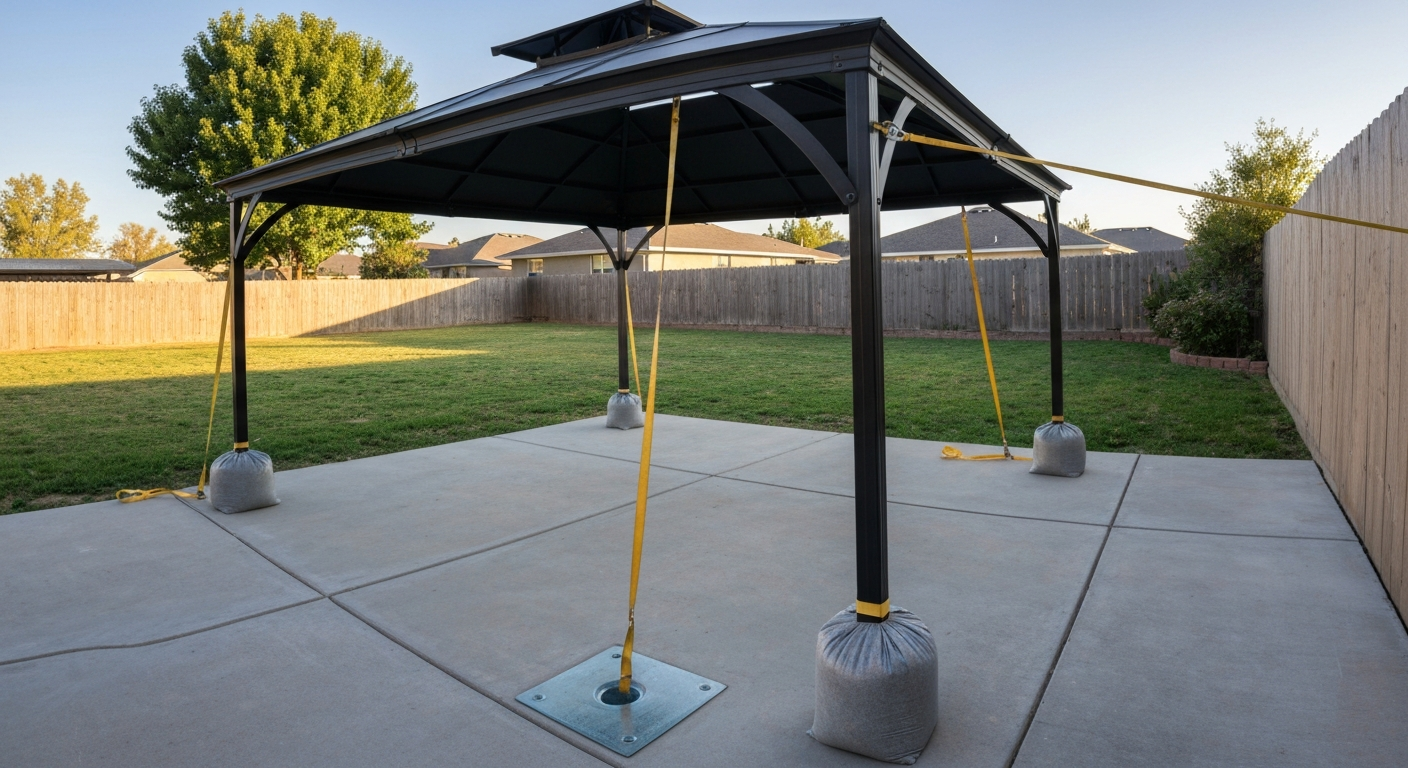
To weigh down a gazebo on a patio, your two main paths are temporary ballast (weight bags, concrete blocks, or water-fill containers strapped to each leg) and permanent anchoring (wedge anchors, epoxy anchors, or anchor plates drilled into concrete or pavers). Which one you need depends on your surface, your local wind exposure, and whether the gazebo is a pop-up you move seasonally or a metal or aluminum frame you plan to leave standing year-round. Get the right method dialed in and your gazebo stays put safely. Skip it and a 30 mph gust can send a 10x10 canopy frame across your yard.
How to Weigh Down a Gazebo on a Patio: DIY Anchoring Guide

Celia Vaughn
10 Aug 2026
Who this guide is for
If you have a pop-up canopy, a steel or aluminum gazebo kit, or a heavier wood-frame structure sitting on a concrete slab, paver patio, or wood deck, this guide is written for you. I'll walk through how to assess your specific setup before you buy a single anchor bolt, compare temporary and permanent securing methods side by side, and give you concrete installation guidance for each surface type. I'll also cover what changes when you swap out a canopy top, basic wind-load concepts you need to know without having to hire an engineer for a backyard project, and the honest criteria for when a pro should take over. If you're still in the assembly stage, the section on putting up a gazebo on a patio covers frame-by-frame setup. For step-by-step, frame-by-frame setup instructions, see how to put up a gazebo on a patio. For step-by-step instructions on how to fix a gazebo to a patio, see the detailed guide on how to fix a gazebo to a patio.
Site assessment checklist before you anchor anything
Spend five minutes on this before buying anchors. The wrong anchor on the wrong surface is worse than no anchor because it creates false confidence. Work through each item below and keep notes.
- Surface type: Is your patio poured concrete, mortared or sand-set pavers, a wood deck over joists, or a combination? Each surface needs a different fastener strategy, and mortared joints versus dry-laid sand can change your options entirely.
- Slab thickness and condition: For concrete, tap with a hammer and listen for hollow spots near edges. Spalled or cracked concrete may not hold expansion anchors reliably. Minimum usable thickness for most wedge anchors is around 3.5 inches, though 4 inches or more is preferred.
- Slope and drainage: A sloped slab affects how post bases sit level. A slope greater than 1/4 inch per foot means you'll need leveling shims under the base plate before fastening.
- Wind exposure: Are you in an open, flat yard with no neighboring structures (Exposure Category C or D under ASCE 7), a suburban area with trees and nearby buildings (Exposure B), or a coastal or hilltop location? Open and coastal sites face significantly higher wind pressures and need more robust anchoring.
- Gazebo footprint and canopy area: A 10x10 ft canopy has 100 sq ft of sail area; a 12x16 ft has 192 sq ft. Larger canopies generate more uplift force at the legs. Do not undersize your ballast or anchors based on how lightweight the frame feels.
- Frame material: Pop-up steel frames with powder coating, welded aluminum kit frames, and pressure-treated wood posts all have different base-plate designs and different tolerances for torque during fastening. Know yours before you drill.
- Leg base style: Does your gazebo have open tube legs, flat foot pads, or adjustable leveling feet? This determines whether you bolt through an existing plate or need to add a third-party anchor bracket.
- Local permit requirements: Some jurisdictions treat permanent gazebo anchoring as a structure addition requiring a permit, especially on HOA properties or in hurricane/high-wind zones. A five-minute call to your local building department is worth making.
How wind, canopy size, and frame material affect what you actually need
Wind pressure does not scale linearly with wind speed. It scales with the square of wind speed, which is why the ASCE 7 velocity-pressure equation is written as qz = 0.00256 x Kz x Kzt x Kd x Ke x V squared (in psf, with V in mph). What that means practically: a site with a 90 mph basic wind speed sees roughly 2.25 times the wind pressure of a site with a 60 mph design speed. A double vent or double-tier canopy top helps because the upper vent allows airflow through rather than pushing entirely against the fabric, which lowers the net uplift force on the frame. That is not just marketing copy from manufacturers; it reflects real aerodynamic behavior. However, it does not eliminate the need for anchoring.
Most pop-up canopy manufacturers, including E-Z UP and ShelterLogic, recommend taking down soft-top canopies when sustained winds hit roughly 20 to 30 mph. That is not a conservative suggestion. At those speeds, a 10x10 canopy with no anchoring can become airborne and cause serious injury. Weight bags and ballast reduce risk in moderate gusts but are not designed to hold a canopy in a storm. Permanent mechanical anchors change that equation for sturdier gazebo frames.
Frame material matters too. A lightweight pop-up steel or aluminum frame is aerodynamically very different from a heavy wood-post gazebo. Heavier wood or thick-walled aluminum structures have more dead weight holding them down, but they also have larger exposed canopy areas. When planning anchoring loads, always start from the canopy square footage, not just the frame weight.
Temporary ballast vs. permanent anchoring: which approach makes sense
The honest comparison comes down to three questions: How often do you move the gazebo? How severe is your local wind exposure? And are you willing to put fasteners into your patio surface? If all three answers point toward permanence, permanent anchoring is the right path. If you rent, move the gazebo seasonally, or have a landlord-owned patio, ballast is the practical choice.
| Factor | Temporary Ballast | Permanent Anchoring |
|---|---|---|
| Cost (materials) | $20–$80 for weight bags/blocks per setup | $15–$60 per anchor point for mechanical anchors; $30–$90 per point for epoxy |
| Surface damage | None | Drilled holes remain; patching required if removed |
| Holding strength | Moderate (40–50 lb per leg typical) | High (hundreds of lb pullout per anchor when correctly installed) |
| Suitable for pop-up canopies | Yes | Possible but usually overkill |
| Suitable for metal/aluminum kit gazebos | Marginal for windy sites | Recommended for exposed or permanent installs |
| Suitable for wood-frame gazebos | Not recommended | Required |
| Setup time | 5–15 minutes per use | 1–4 hours one-time installation |
| Permit likely needed | No | Possibly, depending on jurisdiction and structure size |
| Reversibility | Fully reversible | Holes remain; difficult to reverse cleanly |
My recommendation: use ballast for any pop-up or seasonal canopy that you store indoors during bad weather, and use permanent anchors for any gazebo frame that stays up year-round or lives in a high-wind exposure zone. A hybrid approach works well for mid-weight aluminum kit gazebos in moderate climates: permanent anchor plates at two legs and heavy ballast at the other two, giving you some flexibility to disassemble while maintaining a meaningful anchor baseline.
Temporary ballast and hold-down options for patios
For hard surfaces like concrete, pavers, or composite decking where you cannot drive stakes, ballast is your go-to for temporary securing. The principle is simple: add enough downward weight to each leg so that wind uplift cannot lift the frame. The execution has a few details worth getting right.
Weight bags (sand or gravel fill)
Purpose-made canopy weight bags like those from E-Z UP hold up to 45 lb of sand each and are designed to loop or velcro around the vertical leg of a pop-up frame. One bag per leg is the standard minimum recommendation from most manufacturers for a 10x10 canopy in moderate conditions. In windier locations or for larger canopies, doubling up (two bags per leg) or moving to heavier ballast is the right call. Fill them with sand rather than gravel because sand packs denser and shifts less when the bag moves.
Water-fill ballast containers
Water-fill ballast containers are sold under various names and work on the same principle: a durable plastic container with a hook or strap that attaches to the leg. You fill it on-site from a garden hose. A one-gallon container gives you about 8.3 lb. You need roughly a 5-gallon unit per leg to hit the 40 lb minimum, which is perfectly viable but bulkier than sand bags. The advantage is that you can drain them for transport and storage. The disadvantage is that they shift more than sand under dynamic loading and can crack in freezing temperatures if left outdoors in winter.
Concrete blocks and DIY ballast
A standard 8x8x16 inch CMU block weighs about 30 to 35 lb. Two stacked blocks per leg gives you 60 to 70 lb, which exceeds the minimum ballast recommendation for most 10x10 canopies in moderate wind. The downside is that loose blocks are not attached to the frame, so uplift can lift the frame off the blocks rather than lifting the blocks with it. To fix this, run a ratchet strap from the block through or around the leg base. This is ugly but it works and costs almost nothing if you already have straps.
Tethering and guylines as a supplement
Tethering to a nearby fixed structure (a fence post, deck railing bolted to joists, or a wall anchor) adds a horizontal restraint that ballast alone does not provide. Use 3/16 inch or 1/4 inch braided nylon or polyester cord rated for the application. Paracord is not a structural tether for this purpose. Run lines from the upper frame corners or peak at roughly 45 degrees down to fixed anchor points. This is most effective when combined with leg ballast, not as a standalone solution.
Deciding on permanent anchoring by patio surface
The right permanent anchor depends almost entirely on what is under your gazebo's legs. Poured concrete and paver patios look similar from above but require completely different fastening strategies. Here is how to think through each surface before committing to hardware. For step-by-step instructions on how to fix gazebo to patio, see the linked guide for detailed procedures and tool lists.
| Surface | Best Anchor Type | Key Consideration | Approximate Material Cost Per Point |
|---|---|---|---|
| Solid poured concrete (4"+ thick) | Wedge/sleeve anchor or epoxy anchor with threaded rod | Check for rebar proximity; stay 6" from slab edges | $5–$20 per anchor |
| Concrete with cracked or spalled areas | Epoxy/adhesive anchor (e.g., Hilti HIT-HY 200) | Cracked concrete requires bonded anchors per ICC-ES design rules | $20–$50 per anchor point |
| Dry-laid (sand-set) pavers over compacted base | Remove pavers, pour small concrete pier or footing | Cannot rely on paver or sand alone; reach the base material | $30–$80 per footing (DIY) |
| Mortared pavers over concrete slab | Through-paver anchor to underlying slab using epoxy or wedge anchor | Drill through the mortar joint and paver into slab; avoid paver cracking | $15–$40 per anchor |
| Wood deck (joists and decking) | Post base with through-bolts into joist or blocking | Never fasten to decking boards alone; always anchor to framing | $15–$50 per post base |
One principle applies across all surfaces: anchor into the structural layer, not the finish layer. Pavers, deck boards, and tile are all finish materials. They are not designed to resist uplift or lateral load from a gazebo in wind. If your plan involves fastening only to the surface you walk on, revisit it. The Deck Connection and Fastening Guide, Simpson Strong‑Tie (technical guide for deck/post anchorage) explicitly warns to never attach posts to deck boards only and shows proper post bases, through‑bolts or post‑installed anchors and blocking/backing for code‑compliant anchorage Deck Connection and Fastening Guide — Simpson Strong‑Tie (technical guide for deck/post anchorage).
Anchoring into a concrete patio: wedge anchors, sleeve anchors, and epoxy
Poured concrete is the most forgiving surface to anchor into because the material itself is strong and consistent when it is in good condition. The two main mechanical options are wedge anchors and sleeve anchors, and the chemical option is an epoxy-bonded threaded rod. Each has its place.
Wedge anchors and sleeve anchors
A wedge anchor (like the Simpson Strong-Bolt 2 or similar) is a one-piece bolt with a mechanical clip near the bottom that expands and locks against the sides of the drilled hole when you torque the nut down. They are fast to install, widely available, and carry published pullout and shear values in concrete that you can look up from manufacturer ICC-ES reports. For a typical 3/8 inch wedge anchor at 3.5 inch embedment in normal-weight concrete, allowable tension loads are in the range of a few hundred pounds per anchor, depending on edge distance, spacing, and concrete strength. A sleeve anchor works similarly but uses a threaded bolt that pulls up into a sleeve, expanding it outward. Sleeve anchors are slightly easier to remove but have lower shear values in most published tables.
For most homeowner gazebo applications, 3/8 inch diameter wedge anchors at 3 to 3.5 inch embedment depth, installed through a steel base plate into sound concrete, are adequate for a metal or aluminum gazebo frame in Exposure Category B. If you are in a coastal, hilltop, or otherwise exposed location, step up to 1/2 inch diameter or add more anchor bolts per base plate. Always maintain at least 6 inches from a slab edge and follow the manufacturer's minimum spacing between anchors.
Epoxy (adhesive) anchors
When you are anchoring near the edge of a slab, into concrete that has visible cracks, or when you need high pullout capacity in a smaller diameter rod, epoxy anchors are the professional's choice. Systems like the Hilti HIT-HY 200 inject a two-part adhesive into a cleaned, blown-out hole, then a threaded rod is pushed in and allowed to cure. The adhesive bonds the rod to the full depth of the hole rather than relying on mechanical expansion forces, which is why cracked-concrete ICC-ES evaluations favor epoxy systems. The tradeoff is cure time: depending on temperature, an epoxy anchor may need 30 minutes to several hours before you can apply load. Do not skip the hole-cleaning step. Blowing out the dust with compressed air and brushing the hole is mandatory for epoxy anchors to achieve their rated capacity.
Installation steps for concrete anchors
- Position the gazebo base plate where you want it and mark the hole locations with a marker or punch through the plate holes.
- Move the gazebo aside. Drill to the specified embedment depth plus the thickness of the base plate using a hammer drill and the correct diameter carbide bit (check the anchor manufacturer's table for the exact bit size, not just the anchor diameter).
- Blow out each hole with compressed air and brush with a wire brush. For epoxy anchors, repeat this step three times.
- For wedge anchors: drop the anchor through the base plate hole, tap the anchor into the drilled hole so the threads are above the plate, spin the nut down finger-tight, then torque to the manufacturer's specification (typically 25–40 ft-lb for 3/8 inch anchors). Check that the expansion clip has fully engaged by watching for resistance.
- For epoxy anchors: inject the cartridge from the bottom of the hole upward to avoid air pockets, insert the threaded rod to full embedment depth, and wait for the full cure time before loading.
- Reposition the gazebo post over the anchor or bolt the base plate down, then level the frame before tightening all hardware.
- Torque all nuts to spec. Do not overtighten wedge anchors as this can crack the concrete around the hole.
Tools and materials list for concrete anchoring
- Rotary hammer drill (SDS-plus is ideal; a standard hammer drill works for occasional use)
- Carbide masonry bits in the correct diameter per anchor specification
- Compressed air or hand pump bulb for hole cleaning
- Wire tube brush in the anchor diameter
- Torque wrench (0–75 ft-lb range covers most residential anchors)
- Level (2-foot or 4-foot)
- Wedge anchors or epoxy anchor system with correct cartridge gun
- Steel post base plates (if not supplied with the gazebo)
- Safety glasses and hearing protection
Anchoring a gazebo into a paver patio
Paver patios are the trickiest surface for gazebo anchoring, and the mistake I see most often is treating individual pavers like concrete. A sand-set paver is a loose unit sitting on a compacted gravel and sand bed. It can be lifted, shifted, or cracked under load. Driving a spike through a paver or drilling an anchor into a single paver accomplishes almost nothing structurally.
Dry-laid (sand-set) pavers: the footing approach
For sand-set paver patios, the most reliable permanent anchoring method is to remove the pavers at each leg location, excavate down through the gravel bed to undisturbed soil, pour a small concrete footing (typically 12 inches in diameter and 12 to 18 inches deep), and set an anchor bolt or J-bolt into the wet concrete. Once cured, set the pavers back around the footing. This is essentially the same technique used when installing a pergola post on a paver patio. The footing bypasses the paver surface entirely and transfers load into the ground. It is the most time-consuming option but gives you genuinely solid anchoring with no reliance on the paver bed.
Mortared pavers over an existing concrete slab
If your pavers are mortared over a poured concrete slab (common in many newer patio installations), you have more options. You can drill through the mortar joint between pavers and into the underlying slab, then use an epoxy anchor and threaded rod, essentially anchoring to the slab below without touching the paver itself. Drill slowly through the mortar joint to avoid cracking the adjacent paver, and use a smaller bit for the initial pilot pass. This method works well and is far less disruptive than removing pavers, but it requires that the underlying slab is in good condition and thick enough (4 inches minimum) to accept an anchor.
Anchor plates and in-fill methods
Some homeowners use large-footprint anchor plates or base plates that spread load across multiple pavers rather than concentrating it on one. This reduces the risk of cracking individual pavers and works reasonably well for lower-load applications like lightweight aluminum gazebo kits in sheltered locations. The base plate sits flat on the paver surface, and the gazebo post bolts to it. This is not truly anchored to the ground, but it distributes the frame's dead weight broadly and raises the resistance to tipping. For anything heavier or in exposed wind conditions, combine this with the footing approach above for at least two legs.
Paver anchoring installation steps
- Mark the four leg positions before removing any pavers. Lay out the full gazebo footprint with chalk or tape.
- For the footing method: remove pavers in a roughly 18-inch square around each leg mark, keeping them aside carefully for reinstallation.
- Excavate the gravel and sand base to the required footing depth (12 to 18 inches below paver surface is typical for frost-free zones; go deeper if your area freezes).
- Mix and pour concrete, setting a J-bolt or anchor coupler at the correct height and position before the concrete sets. Use a bubble level to keep the bolt plumb.
- Allow the concrete to cure for a minimum of 24 to 48 hours (72 hours is better) before applying any load.
- Reinstall the pavers around the footing, cutting pavers as needed to fit closely around the anchor assembly.
- Attach the gazebo post base to the anchor bolt and level the structure before tightening all hardware.
When a new canopy top changes your anchoring needs
Replacing a worn or torn canopy top is a common and worthwhile upgrade, and it is one of the few changes that can actually affect your wind-load situation. A double-tier or vented replacement top has an upper vent panel that allows air to pass through rather than accumulate pressure underneath the canopy. Manufacturers market this as a wind-stability feature, and the aerodynamic principle is real: vents reduce net uplift by changing how pressure builds under the fabric. Peer-reviewed research (see Analysis and design of membrane structures: Results of a round‑robin exercise, Engineering Structures) reports that vents and double‑curved membrane shapes reduce uplift and change pressure coefficients, materially altering aerodynamic response Analysis and design of membrane structures: Results of a round‑robin exercise — Engineering Structures (peer‑reviewed paper on membrane wind behaviour). If you are upgrading from a flat single-panel top to a vented double-tier, you are likely reducing the uplift load on your anchor points, which is a good thing.
The reverse situation is worth paying attention to too. If you are replacing a small original canopy top with a larger aftermarket top, or adding a solid-panel enclosure to an open gazebo frame, you are increasing both the sail area and the potential uplift. What was adequate ballast or anchoring for the original configuration may not be enough for the new one. A 10x10 frame fitted with a 12x12 replacement canopy is no longer a 10x10 wind-load problem. Check that your anchor strategy reflects the actual canopy size you are running, not the frame size. For more detail on canopy compatibility and top replacement specifically, the guide on patio gazebo canopy top replacement covers fitting and sizing in depth.
Installation order and full project checklist
Whether you are going temporary or permanent, follow this sequence to avoid the most common mistakes, like drilling anchor holes before confirming the gazebo is level, or installing ballast bags before the frame is fully assembled and square.
- Complete site assessment (surface type, slab condition, wind exposure, permit check).
- Assemble the gazebo frame fully and dry-fit it in the final position without any fastening. Confirm it is level and square before marking any hole locations.
- Mark all anchor or ballast attachment points with the frame in place.
- Move the frame aside and perform any drilling, footing pours, or surface prep.
- Allow any concrete or epoxy anchors to fully cure before proceeding.
- Reassemble or reposition the frame, attach base plates to anchors, and level the structure.
- Attach ballast bags, blocks, or tethering lines if using temporary methods.
- Install the canopy top last, after the frame is secured, to avoid wind catching the top during the anchoring process.
- Perform a visual check: all bolts are torqued, all ballast is attached (not just stacked), and guylines or tethers are taut.
Maintenance and inspection after installation
Permanent anchors need periodic inspection, especially after the first winter freeze-thaw cycle or after any significant wind event. Check for concrete spalling or cracking around anchor holes, loose nuts on wedge anchors (retorque if they have backed off), and rust on any steel fasteners that are not stainless or hot-dipped galvanized. Sand-set paver footings can shift over time if water erodes the paver base around them; check that pavers near the footing have not risen or tilted, and re-sand joints annually.
For temporary ballast, check that weight bags have not split or lost fill over the season. Sand bags left outdoors for extended periods can develop mold, and the fabric can degrade from UV exposure. Replace bags every two to three seasons or when the fabric shows thinning or small tears. Before any forecasted windstorm, your first action should be to either take the canopy down or verify that all ballast is fully loaded and attached.
When to call a professional instead of doing it yourself
Most of what is described in this guide is well within DIY reach for a homeowner comfortable using a drill and following manufacturer specs. However, there are real situations where calling a structural engineer or licensed contractor is the smarter move. If your site is in a high-wind zone (basic wind speed above 115 mph per the ASCE 7 maps for your zip code), the anchoring loads exceed what rule-of-thumb guidance covers, and a proper engineering calculation is warranted. Similarly, if your concrete slab is thin (under 3 inches), heavily cracked, or shows signs of soil settlement underneath, a professional assessment of the slab before drilling is worth the cost.
For larger or heavier gazebo structures (think 16x20 ft or larger with solid wood posts and a real roof load), the anchor design should come from someone who can run the numbers against your local code. The ASCE 7 and IBC wind-load provisions that govern this work are not complex for a structural engineer but are genuinely outside what a homeowner should be estimating freehand. If your municipality requires a permit for the gazebo installation, that permit process will likely route you through a plan reviewer who can flag any anchoring concerns before you start digging.
FAQ
What is the first thing I should do before anchoring or weighing down a gazebo on my patio?
Perform a site assessment: note patio surface (concrete slab, interlocking pavers over base, wood deck), measure wind exposure (open yard, next to buildings/trees; use exposure B/C/D rules), record gazebo size and frame material (steel, aluminum, wood) and estimate frame weight. Check for utilities beneath the surface and local code or HOA rules. This determines whether temporary ballast or permanent anchors are appropriate.
How do I estimate wind forces and required anchoring capacity for a DIY project?
Use the ASCE/IBC approach conceptually: wind pressure scales with V^2. For practical DIY use: identify the local basic wind speed from code maps or local building department, classify exposure (B = suburban/trees, C = open terrain, D = coast), and assume heavier anchoring as exposure and wind speed increase. Many manufacturers recommend at least ~40–50 lb per leg for a 10×10 canopy in moderate winds, but engineered uplift uses ASCE qz = 0.00256·Kz·Kzt·Kd·Ke·V^2 to calculate psf if you need precise values or are anchoring a large structure.
What temporary ballast options work best on hard patio surfaces (concrete, pavers, deck)?
Temporary options: manufacturer weight bags (sand/gravel fill; 25–45 lb each) over each leg; stackable steel or concrete ballast plates that clamp to base plates; water‑fill ballast containers (light to move when empty); concrete blocks or pavers strapped to legs; removable ballast buckets filled with sand/gravel. Use one bag or plate per leg minimum and increase weight in higher winds. Do not rely on tent stakes on hard surfaces.
When should I use permanent anchoring instead of temporary ballast?
Choose permanent anchors when the gazebo is seasonal/permanent, your patio will host it long‑term, you need higher uplift resistance (exposure C/D or high local wind), or event/permit rules require fixed anchorage. Temporary ballast is fine for occasional use in low‑to‑moderate wind areas and if you’ll dismantle or store the gazebo when uncertain weather arrives.
What are appropriate permanent anchoring methods for concrete patios?
Options by increasing reliability: mechanical anchors (wedge/sleeve anchors) for through‑plate or base plate bolting into good, thick concrete; concrete screw anchors (Tapcon) for lighter loads; chemical/epoxy anchors (bonded threaded rods) where higher reliable pullout is needed or for cracked/edge conditions. Follow manufacturer embedment, spacing and edge‑distance tables; use washers/plates under legs to spread load and account for concrete condition.
How do I anchor a gazebo to a paver patio?
Best practice: remove pavers at each leg and cast small concrete piers/footings or expose underlying slab, then anchor into poured concrete with mechanical or chemical anchors. Avoid anchoring only into loose pavers or sand bed. If unable to pour concrete, use large ballast plates that span multiple pavers and are restrained with interlocking edges, but this is less reliable in high winds.