You can absolutely build an adjustable louvered patio roof yourself. The basic process is this: build a sturdy perimeter frame (either freestanding or attached to the house), install a rail system that holds pivoting aluminum slats, connect a manual rod or motorized actuator to tilt those slats anywhere from fully open to fully closed, and slope the whole thing slightly so rain drains to a gutter channel rather than dripping on your furniture. Done right, you end up with a cover that blocks harsh afternoon sun when you need it, ventilates when you don't, and sheds rain without pooling. The project is within reach for a confident DIYer who has some framing and hardware experience, but it demands careful planning, proper anchoring, and respect for your local building code.
How to Build Adjustable Louvered Patio Roofing DIY Guide

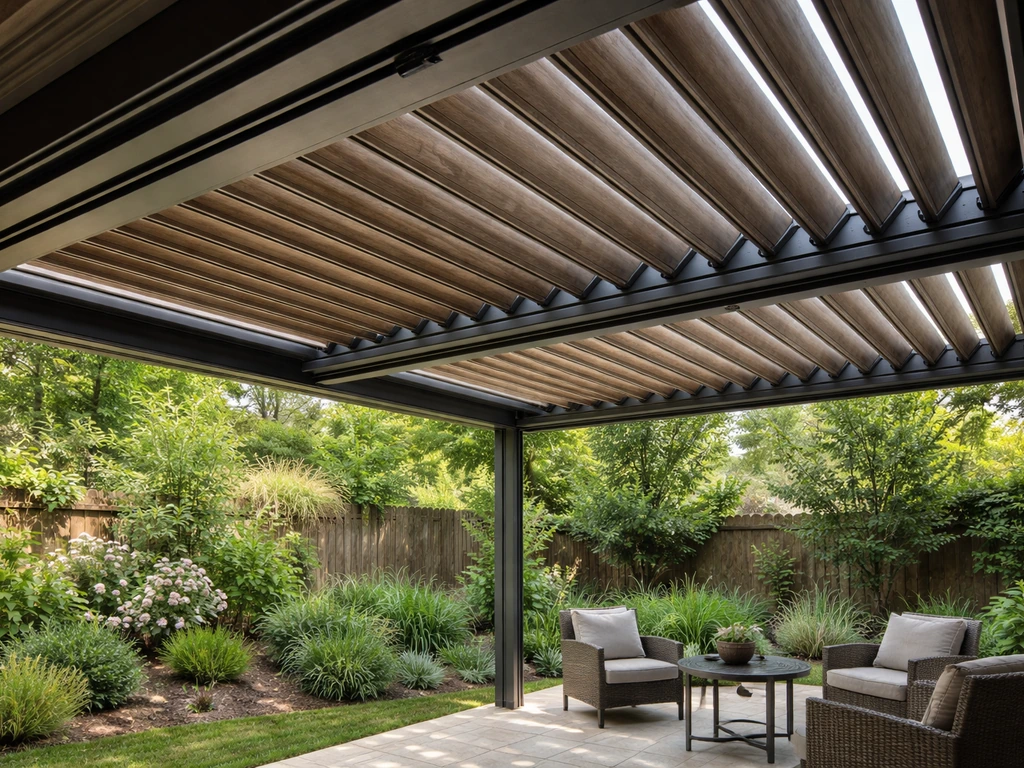
What an adjustable louvered patio roof actually does

An adjustable louvered patio roof is essentially a set of horizontal blades (louvers) mounted in a frame above your patio. Each blade pivots on a pin at each end, and they're all linked together so they move as one unit when you push a rod or trigger a motor. Tilt them flat and you get full shade and rain protection. Open them to an angle and you get sun, a breeze, or both. High-end commercial systems like Renson's Algarve can rotate blades up to 150 degrees, and Azenco's R-BLADE system goes to 135 degrees with a gapless overlap seal for true rain protection. A good DIY build can realistically achieve a 0-to-105-degree range, which covers every practical condition you'll encounter.
There are three common frame configurations to choose from: attached (a ledger board bolts directly to your house), freestanding (four or more posts carry the whole load independently), and a hybrid that attaches on one side and uses a post on the other. For most residential patios, an attached design is the most economical and the most structurally straightforward. A freestanding build is better when you can't or don't want to penetrate the house wall, or when the patio is far from the structure.
On materials, aluminum is the clear winner for louvered systems. It doesn't rot, doesn't warp from moisture cycles, and the extruded profiles for frames, rails, and louver blades are all designed to work together with consistent tolerances. Wood frames look great but louver hardware designed for wood is less common, and wood movement over seasons can cause the blades to bind. Steel is strong but heavy and needs consistent corrosion protection. Most serious DIY louvered builds use powder-coated aluminum extrusions throughout.
Plan your layout before you buy a single part
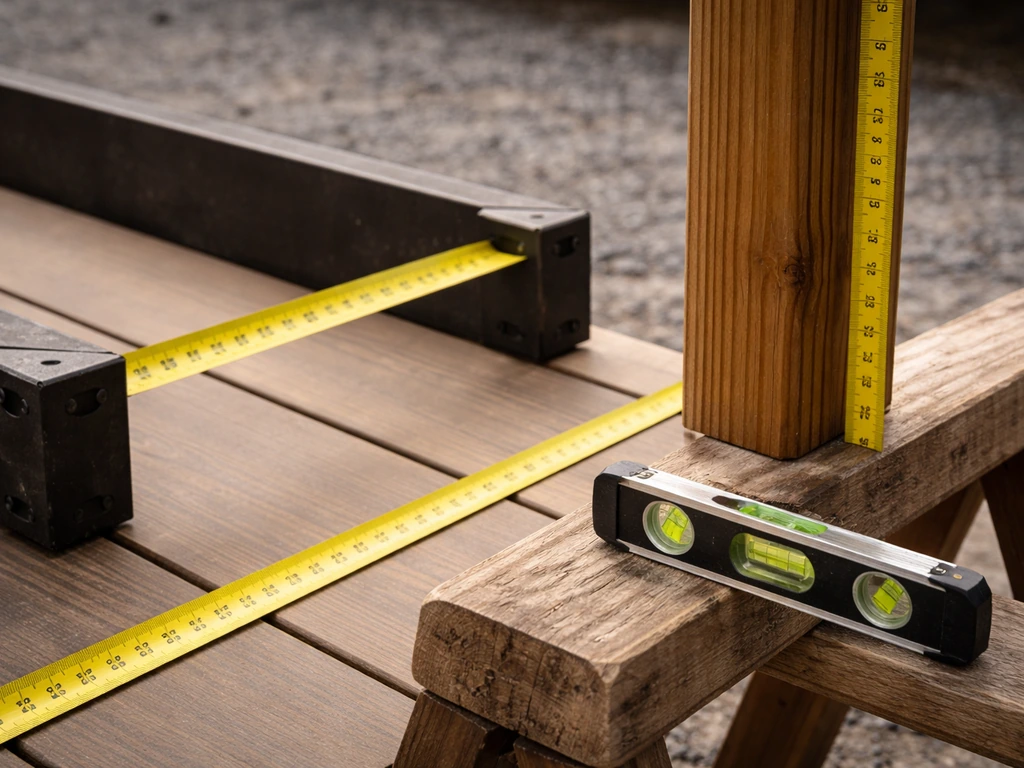
Measure twice, order once. For a louvered roof, this matters more than most projects because the louver blades come in fixed widths and the frame dimensions need to match exactly. After you measure your span and confirm the blade widths, follow these diy patio cover instructions to plan the frame layout before you buy parts. Start by determining your clear span: the width the louvers will need to bridge without a mid-span support. Most residential louver blade systems top out at around 16 to 18 feet of unsupported span before deflection becomes a problem. If your patio is wider than that, you'll need a center beam and intermediate rail.
Sketch your overhead view on paper or in a free tool like SketchUp. Mark the house wall (if attaching), the location of any doors or windows that could affect ledger placement, existing utilities overhead or underground, and the final post positions. Check your local setback requirements: many municipalities require patio structures to sit a minimum of 3 to 5 feet from property lines. Note any overhead electrical lines and call 811 before you dig any post holes. This is non-negotiable.
Slope is built into the design from the start, not added as an afterthought. A minimum slope of 1/8 inch per foot (roughly 0.6 degrees) will move water toward your chosen drain edge, but most builders use 1 to 2 degrees to be safe. On an attached structure, this usually means the ledger side is higher and the outer beam is lower, or the outer beam has an integral gutter at the low edge. Decide which side your water exits before you set any heights, because that determines where your gutter or downspout goes.
Key measurements to nail down before ordering materials
- Clear span (width between beams that the louvers bridge)
- Overall frame length and width including overhang
- Post height: measure from finished grade or deck surface to underside of beam
- Slope differential: calculate total drop from high side to low side based on your span
- Blade width: most systems use 6-inch, 8-inch, or 10-inch wide louver profiles
- Number of blades: divide clear span by blade width to get the count (no gaps)
- Ledger height on house wall, confirming clearance under soffit or eave
- Post footprint and footing depth based on local frost depth
Building the frame: load path, materials, and connections
The frame is what keeps everything safe, so this is where structural thinking matters most. The load path flows downward: dead load of the aluminum structure plus any live load (snow, a person doing maintenance, wind uplift) travels from the louver blades into the rails, from the rails into the perimeter beams, from the beams into either the ledger or the posts, and from the posts into the footings and ground. Every connection in that chain needs to be properly sized and fastened.
Footings and posts
For a freestanding or hybrid build, the posts are your foundation. Concrete footings need to extend below your local frost depth (check with your building department, but 24 to 36 inches is common in many regions). A standard 4x4 post handles modest spans just fine; move to 4x6 or 6x6 aluminum square tube if your post height exceeds 9 feet or your spans are on the longer side. Set post base hardware in concrete rather than direct-burying the post itself: post bases keep the post end off wet concrete and make future replacement possible. Use stainless steel or hot-dip galvanized hardware throughout to prevent corrosion, especially if you're in a coastal area.
Ledger attachment (for house-attached designs)
This is the connection most likely to cause long-term problems if done wrong. The ledger must bolt into the house's rim joist, band board, or blocking: it cannot attach only to siding, stucco, or sheathing. Remove the siding in the ledger zone, install flashing that tucks under the siding course above and laps over the ledger face, and use 1/2-inch structural lag screws or through-bolts at 16-inch spacing. Seal every bolt penetration with a good exterior sealant. Water infiltration at the ledger is one of the top sources of structural rot and insurance claims on patio additions, so take your time here.
Beams and perimeter frame
For an all-aluminum build, you'll be working with extruded aluminum rectangular tube or I-beam profiles. The manufacturer's span tables will tell you the minimum profile size for your span and load zone. For a wood frame, doubled 2x10 or 2x12 lumber is common for beams spanning 10 to 16 feet; consult a span table for your lumber species and grade. Connect beams to posts with structural post caps rated for your load. Check that every connection is square (use a framing square and a level) before you proceed, because the louver mechanism depends on the frame being true.
Designing the louver system: blades, rails, and the adjustment mechanism
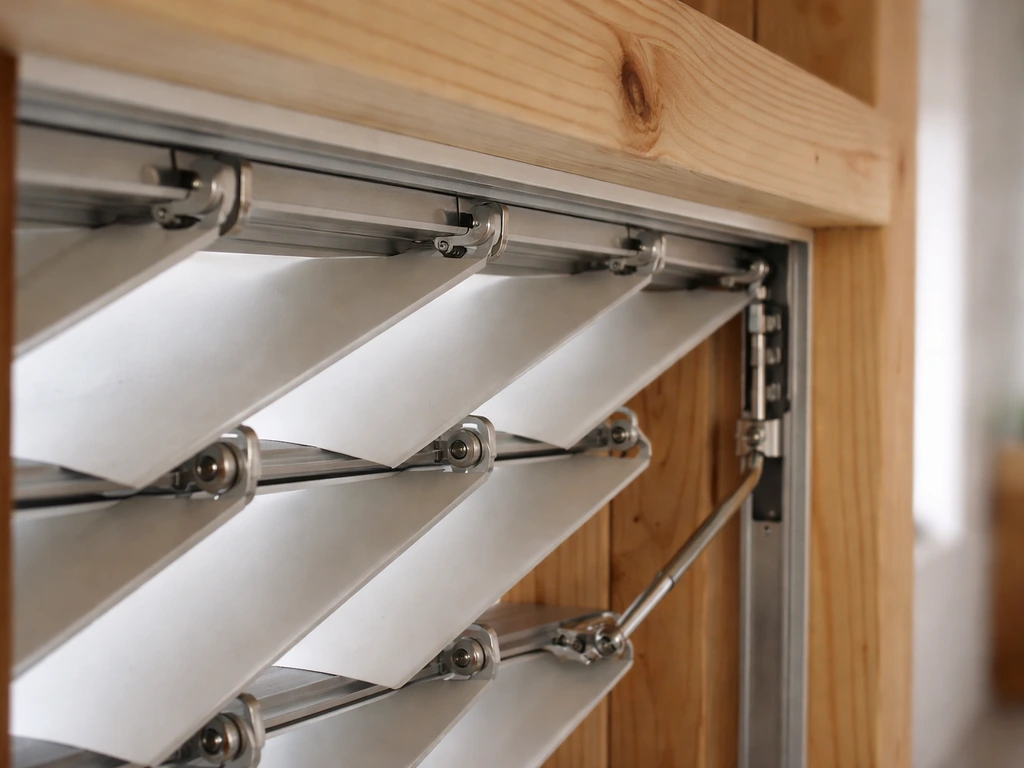
Once the frame is square and level, the louver system goes in. The basic components are the rail housings (mounted to the inside faces of the beams, running the full length of the structure), the louver blades (which snap or pin into the rails and pivot), and the adjustment rod or actuator that links all the blades and moves them together.
For a DIY build, the most practical approach is a commercially available aluminum louver kit that includes all of these components with matching profiles. A do it yourself louvered patio cover is usually easiest when you start with a complete aluminum louver kit and build from there. Buying mismatched components from different manufacturers is a common and frustrating mistake: the pivot pin diameter, the rail channel width, and the blade profile all need to match for smooth operation. Kits are available from specialty outdoor structure suppliers and some online aluminum profile companies. Sizes typically start at around 6 inches wide per blade and go up from there.
Blade spacing and overlap
For rain protection, you need an overlap between adjacent blades when they're in the closed position. A true waterproof louvered roof (like the commercial systems that achieve gapless sealing) uses blades that overlap by at least 10 to 15 percent of their width. On a 6-inch blade, that's about 3/4 inch of overlap. When you're in the closed position, one edge of each blade rests slightly above the edge of the next blade, forming a continuous shed surface. If your system has no overlap and blades just meet edge-to-edge, it will leak in driving rain. Verify this in the kit specs before ordering.
Manual vs. motorized adjustment
Manual adjustment uses a push rod or crank mechanism that runs along one end of the rail. You push or pull the rod, the linkage pivots all the blades together, and a friction lock or detent holds them in position. It's simple, reliable, and entirely within DIY scope. Motorized systems use electric linear actuators or piston motors (similar to the electronic piston motors in commercial louvered pergolas that open and close blades precisely) connected to the same linkage.
Motorized setups add convenience and are increasingly affordable through aftermarket actuator suppliers, but they require wiring, a control unit, and potentially a permit for the electrical work. If you want motorization, I'd recommend getting the frame and manual mechanism working perfectly first, then adding the actuator as a second phase.
| Feature | Manual Rod System | Motorized Actuator System |
|---|---|---|
| Adjustment method | Hand-push rod or crank along rail | Electric linear actuator, button or app control |
| DIY difficulty | Straightforward, no electrical needed | Moderate to complex, electrical permit likely required |
| Cost (hardware only) | Lower ($50–$200 for linkage hardware) | Higher ($300–$1,000+ per actuator plus controls) |
| Reliability | Very high, simple mechanics | High when installed correctly, needs weatherproof wiring |
| Smart home integration | Not applicable | Possible with compatible controllers and rain/wind sensors |
| Best for | Smaller spans, budget builds, beginners | Larger or multi-zone systems, convenience-focused builds |
Weatherproofing, drainage, and slope logic
This is the section most DIY guides skip over, and it's why a lot of homemade louvered roofs leak. There are three separate water management challenges: water that hits the closed louvers and needs to drain off, water that gets into the rail housings as it runs off the blades, and water that gets into fastener holes and seams in the frame. Each one needs its own solution.
The louver blades themselves shed water toward the low end of the structure when they're closed. That low end needs an integrated gutter or a proper gutter system that catches the flow and routes it to a downspout. Many commercial systems like Renson's Algarve use an integrated gutter border that captures drainage as blades open after rain, keeping water from dripping on furniture or people. For a DIY build, a standard 4-inch K-style aluminum gutter attached to the low beam works well. Make sure it's sized for your roof area: use a rain intensity calculator for your region and your roof's square footage to pick the right gutter and downspout size.
The rail housings accumulate water that runs off the blade pivot ends. Good rail systems have small drainage holes at the low end of each rail housing so this water can weep out rather than pooling. If your kit doesn't include these, drill 3/16-inch weep holes at the low end of each rail housing before assembly. Seal the butt ends of rail housings with aluminum-compatible silicone or end caps provided in the kit.
For the frame itself, every through-hole for a lag screw or bolt needs a bead of exterior-grade silicone sealant before the fastener is driven. Pay special attention to the ledger-to-house connection, any penetrations through the top of the beam, and where posts go through decking. Use closed-cell backer rod in any joint wider than 1/4 inch before sealing. Butyl tape is a good secondary layer at the ledger flashing overlap.
A note on slope angle: your structure needs enough pitch to move water briskly to the gutter but not so much that the louver mechanism geometry changes significantly. A slope of 1 to 3 degrees (about 1/4 inch to 5/8 inch per foot) is the practical range for most louvered systems. Beyond 5 degrees and the blades start looking odd when closed, and water can run back toward the house on some designs. Set your slope at the frame stage by adjusting the post heights or ledger height, and confirm it with a level and tape measure before locking in your beam connections.
Step-by-step installation and commissioning
Here's the build sequence that works for most attached and freestanding single-bay louvered roof builds. Adapt it to your specific kit and site conditions, but don't skip steps or reorder them because each step sets up the next.
- Pull permits and mark utilities: submit your plans to the building department, wait for approval, and call 811 to mark underground lines before digging.
- Lay out post locations: use batter boards and string lines to mark exact post positions. Check square by measuring diagonals (they should be equal).
- Dig and pour footings: auger or hand-dig to the required depth, set tube forms, place a post base anchor bolt at the exact center, and pour concrete. Let cure for at least 48 hours before loading.
- Set and plumb posts: place posts in post bases, check plumb in both directions with a level, and brace temporarily with 2x4 kickers staked to the ground.
- Install ledger (for attached designs): remove siding, install flashing, lag-bolt ledger into rim joist or blocking, seal all penetrations, and replace or trim siding to meet the ledger flashing.
- Cut and install beams: lift beams onto post caps or ledger hangers, confirm level and slope in both directions, and fasten with structural hardware per the manufacturer's specs.
- Install rail housings: mount the louver rail housings to the inside faces of the beams at the correct height, confirm they are parallel to each other and level side-to-side (even though the structure has a longitudinal slope, the rails themselves should be level across the width).
- Insert louver blades: slide or pin each blade into the rail housings starting from one end, confirm each pivot pin seats fully before moving to the next blade.
- Attach adjustment linkage: connect the push rod or actuator arm to each blade's pivot lever, confirm all levers are oriented the same direction before tightening any connections.
- Install gutter and downspout: attach gutter to the low-side beam with gutter hangers, add end caps, and run the downspout to a splash block or drain that directs water away from footings.
- Test full range of motion: operate the louvers slowly through the full range (closed to open), checking for binding, uneven movement, or blades that don't seat properly at the closed position.
- Check for leaks: with a garden hose, run water over the closed louvers for at least 5 minutes and inspect the rail ends, gutter joints, and ledger connection for any leaks.
- Final inspection: walk through your permit's inspection checklist, confirm all fasteners are tight, all sealant joints are complete, and the structure is plumb and square.
- Commission motorized system (if applicable): connect wiring, test controls, set travel limit switches so the actuator stops at 0 degrees (fully closed) and your chosen maximum open angle.
Tools and materials checklist
- Post hole digger or power auger
- Concrete tube forms and ready-mix concrete
- Post base hardware (stainless or HDG rated for your load)
- 4-foot level and torpedo level
- Framing square and tape measure (25-foot minimum)
- String lines and batter boards
- Drill/driver with impact driver
- Drill bits: 1/2-inch for lag pilot holes, 3/16-inch for weep holes
- Circular saw or miter saw (for wood frames); angle grinder or aluminum-rated miter saw (for aluminum)
- Aluminum-compatible silicone sealant and caulk gun
- Butyl tape and closed-cell backer rod
- Structural lag screws (1/2-inch x 4-inch minimum for ledger), structural post caps, joist/beam hangers
- Louver kit (blades, rail housings, pivot hardware, adjustment linkage)
- K-style aluminum gutter, end caps, hangers, and downspout
- Safety glasses, work gloves, and fall protection if working above 6 feet
- Temporary 2x4 bracing and stakes
- Optional: linear actuator kit and low-voltage wiring for motorized system
Safety, permits, and when to hire a pro
Most jurisdictions require a building permit for an attached patio structure, and many also require one for larger freestanding builds. [Under IBC 2018 Appendix I (and its equivalent in state-adopted codes), patio covers are subject to structural load requirements including dead load, live load, wind uplift, and in many regions snow load. ](https://www. iccsafe.
org/content/IBC2018/appendix-i-patio-covers) Your permit submission will likely need a simple site plan, a framing plan, and sometimes a structural calculation or engineer's stamp if the span or load is significant. You can also ask whether Lowe's installation services are available for patio covers in your area before you start shopping for materials.
Don't skip the permit: an unpermitted structure can complicate a home sale, void your homeowner's insurance in the event of a collapse, and leave you liable if anyone is injured.
Wind uplift is the sneaky structural failure mode for louvered roofs. When louvers are open, the structure acts more like a fence than a roof, and lateral wind loads increase dramatically. When louvers are closed, they create a horizontal surface that wind can push up against from below. Your connections (post base, beam-to-post, ledger) need to be rated for the uplift loads in your wind zone. In hurricane-prone areas, commercial systems like the Azenco R-BLADE are rated to 190 MPH, but a DIY build in those areas really needs a structural engineer involved in the design.
Here's my honest take on when to bring in a pro. Do the framing and louver installation yourself if you're comfortable with basic construction and you have straightforward site conditions. But hire a licensed electrician for any motorized system wiring: 120V near a metal structure in an outdoor environment is genuinely dangerous territory. Hire a structural engineer if your span exceeds 16 feet, if you're in a high-wind or heavy-snow zone, or if the house wall you're attaching to has any signs of existing moisture damage. And always get your building department's required inspections: a framing inspection before you close up the ledger area is standard and gives you peace of mind that the load path is right.
Troubleshooting and keeping it running for years
Even a well-built louvered roof will need attention over time. Here are the most common problems and how to fix them.
Blades bind or move unevenly
This is almost always a frame alignment issue. The two rail housings need to be perfectly parallel to each other for the pivot pins to rotate freely. If one end is even slightly higher than the other, the pins bind in their channels. Check with a level across both rails and shim the low side until they match. On manual systems, also check that every blade's linkage lever is oriented at the same angle: one reversed lever will fight the whole run. A light spray of dry PTFE lubricant (not WD-40, which attracts dirt) on the pivot pins once a year keeps things moving smoothly.
Leaks at the ledger or rail ends
If you're getting water inside at the ledger, the flashing has either been installed incorrectly or has separated. The fix is to carefully remove the bottom course of siding above the ledger and re-flash with a proper Z-flashing that has at least a 4-inch wall leg tucked under the siding. At rail ends, recheck your weep holes and make sure end caps are fully seated and sealed. A bead of fresh silicone at any joint showing daylight will usually solve minor seepage.
Water pools on closed louvers instead of draining
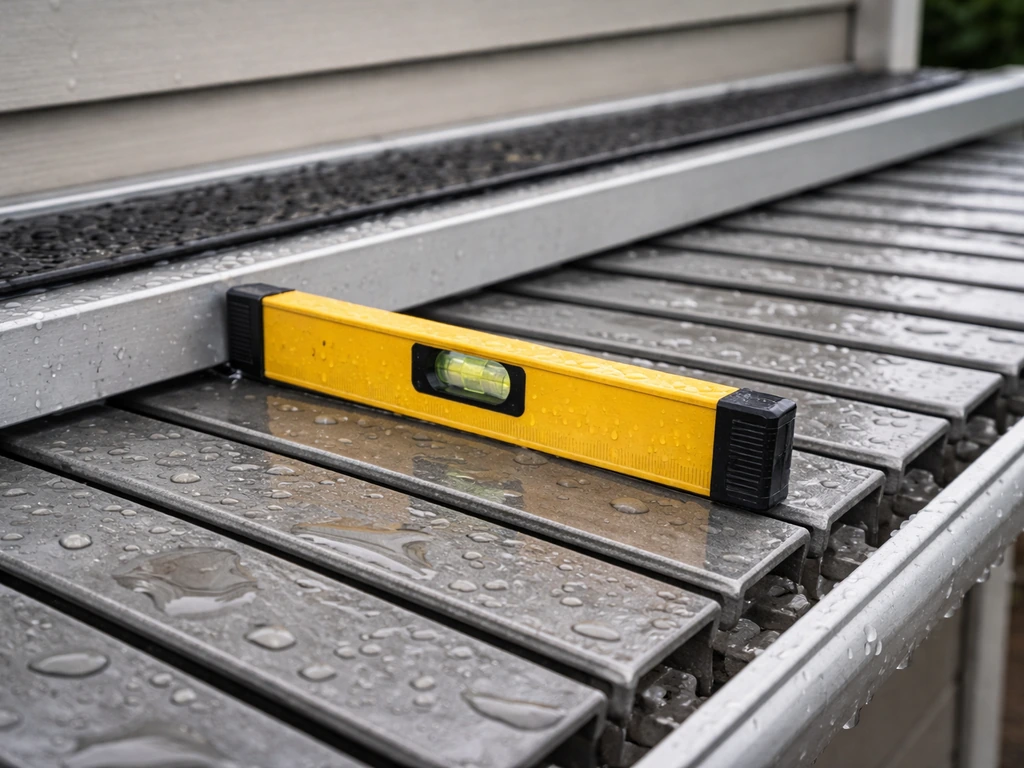
This means your slope is insufficient or has settled. Check your slope with a level and a known measurement: there should be a consistent drop toward the gutter side. If a post has settled, you may need to jack that corner slightly and add a shim plate under the post base, then re-tighten the anchor bolts. Also confirm the gutter itself hasn't sagged at a joint: gutters need to maintain a continuous slope of at least 1/8 inch per 10 feet toward the downspout.
Motorized actuator stops short or overruns
Linear actuators have adjustable travel limit switches. If the blades don't fully close or the actuator stalls before reaching full open, adjust the limit switch settings per the actuator manufacturer's instructions. If the actuator runs hot or trips its thermal cutout frequently, check that the blade pivot pins aren't binding (see above) and that the actuator is properly sized for the total louver area it's moving.
Annual maintenance routine
- Inspect all structural fasteners for corrosion and tighten any that have loosened
- Clean rail housings and blow out any debris from weep holes
- Apply dry PTFE lubricant to pivot pins and linkage joints
- Inspect all sealant joints and re-caulk anywhere you see cracking or separation
- Check gutter for debris and confirm downspout flows freely
- Inspect ledger flashing for gaps, and verify no moisture staining on the house wall below the ledger
- Test full louver range of motion and note any new binding or resistance
- For motorized systems: verify wiring connections are tight and weatherproof covers are sealed
A well-built adjustable louvered patio roof will give you 20-plus years of reliable service if you stay on top of these basics. The aluminum components won't rot, and the main wear items are the pivot hardware and sealants, both of which are inexpensive and easy to replace. If you're starting with solid DIY skills and a clear plan, this is one of the most satisfying patio projects you can tackle. You get a functional, good-looking result that makes your outdoor space genuinely usable in weather that would otherwise drive you inside.
FAQ
What is the minimum spacing or clearance I should leave around the louvers so they can open and close without binding?
Plan clearance so the louvers can rotate freely at full open, not just at the closed position. A practical check is to mock the rail end position and confirm the blade tips will not hit fascia, soffit, window trim, or light fixtures, even after your structure settles. If you are close to a wall or post, add at least the kit’s specified operational gap, and avoid stacking hardware that creates a “pinch point” near the blade ends.
Can I use a louvered roof to fully stop rain, or is some water getting through normal?
Some water passage is normal for any outdoor enclosure unless the system is designed for overlap and includes proper drainage. For a DIY build, insist on the kit’s specified closed-position overlap percentage (edge-to-edge without overlap will leak in driving rain). Also confirm the rail weep hole strategy, because water that lands on the blades still has to exit the rail housings safely.
How do I choose the right slope if my gutter outlet location is fixed?
Set the outer beam height to achieve both the needed slope and the correct gutter alignment to the downspout. If your outlet location is non-negotiable, work backward: determine the required drop over the run, then adjust post heights or ledger height accordingly before tightening any beam connections. After assembly, re-measure with a level, aiming for a consistent drop toward the drain edge, not just the right overall height.
Do I need a center beam if my patio is wider than the kit’s “unsupported span” guidance?
Yes, if the kit or manufacturer limit is exceeded, you should plan additional support rather than trying to “make it work” with undersized profiles. Add the center beam and intermediate rail so the louvers and rail housings stay aligned under load. This also reduces frame racking, which is a common cause of stiff pivots and leaks at rail ends.
What should I do if the louvers bind when I open them, but the frame is level?
Binding after leveling usually comes from rail housing alignment or linkage mismatch. Verify the two rail housings are parallel and not just level, then check that each blade’s linkage lever orientation matches (a single reversed lever can fight the motion). Also inspect for debris in the rail channels and confirm the pivot pin diameter matches the rail profile exactly, since slightly mismatched parts can “catch” under load.
Is it safe to attach the ledger to siding or stucco if the bolts feel solid?
No. Ledger fasteners must engage structural framing elements like rim joists, band boards, or installed blocking, not just the exterior finish. If you cannot clearly locate solid framing, remove the siding in the ledger zone, verify attachment points, install proper flashing, then use the specified fasteners at the specified spacing with exterior sealant at each penetration.
How do I prevent corrosion in coastal or high-humidity locations?
Use corrosion-rated fasteners and keep dissimilar metals from touching where possible. Hot-dip galvanized or stainless steel hardware is a common requirement for longevity, and sealed penetrations matter as much as the hardware choice. Also inspect annually for any silicone voids around penetrations, because salt air accelerates failure where water sits.
What water leaks are most common at the rail housing ends, and how can I troubleshoot them?
Most leaks at rail ends come from missing or poorly seated end caps and blocked or absent weep drainage. Start by confirming weep holes are clear and at the low end of each rail housing, then verify the end caps are fully seated and sealed (including any butt ends). If you see water tracking back into the frame, re-seal with aluminum-compatible sealant and re-check overlap in the closed position.
If I want motorization later, what should I confirm during the manual build to avoid rework?
Make sure the frame and linkage function smoothly at full open and full close, then leave access and routing space for the actuator wiring path and controller location. Install according to the kit’s manual mechanism first, then add the actuator as a second phase only after you confirm free pivot movement with no binding under load. Also plan for limit switch adjustment and ensure the actuator has adequate travel for your full louver range.
Do I need an engineer even for a “small” patio cover installation?
Not always, but you should strongly consider a structural engineer if you exceed the kit’s span guidance, are in a high-wind or heavy-snow zone, or have any visible moisture damage where the structure attaches to the house. Engineering input is also wise when the attached side includes complicated wall conditions, since the load path depends on solid backing and correct ledger fastening.
How should I set and verify the rail drainage so it doesn’t pool during heavy storms?
Confirm three things: the louvers shed toward the gutter side, the rail housings have drainage paths (weep holes) at the low end, and the gutter system maintains continuous slope to the downspout. After installation, perform a water test by running a controlled hose stream across the louvers and checking that water exits cleanly from the rail housings and into the gutter rather than lingering at rail ends or seams.