You can absolutely build a louvered patio cover yourself, and the result is one of the most versatile outdoor structures you can add to a backyard. A louvered cover uses angled slats that you can tilt open for breeze and partial shade or close for more shelter, unlike a solid roof that just blocks everything. Most DIY-friendly builds use aluminum framing with either fixed or manually adjustable louvers, take a long weekend to a week depending on size, and land somewhere between $1,500 and $5,000 in materials if you source the components yourself rather than buying a full motorized kit.
Do It Yourself Louvered Patio Cover: Step by Step Guide

Celia Vaughn
23 May 2026
What a DIY louvered patio cover actually is (and when it makes sense)
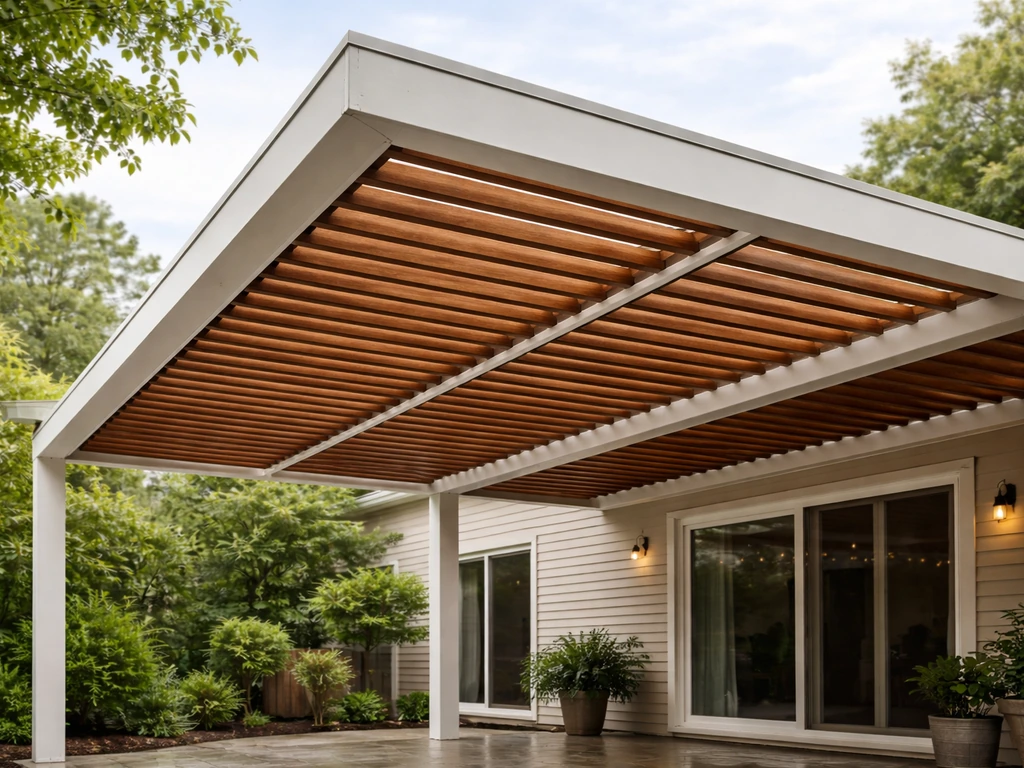
A louvered patio cover is a roof-like structure where the 'roof' is made of parallel slats (louvers) mounted in a frame, typically angled or rotatable. When the louvers are open, you get airflow, dappled light, and an open-sky feel. When they're closed or angled down, you get shade and some rain protection. That flexibility is the whole point: a solid patio cover is great for full shelter, but it traps heat and blocks airflow, which is miserable in warm climates. A louvered cover lets you tune your outdoor space throughout the day.
This type of build makes the most sense if you want partial shade without the stuffiness of a solid roof, live somewhere with warm or hot summers, or just want more control over your outdoor comfort. It makes less sense if you get heavy snow loads and want a year-round fully weatherproof structure. Louvered covers are popular in drier climates like Las Vegas, Phoenix, and Southern California, but they work in wetter climates too if you design the drainage correctly. Fixed louvers are the simplest DIY option. Operable (adjustable) louvers add mechanical complexity but deliver much better flexibility.
Design choices: material, louver size and spacing, orientation, and fixed vs. operable
Material options
Aluminum is the go-to material for most DIY louvered covers, and for good reason. It doesn't rot, doesn't warp, needs almost no maintenance, and holds up to moisture and UV without staining or sealing every few years. Wood (typically cedar or pressure-treated pine) gives you a warmer, more traditional look and is easier to cut and fasten with basic tools, but it requires regular maintenance and is vulnerable to moisture if your drainage isn't perfect. Steel and other metals are rarely used in residential DIY builds because of weight and corrosion concerns.
| Material | Pros | Cons | Best for |
|---|---|---|---|
| Aluminum | Zero rot, low maintenance, lightweight, moisture-resistant | Higher upfront cost, requires specific fasteners | Most climates, especially humid or rainy areas |
| Wood (cedar/PT pine) | Easy to work with, natural look, widely available | Needs sealing/staining, can warp, rot risk if drainage fails | Dry climates, traditional aesthetics |
| Steel | Very strong | Heavy, rust risk, harder to DIY | Rarely used in residential DIY builds |
If you're torn, go with aluminum. It will outlast wood by many years with no effort, and most DIY-friendly louvered systems sold at home improvement stores and online are already aluminum-based.
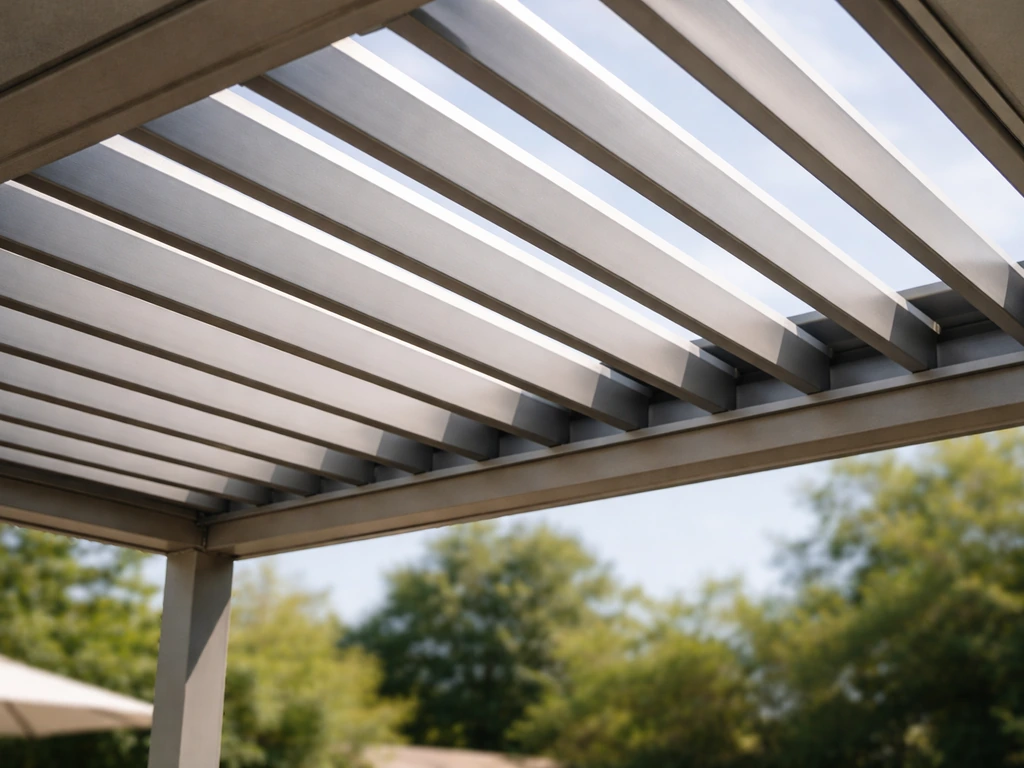
Louver size, spacing, and orientation
Standard louver blades for residential patio covers typically run 4 to 8 inches wide. Wider blades mean fewer louvers to install and a cleaner look; narrower blades give more granular control over shade angles. Spacing between fixed louvers is usually set at roughly the same width as the blade itself (a 1:1 ratio) for a 50/50 open-to-covered feel when viewed from straight down. If you want more shade, reduce the gap. If you want more airflow, increase it slightly.
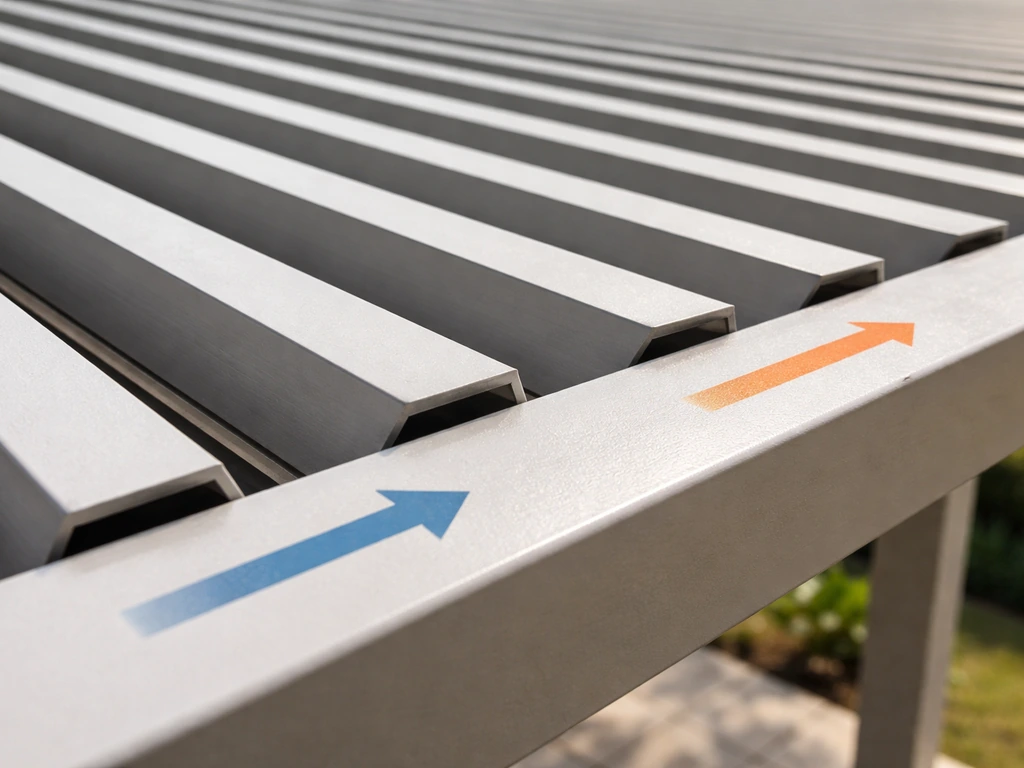
Orientation matters a lot. In the Northern Hemisphere, running louvers east-to-west (so they face north-south) means the blades shade the sun's east-to-west arc more effectively in the afternoon. Running them north-to-south works better for blocking low-angle morning or late-afternoon sun. Think about which direction the hot afternoon sun hits your patio and orient your louvers to block that angle when tilted. For operable systems, you get to adjust anyway, but fixed louvers need to be angled and oriented at install time, so spend 10 minutes watching where the sun hits your patio in the late afternoon before you set anything.
Fixed vs. operable louvers
Fixed louvers are locked at a single angle permanently. They're simpler, cheaper, and easier to build. Operable (adjustable) louvers rotate within the frame, typically from about 0 degrees (horizontal/flat) to 135 degrees (nearly vertical/fully open), using either a manual push rod or a motorized actuator. Manual systems use a linkage rod connecting all blades so they all move together, which is straightforward to build or install from a kit. Motorized systems add a motor and controller, which bumps up both cost and complexity significantly. For a first DIY build, a manual operable or a well-designed fixed system is the realistic target. Motorized systems in the $7,900 to $18,000 installed range are better left to pros or very experienced builders.
Structural planning: loads, spans, posts, and code basics
This is where a lot of DIYers underinvest in planning and regret it later. A louvered patio cover is an outdoor structure attached to or near your house, and it needs to handle dead load (its own weight), live load (people accessing it for maintenance), wind load, and depending on your climate, snow load. The governing standard for load calculations in the US is ASCE 7, which your local building code will reference.
ASCE 7 (the standard referenced by local building codes) includes design-load requirements for hazards such as dead, live, snow, rain, wind, and other load types, as well as methods for evaluating load combinations ASCE 7 provides design-load requirements for hazards including dead, live, snow, rain, wind, and other load types, plus how to evaluate load combinations. You don't need to be an engineer to build this, but you do need to understand a few basics.
Span and bay layout
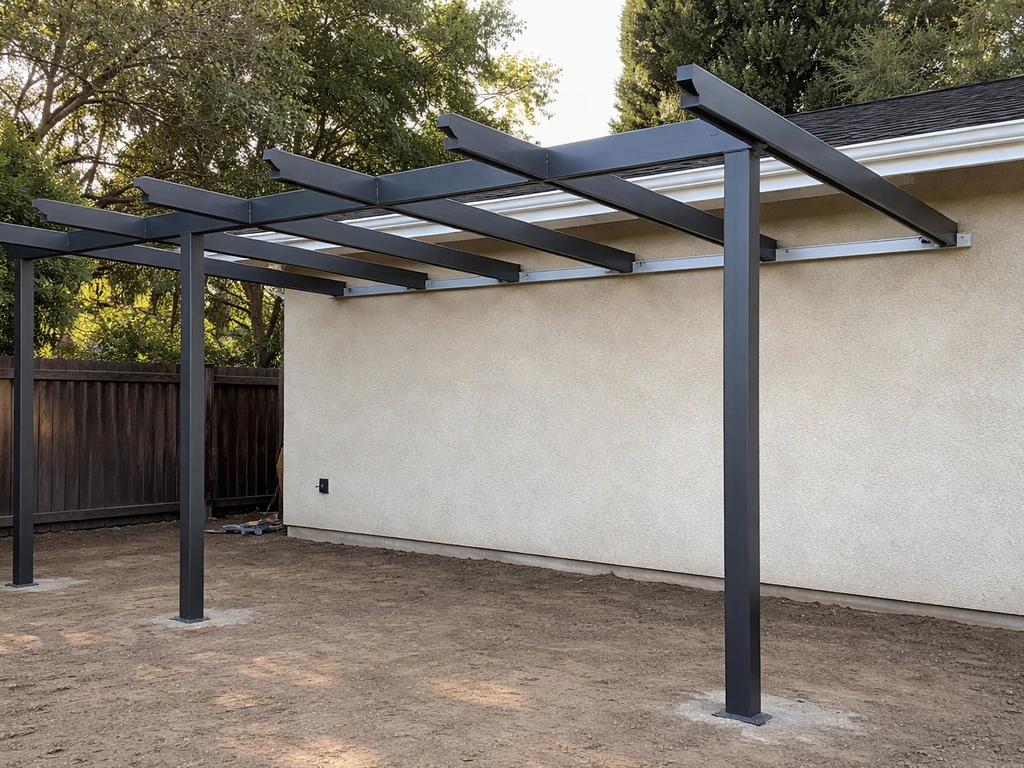
For a typical aluminum louvered cover, beams spanning up to 12 feet between supports are common without needing anything exotic. Go beyond 14 to 16 feet and you'll need heavier beam profiles or an intermediate post. Plan your bay layout so posts land where they won't block walkways, and space them symmetrically. A common setup is a 2-bay layout: one ledger attachment at the house, two front posts, and a beam spanning across the front. For wider patios (over 20 feet), add a center post or intermediate beam.
Post sizing and ledger placement
For wood builds, 4x4 posts work up to about 8 feet tall in most low-wind areas; 6x6 posts are better for anything taller or in high-wind zones. Aluminum post sizes depend on the system, but most kit-based systems specify minimum post sizes in their instructions. The ledger (the horizontal board or beam you fasten to the house wall) needs to be bolted into your home's rim joist or structural framing, not just into siding or sheathing. Use lag screws or through-bolts, typically 5/8-inch diameter, every 16 inches. This is non-negotiable. A ledger pulling off the house is a catastrophic failure.
Wind loads and code basics
Wind is your biggest structural concern for a louvered cover, especially with louvers open. Check your local wind speed map (ASCE 7 or your local building department's wind zone map) to understand the design wind speed for your area. Most suburban locations fall under Exposure Category B (sheltered by surrounding buildings and trees), which is less demanding than Exposure C (open terrain). When in doubt, ask your building department.
Most jurisdictions require a permit for patio covers over a certain size, typically anything over 200 square feet or attached to a dwelling. When you pull a permit, you'll submit a plot plan, a simple framing plan, and often a reference to IRC conventional framing compliance. This is worth doing because it protects you at resale and ensures an inspector verifies your ledger attachment.
Attachment and waterproofing: flashing, sealing, and drainage
This is the section most DIY guides skip, and it's where structures fail years later. Where your patio cover meets your house, water has to go somewhere, and if you don't direct it intentionally, it will find its own path, usually into your wall assembly.
Ledger flashing
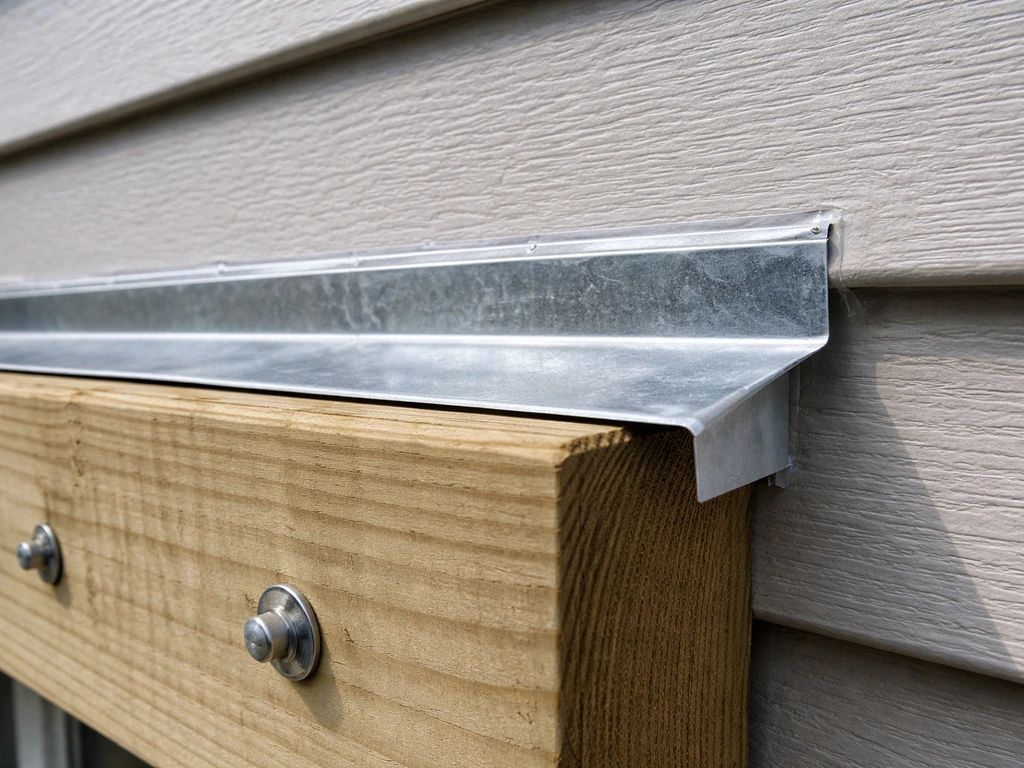
Before bolting your ledger to the house, you need to flash the joint. That means installing a piece of metal flashing (typically galvanized or aluminum, 4 to 6 inches wide) that directs water away from the wall and over the top of the ledger. The flashing goes behind the siding above the ledger, bends over the top edge of the ledger board, and extends out past the face.
Seal the top edge where it tucks under the siding with a high-quality exterior caulk. A drip edge along the outer edge of your cover's roof frame further directs water off the structure, and kick-out flashing at the ends channels water away from wall intersections rather than letting it run down the siding.
Louver drainage
Even fixed louvers need a drainage path. For operable systems especially, water that hits closed louvers needs to go somewhere controlled. The best louver systems use a drainable blade design: each blade has a small channel (blade gutter) that collects water and drains it toward vertical channels in the side frames (jamb gutters), which then route water down and out through a sill drain or downspout connection at the bottom of the frame. When you're designing your layout, plan where those downspouts will discharge. Don't route water toward your foundation. Tie into an existing gutter system or direct runoff at least 6 feet away from the house.
Slope
The entire cover frame needs a slight slope away from the house, typically 1/8 to 1/4 inch per foot minimum. This is one of the most common mistakes on DIY builds: people build everything perfectly level and then wonder why water puddles at the ledger end. Set your ledger slightly higher than your front beam and let gravity do the work.
How to build it: typical DIY workflow from start to finish
Here's a realistic build sequence for a typical attached louvered patio cover, about 12 by 16 feet, with aluminum framing and manual operable louvers. Adjust steps for your specific kit or custom design, but this order of operations applies broadly.
- Measure your patio and finalize your layout. Mark post locations with stakes and confirm clearances from property lines and the house. Double-check your local setback requirements before digging anything.
- Pull your permit. Submit your plot plan and framing sketch to the building department. Most residential patio cover permits take a few days to a couple of weeks. Don't skip this if your jurisdiction requires it.
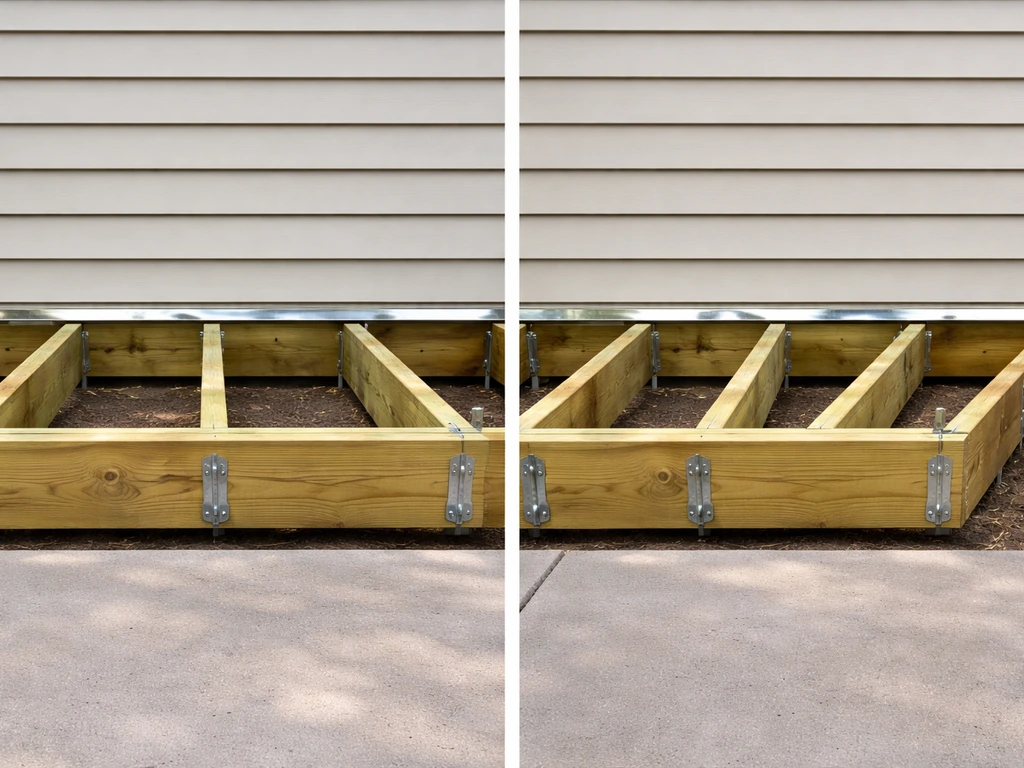
- Prepare the ledger location. Remove siding where the ledger will attach, down to the sheathing. Install flashing behind the siding before you do anything else. Bolt your ledger board or beam to the rim joist using 5/8-inch lag screws at 16-inch intervals. Check level in both directions.
- Dig post footings. For most attached covers in average soil, a 12-inch diameter hole 24 to 36 inches deep works. In frost areas, go below your local frost line. Set post anchors in concrete and allow 24 to 48 hours to cure before loading them. Never set wood posts directly in concrete without a standoff base that keeps the end grain off the soil.
- Set and plumb your posts. Attach posts to anchors with structural screws or through-bolts per the anchor manufacturer specs. Brace posts temporarily with diagonal 2x4 bracing staked to the ground. Check plumb in both directions with a 4-foot level.
- Install the front beam (or header). For aluminum systems, the beam typically connects to the post tops with bracket hardware supplied with the kit. For wood, toenail or use post caps. Verify the beam is level side to side and that the overall frame slopes away from the house at 1/8 to 1/4 inch per foot.
- Install any intermediate or side beams to complete the rectangular frame. Square the frame by measuring diagonals: if both diagonals match, you're square. Adjust before any fasteners are fully set.
- Install the roof framing or purlins (the secondary members that support the louvers). For a louvered system, these are the rails that the louver ends will sit in. Space them per your louver design, typically at 6 to 12-foot intervals for the structural rails.
- Install louver side channels or jamb frames into the purlin/beam openings. These are the tracks the louver blade ends rotate in. They need to be plumb and parallel, or your louvers won't rotate smoothly.
- Slide louver blades into the channels. For manual operable systems, connect the linkage rod that ties all blades together so they move as a unit. Test rotation through the full range before securing anything permanently.
- Install end caps, fascia covers, and any drainage downspouts. Seal all penetrations at the house wall with exterior-grade caulk. Install drip edge along the outer frame edge.
- Caulk and touch up. Run a bead of sealant at the top of the ledger flashing, around any fasteners that penetrate the roof framing, and at any transitions between dissimilar materials.
- Final inspection and cleanup. If you pulled a permit, schedule your final inspection before fully removing temporary bracing.
Hardware, guides, ventilation, and wind performance
The hardware you use inside the louver system makes a big difference in how well it operates and holds up over time. For operable louvers, the pivot pins or axles that each blade rotates on need to be stainless steel or aluminum, not zinc or uncoated steel, which will corrode and seize up. The linkage rod that connects all blades typically runs along one side of the frame and connects to each blade's pivot with a small clip or pin. Every blade pivot point needs to be aligned at exactly the same angle in the channel, or the linkage won't move them all uniformly. Take your time on this step.
For ventilation performance, louvers closed at an intermediate angle (around 30 to 45 degrees from horizontal) provide weather protection while still allowing some airflow through the gaps. Fully open (around 90 to 135 degrees, nearly vertical blades) maximizes airflow but offers almost no rain protection. In high-wind events, the safest position is fully closed, as open blades present more surface area to uplift forces. If you're in a high-wind area, consider adding a wind sensor or just make it a habit to close the louvers when weather rolls in.
Fasteners throughout the structure should be stainless steel or hot-dipped galvanized, especially where aluminum meets wood or where any fastener is exposed to weather. Mixing incompatible metals (like standard steel screws in aluminum channels) causes galvanic corrosion that can seize components and stain surfaces within a year or two.
Cost, tools, common mistakes, and when to hire a pro
What it costs to DIY
For a 12x16-foot DIY louvered cover using aluminum components sourced from a supplier or kit, expect to spend roughly $1,500 to $4,000 in materials, depending on whether you go with basic fixed louvers or a full manual operable system. Professionally installed louvered pergola systems run $6,500 to $18,000 on average, or $45 to $125 per square foot, which means a competent DIYer can save several thousand dollars. The savings shrink if you add motorized actuators, which alone can cost $800 to $2,000 for a residential system. Budget an extra $200 to $500 for hardware, fasteners, concrete, and incidentals.
Tools you'll need
- Tape measure (at least 25 feet) and chalk line
- Cordless drill and impact driver with bit set
- Circular saw (for wood framing or cutting aluminum extrusions with a fine-tooth blade)
- Level (4-foot minimum, a laser level saves a lot of time)
- Post hole digger or rented power auger
- Concrete mixing tools or a mixer rental
- Adjustable wrenches and socket set for hardware
- Safety glasses, work gloves, and hearing protection
- Ladder (6-foot step and extension for higher work)
- Speed square and framing square for layout and checking corners
Common mistakes to avoid
- Building level instead of sloped: always pitch the frame at least 1/8 inch per foot away from the house or water will back up at the ledger.
- Skipping the ledger flashing: this is the single most common source of rot and water intrusion. Don't bolt the ledger to the house until the flashing is properly installed behind the siding.
- Undersizing the structure: using 4x4 beams where 4x6 or 6x6 is needed, or spanning too far between posts, leads to sag and potential collapse in wind or snow.
- Misaligning louver channels: if the side channels aren't parallel and perfectly plumb, blades will bind and you won't get smooth operation. Take time to verify alignment before fastening channels permanently.
- Using the wrong fasteners: uncoated steel fasteners corrode quickly outdoors, especially in contact with aluminum. Use stainless steel or hot-dipped galvanized throughout.
- Anchoring posts improperly: setting wood posts directly into concrete without a standoff base traps moisture and causes rot from the bottom up. Use code-compliant post base hardware.
- Skipping the permit: this can cause problems at home sale, affect your homeowner's insurance, and means no inspector catches structural errors.
When to call a pro instead
There are clear situations where hiring out is the smarter call. If you’re wondering whether Lowe’s installs patio covers for you, the answer depends on the specific service availability in your area. If your jurisdiction requires engineered drawings and you're not comfortable doing the structural calcs, hire a structural engineer for a plan review, typically $300 to $800. If your patio cover will span more than 16 feet without intermediate posts, that's engineer territory.
If you're attaching to a house with brick veneer, stucco, or an older structure where you're unsure where the structural framing is, get a professional to locate the framing and specify the attachment method. Motorized louvered systems with electrical components should be wired by a licensed electrician. And if you're in a high-wind or high-snow zone and aren't confident in your load calculations, the cost of a pro consultation is small compared to a structural failure.
For most homeowners with basic carpentry skills, a straightforward attached louvered cover on a level site with good soil is a realistic DIY weekend project. Budget a full weekend for framing and a second day for the louver system and finishing details.
If you're considering a more complex structure with adjustable louvers across a larger span, the general patio cover instructions and framing principles covered in broader DIY patio cover guides apply directly, and the same structural and flashing rules hold whether you're in a mild coastal climate or a dry desert environment. If you want a clear walkthrough, follow diy patio cover instructions for framing, louvers, and waterproofing step by step.
If you want adjustable louvered patio roofing, make sure your kit uses an operable louver design and that you plan for drainage, hardware, and wind loads before you frame adjustable louvers.
FAQ
Do I still need a slope if my louvered blades tilt and drain?
Plan for a small roof slope even on a louvered system. A common approach is to keep the overall frame pitched away from the house (1/8 to 1/4 inch per foot), then ensure the louver frame sits level within its own track so water still drains through the blade and side-frame gutters instead of pooling at the ledger end.
How should I design drainage if the louvers are partially open during rain?
If louvers are fixed, you can usually rely on “drainable blade” channels only for the portion that actually lands on the slats, but you still need frame-level drainage (drip edge, kick-out flashing, and a discharge point). For operable louvers, assume rain will hit at least part of the time while blades are partially open, so design for the worst-case water path into the side jamb gutters and downspout connections.
Will a do it yourself louvered patio cover work in areas with heavy snow?
Yes, louvers can be a poor fit for heavy snow unless the system is designed to shed and the structure is engineered for that load. In snow regions, fixed louver angles can trap meltwater or allow drifting around slats. If you do build anyway, use the manufacturer’s snow load guidance (or have it engineered), and consider more conservative clearances and stronger beam spans.
What’s the safest way to attach the ledger to my house?
Avoid attaching the ledger to just siding or thin sheathing. The ledger needs to be bolted into structural framing (like rim joist or joists), and you should follow a bolt pattern your kit or engineer specifies. If you cannot clearly identify framing locations, use exploratory methods or have a pro verify before you drill anything structural.
Why do my operable louvers bind or move unevenly after installation?
If you are using a kit, most problems come from misalignment at the blade pivots and inconsistent blade angles in the channel. Before final tightening, cycle the linkage without louvers installed (or with loose hardware) to confirm smooth travel. Then, set every pivot to the same baseline position and recheck after the first few full open-close cycles.
What fasteners should I use to prevent corrosion and sticking?
Use stainless steel or hot-dipped galvanized where hardware is exposed or where dissimilar metals touch, especially at aluminum channels meeting treated lumber. Also match fastener material near the blade pivot and linkage points because those are high-humidity, high-wear joints. Mixing in standard zinc-plated screws often leads to seized motion over time.
Is there a recommended louver position for wind and storms?
For high-wind areas, the safest control is operational discipline, not just “stronger parts.” Close the louvers before storms, because open blades create more lift and drag. If your system supports it, consider adding a simple wind-safety plan such as a manual checklist or an automatic sensor that triggers closure when gust thresholds are exceeded.
Will I need a permit, and what usually gets inspected on patio covers?
Yes, but you need to confirm local code specifics. Many jurisdictions require permits when the cover is attached to the dwelling or exceeds a certain square footage, and you may need engineered drawings if your spans, posts, or roof slopes go beyond “conventional” framing limits. Even if you can build it, skipping permits can complicate resale or trigger required retrofits.
How do I know my cover is strong enough for my patio size and wind zone?
Don’t assume the kit’s “maximum span” matches your actual bay spacing and wind zone. The key is whether your post locations, beam spans, and ledger attachment meet design wind pressure and uplift checks. If your patio is wider than the common 12 to 16 ft example or you plan an unusual layout, get a structural review rather than relying only on kit charts.
Can a do it yourself louvered patio cover improve privacy without losing airflow?
A louvered cover can be a privacy upgrade, but fixed slat density and blade spacing determine how much you still see through at low sun angles. If you want more privacy, select narrower blades (or reduce spacing) and consider a higher closed-angle range. Also think about side coverage, because most sightlines come from the open ends unless you add end panels or adjustable side screens.
What should I know before adding motorized louvers (or upgrading later)?
Yes, electrical adds complexity. If your kit uses a motorized actuator, plan for safe routing of wiring in treated conduits, proper outdoor-rated components, and a weatherproof disconnect location. In many areas, the electrical work must be done by a licensed electrician, and inspectors may want to see the conduit path and junction box rating.
How do I handle footings and ground conditions for posts?
If you are on questionable soil, the weakest point is often post foundations, not the louver mechanism. Use footings designed for your frost depth and soil type, and ensure posts are set on properly engineered pads or concrete piers. Avoid “surface” post bases unless the system documentation explicitly allows them for your conditions.