
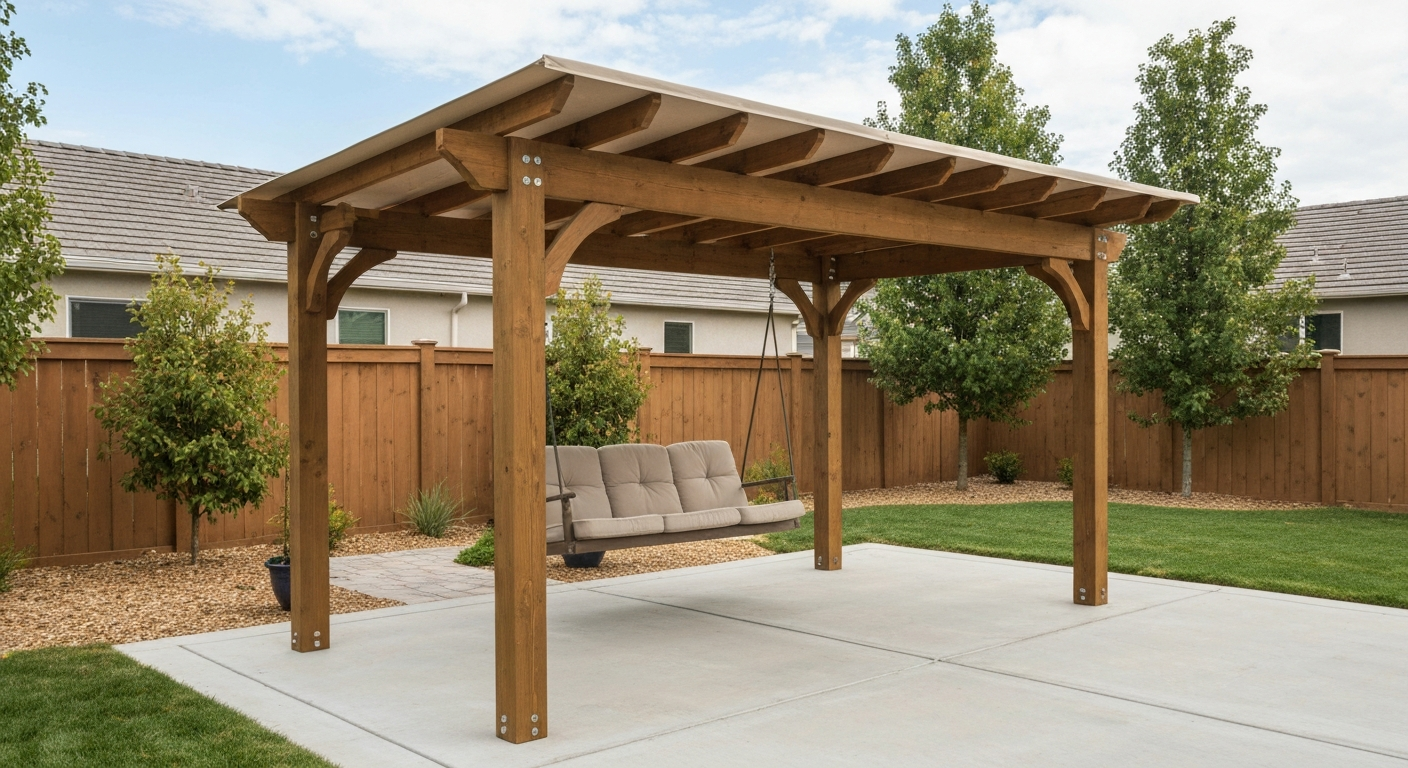
You can make a canopy for a patio swing in a weekend using a simple freestanding wood or aluminum frame topped with outdoor fabric, polycarbonate panels, or a fabric sling cover. For step-by-step plans and materials lists on how to make a patio shade canopy, see a focused guide that walks through sizes, framing, and weatherproofing for small freestanding canopies. The most practical approach for most homeowners is a four-post freestanding frame sized to your swing's footprint, with a sloped fabric or panel roof mounted 7 to 8 feet off the ground. It costs roughly $150 to $500 in materials depending on your frame choice, and it doesn't require a permit in most jurisdictions as long as it stays under 200 square feet and isn't attached to the house.
How to Make a Canopy for a Patio Swing: Materials, Steps & Safety

What this article covers and who it's for
This guide is written for homeowners who already own a patio swing (or are building one) and want to add real weather protection overhead. Whether you're starting from scratch with a bare swing frame, extending an existing pergola, or trying to figure out how to attach a canopy to a finished structure, this article walks you through every decision: style selection, measurements, materials, structural hardware, tools, and installation. You don't need a construction background, but you should be comfortable with a drill, a circular saw, and a tape measure. I'll call out the steps where things commonly go sideways and tell you honestly when a project crosses the line from confident DIY into territory where a second opinion or a structural engineer is worth the money.
Picking the right canopy style for your swing
Before you buy a single board or roll of fabric, you need to make one foundational decision: do you want a canopy that's part of the swing itself, one that stands independently over it, or one that ties into an existing overhead structure? Each path has different complexity, cost, and permanence. Here's how I think through it.
If your swing already has a built-in canopy frame (most commercial porch swings do), you may only need to replace or upgrade the fabric. That's a one-afternoon project. If your swing hangs from a freestanding A-frame, you can extend that frame upward or add a separate overhead structure right above it. If the swing is on a covered patio, you may just need to add a fabric panel or polycarbonate sheet to an existing pergola or patio roof section. And if none of those apply, a standalone four-post frame is your cleanest option.
- Built-in canopy upgrade: Replace or add fabric directly to the swing's existing top rail. Easiest and cheapest, but coverage is limited to the swing's own footprint.
- Freestanding overhead frame: Four posts set around the swing, connected by a top frame and covered with fabric or panels. Best for free-hanging swings or swings without natural overhead structure.
- Attached awning: A canopy arm or bracket-mounted awning bolted to a house wall or fascia directly behind the swing. Works well for swings positioned against the house, but requires solid wall attachment points.
- Pergola or existing structure extension: Add a fabric panel, sail shade, or polycarbonate insert to an existing pergola beam layout over the swing. Low-effort if the pergola is already there.
- Retractable fabric system: A track-mounted or cable-tensioned fabric that can open and close. More expensive but gives flexibility on sun vs. open sky.
Planning and measurements: swing arc, clearance, and load points
This is the step most people skip, and it's the one that causes the most problems. A patio swing moves, and that movement changes everything about how you position an overhead canopy. If your canopy is too low, the swing will hit it. If your posts are inside the swing's arc, you'll have a safety hazard.
Swing arc clearance
Most patio swings travel 12 to 18 inches forward and backward from their resting position at seat height, and the top rail of the swing (or the heads of seated users) can sweep through an arc at about 5 to 5.5 feet off the ground. Your canopy's lowest structural element needs to clear that arc with at least 12 inches of buffer. That puts your minimum post height or attachment point at roughly 6.5 to 7 feet, with 7.5 to 8 feet being the comfortable working target. I always build to 8 feet for any structure I'm standing under.
Footprint sizing
Measure the swing's overall length (seat width plus armrests) and depth (front to back of the frame at ground level), then add 12 to 18 inches on each side for your canopy frame footprint. This keeps posts outside the swing's travel zone. A typical 3-seat swing is about 60 to 66 inches wide and 36 to 42 inches deep at the base, so your canopy frame needs to be at least 84 inches (7 feet) wide and 60 inches (5 feet) deep. Add 12 inches of roof overhang on each side for actual rain coverage and you're sizing a canopy top of roughly 9 feet by 7 feet.
Load points and weight
Two-person porch swings are typically rated at 400 to 500 lb. Three-person models commonly carry 500 to 900 lb or more depending on construction. For example, the Latitude Run 3‑Seat Outdoor Porch Swing, product listing (Wayfair) lists a 750 lb capacity blank" rel="noopener noreferrer">Latitude Run 3‑Seat Outdoor Porch Swing — product listing (Wayfair). Your canopy frame is a separate structure from the swing itself and carries its own dead load (the weight of the roof material) plus live loads from wind and snow. For most fabric canopies over a residential swing, the structural loads are modest, but if you're using heavy polycarbonate panels or building in a snow-load zone, run a quick load check. The IRC's R301 tables and the ASCE Hazard Tool can give you site-specific ground snow load (Pg) values for your ZIP code, which is the starting point for sizing rafters and post bases in snowy regions. Interactive ground‑snow lookup tools (example: ASCE ground‑snow loads map (third‑party implementation), design.medeek.com) provide site‑specific Pg values for a given location blank" rel="noopener noreferrer">ASCE ground‑snow loads map (third‑party implementation) — design.medeek.com.
Key measurements to record before you start
- Swing seat width (inside armrest to inside armrest) and overall width including armrests.
- Swing frame depth front to back at ground level.
- Height of the swing's highest point at rest (top of canopy bar or hanging hardware).
- Height of occupants' heads when seated (usually 4.5 to 5 feet off the ground).
- Swing arc: how far the seat travels forward and backward (check the manufacturer spec or measure manually by pushing the swing and marking the floor).
- Distance from the back of the swing to the house wall, fence, or any obstacle.
- Ground surface type (concrete slab, pavers, soil, deck) to plan post footings or surface mounts.
Comparing canopy styles side by side
Each style has real trade-offs in cost, permanence, and skill required. Here's an honest comparison to help you decide before you start buying materials.
| Style | Approx. Material Cost | Skill Level | Permit Likely? | Best For |
|---|---|---|---|---|
| Attached awning (wall-mounted) | $200–$600 | Moderate | Sometimes (if attached to house) | Swings close to the house wall |
| Freestanding 4-post frame (fabric roof) | $150–$400 | Beginner–Moderate | Rarely (under 200 sq ft) | Most standalone swings on patios or lawns |
| Umbrella (offset or center-post) | $80–$300 | Beginner | No | Temporary or rental situations |
| Pergola extension (add fabric/panels) | $50–$250 (materials only) | Beginner–Moderate | No (if existing pergola permitted) | Swings already under a pergola |
| Retractable fabric track system | $400–$1,200+ | Moderate–Advanced | Rarely | Homeowners wanting open/close flexibility |
For most DIYers reading this, the freestanding 4-post frame is the sweet spot. It avoids wall attachment complexity, doesn't require ledger flashing or house penetrations, and can be moved or modified later. The pergola extension route is even simpler if you already have the overhead structure. The umbrella approach is fine for casual shade but won't protect you in a real rainstorm or stay put in wind above 20 mph without a weighted base.
Attached awning: what to know before you commit
If your swing sits against the house, a wall-mounted awning arm or bracket canopy is compact and clean-looking. The problem is that any fastener going through your siding and into the house framing creates a potential water intrusion point. You need to hit wall studs (not just siding), use flashing tape or caulk rated for exterior use, and ensure the awning pitch drains water away from the wall. In many jurisdictions, attaching a roofed structure to the house triggers a permit review, even for small canopies.
Retractable systems: when they make sense
Retractable fabric canopies (either awning-arm style or cable-tensioned shade sails) are the most flexible option but also the most expensive to buy and the trickiest to tension correctly. Fabric that isn't properly tensioned flaps in wind, holds water, and degrades in a single season. If you go this route, buy a kit from a reputable outdoor shade company rather than fabricating the tensioning hardware yourself.
Adapting a canopy to an existing patio ceiling or overhead structure
If your swing sits under an existing covered patio, pergola, or porch roof, you may not need a separate canopy frame at all. The real question is whether the existing overhead structure provides adequate coverage over the swing and whether you can add weatherproofing to it without changing the structure itself.
For a pergola with open slat spacing, the simplest upgrade is a fabric panel or shade sail attached to the existing beams directly above the swing. Use stainless steel eye bolts or D-rings screwed into the beam tops and tension a waterproof canvas or solution-dyed acrylic panel over the swing area. This takes about two hours, costs under $100 in hardware and a $50 to $150 fabric panel, and doesn't affect the rest of the pergola.
If you want more complete waterproofing over a covered patio ceiling, polycarbonate panels can be inserted between existing rafters or strapped to the top of purlins. Twin-wall polycarbonate (6mm or 10mm thickness) is the most practical choice here: it's lightweight, cuts with a utility knife or circular saw, handles thermal expansion better than solid sheet, and provides meaningful insulation. When covering an existing patio ceiling section, make sure you maintain a minimum 1/4 inch per foot slope for drainage and lap the panels so water flows to the low end, not between seams.
One thing to check before any attachment to an existing covered structure: confirm the original structure was permitted and built to code. If you're adding a new load (a heavy polycarbonate panel, a motorized canopy, or a solid roof section) to a pergola that was never engineered for it, you could be exceeding the original design loads. For most lightweight fabric additions, this isn't a concern. For solid panel systems over 50 square feet, it's worth a quick check of the existing post and beam sizing.
Materials: what to use for the frame, roof, and fasteners
Material choice drives both cost and how long your canopy lasts without maintenance. For a step-by-step build guide, material lists, and printable plans, see how to build a canopy for patio. Here's the honest breakdown.
Frame materials
| Material | Pros | Cons | Best Use Case |
|---|---|---|---|
| Pressure-treated pine (4x4 posts, 2x6 rafters) | Inexpensive, widely available, easy to cut and drill | Needs paint/stain to look good, check for warping, heavy | Budget freestanding frames, ground-contact posts |
| Cedar or redwood | Naturally rot-resistant, attractive, lighter than PT pine | More expensive, harder to find in larger sizes | Above-ground framing where appearance matters |
| Aluminum (square tube or pipe) | Lightweight, rust-proof, low maintenance | More expensive, requires cutting with a metal blade, harder to connect without welding or specialized brackets | Lightweight portable frames, coastal locations |
| Galvanized steel tube | Strong, durable, weldable | Heavy, can rust at cut ends if not touched up, harder to work with for beginners | High-wind zones, commercial-look permanent frames |
| Powder-coated steel (kit components) | Attractive finish, strong, ready to assemble | Most expensive, fixed dimensions from manufacturer | Ready-made swing canopy kits |
For a first-time build, I'd go with pressure-treated 4x4 posts and 2x4 or 2x6 rafters. It's cheap, forgiving, and every hardware store has it. If you're in a coastal area or want a maintenance-free life, aluminum tubing with corner brackets is worth the extra cost upfront.
Roofing and cover materials
Solution-dyed acrylic fabric (Sunbrella is the most widely known brand) is the top choice for fabric canopies. It's UV-resistant, mildew-resistant, and holds color for years. It's not fully waterproof out of the box but sheds water effectively at any pitch greater than about 15 degrees. For true waterproofing, use a marine-grade canvas or a coated polyester fabric, both of which are less breathable but handle rain better. Avoid cheap polyester tarps: they degrade in UV within a single season and look terrible by spring of year two.
Twin-wall polycarbonate panels (6mm to 16mm) are the best rigid option for permanent canopies. UV-stabilized grades (look for panels with a UV-protective co-extruded layer on one side) are rated for 10-year outdoor use by some manufacturers. LEXAN and similar brand polycarbonate sheets come in clear, bronze, and opal finishes. Clear gives maximum light but maximum heat; bronze cuts glare; opal diffuses light pleasantly for an outdoor sitting area. Cut polycarbonate with a fine-tooth circular saw blade and always seal the channel ends with aluminum tape to keep bugs and moisture out of the twin-wall channels.
Fasteners and corrosion protection
This is the part of outdoor builds that most homeowners underestimate. Regular zinc-plated screws will rust visibly within two years in most climates and can stain wood and fabric permanently. For outdoor canopy framing, use hot-dip galvanized (HDG) or stainless steel fasteners throughout. When using pressure-treated lumber, the American Wood Council specifically recommends fasteners with corrosion protection at least equivalent to hot-dip galvanized, because the preservatives in modern treated wood are corrosive to unprotected steel. For coastal locations within a few miles of salt water, 316 stainless is the right choice. Inland, 304 stainless or HDG is sufficient. Simpson Strong-Tie's SDS structural screws in hot-dip galvanized (ZMAX coating) or stainless versions are a reliable choice for post-to-beam and rafter connections.
Structural components and hardware options
Even a simple canopy frame has four structural jobs: the posts carry vertical load, the top plate or beam ties the posts together and supports the rafters, the rafters span the top and carry the roof load, and the footings or post bases anchor everything to the ground. Each piece needs to be sized and connected correctly.
Posts
For a freestanding canopy over a patio swing, 4x4 posts in pressure-treated pine or cedar are adequate for most spans and loads. If your canopy footprint exceeds 8 by 10 feet or you're in a high-wind zone (coastal, mountain, or tornado-prone areas), step up to 4x6 posts. Post height should be your target underside height (7 to 8 feet) plus whatever length goes into the ground or footing. Surface-mount post bases (like Simpson Strong-Tie's EPB or CBSTQ series) let you anchor posts to an existing concrete slab without digging, which is ideal for a patio swing on a poured concrete pad.
Top plates, beams, and rafters
Connect the post tops with a doubled 2x6 or a 4x6 beam running the length of the canopy on each side. Rafters span across these beams perpendicular to the main beam direction and carry the roof material. For fabric canopies, 2x4 rafters at 24 inches on center are plenty. For polycarbonate panel systems, use 2x6 rafters at 16 to 24 inches on center and check the panel manufacturer's maximum unsupported span (most 6mm twin-wall polycarbonate is rated for spans up to 24 to 30 inches between supports). Pitch your rafters at a minimum 1/4 inch per foot (about 1 degree) for drainage; 2 to 4 inches of rise per foot (about 10 to 18 degrees) is the practical sweet spot for both water shedding and canopy appearance.
Post bases and anchors
For concrete slab installations, use a surface-mount post base rated for your post size. Simpson Strong-Tie's ABU (adjustable post base) or CBSTQ (standoff column base) series are commonly available at big-box stores and designed for exactly this application. Install them with concrete anchors rated for the shear and uplift loads in your area. For soil or gravel, set posts in concrete footings at least 24 inches deep (36 inches in freeze-thaw climates). Common mistake here: people undersize the footing diameter. Use at least an 8-inch-diameter tube form; 10 to 12 inches is better for a permanent structure. If you're in a high-wind zone, your local building department may specify deeper or wider footings.
Connectors and brackets
Metal connectors are not optional on a structure people sit under. Use joist hangers, post caps, or tie plates rated for your member sizes at every rafter-to-beam and post-to-beam connection. Simpson Strong-Tie publishes allowable shear and tension values for their connectors and structural screws (including the SDS series), and these values are what engineers use to verify a connection is adequate for wind uplift. For a residential-scale swing canopy, post caps (PC or PCZ series) and single joist hangers are the two most commonly needed connector types. Use the appropriate SDS or SD structural screws per the manufacturer's installation guide, not standard wood screws.
Tools, safety gear, and your build checklist
Here's what you'll actually use on this project. I've split it into power tools, hand tools, safety gear, and consumables, so you can print or screenshot this before your hardware store run.
Power tools
- Cordless drill/driver (18V or higher): for driving structural screws and drilling pilot holes. Have two batteries charged.
- Circular saw: for cutting posts, rafters, and beams to length. A fine-tooth blade (40-tooth) works for most wood. Use a metal-cutting blade for aluminum.
- Jigsaw (optional but useful): for notching rafters or cutting polycarbonate panels to irregular shapes.
- Rotary hammer drill or hammer drill: required if anchoring post bases into concrete slab.
- Impact driver: faster than a drill for driving SDS structural screws, especially into pressure-treated lumber.
Hand tools
- Tape measure (25 ft): you'll use this constantly.
- Speed square: for checking 90-degree angles on post and rafter cuts.
- Level (4 ft): essential for plumb posts and level top plates.
- Line level or laser level: faster and more accurate for checking level across longer spans.
- Hammer: for tapping connectors into position and setting anchors.
- Clamps (4 to 6 bar or F-clamps): hold beams and rafters in position while you drive fasteners.
- Chalk line: for snapping layout lines on the concrete or ground.
- Utility knife and aluminum tape: for cutting and sealing polycarbonate panel ends.
Safety gear
- Safety glasses: non-negotiable any time you're cutting, drilling, or driving fasteners.
- Work gloves: pressure-treated lumber splinters and cut aluminum edges are sharp.
- Hearing protection: for circular saw work.
- Dust mask or N95 respirator: especially when cutting pressure-treated lumber, which produces fine particles from preservative chemicals.
- Sturdy ladder (6 ft minimum): a step ladder isn't enough for post and rafter work at 8 feet. Use a platform ladder or scaffolding if available.
- Steel-toed boots: optional but worth it when lifting 4x6 beams.
Consumables and supplies checklist
- Hot-dip galvanized or stainless SDS structural screws (3 inch and 1.5 inch): primary fasteners for all wood-to-wood connections.
- Concrete anchors (Tapcon or equivalent): for post base installation into slab.
- Exterior construction adhesive (optional): for layered beam construction.
- Exterior wood primer and paint or stain: applied before assembly where possible.
- Aluminum seam tape: for sealing polycarbonate panel ends.
- Stainless steel eye bolts and D-rings: for fabric attachment.
- Bungee cords or shock cord with hooks: for temporary fabric tensioning while you fine-tune the fit.
- Concrete tube forms (Sonotube or equivalent): for in-ground footings.
- Pre-mixed concrete (60 lb bags): two bags per footing for a standard 8-inch-diameter tube.
- Exterior caulk (silicone or polyurethane): for sealing any wall penetrations or panel laps.
Permit and code quick-check (do this before you buy anything)
In most U.S. jurisdictions, a freestanding structure under 200 square feet that isn't attached to the house doesn't require a building permit. But local amendments to the IRC (International Residential Code) vary significantly by city and county, and some jurisdictions have lower thresholds or specific rules about structures near property lines. A 10-minute call or website check with your local building department before you start can save you from a stop-work order later. If your canopy attaches to the house (wall-mounted awning, attached pergola extension), a permit is more commonly required because you're affecting the building envelope. The IRC R301 tables and ASCE 7 load maps are what your building department uses to evaluate wind and snow loads if a permit review is required.
FAQ
What building codes and standards should I research to ensure canopy designs meet structural safety requirements?
Primary sources: ASCE 7 (wind, snow, live/dead loads and hazard tool) and the International Residential Code (IRC) R301 series for residential load criteria. Also check local code amendments and municipal building department guides because jurisdictions commonly modify IRC/ASCE values.
Which local data/tools are needed to size members for wind and snow loads at a specific site?
Use the ASCE Hazard Tool or ASCE/IRC ground‑snow and wind maps to obtain site‑specific ground snow (Pg) and basic wind speeds. Supplement with third‑party interactive maps or lookup tools for convenience, but record the controlling values and map reference for design notes.
What manufacturer and product documentation must I consult for swing, canopy, and hardware capacity information?
Gather product pages and installation manuals for the specific patio swing and any prefabricated canopy/awning components to confirm rated capacities and attachment details. Also collect datasheets for post bases, fasteners, and connectors (e.g., Simpson Strong‑Tie catalogs and technical bulletins) showing allowable shear/tension values and recommended fastener patterns.
Which fastener, connector and anchoring references are essential for safe attachments?
Simpson Strong‑Tie product installer guides and technical bulletins for SDS/SD screws, lag bolts, post bases and adjustable anchors. Manufacturer load tables for post bases and concrete anchors. Local code or design tables for embedment and spacing. Use corrosion‑resistant anchor specs appropriate to exposure (see corrosion guidance below).
What material datasheets should I include when comparing canopy materials?
Datasheets and technical literature for common materials: exterior fabrics (Sunbrella for acrylic outdoor fabrics), polycarbonate sheet datasheets (LEXAN/ SABIC for UV‑stabilized panels), aluminum/steel framing specs, and wood grade/treatment data. Include manufacturer warranty/UV/fade and impact info to justify choices.
What corrosion and fastener guidance is needed for long‑term durability?
Industry references from the American Wood Council, American Galvanizers Association, and technical studies comparing galvanizing methods. Guidance on stainless grades (304 vs 316) for coastal exposures and specifying hot‑dip galvanized or stainless fasteners with pressure‑treated lumber.