You can insulate a patio roof whether you're mid-build or retrofitting an existing structure, but the right approach depends on what kind of roof you have, your climate, and whether the assembly is vented or unvented. For most DIYers, the practical path is either rigid foam board or a radiant barrier for a simple covered patio, with batts reserved for situations where you have proper rafter bays, a finished ceiling below, and a solid moisture management plan. Get the moisture and ventilation strategy right first, and the actual installation is very manageable.
How to Insulate a Patio Roof: DIY Retrofit Guide

Celia Vaughn
29 Apr 2026
First, figure out what you're actually working with
Before you buy a single roll of insulation, you need to know what type of patio roof you have, because the approach changes significantly depending on your situation. The two biggest questions are: is the roof open or enclosed, and are you building new or retrofitting?
A simple open pergola-style cover with gaps between boards isn't a good candidate for conventional insulation. You'd need to close it up first. A solid covered patio roof, whether that's corrugated metal panels, aluminum sheeting, wood decking, or a properly sheathed frame, gives you something to actually work with. Lean-to roofs attached to the house are the most common and easiest to insulate. Gable or hip-style freestanding patio structures are more complex because you're dealing with more framing geometry, and you may have a situation closer to a small outbuilding.
If you're still in the building phase, you have the easiest path. You can add insulation between rafters before putting on the roof decking or ceiling panels, choose insulation-friendly structural spacing from the start (16 or 24 inches on center for standard batts), and plan for ventilation channels before everything is enclosed. If you're retrofitting an existing covered patio, your options narrow based on what's accessible. The underside is usually your best and only access point, which means rigid board or spray foam are often more practical than batts.
Feasibility quick check
- New construction or mid-build: full range of options, easy to hit target R-values
- Existing roof with exposed rafter bays underneath: retrofittable with rigid board or batts + a finished ceiling panel
- Existing roof with a flat or enclosed soffit underneath: you'd need to open it up or use injection foam, which gets complicated
- Open pergola or lattice cover: not insulation-ready without structural changes first
- Any evidence of leaks, rot, or mold: stop and fix those before anything else
Picking the right insulation strategy and materials
Patio roofs are not the same as a house attic. You're usually dealing with a shallow, low-slope or single-pitch assembly without much depth in the rafter bays, and the space is semi-exposed to the outside. That changes which insulation types make sense. Here's how the main options break down.
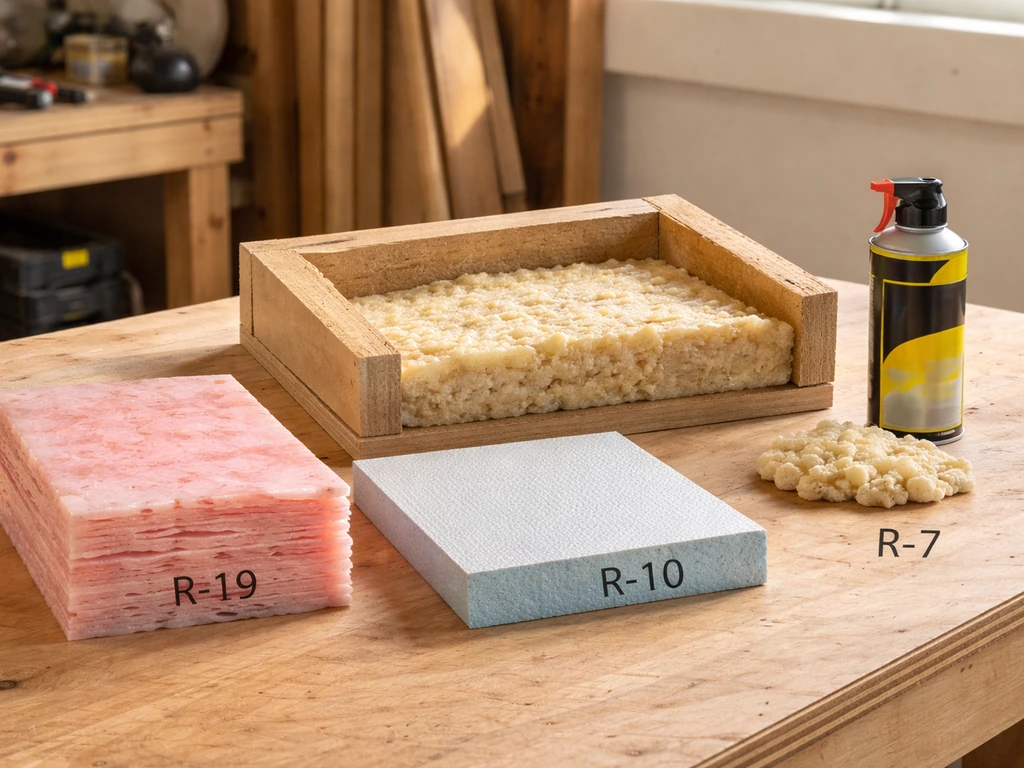
| Insulation Type | R-Value per Inch | Best For | DIY Difficulty | Moisture Risk |
|---|---|---|---|---|
| Fiberglass batts | R-2.9 to R-3.8 | New builds with standard rafter spacing, enclosed assemblies | Easy | High if moisture control isn't done right |
| Rigid foam board (EPS/XPS/Polyiso) | R-3.8 to R-6.5 | Retrofits, continuous above-deck or below-rafter installs, thin assemblies | Easy to moderate | Low to moderate (foam is air/moisture resistant) |
| Spray foam (closed-cell) | R-6 to R-7 per inch | Unvented assemblies, complex geometry, air sealing + insulation in one step | Hard (professional application recommended) | Very low if applied correctly |
| Radiant barrier (foil) | Not rated by R-value alone | Hot climates, attics/patio roofs where radiant heat is the main problem | Easy | Low (no bulk moisture absorption) |
For most DIY patio roof projects, rigid foam board is the go-to. It's affordable (typically around $0.25 to $0.50 per board-foot depending on thickness and type), easy to cut with a utility knife and straightedge, and it does double duty as both insulation and an air barrier when the seams are taped. Polyiso gives you the most R-value per inch (about R-6 to R-6.5), which matters when your rafter bays are only 3.5 to 5.5 inches deep. XPS (the blue or pink board) is a solid all-around choice and holds up better in damp conditions than EPS.
Fiberglass batts work well in new construction when you have standard 16-inch or 24-inch rafter spacing and a plan for a finished ceiling below. The problem with batts in a patio roof is that they're air-permeable, they sag over time if not properly retained, and if any moisture gets into the assembly, batts absorb and hold it. If you use batts, you need a proper air barrier and vapor control layer, not just the batts alone.
Radiant barriers are worth considering if you're in a hot climate (think Texas, Florida, Arizona) and your main complaint is summer heat radiating down through a metal or aluminum roof. A foil-faced radiant barrier stapled to the underside of rafters, with at least a 1-inch air gap between it and the roof deck, can cut radiant heat gain significantly. It doesn't add much in terms of R-value, but in hot climates, radiant heat is often the bigger problem anyway.
Many aluminum patio cover systems already use insulated or foam-core panels, which combine radiant barrier and some foam insulation in one product. If you're specifically working with aluminum or metal patio roofs, there's more detail on those material-specific approaches in the related guides on insulating aluminum and metal patio roofs on this site.
If you're specifically working with aluminum or metal patio roofs, there's more detail on those material-specific approaches in the related guides on insulating aluminum and metal patio roofs on this site, including how to insulate a metal patio roof.
What R-value should you aim for?
For a patio roof, you don't need to hit the same R-values as a conditioned home ceiling. Energy codes specify R-60 or higher for house ceilings in cold climates, but a patio is a semi-conditioned or unconditioned space. A practical target is R-13 to R-20 for most covered patios where you want to reduce heat gain and keep the space comfortable. If you're enclosing the patio fully into a conditioned sunroom, then you'd want to treat it like a room addition and consult your local code requirements for your climate zone.
Moisture, air sealing, and ventilation: the part most people skip

This is where most DIY patio roof insulation projects go wrong. Getting insulation into the roof cavity is the easy part. Managing moisture is where it gets complicated, and getting it wrong can lead to rot, mold, and structural damage within a few years. Building Science Digest report RR-0108 on unvented roof systems notes that moisture accumulation from interior sources can drive mold, corrosion, and decay risks, especially in climates where cold conditions are significant Managing moisture is where it gets complicated, and getting it wrong can lead to rot, mold, and structural damage within a few years..
The first thing you need to decide is whether your assembly will be vented or unvented. A vented assembly means there's airflow through the rafter bays from soffit to ridge (or equivalent), which carries moisture out before it can condense. An unvented assembly is sealed tight, relying on air-impermeable insulation to keep the dew point away from cold surfaces. Both can work, but they require different insulation strategies.
Vented patio roof assemblies
If you're going the vented route, you need a clear air path from the low edge (usually the eave or soffit) to the high edge (ridge or upper wall). The standard ventilation ratio is 1 square foot of net free ventilation area for every 150 square feet of ceiling area (often written as 1:150). You'd maintain a 1.5-inch to 2-inch ventilation channel above the insulation using rafter baffles or rigid foam channels before installing insulation below. With batts, this is critical: without baffles, the insulation blocks airflow and you lose both the ventilation benefit and you trap moisture.
Unvented patio roof assemblies
Unvented assemblies work when you fill the entire rafter bay (or most of it) with air-impermeable insulation like closed-cell spray foam or rigid foam, so there's no cold surface inside the cavity where moisture can condense. [Building science research is clear on this: if you go unvented, you cannot use air-permeable insulation like fiberglass batts alone. ](https://www. energy.
gov/eere/buildings/monitoring-unvented-roofs-diffusion-vents-and-interior-vapor-control-cold-climate) You need closed-cell spray foam or a layer of rigid foam thick enough to keep the dew point within the foam itself, not at the roof deck. In cold climates especially, partial filling with batts in an unvented assembly can trap moisture at the deck and cause rot. If you're in a hot-humid climate, the moisture concern flips: you're more worried about exterior humidity getting in, so vapor control belongs on the exterior side.
Air sealing basics
Air sealing matters as much as insulation. Insulating without air sealing is like putting on a sweater full of holes. For a patio roof, the key places to seal are: the junction where the roof meets the house wall (for attached patios), any penetrations through the roof deck (light fixtures, fasteners, conduit), the perimeter of any rigid foam panels you install, and the top-plate area if you're tying into the house. Use canned spray foam for gaps under half an inch, and foam backer rod plus caulk for larger gaps. Foil tape works well for sealing rigid foam board seams.
Tools, safety, and prep before you start
Don't underestimate the prep phase. Getting this right before you buy materials saves time, money, and rework. Start by measuring your rafter spacing carefully, because it's rarely exactly 16 or 24 inches once you account for the actual lumber dimensions and any inconsistencies in the framing. Measure three or four bays, not just one.
What you'll need
- Tape measure and chalk line
- Utility knife with fresh blades (for cutting rigid foam) or insulation knife for batts
- Straightedge or T-square (a long 4-foot level works great)
- Canned spray foam (low-expansion for gaps around rigid foam perimeters)
- Foil tape or housewrap tape rated for foam (not standard duct tape, which fails over time)
- Staple gun and staples (for radiant barrier or batt retainers)
- Respirator rated for insulation fibers (N95 minimum for fiberglass, P100 for spray foam work)
- Safety glasses and gloves
- Ladder rated for your weight plus tools (Type I or Type II minimum)
- Plywood board or roof jacks if you need to get on top of the roof
Permits and structural checks
Check with your local building department before you start. Adding insulation to a new patio roof during construction usually doesn't require a separate permit if the cover was already permitted, but enclosing an open patio or converting it to conditioned space almost always does. More importantly, if you're adding significant weight to an existing structure (rigid foam plus a new ceiling panel, for example), make sure the existing rafters and ledger connections can handle it. A 4x8 sheet of 2-inch polyiso plus a 4x8 sheet of 3/8-inch OSB ceiling panel adds roughly 20 to 30 pounds per bay. For most properly built patio covers, that's fine. For lightweight aluminum extrusion systems, check the manufacturer's specs.
Fall safety
Most patio roof work happens from below (installing ceiling panels and insulation from a ladder or scaffold), which is much safer than working on top of the roof. If you do need roof access, use roof jacks or a chicken ladder (a hook ladder that drapes over the ridge) rather than walking directly on lightweight patio roof panels. Many aluminum and corrugated metal patio roofs will not support your weight. When working from a ladder at 8 to 10 feet, use a stepladder stabilizer, never lean sideways off the ladder, and have someone footing the ladder when possible.
How to insulate a patio roof during new construction
This is the cleanest scenario. You have full access to the rafter bays before the roof deck or ceiling goes on, and you can plan the entire assembly from the start. Here's the process for a common wood-framed patio cover with a solid roof deck.
- Decide vented vs. unvented before you frame. Vented requires soffit-to-ridge airflow, so plan eave vents and a ridge gap or ridge vent. Unvented means you'll fill the bay completely with foam and skip the venting.
- Frame your rafters at 16 or 24 inches on center if you plan to use standard-width batts (14.5 inches or 22.5 inches actual). If you're going with rigid foam cut to fit, spacing is less critical but consistency makes cutting faster.
- For a vented assembly: install rafter baffles (foam or cardboard chutes) from eave to ridge before insulation goes in. Staple them to the underside of the roof sheathing, leaving a gap of at least 1.5 inches between the baffle and the bottom of the roof deck.
- Install roof sheathing (typically 1/2-inch OSB or plywood) on top of the rafters. At this point you can also add a continuous layer of rigid foam above the sheathing before roofing, which gives you a thermal break and boosts total R-value without compromising the rafter bays below.
- For batts: fit them snugly into the rafter bays below the baffles. Don't compress them. Compression reduces R-value significantly. If the batt is 3.5 inches thick and the rafter bay is only 3.5 inches deep, you have no room for baffles and should switch strategies.
- For rigid foam below the rafters: cut panels to fit the bay width precisely, press them up into the bay, and seal the perimeter of every piece with canned low-expansion foam. No gaps.
- If using a radiant barrier: staple foil-face down to the bottom edges of the rafters before installing any ceiling material, making sure there's an air gap between the foil and the roof deck above.
- Air seal everything before closing up the ceiling. Hit the wall-plate connections, any penetrations (conduit, fixture boxes), and the ledger area where the roof ties into the house wall.
- Install your ceiling material (tongue-and-groove wood, OSB, aluminum soffit panels, or whatever matches your project) to hold the insulation and create the finished look.
How to insulate an existing patio roof (retrofit)
Retrofitting is more constrained but very doable in most cases. The most common retrofit scenario is an existing covered patio with exposed rafters on the underside, no ceiling panel, and either metal or wood roof decking on top. You have access from below, which is actually enough for most approaches.
Scenario 1: Exposed rafter bays from below, no existing ceiling
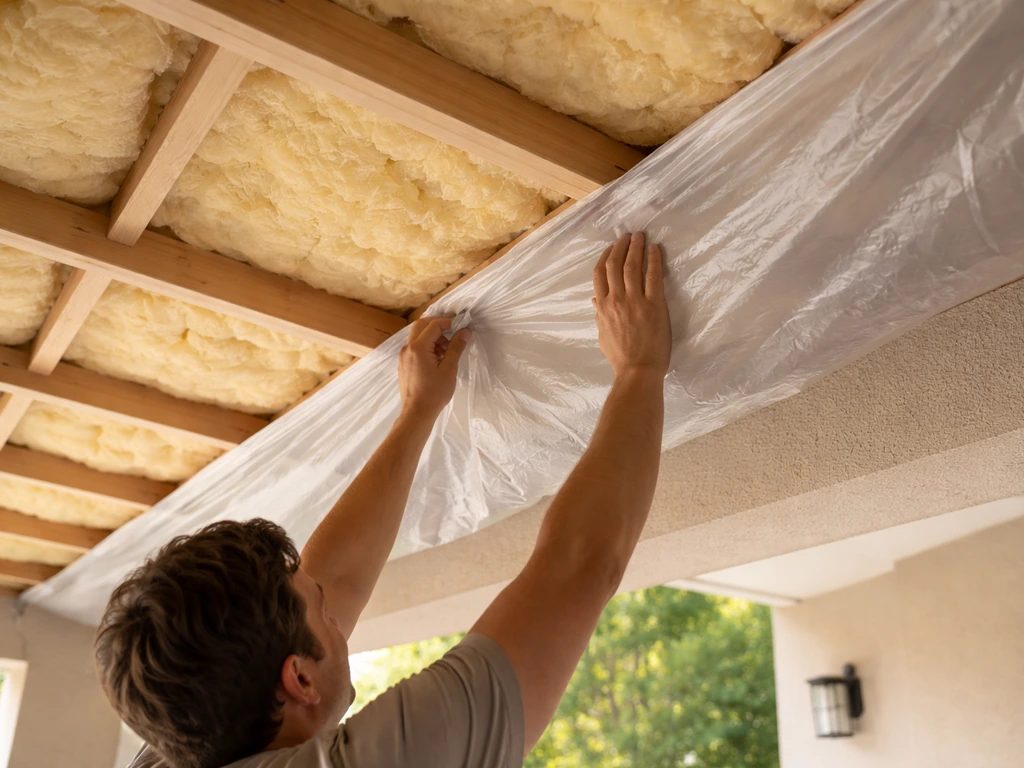
This is the best retrofit situation. Cut rigid foam panels to fit between the rafters, cutting them about 1/4 inch narrower than the actual bay width so they slip in easily, then spray the perimeter of each panel with low-expansion foam to lock it in place and seal the gap. Stack two thinner layers (for example, two layers of 1. 5-inch polyiso for about R-18 total) if you need more R-value and the bay is deep enough.
Then install a ceiling panel to hold everything up and give a finished look. If you want to keep it simple and your main concern is heat, a foil-faced radiant barrier stapled to the underside of the rafters costs very little and is a one-afternoon job.
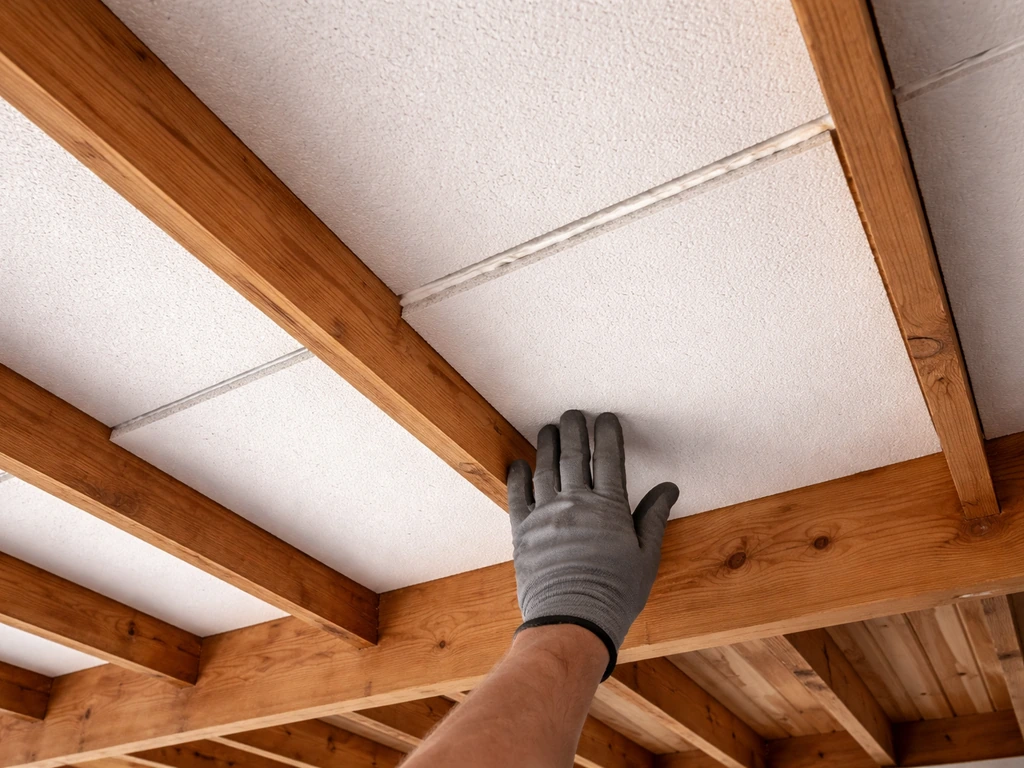
Scenario 2: Existing ceiling panel already in place
If there's already a ceiling (plywood, T&G, or aluminum soffit panels), you have two real options. The first is to add insulation above the existing ceiling by removing a few panels from one end and sliding rigid foam boards in horizontally, working from one side to the other. It's tedious but works. The second option is to remove the ceiling panels entirely, insulate properly with full access, and then re-install them. This gives you the best result and the chance to air seal everything correctly. If the ceiling is aluminum soffit material, panels usually snap out and back in fairly easily. If it's screwed OSB or plywood, budget more time.
Scenario 3: Insulated or foam-core aluminum patio cover panels
Many aluminum patio cover systems use hollow or foam-filled extruded panels that span rafter to rafter. For a deeper, material-focused walkthrough, see the guide specifically on insulating aluminum patio roofs foam-core aluminum patio cover panels. If your roof uses these, the insulation is already built into the panel system. The weak points are the seams between panels, the endcaps, and where the panels meet the house wall. Sealing these with compatible caulk or foam dramatically improves performance. If you're installing a new aluminum patio cover and want better thermal performance, upgrading from hollow to foam-core panels at the point of purchase is far easier and cheaper than any retrofit insulation you'd try to add later.
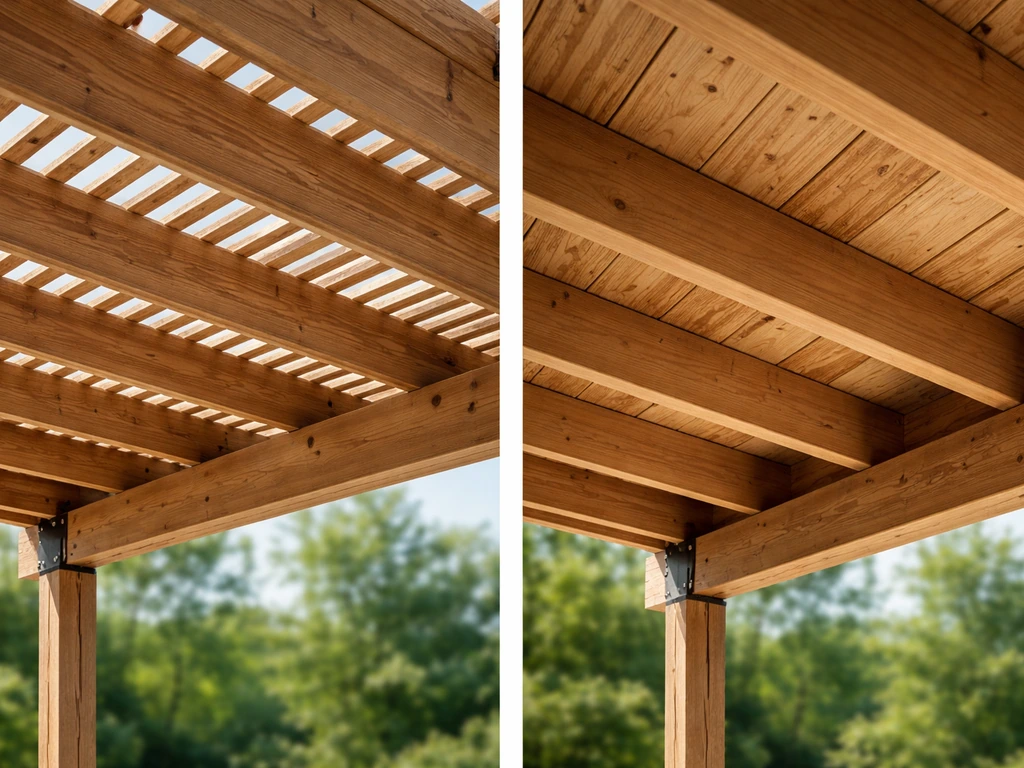
Scenario 4: Lean-to vs. gable roof differences
A lean-to (single-slope) patio roof is simpler because all the rafters run the same direction with consistent bay geometry. A gable patio roof has a ridge in the middle and two sides, so you have to work both slopes and deal with the ridge connection. The insulation strategy is the same for each bay, but the ceiling installation is trickier on a gable because you're installing angled ceiling panels on two slopes instead of one.
If your gable patio is large enough to have a true attic space above the ceiling level (even a small one), you may be able to insulate at the ceiling plane rather than the roof slope, which is much easier. Just make sure to vent that mini-attic space.
Common mistakes, inspection checklist, and when to call a pro
The most common mistakes
- Skipping air sealing and relying on insulation alone: insulation slows heat transfer, but air leaks bypass it entirely. Seal first, insulate second.
- Using batts in an unvented assembly without foam: this traps moisture against the roof deck and leads to rot, sometimes within just a few years.
- Blocking ventilation channels in vented assemblies: if you stuff insulation right up to the roof deck with no baffle, you've eliminated the ventilation and now have a poorly performing unvented assembly that doesn't meet the requirements for an unvented one either.
- Ignoring existing leaks before insulating: adding insulation over a leaky roof seals moisture in. Any leak, even a small one, will cause mold and rot inside an insulated assembly much faster than in an uninsulated one.
- Not accounting for the weight of new ceiling panels when retrofitting: check rafter size and span before adding a heavy ceiling plus insulation.
- Using the wrong tape on rigid foam seams: standard duct tape fails in temperature extremes. Use foil tape or contractor-grade housewrap tape rated for the application.
Pre-completion inspection checklist
- All rafter bays fully covered with no gaps or missed sections
- Perimeter of every rigid foam panel sealed with spray foam or tape
- Ventilation channels clear and unobstructed (if vented assembly)
- Wall-plate and ledger connections air-sealed at the house junction
- All penetrations (conduit, light fixture boxes, fasteners) sealed
- No visible daylight gaps at eaves, ridge, or gable ends
- Ceiling panel fastened properly and not sagging
- No evidence of existing moisture, staining, or mold before closing up
When to hire a pro
There are a few situations where calling a professional is the right call, not the cautious one. If you find existing mold, rot, or water damage in the roof assembly, stop work and get a contractor or building inspector involved before going any further. Adding insulation over a moisture-damaged structure makes everything worse.
If your project involves modifying the roof structure itself (adding a ridge beam, changing the slope, enlarging the opening), that's structural work that needs an engineer sign-off in most jurisdictions. If you're enclosing the patio as conditioned living space, a building permit and inspection are almost certainly required, and an insulation contractor who knows local code can make that process much smoother.
Similarly, if there are electrical lines running through the rafter bays that need to be moved or that complicate access, have an electrician address those before you insulate around them.
The good news is that straightforward patio roof insulation, installing rigid foam into open rafter bays, sealing the perimeter, and putting up a ceiling panel, is genuinely within reach for most homeowners who are comfortable with a utility knife, a caulk gun, and a ladder. Take the time to get the moisture strategy right for your climate, do your air sealing properly, and the physical installation is a weekend project for most single-car-garage-sized patio covers.
FAQ
What R-value should I aim for when learning how to insulate a patio roof?
A good rule of thumb is to insulate to reduce heat transfer, but treat the patio like a semi-conditioned or unconditioned space. For most covered patios, R-13 to R-20 at the roof/ceiling plane is usually the practical comfort target. If you are fully enclosing and conditioning the space like a room addition, use your local code requirements for the actual conditioned ceiling and follow the code-compliant moisture strategy for that assembly.
Can I insulate a patio pergola or open slat roof the same way as a covered patio roof?
If you have any open gaps in the roof system (open pergola slats, widely vented cover, or an assembly that leaks air), you need to address that first. Conventional roof insulation will not perform well when air can freely move through the structure, and moisture can be driven into cavities. Close up or sheath the roof before insulating, then focus on air sealing the perimeter and seams.
Is it ever acceptable to use fiberglass batts when I insulate a patio roof?
Yes, but only if you keep the insulation strategy and thickness aligned with the venting plan. In a vented assembly, batts require continuous rafter baffles (or channels) so air can flow above the insulation. In an unvented assembly, batts alone are not appropriate because they are air-permeable; you typically need closed-cell spray foam or a correctly sized rigid foam layer to control where the dew point falls.
How do I know if my patio roof insulation is creating moisture problems?
Don’t rely on insulation alone to handle moisture, especially when you add a ceiling panel below. Start with air sealing (house-to-roof junction, penetrations, panel seams, top plates) and then decide vented versus unvented based on how your cavity can dry. After installation, watch for early signs like persistent damp odor, staining at the underside of decking, or paint bubbling. Those are indicators you should investigate before adding finishing layers.
What’s the easiest insulation method for retrofitting a patio roof from underneath?
When you have access from below with exposed rafters, rigid foam board is usually the easiest path because you can cut to fit, tape seams, and seal the perimeter with low-expansion foam. Spray foam can be excellent too, but it can be messy and requires careful dispensing, especially around electrical penetrations. If you are trying to install batts from below, you must add a complete air barrier and vapor strategy plus reliable retention to prevent sagging and airflow bypasses.
Where do I need to seal when I insulate a patio roof with rigid foam?
For rigid foam board, the seams and edges are performance-critical. Use the tape product recommended for the foam type, and seal around each panel perimeter with low-expansion foam where gaps exist. Also seal at transitions (where panels meet the house wall, around lighting fixtures, and at any board edges that contact framing) so air cannot bypass the insulation layer.
What ventilation mistakes should I avoid when insulating a patio roof?
If you choose a vented roof/ceiling assembly, you must maintain a continuous air path from the intake at the low edge (typically soffit or eave) to the exhaust at the high edge (ridge or equivalent). Using insulation that blocks airflow is a common mistake, because it defeats the purpose of ventilation and can trap moisture. If you cannot create a clear pathway, unvented strategies are often more appropriate.
Does vented versus unvented insulation depend on my climate?
Pay attention to the dew-point direction created by your climate. In cold climates, you typically need insulation that keeps condensation away from roof decking, and you avoid partially insulating with air-permeable materials in an unvented design. In hot-humid climates, the concern is often exterior humidity entering the assembly, so vapor control may need to be oriented differently (sometimes exterior-side). If you’re unsure, pick a documented assembly approach for your climate and insulation type rather than mixing methods.
Should I insulate above or below an existing patio ceiling when retrofitting?
If there are already ceiling panels, you generally have two practical paths: remove a section to slide foam in horizontally (tedious but possible) or remove and reinstall the ceiling so you can air seal and insulate more completely. The “remove to reinsulate” approach usually produces better air sealing and fewer hidden gaps, which is often the difference between a good and mediocre retrofit.
Do electrical fixtures and conduit change how I should insulate a patio roof?
Yes, and it matters. Many patio covers fail around electrical and plumbing penetrations because air leaks pull moist air into the cavity. Seal around light fixture openings and any conduit penetrations with appropriate air-sealing materials, and use rated electrical boxes when required. If you need to relocate wiring to create clearance, do that before closing the assembly so you can seal properly.
Do I need to consider load capacity when I insulate a patio roof?
Before you start, confirm your framing can handle added mass and fastener loads. Even if the patio was built for a roof, adding rigid foam plus a new ceiling panel increases dead load per bay. If your patio cover uses lightweight aluminum systems, stick to manufacturer specs for allowable loads and compatible insulation products, and do not assume a retrofit ceiling is acceptable without checking.
When should I stop my DIY insulation plan and call a professional?
If you find active mold, rot, or water stains from a leak, stop and correct the moisture source first. Insulating over damaged materials can lock in wet conditions, accelerating deterioration. Also, if structural changes are planned (like modifying slope or adding a beam), treat it as structural work that usually requires permits or engineering sign-off.