
You can convert most existing pergolas into a fully covered patio in a single weekend or a few weekends, depending on the roof style you choose. The core process is: inspect the existing structure for rot or damage, verify the posts and footings can handle the added load, pull any required permits, then add rafters, roofing material, and flashing. The typical DIY cost runs from about $1,500 for a simple polycarbonate lean-to up to $8,000 or more for a framed gable with shingles, not counting labor savings. The most important decision you'll make upfront is whether your existing pergola is worth keeping or whether it's cheaper and safer to rebuild.
How to Convert Pergola to Covered Patio: Step-by-Step Guide

Celia Vaughn
9 Aug 2026
What you're actually trying to accomplish (and how this guide helps)
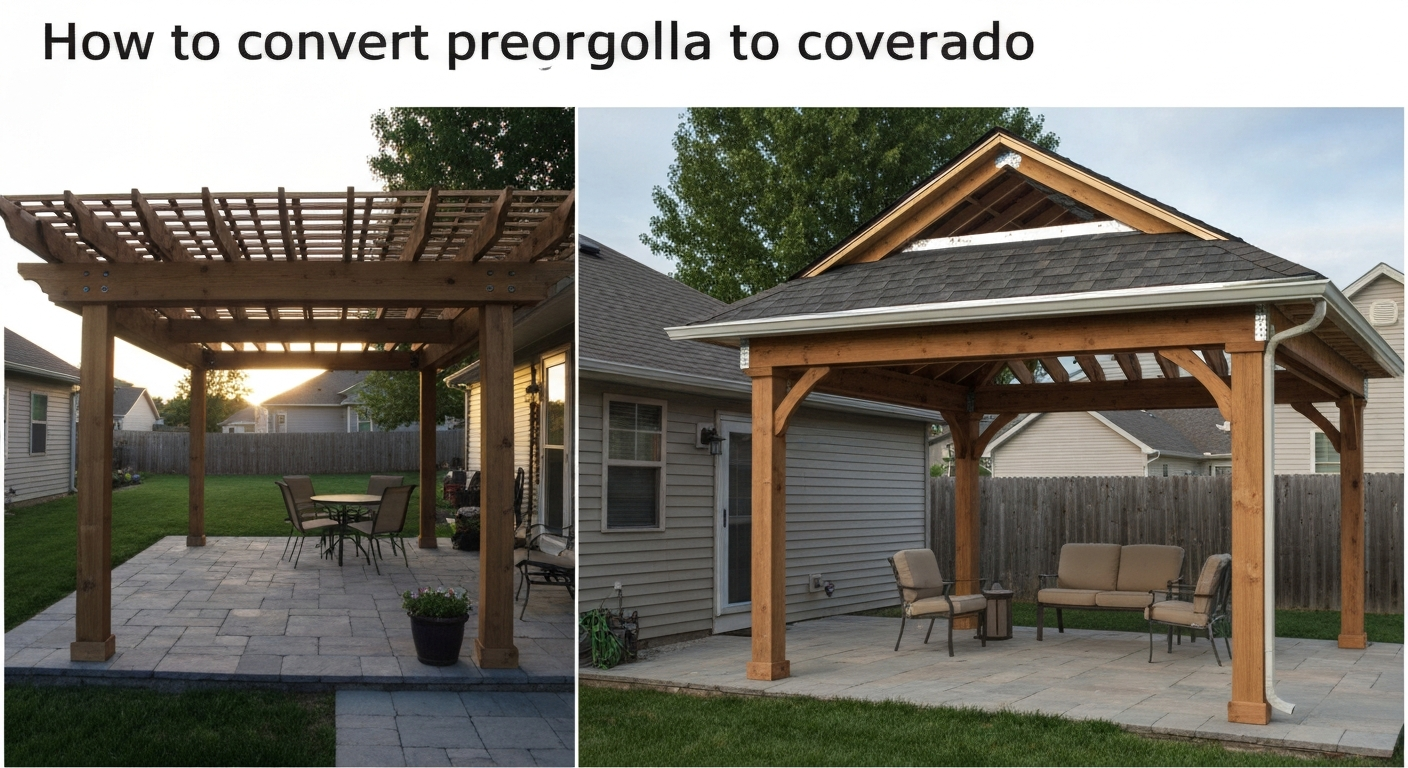
A pergola gives you shade and structure but it doesn't stop rain. A covered patio does. The conversion goal is to take the frame you already have, close the roof plane with a waterproof material, manage water runoff with gutters or slope, and make sure the whole thing is structurally sound enough to handle whatever weather your area throws at it. This guide walks you through every decision in order: evaluate what you have, do a quick structural sanity check, figure out permit requirements, choose your roof style and materials, then frame and install. It also gives you honest criteria for when to stop and call a structural engineer or licensed contractor, because sometimes that's the right call and it doesn't mean the project is beyond you.
If you're starting from scratch rather than converting an existing structure, the process overlaps heavily with how to add a pergola to an existing patio, so some of the framing and attachment guidance here applies in both directions. For step-by-step instructions on how to fix pergola to patio, see the linked guide. And if your pergola isn't anchored properly to begin with, you'll want to address that before you add any roof load. For step-by-step instructions on securing and attaching an existing pergola to a patio surface, see guidance on how to fix a pergola to a patio.
Project prep: what to gather before you touch a single board
Good prep saves you two trips to the lumber yard and one call to a structural engineer. Before you do anything else, spend an hour taking measurements and photos. You'll need the exact dimensions of the existing pergola (post spacing, beam spans, rafter spans, post heights), the size and condition of each post and footing, and clear photos of every connection point. Measure to the nearest quarter inch. Get a photo of the ledger-to-house connection if it's an attached structure, and take a wide shot from each corner so you can reconstruct the layout later.
- 25-foot tape measure and a helper (or a laser distance measurer for solo work)
- Smartphone or camera for site photos — shoot every connection, every post base, and the underside of any existing rafters
- Pencil, graph paper or a free app like MagicPlan to sketch the footprint to scale
- Screwdriver, awl, or a pocket knife for probing wood for soft spots and rot
- Ladder (6-foot step ladder minimum; 8-foot if posts are taller than 9 feet)
- Safety glasses, work gloves, and hard-soled boots
- Voltage tester if you suspect any electrical near the structure
- Contact your local 811 utility-locate service before any digging — it's free and legally required in most states
Before you buy a single piece of lumber, call your local building department and ask whether your project triggers a permit. Bring your sketched layout and the rough dimensions. Many offices will tell you on the phone whether you need a permit and what the submission requirements are. Some jurisdictions have online permit portals where you can check thresholds in minutes. Doing this before ordering materials saves you from having to tear out work or pay stop-work fines.
Evaluate your existing pergola honestly
This is the step most DIYers rush, and it's where projects go sideways. A solid pergola conversion is only as good as the structure underneath it. Probe every post at the base and at the ground line, because that's where rot starts. If the wood feels spongy or your awl sinks in more than a quarter inch without much pressure, that post needs to go. Check every beam-to-post and rafter-to-beam connection for splitting, corrosion on the hardware, or loose fasteners. Rock each post by hand, there should be zero movement.
Condition checklist
- Post bases: no rust on hardware, posts plumb within 1/4 inch per 6 feet, no visible rot at grade level
- Beams and rafters: no cracks running with the grain longer than 6 inches, no significant sag (more than 1/360 of span), no soft spots when probed
- Existing fasteners and connectors: all Simpson-style or equivalent hardware still tight, no significant surface rust that has pitted the metal
- Ledger (if attached to house): no rot in the house rim joist behind it, flashing present and intact, no gap between ledger and house wall
- Footings: no heaving, cracking, or settling visible at grade, no posts simply buried in soil without a concrete base
- Existing roof structure: any roofing material already on the pergola (shade sails, lattice) is accounted for in your load estimate
When rebuilding beats retrofitting
Retrofit when the posts are solid, footings are poured concrete, hardware is in good shape, and the structure is less than 10 to 15 years old. Rebuild or replace when more than one post shows rot at grade, the footings are just posts buried in dirt, the structure leans more than an inch out of plumb, or the lumber is already badly checked and splitting. A rebuild with pressure-treated 6x6 posts, proper footings, and new hardware will outlast a patched-up conversion by decades, and the material cost difference is often smaller than people expect.
Permits, codes, and inspections: what usually triggers a permit
Most jurisdictions in the U.S. follow the International Residential Code (IRC) and require a permit any time you add a permanent roof structure. The general threshold is a covered structure greater than 200 square feet, but many localities set it lower (120 square feet is common) and some require a permit for any permanent exterior structure regardless of size. Converting an open pergola to a solid roof almost always triggers a permit because you are fundamentally changing the structure's load profile. Don't skip this step assuming nobody will notice. A neighbor complaint or a home sale inspection can force a retroactive permit, which is far more expensive and stressful.
- New permanent roof over any previously open structure: almost always requires a permit
- Any structure attached to the house: requires permit in nearly all jurisdictions
- Projects adding more than 200 sq ft of covered area: permit required in most areas, often lower
- Electrical additions (fans, lighting): requires separate electrical permit
- Projects in HOA communities: also require HOA approval before you start, separate from city/county permits
- Inspections typically required: footing inspection before pour, framing inspection before sheathing, and final inspection after completion
Permit fees typically run $100 to $500 for a residential patio cover project, and inspection timelines vary from same-week to three weeks depending on your jurisdiction's backlog. Budget two to four weeks for permit approval in busy seasons (spring and early summer). If your project is in a coastal zone, flood zone, or high-wind region, expect additional requirements and longer review times. Ask the building department whether they require stamped engineered drawings, smaller jurisdictions often accept owner-drawn plans with basic calculations, but larger cities and complex structures usually require a licensed engineer's stamp.
Structural checks and simple load calculations
You don't need to be a structural engineer to do a basic sanity check on your structure. What you need to know is whether your posts, beams, and footings can handle the weight of the new roof plus whatever snow or wind load your area gets. Here's how to think through it without getting lost in engineering textbooks.
The four loads you're checking
- Dead load: the weight of the roof structure itself. Polycarbonate panels add about 0.5 to 1.5 psf (pounds per square foot). Corrugated metal adds 1 to 3 psf. Asphalt shingles on OSB sheathing add about 10 to 15 psf total.
- Live load: people and equipment temporarily on the roof during installation or maintenance. IRC requires a minimum 20 psf live load for roofs with a slope under 3:12.
- Snow load: check ASCE 7 ground snow load maps or your local building department for the design snow load in your area. Ranges from 0 psf in southern states to 70 psf or more in mountain regions.
- Wind load: also from ASCE 7 or your local jurisdiction. Coastal and high-wind regions (ASCE 7 wind speed over 130 mph) have uplift requirements that affect both fastener sizing and footing depth.
DIY sanity check: a quick worked example
Suppose you have a 12-foot by 16-foot pergola (192 square feet) in a moderate climate with a 20 psf ground snow load and a standard 20 psf live load. You're adding polycarbonate panels (1 psf dead load). Total design load per square foot: 1 (dead) + 20 (snow) + 20 (live) = 41 psf. Total load on the structure: 192 sq ft x 41 psf = 7,872 pounds. If you have four posts, each post carries roughly 1,968 pounds. A standard 4x4 wood post 8 feet tall can carry around 5,000 pounds in compression, that's fine. A 6x6 carries much more. The beam spanning between posts is the more likely weak point: check the American Wood Council's span tables (available free at awc.org) for your beam size, species, and span. If a doubled 2x10 Douglas Fir beam spans 10 feet and carries a tributary width of 6 feet, it can handle well over 2,000 pounds, adequate for this example. If your numbers come out close to or over the allowable limits, stop and get an engineer.
What often goes wrong here: people forget that adding a solid roof also changes uplift loads significantly. A solid roof acts like a sail in high winds. If your footings are shallow (less than 18 inches below grade) or your posts are in friction-only post bases without through-bolts, strong winds can lift or overturn the structure. In ASCE 7 wind speed zones above 115 mph, or in any coastal area, get an engineer to check the uplift and overturning before you proceed.
When to call a structural engineer
- Your calculated loads approach or exceed the published allowable values for your existing members
- Your jurisdiction requires stamped engineering drawings for the permit
- You're in a high-wind zone (ASCE 7 design wind speed above 115 mph) or a seismic zone C or higher
- The pergola spans more than 20 feet between supports without an intermediate beam
- You're attaching to the house and the ledger connection into the rim joist or band joist is unclear
- The existing footings are unknown depth, underpoured, or absent
- Any post shows evidence of rot or the structure has moved from its original position
How to pick your roof style and materials: a choice checklist
Before buying anything, run through this checklist. It filters out options that won't work for your situation so you're not comparing every possible material against every possible roof style all at once.
- Climate first: if you get more than 30 psf of ground snow load, eliminate lightweight fabric and thin polycarbonate panels — you need a structural solid roof. If you're in a hot climate with minimal rain, polycarbonate or a retractable system may be ideal.
- Budget bracket: under $2,500 total, polycarbonate or corrugated metal lean-to are your realistic options. $2,500 to $5,000 opens up aluminum patio cover kits and more refined framing. Above $5,000 you can do a full gable with shingles.
- Attachment situation: if the pergola is freestanding, you have more flexibility on pitch and drainage direction. If it's attached to the house, you must flash against the wall and maintain the minimum roof pitch (typically 1/4 inch per foot for solid roofing).
- DIY skill level: lean-to with polycarbonate or corrugated metal is beginner-friendly. Aluminum patio cover kits are moderate. Framed gable with shingles requires framing and roofing skills — not impossible, but plan for a longer timeline.
- HOA and aesthetic constraints: check your HOA rules on roofing materials and colors before choosing. Some prohibit corrugated metal or visible polycarbonate.
- Permit complexity: shingle roofs almost always require a permit and framing inspection. Some jurisdictions allow polycarbonate or metal panel covers under a simpler accessory structure permit. Ask before you decide.
Material options: what each one actually costs and does
| Material | Approx. Cost per Sq Ft (materials only) | Weight (psf) | Lifespan | DIY Friendliness | Best For |
|---|---|---|---|---|---|
| Polycarbonate panels (twin-wall) | $2–$5 | 0.5–1 | 10–20 years | High | Budget builds, light climates, allows diffused light |
| Corrugated metal (steel or aluminum) | $1.50–$4 | 1–3 | 20–40 years | High | Budget builds, moderate climates, rustic or modern look |
| Aluminum patio cover kit (solid) | $5–$12 | 1–2 | 30–50 years | Moderate | Low-maintenance, coastal climates, clean look |
| Wood framing + OSB + asphalt shingles | $4–$10 | 10–15 | 20–30 years | Moderate–Low | Matching house roof, cold/snowy climates |
| Steel roofing panels (standing seam) | $8–$15 | 2–4 | 40–70 years | Moderate | Long-term investment, modern aesthetic, high snow areas |
| Retractable fabric / shade sail system | $3–$10 | 0.1–0.5 | 5–15 years | Moderate | Mild climates, wanting flexibility between sun and shade |
Wood
Pressure-treated lumber and rough-sawn cedar or redwood are the classic choices for pergola-to-patio conversions. Wood integrates naturally with most home styles and is easy to cut, drill, and fasten with basic tools. The downside is maintenance: wood needs sealing or painting every two to three years to stay in good shape, and it's vulnerable to rot if your drainage isn't right. Use pressure-treated lumber rated for ground contact (UC4B or higher) for any member within 6 inches of the ground, and use stainless steel or hot-dipped galvanized fasteners throughout, never standard zinc-plated fasteners, which corrode quickly when in contact with treated lumber.
Aluminum
Aluminum patio cover kits (brands like Palram, Genova, and regional aluminum fabricators) are probably the most DIY-friendly option for a solid, low-maintenance roof. They come pre-engineered with extrusion channels, snap-in panels, and gutter edges. Most span up to 12 feet without intermediate support, and many come with a 10-to-20-year warranty. The panels don't rot, don't need painting, and weigh almost nothing. The trade-off is cost (mid-range) and the fact that they can be noisy in heavy rain without insulation.
Steel and corrugated metal
Corrugated steel or aluminum roofing panels are inexpensive, easy to cut with tin snips or a circular saw with a metal-cutting blade, and extremely durable. They're a good match for modern, farmhouse, or workshop-adjacent aesthetics. Use butyl rubber closure strips at the ridge and eave to seal the corrugation gaps, and lap panels at least 1.5 corrugations sideways and 6 inches end-to-end. In coastal areas, choose Galvalume or aluminum rather than bare galvanized steel to avoid rust.
Polycarbonate
Twin-wall polycarbonate is lightweight, lets in diffused light (which is great for plants and for avoiding the cave effect), and installs easily with H-channel connectors and aluminum tape on the cut edges. The limitation is long-term UV degradation, budget panels can yellow and crack within five to ten years. Pay for panels with a multi-wall UV protective coating, and always install them with the UV-protected face up as marked. Don't use flat polycarbonate on a pitch below 1/4 inch per foot or water will pool and algae will grow between the walls.
Asphalt shingles over sheathing
If you want the patio cover to look exactly like the house roof, shingles are the right answer. You'll need a minimum 2:12 pitch (most shingle manufacturers specify 3:12 with underlayment), OSB or plywood sheathing, roofing underlayment, drip edge, and flashing at any wall connection. This is the most involved option but also the most weather-tight and longest-lasting when done correctly. It also adds the most structural weight, so verify your beams and posts can handle the load before committing.
Roof style options: lean-to, gable, solid flat, and retractable systems
The roof style you choose determines framing complexity, drainage direction, and how well the final structure integrates with your house. Here's an honest breakdown of each.
Lean-to (attached to house)
A lean-to is the most common conversion and the most DIY-accessible. You install a ledger board against the house wall, set the outer beam on your existing pergola posts, and run rafters between them at a slope (1/4 inch per foot minimum, 1/2 inch per foot or more is better for shedding debris). The ledger must be through-bolted into the house rim joist or structural wall framing, not just into siding or sheathing. Use 1/2-inch lag screws or through-bolts into solid framing, 16 inches on center, with a flashed gap between the ledger and the house wall to prevent moisture trapping. Water sheds off the low end, away from the house, put a gutter there to direct runoff away from your foundation. The lean-to is the best starting point for most conversions of an attached pergola.
Gable roof
A gable gives you a more architectural look and better headroom in the center. It's also more complex: you need a ridge beam, common rafters cut with a plumb cut and bird's-mouth, and gable end framing. Water sheds off both sides, which is good for drainage but means you may need gutters on two sides. A gable works particularly well on a freestanding pergola because you can center the ridge and create a symmetrical pitch. Difficulty level: moderate to advanced. If you've never cut rafters before, practice on scrap before committing to your good lumber.
Solid flat or low-slope roof
A true flat roof needs a membrane (like EPDM rubber or TPO) rather than shingles, because water doesn't shed fast enough for traditional roofing. EPDM comes in large rolls, self-adheres or mechanically fastens, and is DIY-installable, but the deck must be solid and all penetrations carefully sealed. A minimum 1/4 inch per foot slope is needed even for membrane roofs to prevent ponding. Flat or low-slope roofs look very clean and modern, but they have the highest maintenance requirement and any installation error shows up quickly as a leak. Common mistake: insufficient slope. Build in more pitch than you think you need.
Retractable and fabric systems
Motorized retractable awnings and tensioned shade sail systems give you flexibility: full shade when you want it, open sky when you don't. They're not waterproof in the same sense as a solid roof (most are water-resistant at best, and shouldn't be left extended in heavy rain or snow), but in mild climates they're a practical and lower-cost alternative to full conversion. Fabric systems typically cost $800 to $3,000 installed for a mid-size pergola and can last 10 to 15 years with proper care and winter storage. They're the right choice when your permit situation is unclear, your budget is tight, or you genuinely want the option to remove the cover.
| Roof Style | DIY Skill Required | Typical Cost (materials) | Water Shedding | Permit Likely? | Best Match |
|---|---|---|---|---|---|
| Lean-to (attached) | Beginner–Moderate | $1,200–$4,000 | Excellent (single slope) | Usually yes | Attached pergola, most climates |
| Gable (freestanding or attached) | Moderate–Advanced | $2,500–$8,000 | Excellent (two slopes) | Yes | Freestanding pergola, architectural match to house |
| Low-slope / flat (membrane) | Moderate | $1,500–$4,500 | Adequate with correct slope | Usually yes | Modern aesthetic, warm climates |
| Retractable / fabric | Low–Moderate | $800–$3,000 | Partial (not storm-rated) | Often no (check locally) | Mild climates, budget-conscious, flexibility needed |
Framing and attachment: ledger boards, beam-to-post, and footings
The framing and attachment phase is where the structural decisions from earlier become real cuts and bolts. Here's how to handle the most common connections.
Ledger board attachment to the house
The ledger is the most critical connection in an attached patio cover. Use a 2x ledger board the same depth as your rafters (typically 2x6 or 2x8). Install a 1/2-inch standoff between the ledger and the house wall to allow drainage and prevent moisture from being trapped against the sheathing, use manufactured standoff connectors or strips of HDPE plastic, not wood spacers. Fasten with 1/2-inch hex-head lag screws into the house rim joist, staggered top-and-bottom, 16 inches on center. Always locate the rim joist with a stud finder before drilling, lag screws into nothing more than sheathing will fail under load. Flash the top of the ledger with step flashing tucked behind the house's water-resistive barrier and lapped over the ledger face.
Beam-to-post connections
At each post, the beam needs a positive connection, not just gravity bearing. Use post cap hardware (Simpson Strong-Tie BC or E-series caps are common) rated for the beam and post size. Through-bolt the post cap to the post with 1/2-inch carriage bolts, not just screws. For a doubled beam, through-bolt the two members together with 1/2-inch bolts every 24 inches and use construction adhesive between them. Common mistake: setting a beam in a notched post without any hardware. This looks sturdy until a wind event loads the joint in tension, use hardware.
Rafter connections and spacing
Rafters connect to the ledger with joist hanger hardware (Simpson LU or HU series, sized to your rafter depth), and connect to the outer beam with rafter tie or hurricane tie hardware. Typical rafter spacing is 16 or 24 inches on center for solid sheathed roofs, and up to 24 or 48 inches for polycarbonate or metal panels depending on the panel manufacturer's span table. Always check the panel manufacturer's installation manual for maximum span, exceeding it leads to panel flex, fastener blow-out, or collapse under snow load.
Footings: what's required and when to add them
If your existing pergola posts are set in concrete tube forms with the post sitting on a hardware connector above grade, you're in good shape. If the posts are buried directly in the ground (even in concrete), they're subject to rot at the ground line and may not be deep enough for the new uplift loads. IRC Section R403 requires footings to extend below the frost line, typically 12 to 48 inches depending on your region. For a 12x16-foot covered patio with four posts, each footing should be at minimum a 12-inch diameter tube form poured to frost depth. For wind uplift, anchor the post base hardware to the footing with an embedded J-bolt or a post-base sleeve before pouring.
Waterproofing and drainage: keeping water out and moving it away
Every covered patio fails at the same two points: where the roof meets the house, and at the eave where water concentrates. Get these right and the structure will stay dry for decades. Get them wrong and you'll be chasing leaks within two rainy seasons.
- Flashing at house wall: install continuous step flashing behind the house's water-resistive barrier (house wrap or building paper), lapping over the top of the ledger. Never just caulk a gap between roofing and siding — caulk fails within two to five years.
- Drip edge at eaves: install metal drip edge at the low end of the roof (and at the rakes for a gable). This prevents water from wicking back under the roofing material.
- Gutters: for any solid roof greater than about 8 feet wide, install a gutter at the low eave and direct downspouts at least 6 feet away from the foundation. A 5-inch K-style gutter handles up to about 5,000 square feet of roof area per outlet in most rainfall intensity zones.
- Panel overlap and sealant: for metal or polycarbonate panels, lap end-to-end joints at least 6 inches in the direction of slope. Use butyl tape or panel-specific sealant tape, not silicone, at all panel seams — silicone doesn't adhere reliably to polycarbonate or Galvalume.
- Maintain slope: even polycarbonate panels need at least 1/4 inch per foot. Low spots trap water and accelerate panel degradation.
- Penetrations: any fastener through a panel face must have a rubber-gasketed fastener or a sealant washer — bare metal fastener holes leak.
Step-by-step conversion workflows for three common scenarios
Scenario 1: Attached pergola to lean-to covered patio
- Pull permit and gather stamped plans if required by your jurisdiction.
- Inspect all existing posts, beams, and footings using the condition checklist above. Replace or reinforce any compromised members before proceeding.
- Mark the ledger location on the house wall, find the rim joist with a stud finder, and snap a level chalk line at the correct height (calculate from your desired pitch and the outer beam height).
- Cut through the siding at the ledger line, fold back or remove the house wrap, and install the ledger with standoff connectors and 1/2-inch lag screws into the rim joist at 16-inch centers.
- Install continuous step flashing above the ledger, tucked behind the house wrap and lapping over the ledger face. Install a counterflashing piece if your siding gap is wide.
- Set the outer beam on the pergola posts using post cap hardware. Check level across both directions.
- Cut rafters to length with the correct plumb cut and tail cut, then install with joist hangers at the ledger and rafter ties at the outer beam, at your chosen spacing (16 or 24 inches on center).
- Install roofing material: sheathing plus underlayment plus shingles for a shingle roof, or polycarbonate/metal panels directly to the rafters for panel systems. Follow the manufacturer's span and fastener requirements.
- Install drip edge at the eave and rake, then gutters and downspouts directed away from the foundation.
- Call for framing and final inspections as required by your permit.
Scenario 2: Freestanding pergola to covered patio with gable roof
- Pull permit. Freestanding structures often have a slightly simpler permit path but still require one for a solid roof.
- Inspect and reinforce footings if needed — freestanding structures have no house wall to resist racking, so diagonal bracing or larger footings may be required.
- Set a ridge beam at the center of the structure, supported by a king post or a built-up center post. Calculate the ridge height based on your desired pitch (a 4:12 pitch on a 12-foot-wide structure raises the ridge 2 feet above the eave).
- Cut common rafters with plumb cut, seat cut (bird's-mouth over the top plate or beam), and tail cut. Use a speed square and rafter tables to calculate the common difference — or use an online rafter calculator.
- Install rafters from each end, working toward the center, with rafter ties or hurricane ties at the beam.
- Frame the gable ends with cripple studs from the top plate to the underside of the roof sheathing.
- Install sheathing, underlayment, drip edge, and roofing material.
- Install gutters on both eaves, with downspouts at the low corners directed away from the patio surface.
- Add fascia boards at the rafter tails for a finished appearance and to support the gutters.
Scenario 3: Upgrading an existing partially-covered pergola to a solid roof
- Remove any existing shade cloth, lattice, or partial roofing. Inspect what was underneath it for UV damage and weathering.
- Assess whether the existing rafter spacing is appropriate for the new roofing material. Polycarbonate and metal panels can often span existing 24-inch rafter spacing; shingles over OSB require 16 or 24-inch rafter spacing depending on sheathing thickness.
- Add intermediate rafters if needed to tighten the spacing for your roofing material.
- Install the roofing material per the manufacturer's instructions, starting from the low edge and working up.
- Flash any wall connection or penetration, install drip edge, and add gutters.
- Check the final structure for any racking under hand pressure and add diagonal knee braces or blocking as needed.
Cost and timeline: realistic estimates
| Project Type | Material Cost (DIY) | Permit and Inspection | Typical Weekend Time | Total DIY Cost Estimate |
|---|---|---|---|---|
| Lean-to, polycarbonate panels, 12x16 ft | $800–$1,800 | $100–$400 | 1–2 weekends | $1,000–$2,300 |
| Lean-to, corrugated metal, 12x16 ft | $700–$1,500 | $100–$400 | 1–2 weekends | $900–$2,000 |
| Lean-to, aluminum kit, 12x16 ft | $1,800–$3,500 | $100–$400 | 2–3 weekends | $2,000–$4,000 |
| Lean-to, shingles over framing, 12x16 ft | $2,000–$4,500 | $150–$500 | 3–4 weekends | $2,300–$5,200 |
| Freestanding gable, shingles, 16x20 ft | $4,000–$8,000 | $200–$600 | 4–6 weekends | $4,500–$9,000 |
| Retractable awning system, 12x14 ft | $1,000–$3,000 | Often none | 1 weekend | $1,000–$3,000 |
These estimates reflect 2026 material pricing in mid-range U.S. markets. Lumber prices, aluminum costs, and polycarbonate pricing can swing 20 to 30 percent depending on your region and current market conditions, so get at least two local quotes before finalizing your budget. DIY labor savings compared to contractor installation typically run $3,000 to $10,000 on a project of this scope, which is substantial. Plan your timeline with buffer, framing inspection scheduling alone can add two to three weeks in busy seasons.
A quick note on repurposing other structures
One question that comes up in DIY communities is whether other existing surfaces or structures can be repurposed as part of a patio project. Toy hauler ramps, for example, are sometimes proposed as a ready-made patio deck surface given their steel grating or aluminum construction. In practice, a standard toy hauler ramp (typically 1/8-inch tread plate aluminum or open steel grating, designed for rolling loads rather than sustained distributed loads) is not rated for patio furniture, people standing, or the lateral loads of an attached roof structure. If you want to incorporate one, have a structural engineer verify the load rating, reinforce the attachment points, and make sure the surface is non-slip when wet. It's a creative idea but it needs proper verification before you build on top of it.
When to hire a pro (and what kind)
This guide is written to help you do most of this yourself, but there are clear points where professional help is the smarter call. Knowing when to stop is part of being a good DIYer.
- Structural engineer (SE): hire one when your loads approach or exceed allowable limits, when your jurisdiction requires stamped drawings, when you're in a high-wind or seismic zone, or when the existing structure has unknown or suspect footings. A typical residential structural consultation runs $500 to $1,500 and can save you from a failure or a failed inspection.
- Licensed general contractor or carpenter: consider hiring for the framing phase if you've never cut rafters or installed a ledger before. Many contractors will do a day-rate consultation where they set up and cut the rafters while you assist and learn.
- Licensed electrician: required for any new electrical — fans, lights, outdoor outlets. Don't DIY electrical in a structure where it will be inspected.
- Roofing contractor: if you're installing shingles and have no prior roofing experience, a one-day roofing sub for shingle installation is often worth the cost ($500 to $1,500) versus the risk of an improperly installed roof that leaks.
- Always verify any contractor's license and insurance through your state contractor licensing board before signing anything.
Safety non-negotiables
Working above 6 feet on a ladder or on top of a structure requires fall protection awareness even for short durations. Set your ladder on firm, level ground and have a helper foot it any time you're carrying material. Never stand on the top two rungs of a step ladder. When cutting metal roofing, wear cut-resistant gloves, the edges are sharp enough to need stitches. Safety glasses are mandatory any time you're cutting, drilling, or working overhead. And before any digging for footings, call 811 to have underground utilities marked. This is free, takes one call, and is legally required in every U.S. state. It takes one to three business days for locators to arrive, so build that into your schedule.
Maintenance and warranty: what to expect after you build
The single most common post-installation issue is a failed caulk or sealant joint, typically at the house wall connection, within two to five years. Check and reapply sealant at the flashing connection annually. Clean gutters every fall and after any major storm. For wood structures, inspect for rot at post bases and beam ends every two years and apply a penetrating sealer or paint on the recommended manufacturer schedule. For polycarbonate, inspect for UV yellowing and panel warping every three to four years, most manufacturers cover UV degradation for 10 years but you need the original purchase receipt. For aluminum kits, the main maintenance item is cleaning the channels where debris accumulates. For metal roofing, inspect fasteners every five years for backing-out or deteriorated washers and re-fasten as needed. For another relevant comparison, see how to add a pergola to an existing patio.
FAQ
What are the first steps before converting a pergola to a covered patio?
Inspect the existing pergola and patio: check post condition, concrete or wood footings, rot, fasteners, and attachment to the house. Verify dimensions and clearances. Locate underground utilities (call 811) before digging for new footings. Review local building codes and zoning for permit triggers (roof area, structural changes, new footings, or changing occupancy/use). Take photos and measure so you can show plans to permit officials or an engineer if needed.
How do I know if I need a permit or an engineer?
Permit triggers commonly include adding a roof, changing structural elements, new footings, enlarging the covered area, or altering egress. Small non-structural shade covers may be exempt in some jurisdictions, but most solid roofs require permits. Hire a structural engineer if: the project alters the house ledger, affects load paths to the house, spans large distances without intermediate supports, is in a high-wind or seismic zone, or if you find rot/damage in existing members. When in doubt, contact your local building department early—they’ll tell you permit requirements and documentation needed.
What basic structural checks and simple load calculations can I do as a DIYer?
Visual checks: verify post plumbness, beam deflection, and fastener condition. Measure member sizes and spans. For simple roof loads, estimate dead load (roof materials) and snow/live load per local code (or use conservative values: dead load 5–10 psf, live/snow 20–40 psf if unknown). Calculate uniform load w = (dead + live) psf × tributary width in feet; bending moment for a simply supported beam M = wL^2/8; required section modulus S = M/Fb (use conservative allowable bending stress for material: typical SYP lumber Fb ≈ 900–1200 psi depending on grade; consult span tables). If these calculations are unfamiliar or results are marginal, consult an engineer. For most small pergola conversions to lean-to or short-span solid roofs, following manufacturer span tables or wood span tables (AWC) is faster and safer.
What roof styles work best when converting a pergola?
Common choices: - Lean-to (single slope): simplest for attaching to house, good for tying into existing gutter/roofline. - Gable: more material and framing but better ventilation and a classic look. - Solid flat or low-slope roof: most weatherproof, requires proper flashing and drainage. - Retractable/fabric: lower structural load, less permanent, good for flexible shade. Choose based on climate (snow/wind), aesthetics, and permit rules. Solid roofs need stronger framing and proper flashing; fabric/retractable systems need a sturdy frame and mounting points but carry much lighter dead loads.
Which materials are practical and cost-effective for the roof?
Options by cost/performance: - Asphalt shingles on plywood deck: familiar, blends with house, heavier (higher framing requirements). - Metal panels (standing seam or corrugated): lightweight, durable, good for low-slope; needs solid purlins/roof sheathing under panels for many systems. - Polycarbonate panels: lightweight, translucent, DIY-friendly but can be noisy in rain and less insulating. - Aluminum patio covers (prefab panels): low maintenance, often modular; requires compatible framing and flashing. - EPDM/TPO single-ply membranes on low-slope solid decks: good waterproofing but needs proper substrate. Consider corrosion-resistant fasteners, underlayment, and local climate (snow load, UV).
How should I attach a new roof to the house safely?
Common attachment methods: - Properly flashed ledger board: use pressure-treated lumber or metal ledger, flash above ledger and under house cladding; use through-bolts or approved lag screws into rim joist/blocking, not just siding. - Beam-to-post freestanding option: avoids house attachment; transfer loads to new posts and footings. - Use engineered connectors (hangers, joist ties) rated for the loads. Seal all penetrations and use corrosion-resistant fasteners. If roof ties into house roof, coordinate flashing with the existing roof system to avoid leaks. If uncertain about ledger attachment or roof-to-wall flashing, consult a pro.